


目录
2. 通过FastDeploy C++ 部署PaddleSeg模型
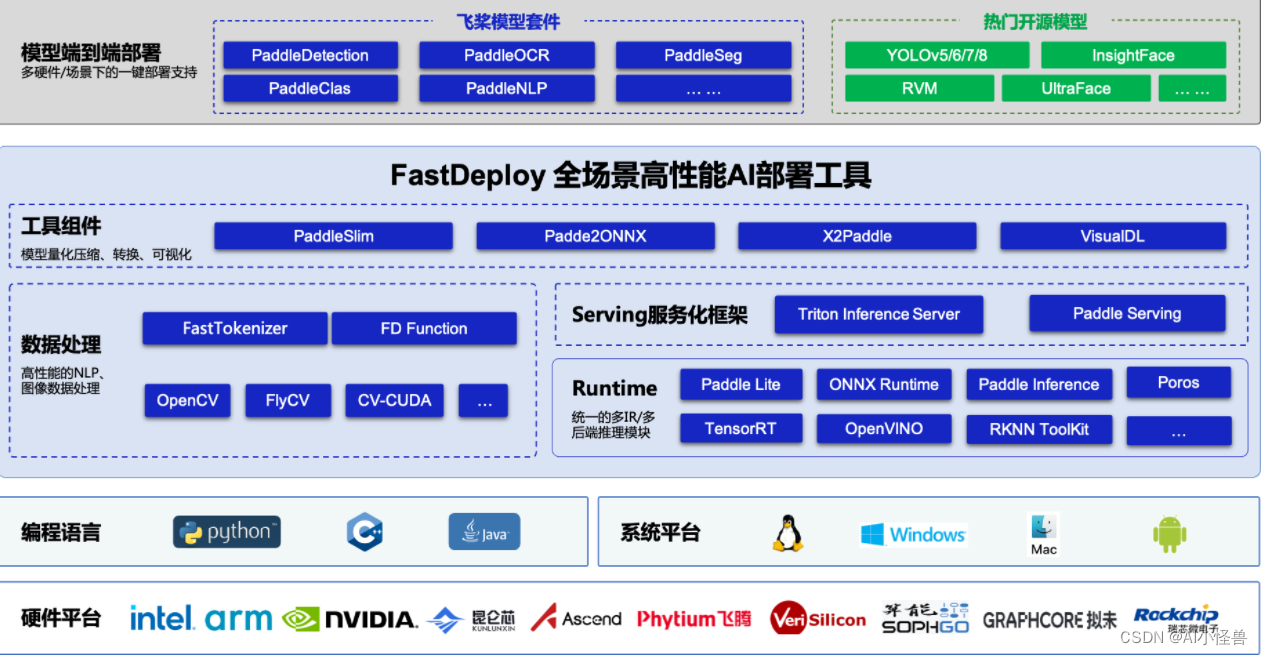
1.FastDeploy介绍
⚡️FastDeploy是一款全场景、易用灵活、极致高效的AI推理部署工具, 支持云边端部署。提供超过 🔥160+ Text,Vision, Speech和跨模态模型📦开箱即用的部署体验,并实现🔚端到端的推理性能优化,满足开发者多场景、多硬件、多平台的产业部署需求。
近期更新
-
FastDeploy系列直播课程回放
-
2023.01.17 发布 YOLOv8 在FastDeploy系列硬件的部署支持。 其中包括 Paddle YOLOv8 以及 社区 ultralytics YOLOv8
- Paddle YOLOv8 可以部署的硬件:Intel CPU、NVIDIA GPU、Jetson、飞腾、昆仑芯、昇腾、ARM CPU、RK3588 和 Sophgo TPU, 部分硬件包含 Python 部署和 C++ 部署;
- 社区 ultralytics YOLOv8 可以部署的硬件:Intel CPU、NVIDIA GPU、Jetson,均包含 Python 部署和 C++ 部署;
- FastDeploy 一行模型API切换,可以实现YOLOv8、 PP-YOLOE+、YOLOv5 等模型性能对比。
-
服务化部署结合VisualDL新增支持可视化部署。在FastDeploy容器中启动VDL服务后,即可在VDL界面修改模型配置、启动/管理模型服务、查看性能数据、发送请求等,详细操作可参考相关文档
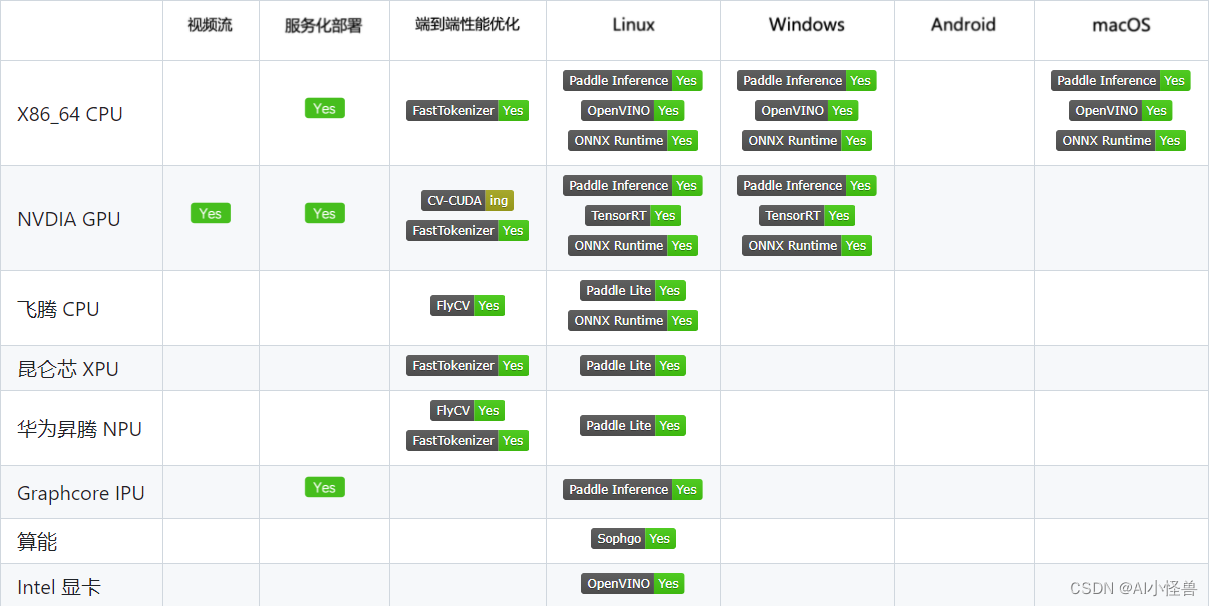
使用FastDeploy可以简单高效的在X86 CPU、NVIDIA GPU、飞腾CPU、ARM CPU、Intel GPU、昆仑、昇腾、瑞芯微、晶晨、算能等10+款硬件上对PaddleSeg语义分割模型进行快速部署,并且支持Paddle Inference、Paddle Lite、TensorRT、OpenVINO、ONNXRuntime、RKNPU2、SOPHGO等多种推理后端。
2. 通过FastDeploy C++ 部署PaddleSeg模型
支持PaddleSeg高于2.6版本的Segmentation模型,如果部署的为PP-Matting、PP-HumanMatting以及ModNet请参考Matting模型部署。目前FastDeploy测试过成功部署的模型:
支持CpuInfer、GpuInfer、TrtInfer三种推理模式
// Copyright (c) 2022 PaddlePaddle Authors. All Rights Reserved.
//
// Licensed under the Apache License, Version 2.0 (the "License");
// you may not use this file except in compliance with the License.
// You may obtain a copy of the License at
//
//     http://www.apache.org/licenses/LICENSE-2.0
//
// Unless required by applicable law or agreed to in writing, software
// distributed under the License is distributed on an "AS IS" BASIS,
// WITHOUT WARRANTIES OR CONDITIONS OF ANY KIND, either express or implied.
// See the License for the specific language governing permissions and
// limitations under the License.

#include "fastdeploy/vision.h"

#ifdef WIN32
const char sep = '\\';
#else
const char sep = '/';
#endif

void CpuInfer(const std::string& model_dir, const std::string& image_file) {
  auto model_file = model_dir + sep + "model.pdmodel";
  auto params_file = model_dir + sep + "model.pdiparams";
  auto config_file = model_dir + sep + "deploy.yaml";
  auto option = fastdeploy::RuntimeOption();
  option.UseCpu();
  auto model = fastdeploy::vision::segmentation::PaddleSegModel(
      model_file, params_file, config_file, option);

  if (!model.Initialized()) {
    std::cerr << "Failed to initialize." << std::endl;
    return;
  }

  auto im = cv::imread(image_file);

  fastdeploy::vision::SegmentationResult res;
  if (!model.Predict(im, &res)) {
    std::cerr << "Failed to predict." << std::endl;
    return;
  }

  std::cout << res.Str() << std::endl;
  auto vis_im = fastdeploy::vision::VisSegmentation(im, res, 0.5);
  cv::imwrite("vis_result.jpg", vis_im);
  std::cout << "Visualized result saved in ./vis_result.jpg" << std::endl;
}

void GpuInfer(const std::string& model_dir, const std::string& image_file) {
  auto model_file = model_dir + sep + "model.pdmodel";
  auto params_file = model_dir + sep + "model.pdiparams";
  auto config_file = model_dir + sep + "deploy.yaml";

  auto option = fastdeploy::RuntimeOption();
  option.UseGpu();
  auto model = fastdeploy::vision::segmentation::PaddleSegModel(
      model_file, params_file, config_file, option);

  if (!model.Initialized()) {
    std::cerr << "Failed to initialize." << std::endl;
    return;
  }

  auto im = cv::imread(image_file);

  fastdeploy::vision::SegmentationResult res;
  if (!model.Predict(im, &res)) {
    std::cerr << "Failed to predict." << std::endl;
    return;
  }

  std::cout << res.Str() << std::endl;
  auto vis_im = fastdeploy::vision::VisSegmentation(im, res, 0.5);
  cv::imwrite("vis_result.jpg", vis_im);
  std::cout << "Visualized result saved in ./vis_result.jpg" << std::endl;
}

void TrtInfer(const std::string& model_dir, const std::string& image_file) {
  auto model_file = model_dir + sep + "model.pdmodel";
  auto params_file = model_dir + sep + "model.pdiparams";
  auto config_file = model_dir + sep + "deploy.yaml";

  auto option = fastdeploy::RuntimeOption();
  option.UseGpu();
  option.UseTrtBackend();
  // If use original Tensorrt, not Paddle-TensorRT,
  // comment the following two lines
  option.EnablePaddleToTrt();
  option.EnablePaddleTrtCollectShape();
  option.SetTrtInputShape("x", {1, 3, 256, 256}, {1, 3, 1024, 1024},
                          {1, 3, 2048, 2048});

  auto model = fastdeploy::vision::segmentation::PaddleSegModel(
      model_file, params_file, config_file, option);

  if (!model.Initialized()) {
    std::cerr << "Failed to initialize." << std::endl;
    return;
  }

  auto im = cv::imread(image_file);

  fastdeploy::vision::SegmentationResult res;
  if (!model.Predict(im, &res)) {
    std::cerr << "Failed to predict." << std::endl;
    return;
  }

  std::cout << res.Str() << std::endl;
  auto vis_im = fastdeploy::vision::VisSegmentation(im, res, 0.5);

  cv::imwrite("vis_result.jpg", vis_im);
  std::cout << "Visualized result saved in ./vis_result.jpg" << std::endl;
}

int main(int argc, char* argv[]) {
    std::string model_dir = "model\\PP_LiteSeg_B_STDC2_cityscapes_without_argmax_infer";
   std::string image_file = "model\\cityscapes_demo.png";


  // CpuInfer(argv[1], argv[2]);

   GpuInfer(model_dir, image_file);

 //  TrtInfer(argv[1], argv[2]);

  return 0;
}
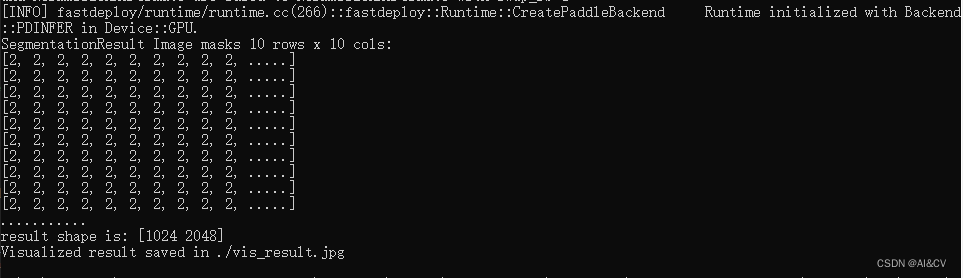
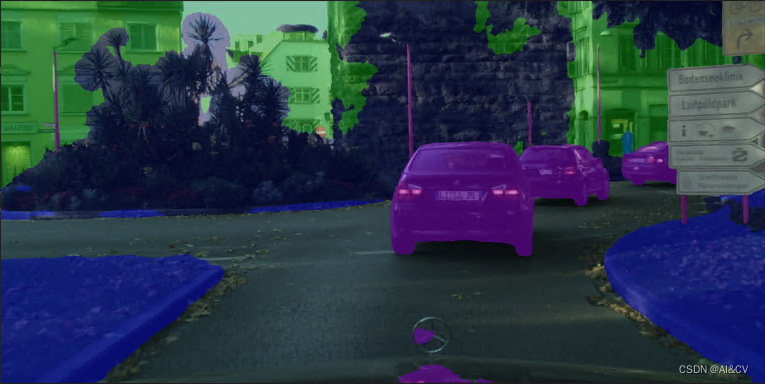
推理结果可视化:


 1820
1820


 被折叠的 条评论
为什么被折叠?
被折叠的 条评论
为什么被折叠?
 到【灌水乐园】发言


