


自动化部署lamp
准备一台主控机(CentOS8)、一台受控机(centos2)
1.配置yum源
[root@CentOS8 ~]# curl -o /etc/yum.repos.d/CentOS-8.repo https://mirrors.aliyun.com/repo/Centos-vault-8.5.2111.repo
[root@CentOS8 ~]# sed -i -e '/mirrors.cloud.aliyuncs.com/d' -e '/mirrors.aliyuncs.com/d' /etc/yum.repos.d/CentOS-8.repo
2.安装ansible
[root@CentOS8 ~]# yum -y install centos-release-ansible-29-1-2.el8.noarch
[root@CentOS8 ~]# yum -y install ansible wget
3.新建一个项目目录,修改相关配置
[root@CentOS8 ~]# mkdir /opt/ansible
[root@CentOS8 ~]# cd /opt/ansible/
[root@CentOS8 ansible]# cp /etc/ansible/ansible.cfg .  ##将ansible的配置文件复制一份到当前目录
[root@CentOS8 ansible]# vim /etc/hosts
[root@CentOS8 ansible]# cat /etc/hosts
127.0.0.1   localhost localhost.localdomain localhost4 localhost4.localdomain4
::1         localhost localhost.localdomain localhost6 localhost6.localdomain6

192.168.195.137 centos2                                ##配置主机映射文件
[root@CentOS8 ansible]# vim inventory                  ##创建主机清单文件
[root@CentOS8 ansible]# cat inventory                  ##将受控机的主机名写入清单文件
centos2
[root@CentOS8 ansible]# vim ansible.cfg
inventory       = inventory                            ##修改清单文件路径
host_key_checking = False                              ##取消控制节点时的验证
remote_user = root                                     ##指定受控节点

[privilege_escalation]                                 ##当受控节点不是root时,需将其取消注释
#become=True
#become_method=sudo
#become_user=root
#become_ask_pass=False

[root@CentOS8 ansible]# touch main.yml                 ##创建一个playbook文件
[root@CentOS8 ansible]# mkdir files                    ##创建files目录用来存放模板等所用文件
[root@CentOS8 ansible]# mkdir vars                     ##创建vars用来写template模块的所需变量
[root@CentOS8 ansible]# ls
ansible.cfg  files  inventory  main.yml  vars

//设置免密登录
[root@CentOS8 ansible]# ssh-keygen -t rsa
[root@CentOS8 ansible]# ssh-copy-id -i ~/.ssh/id_rsa.pub root@centos2
[root@CentOS8 ansible]# ansible all -m ping
centos2 | SUCCESS => {
    "ansible_facts": {
        "discovered_interpreter_python": "/usr/libexec/platform-python"
    },
    "changed": false,
    "ping": "pong"
}
//准备工作完成
4.下载httpd所需的源码包
apr、apr-util源码包网址:Index of /apr (apache.org)
httpd源码包网址: Index of /httpd (apache.org)
阿里源的网址:centos镜像_centos下载地址_centos安装教程-阿里巴巴开源镜像站 (aliyun.com)
下载和安装apr、apr-util、httpd、CentOS-7.repo、CentOS-8.repo
[root@CentOS8 files]# wget https://downloads.apache.org/apr/apr-1.7.4.tar.gz https://downloads.apache.org/apr/apr-util-1.6.3.tar.gz https://downloads.apache.org/httpd/httpd-2.4.57.tar.gz
[root@CentOS8 files]# curl -o /opt/ansible/files/CentOS-8.repo https://mirrors.aliyun.com/repo/Centos-vault-8.5.2111.repo
[root@CentOS8 files]# curl -o /opt/ansible/files/CentOS-7.repo https://mirrors.aliyun.com/repo/Centos-7.repo
[root@CentOS8 files]# vim server.repo
[root@CentOS8 files]# cat server.repo
[Everything]
name=everything
baseurl=https://dl.fedoraproject.org/pub/epel/8/Everything/x86_64/
enabled=1
gpgcheck=0

[good]
name=good
baseurl=http://rpms.remirepo.net/enterprise/8/remi/x86_64/
enabled=1
gpgcheck=0

[root@CentOS8 files]# tar xf apr-1.7.4.tar.gz
[root@CentOS8 files]# cd apr-1.7.4
[root@CentOS8 apr-1.7.4]# sed -i 's/$RM "$cfgfile"/#$RM "$cfgfile"/g' configure   注释此行
[root@CentOS8 files]# cd ..          ##返回上一级目录
[root@CentOS8 ~]# tar -zcf apr-1.7.4.tar.gz apr-1.7.4    ##重新打包
[root@CentOS8 ~]# cd files
[root@CentOS8 files]# ls
apr-1.7.4.tar.gz       httpd-2.4.57.tar.gz
apr-1.7.4          apr-util-1.6.3.tar.gz
[root@CentOS8 ~]# rm -f apr-1.7.4

从其他主机中copy一份http.conf文件到主控机的files目录当中
[root@CentOS8 files]# scp root@192.168.195.131:/etc/httpd.conf /opt/ansible/files/httpd.conf

//修改下列几行
[root@CentOS8 files]# vim httpd.conf
<IfModule dir_module>
    DirectoryIndex index.php index.html
</IfModule>

    AddType application/x-compress .Z
    AddType application/x-gzip .gz .tgz
    AddType application/x-httpd-php .php             //添加这两行
    AddType application/x-httpd-php-source .phps

//在最后添加入下内容:
<IfModule ssl_module>
SSLRandomSeed startup builtin
SSLRandomSeed connect builtin
</IfModule>
<VirtualHost *:80>
    DocumentRoot "/usr/local/apache/htdocs/ftx.com"
    ServerName www.ftx.com
    ProxyRequests Off
    ProxyPassMatch ^/(.*\.php)$ fcgi://127.0.0.1:9000/usr/local/apache/htdocs/ftx.com/$1
    <Directory "/usr/local/apache/htdocs/ftx.com">
        Options none
        AllowOverride none
        Require all granted
    </Directory>
</VirtualHost>
[root@CentOS8 files]# ls
apr-1.7.4.tar.gz       httpd-2.4.57.tar.gz     apr-util-1.6.3.tar.gz   CentOS-7.repo   CentOS-8.repo  httpd.conf  server.repo
[root@CentOS8 files]# vim apache_install.sh         ##编写一个shell脚本,用来执行编译安装三个源码包的步骤
[root@CentOS8 files]# vim apache_install.sh         ##赋予脚本执行权限
[root@CentOS8 files]# cat apache_install.sh
#!/bin/bash

cd /tmp
tar xf apr-1.7.4.tar.gz               ##解压源码包
tar xf apr-util-1.6.3.tar.gz
tar xf httpd-2.4.57.tar.gz
cd apr-1.7.4                                     ##进入对应目录进行编译安装
./configure --prefix=/usr/local/apr && \
	make && make install && \
cd ../apr-util-1.6.3
./configure --prefix=/usr/local/apr-util --with-apr=/usr/local/apr && \
	make && make install
cd ../httpd-2.4.57
./configure --prefix=/usr/local/apache \
        --enable-so \
        --enable-ssl \
        --enable-cgi \
        --enable-rewrite \
        --with-zlib \
        --with-pcre \
        --with-apr=/usr/local/apr \
        --with-apr-util=/usr/local/apr-util/ \
        --enable-modules=most \
        --enable-mpms-shared=all \
        --with-mpm=prefork && \
	make && make install
echo 'export PATH=/usr/local/apache/bin:$PATH' > /etc/profile.d/apache.sh  ##添加环境变量
ln -s /usr/local/apache/include/ /usr/include/httpd            ##设置头文件
sed -i '/#ServerName/s/#//g' /usr/local/apache/conf/httpd.conf
sed -i '/proxy_module/s/#//g' /usr/local/apache/conf/httpd.conf     ##取消注释,开启代理模块
sed -i '/proxy_fcgi_module/s/#//g' /usr/local/apache/conf/httpd.conf
5.利用变量安装源码部署lamp架构过程中所需要的依赖包
[root@CentOS8 files]# cd ..
[root@CentOS8 ansible]# ls
ansible.cfg  files  inventory  main.yml  roles  vars
[root@CentOS8 ansible]# cd vars
[root@CentOS8 vars]# vim dependency_pkgs.yml
[root@CentOS8 vars]# cat dependency_pkgs.yml
Dependency_package:     ##此为设置的变量名
  - openssl-devel
  - pcre-devel
  - expat-devel
  - libtool
  - gcc
  - gcc-c++
  - make
  - ncurses-devel
  - openssl
  - make
  - mariadb-devel
  - ncurses-compat-libs
  - libxml2
  - libxml2-devel
  - bzip2
  - bzip2-devel
  - libcurl
  - libcurl-devel
  - libicu-devel
  - libjpeg
  - libjpeg-devel
  - libpng
  - libpng-devel
  - openldap-devel
  - pcre-devel
  - freetype
  - freetype-devel
  - gmp
  - gmp-devel
  - libmcrypt
  - libmcrypt-devel
  - readline
  - readline-devel
  - libxslt
  - libxslt-devel
  - mhash
  - mhash-devel
  - sqlite-devel
6.配置httpd的service文件,用于使用service模块来启动服务
[root@CentOS8 ansible]# cd files
[root@CentOS8 files]# ls
apache_install.sh     apr-1.7.4.tar.gz    apr-util-1.6.3.tar.gz  CentOS-7.repo   CentOS-8.repo     httpd-2.4.57.tar.gz   httpd.conf   server.repo
[root@CentOS8 files]# vim httpd.service
[root@CentOS8 files]# cat httpd.service
[Unit]
Description=httpd server daemon
After=network.target

[Service]
Type=forking
ExecStart=/usr/local/apache/bin/apachectl start
ExecStop=/usr/local/apache/bin/apachectl stop
ExecReload=/bin/kill -HUP $MAINPID

[Install]
WantedBy=multi-user.target
7.下载mysql所需要的二进制包
从官网拉取mysql的二进制包
[root@CentOS8 files]# ls
apache_install.sh     apr-1.7.4.tar.gz    apr-util-1.6.3.tar.gz  CentOS-7.repo   CentOS-8.repo     httpd-2.4.57.tar.gz      mysql-5.7.39-linux-glibc2.12-x86_64.tar.gz   httpd.conf    server.repo
[root@CentOS8 files]# vim mysql_install.sh    ##编写一个shell用来执行安装配置mysql的步骤
[root@CentOS8 files]# vim mysql_install.sh         ##赋予脚本执行权限
[root@CentOS8 files]# cat mysql_install.sh
#!/bin/bash

cd /tmp
tar xf mysql-5.7.39-linux-glibc2.12-x86_64.tar.gz -C /usr/local/ && \
mv /usr/local/mysql-5.7.39-linux-glibc2.12-x86_64 /usr/local/mysql
chown -R mysql.mysql /usr/local/mysql
echo 'export PATH=/usr/local/mysql/bin:$PATH' > /etc/profile.d/mysql.sh   ##添加环境变量
mkdir -p /opt/data
chown -R mysql.mysql /opt/data/
/usr/local/mysql/bin/mysqld --initialize --user=mysql --datadir=/opt/data/ &> /tmp/mysql_init && \              ##初始化数据库
ln -sv /usr/local/mysql/include /usr/local/include/mysql    ##配置头文件
echo '/usr/local/mysql/lib' > /etc/ld.so.conf.d/mysql.conf  ##写入mysql库文件的查询路径
ldconfig
sed -ri 's#^(basedir=).*#\1/usr/local/mysql#g' /usr/local/mysql/support-files/mysql.server
sed -ri 's#^(datadir=).*#\1/opt/data#g' /usr/local/mysql/support-files/mysql.server
8.编辑mysql免密文件
[root@CentOS8 files]# vim set_mysql_password.sh.j2
[root@CentOS8 files]# cat set_mysql_password.sh.j2
/usr/local/mysql/bin/mysql -uroot -p'{{ mysql_password["stdout"] }}' --connect-expired-password -e 'set password = password("Feitianxiang123");'
9.配置mysql的service文件,用于使用service模块来启动服务
[root@CentOS8 files]# vim mysqld.service
[root@CentOS8 files]# cat mysqld.service
[Unit]
Description=mysqld server daemon
After=network.target

[Service]
Type=forking
ExecStart=/usr/local/mysql/support-files/mysql.server start
ExecStop=/usr/local/mysql/support-files/mysql.server stop
ExecReload=/bin/kill -HUP $MAINPID

[Install]
WantedBy=multi-user.target
10.编写mysql的配置文件
[root@CentOS8 files]# vim my.cnf.j2
[root@CentOS8 files]# cat my.cnf.j2
[mysqld]
basedir = /usr/local/mysql
datadir = /opt/data
socket = /tmp/mysql.sock
port = 3306
pid-file = /opt/data/mysql.pid
user = mysql
skip-name-resolve
11.下载源码编译安装php所需要的源码包
oniguruma-devel依赖包:CentOS Mirror
下载依赖包
[root@RHEL8 files]# wget http://mirror.centos.org/centos/8-stream/PowerTools/x86_64/os/Packages/oniguruma-devel-6.8.2-2.el8.x86_64.rpm
[root@RHEL8 files]# wget https://www.php.net/distributions/php-8.2.9.tar.xz
[root@CentOS8 files]# vim php_install.sh     ##编写一个shell用来执行安装配置php的步骤
[root@CentOS8 files]# vim php_install.sh         ##赋予脚本执行权限
[root@CentOS8 files]# cat php_install.sh
#!/bin/bash

cd /tmp
yum -y install oniguruma-devel-6.8.2-2.el8.x86_64.rpm
tar xf php-8.2.10.tar.gz
cd php-8.2.10
./configure --prefix=/usr/local/php8  \
        --with-config-file-path=/etc \
        --enable-fpm \
        --disable-debug \
        --disable-rpath \
        --enable-shared \
        --enable-soap \
        --with-openssl \
        --enable-bcmath \
        --with-iconv \
        --with-bz2 \
        --enable-calendar \
        --with-curl \
        --enable-exif  \
        --enable-ftp \
        --with-zlib-dir \
        --with-gettext \
        --enable-mbstring \
        --enable-pdo \
        --with-mysqli=mysqlnd \
        --with-pdo-mysql=mysqlnd \
        --with-readline \
        --enable-shmop \
        --enable-simplexml \
        --enable-sockets \
        --enable-mysqlnd-compression-support \
        --with-pear \
        --enable-pcntl \
        --enable-posix && \
        make && make install && \
echo 'export PATH=/usr/local/php8/bin:$PATH' > /etc/profile.d/php8.sh   ##添加环境变量
cp php.ini-production /etc/php.ini
cp sapi/fpm/init.d.php-fpm /etc/init.d/php-fpm
chmod +x /etc/rc.d/init.d/php-fpm
cp /usr/local/php8/etc/php-fpm.conf.default /usr/local/php8/etc/php-fpm.conf
cp /usr/local/php8/etc/php-fpm.d/www.conf.default /usr/local/php8/etc/php-fpm.d/www.conf
12.配置php的service文件,用于使用service模块来启动服务
[root@CentOS8 files]# vim php-fpm.service
[root@CentOS8 files]# cat php-fpm.service
[Unit]
Description=php-fpm server daemon
After=network.target

[Service]
Type=forking
ExecStart=/etc/init.d/php-fpm start
ExecStop=/etc/init.d/php-fpm stop
ExecReload=/bin/kill -HUP $MAINPID

[Install]
WantedBy=multi-user.target
13.编辑playbook文件
---
- name: set lamp
  hosts: centos2           ##受控主机
  vars_files:
    - vars/dependency_pkgs.yml    ##所用到的变量文件
  tasks:
    - name: view yum sources           ##查看是否有yum源
      shell: 'ls /etc/yum.repos.d/CentOS-?.repo'
      register: repo_result        ##将执行结果注册成变量
      ignore_errors: yes           ##忽略错误

    - name: remove /etc/yum.repos.d/
      shell: 'rm -rf /etc/yum.repos.d/*'
      when: repo_result['rc'] != 0  ##当上述结果的返回值不为0时,说明上述命令报错,也就是没有我们需要的yum源,则执行此任务

    - name: Deliver yum source     ##下载我们所需的yum源
      copy:
        src: files/CentOS-{{ item }}.repo
        dest: /etc/yum.repos.d/
      loop:
        - 7
        - 8
      when: >
        (
        ansible_facts['distribution'] == 'CentOS'
        or
        ansible_facts['distribution'] == 'RedHat'
        )
        and
        ansible_facts['distribution_major_version'] == "{{ item }}"

    - name: copy server.repo    ##补充一个yum,以防存在些许依赖包找不到的情况
      copy:
        src: files/server.repo
        dest: /etc/yum.repos.d/

    - name: clear cache     ##清理缓存并建立新的缓存
      shell: 'yum clean all && yum makecache'
      when: repo_result['rc'] != 0

    - name: install Dependency package     ##安装所需要的依赖包
      yum:
        name: "{{ Dependency_package }}"
        state: present

    - name: create user apache and mysql    ##创建Apache和mysql的系统用户
      user:
        name: "{{ item }}"
        system: yes
        create_home: no
        shell: /sbin/nologin
      loop:
        - apache
        - mysql

    - name: copy software for apache    ##将源码包复制到受控机
      copy:
        src: files/{{ item }}
        dest: /tmp/
      loop:
        - apr-1.7.4.tar.gz
        - apr-util-1.6.3.tar.gz
        - httpd-2.4.57.tar.gz

    - name: ensure not exist /usr/local/apache    ##查看有无这个文件或目录,用来解决幂等性的问题
      shell:
        cmd: ls /usr/local/apache
      ignore_errors: yes
      register: result

    - name: install apache     ##执行脚本
      script:
        cmd: files/apache_install.sh
      when: result['rc'] != 0

    - name: provide httpd.service   ##复制httpd的service文件到受控机
      copy:
        src: files/httpd.service
        dest: /usr/lib/systemd/system/httpd.service

    - name: start httpd   ##开启httpd服务
      service:
        name: httpd
        state: started
        enabled: yes

    - name: copy software for mysql    ##复制mysql的二进制包到受控机
      copy:
        src: files/mysql-5.7.39-linux-glibc2.12-x86_64.tar.gz
        dest: /tmp/

    - name: ensure not exist /usr/local/mysql   ##查看有无这个文件或目录,用来解决幂等性的问题
      shell:
        cmd: ls /usr/local/mysql
      ignore_errors: yes
      register: mysql_result

    - name: install mysql     ##执行mysql的脚本文件
      script:
        cmd: files/mysql_install.sh
      when: mysql_result['rc'] != 0

    - name: get password   ##过滤出文件中存放的没有mysql的临时密码
      shell:
        cmd: cat /tmp/mysql_init | grep 'password' | awk '{print $NF}'
      register: mysql_password

    - name: print password   ##打印上述的注册变量
      debug:
        var: mysql_password

    - name: config mysql my.cnf   ##复制mysql的配置文件到受控机
      template:
        src: files/my.cnf.j2
        dest: /etc/my.cnf

    - name: provide mysql.service    ##将mysql的service文件复制到受控机
      copy:
        src: files/mysqld.service
        dest: /usr/lib/systemd/system/mysqld.service

    - name: start mysqld     ##开启mysql服务
      service:
        name: mysqld
        state: started
        enabled: yes

    - name: copy script for password    ##给mysql设置密码
      template:
        src: files/set_mysql_password.sh.j2
        dest: /tmp/set_mysql_password.sh
        mode: "0755"

    - name: ensure mysql password not set    ##查看有无这个文件或目录,用来解决幂等性的问题
      shell:
        cmd: ls /usr/local/mysql/mysql.lock
      register: mysqllock
      ignore_errors: yes

    - name: set password for mysql
      shell:
        cmd: /bin/bash /tmp/set_mysql_password.sh && touch /usr/local/mysql/mysql.lock
      when: mysqllock['rc'] != 0

    - name: copy software for php   ##下载编译安装php所需的包
      copy:
        src: '{{ item }}'
        dest: /tmp/
      loop:
        - files/php-8.2.10.tar.gz
        - files/oniguruma-devel-6.8.2-2.el8.x86_64.rpm

    - name: ensure not exist /usr/local/php8     ##查看有无这个文件或目录,用来解决幂等性的问题
      shell:
        cmd: ls /usr/local/php8
      ignore_errors: yes
      register: php_result

    - name: install php       ##执行php的脚本文件
      script:
        cmd: files/php_install.sh
      when: php_result['rc'] != 0

    - name: provide php-fpm.service    ##复制php的service文件到受控机
      copy:
        src: files/php-fpm.service
        dest: /usr/lib/systemd/system/php-fpm.service

    - name: start php-fpm    ##开启php-fpm服务
      service:
        name: php-fpm
        state: started
        enabled: yes

    - name: copy httpd.conf    将配置好了的httpd.conf文件复制到受控机并覆盖受控机的httpd.conf文件
      copy:
        src: files/httpd.conf
        dest: /usr/local/apache/conf/httpd.conf
      notify:      ##配置文件发生修改,则触发开关,执行handlers的任务
        - restart apache

    - name: create directory   ##创建网站存放目录
      file:
        path: /usr/local/apache/htdocs/ftx.com
        state: directory

    - name: set index.php    ##编辑网页文件内容
      copy:
        content: >
          <?php
              phpinfo();
          ?>
        dest: /usr/local/apache/htdocs/ftx.com/index.php

    - name: disable now firewalld    ##关闭防火墙和selinux
      shell:
        cmd: systemctl disable --now firewalld.service && setenforce 0

  handlers:
    - name: restart apache
      service:
        name: httpd
        state: restarted
14.修改真机C盘的C:\Windows\System32\drivers\etc中的hosts文件

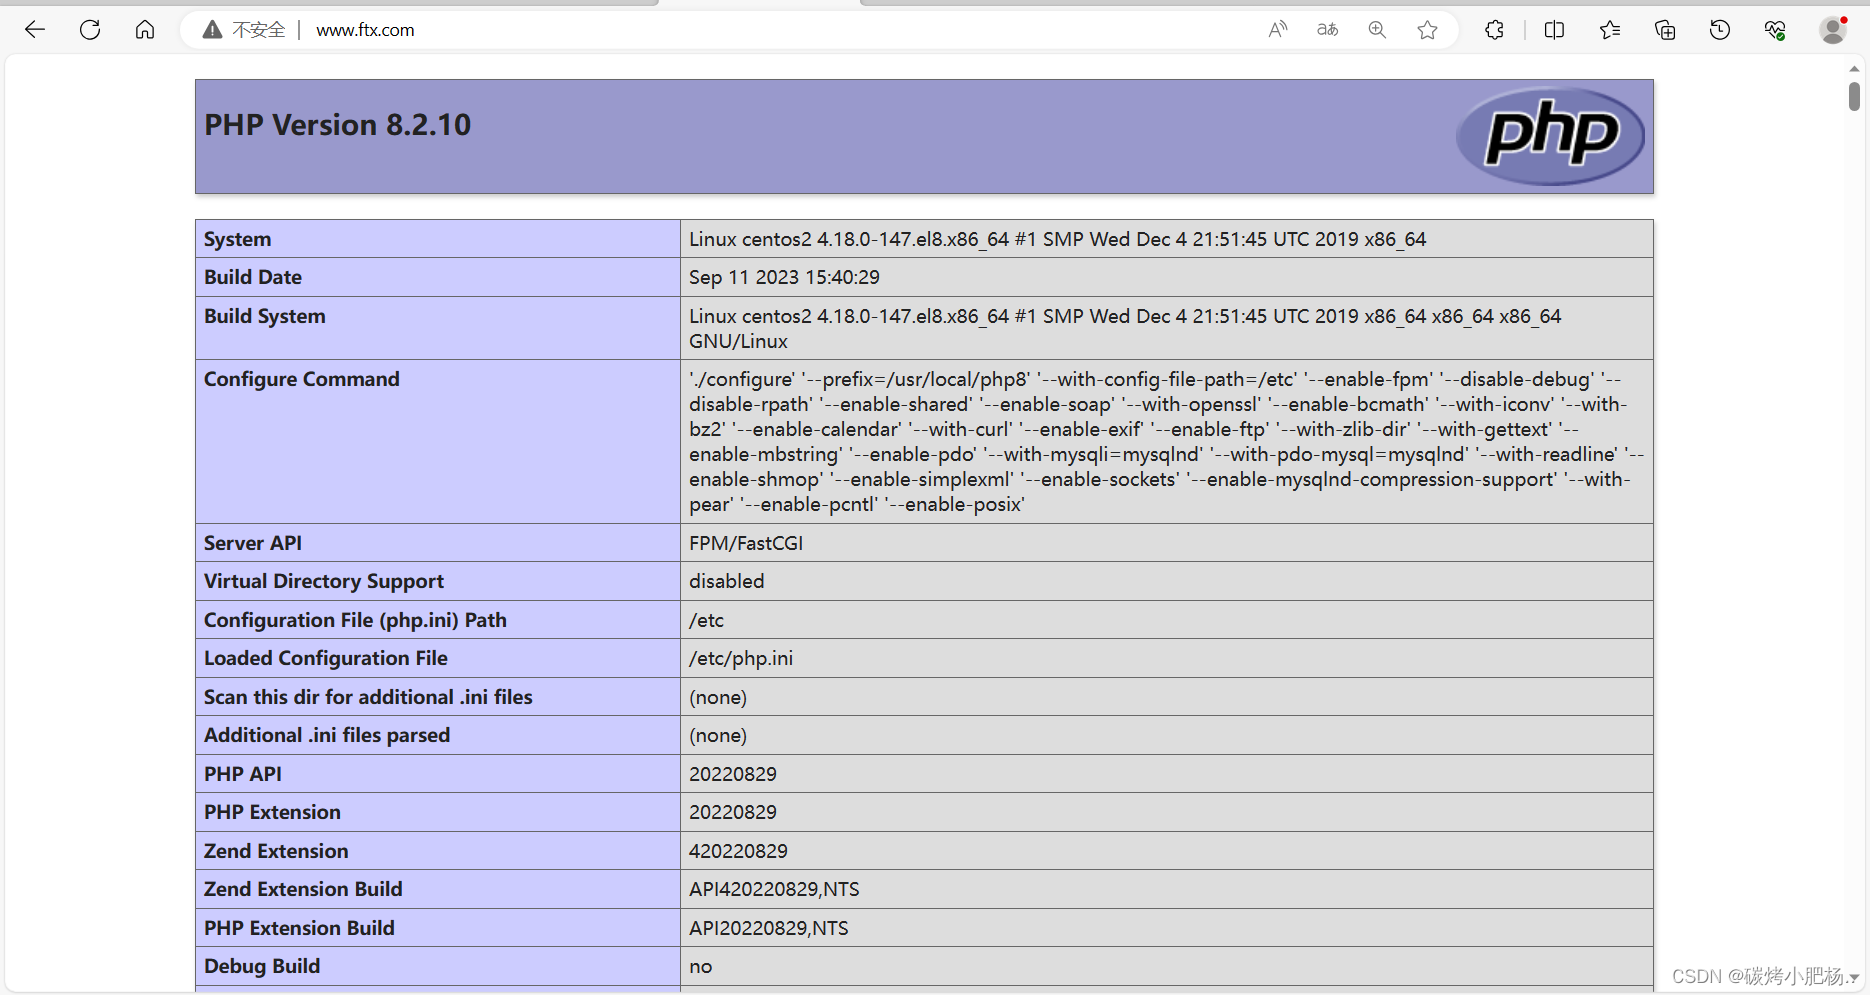
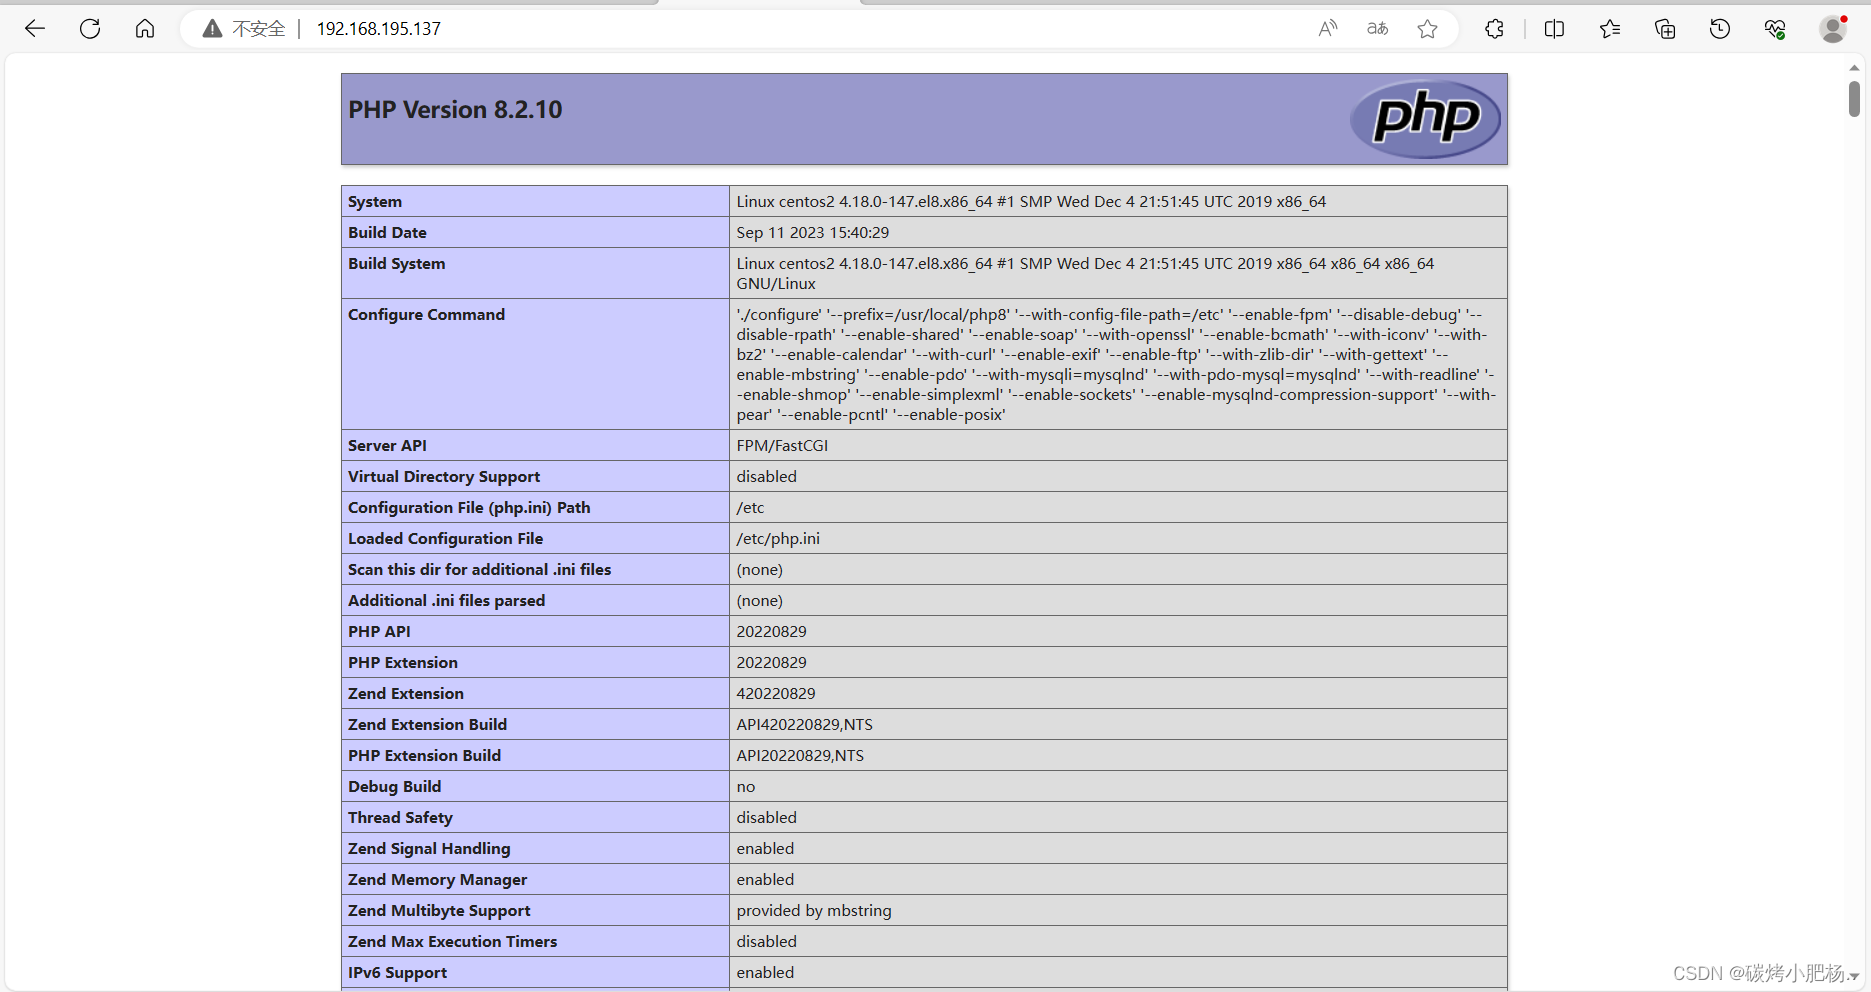
15.访问网页
域名访问
ip访问
错误分析
在启动mysql服务的任务中突然停止,显示报错,在受控机上手动执行systemctl start mysql命令和service mysql start 均不能启动服务

出现这种问题有几种解决方法:
1.可能是受控机的环境问题,在我们进行自动化部署之前,虚拟机中已经存在了mysql的一些软件包,导致文件查询路径不是我们想要的结果
解决方法:这种情况下我们可以将yum装的mysql包和mariadb包都卸载或者重新新建一个新的虚拟机,重新部署一遍基本上就能成功。
2.可能是/usr/local/MySQL/data/mysqld.pid文件没有写的权限
解决方法 : 给予权限,执行 “chown -R mysql:mysql /usr/local/MySQL/data/” “chmod -R 755 /usr/local/mysql/data” 然后重新启动mysqld!
3.可能进程里已经存在mysql进程
解决方法: 用命令“ps -ef|grep mysqld”查看是否有mysqld进程, 如果有使用“kill -9 进程号”杀死,然后重新启动mysqld!


 404
404


 被折叠的 条评论
为什么被折叠?
被折叠的 条评论
为什么被折叠?
 到【灌水乐园】发言


