


目录
1、心知天气所返回的数据是JSON数据,所以需要解析JSON文件的库。
一:需要的库
1、心知天气所返回的数据是JSON数据,所以需要解析JSON文件的库。
2、需要连接WIFI来获取数据,需要WIFI库。
3、需要获取网页数据,要调用http相关的库。
分别是:
#include <WiFi.h>
#include <HTTPClient.h>
#include <ArduinoJson.h>
二:代码
天气获取函数weather.cpp:
#include <Arduino.h>
#include <WiFi.h>
#include <HTTPClient.h>
#include <ArduinoJson.h>

const char *ssid="你的wifi名";                //输入自己的wifi账号
const char *password="wifi密码";         //输入自己的wifi密码
//定义   此处url等是根据心知官网给的参考文档设置,可以自己创建账号获得key私钥参数
String url="https://api.seniverse.com/v3/weather/now.json";    //请求网址响应
String city="meizhou";                                      //输入想要获得的城市
String key="写你自己的私钥";
unsigned int temp=0;
String name="";
String wea="";
String Time = "no_init";
String WEA="";

void weather_init() {
  //连接WiFi
  WiFi.begin(ssid,password);
  Serial.print("正在连接Wi-Fi");
  //检测是否连接成功
  while(WiFi.status()!=WL_CONNECTED){
    delay(500);
    Serial.print(".");
  }
  Serial.println("连接成功");
  Serial.print("IP地址:");
  Serial.println(WiFi.localIP());
}

void http_get()
{//创建HTTPCLient 对象
  HTTPClient http;

  //发送GET请求
  http.begin(url+"?key="+key+"&location="+city);
  int httpCode=0;
  httpCode=http.GET();
  //获取响应状态码
  Serial.printf("HTTP 状态码:%d",httpCode);
  //获取响应正文
  String response=http.getString();
  Serial.println("响应数据");
  Serial.println(response);

  http.end();
  //创建DynamicJsonDocument对象
  DynamicJsonDocument doc(1024);
  //解析JSON数据
  deserializeJson(doc,response);
  //从解析后的JSON文档中获取值
  temp=doc["results"][0]["now"]["temperature"].as<unsigned int>();
  name=doc["results"][0]["location"]["name"].as<String>();
  wea=doc["results"][0]["now"]["text"].as<String>();
  Time = doc["results"][0]["last_update"].as<String>();
}


void weather_scanf()
{
  // put your main code here, to run repeatedly:
  http_get();
  Serial.printf("位置:%s\n",name);
  Serial.printf("温度:%d\n",temp);
  Serial.printf("天气:%s\n",wea);
  WEA.concat(Time);
  Serial.println(WEA);
  WEA="";
  delay(6000);//刷新调用时间,用定时器代替,心知天气刷新时间为10分钟
}
主函数:
#include <Arduino.h>
#include <weather.h>

void setup()
{
    Serial.begin(9600);
    weather_init();
}

void loop()
{
  weather_scanf();
}
三:心知天气
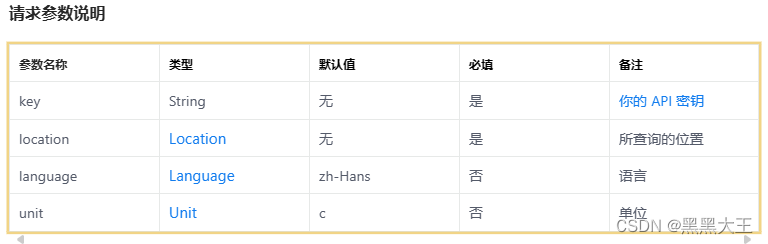
把下面的key换成自己在心知天气注册获得的私钥就行
https://api.seniverse.com/v3/weather/now.json?key=your_api_key&location=beijing&language=zh-Hans&unit=c会获得以下数据(免费用户获得的数据种类会比收费的少):
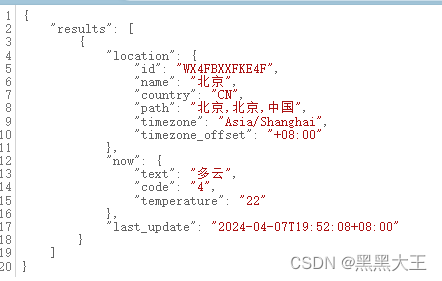
所以代码的核心就是会解析JSON数据就好了,主要是以下这段:
  //创建DynamicJsonDocument对象
  DynamicJsonDocument doc(1024);
  //解析JSON数据
  deserializeJson(doc,response);
  //从解析后的JSON文档中获取值
  temp=doc["results"][0]["now"]["temperature"].as<unsigned int>();
  name=doc["results"][0]["location"]["name"].as<String>();
  wea=doc["results"][0]["now"]["text"].as<String>();
  Time = doc["results"][0]["last_update"].as<String>();
还需要注意的是不同的天气情况申请的url不同,分钟级降水和整点降水的url都不一样 ,所以要自己根据参考文档修改以下内容:
String url="https://api.seniverse.com/v3/weather/now.json";    //请求网址响应
String city="meizhou";                                      //输入想要获得的城市
String key="写你的密钥";
下面是格式,就是网页给的 接口地址的格式:
 //发送GET请求
  http.begin(url+"?key="+key+"&location="+city);
四:注意
天气的刷新时间我这里显示的是7到10分钟,所以每七到十分钟就要重新给网页发送GET请求,不然数据不会刷新。
我这里用的是6000ms刷新来测试的,真正用的话还是建议用定时器。
delay(6000);//刷新调用时间,用定时器代替,心知天气刷新时间为10分钟五:效果 (串口查看)
HTTP 状态码:200响应数据
{"results":[{"location":{"id":"WS6D4KH12059","name":"梅州","country":"CN","path":"梅州,梅州,广东,中国","timezone":"Asia/Shanghai","timezone_offset":"+08:00"},"now":{"text":"阵雨","code":"10","temperature":"20"},"last_update":"2024-04-07T20:07:20+08:00"}]}
位置:梅州
温度:20
天气:阵雨
2024-04-07T20:07:20+08:00
用做学习笔记


 2471
2471


 被折叠的 条评论
为什么被折叠?
被折叠的 条评论
为什么被折叠?
 到【灌水乐园】发言


