


 本文介绍了如何使用Python实现决策树算法,包括计算信息熵、信息增益、信息增益率和基尼值/基尼指数,用于特征选择和构建决策树,以解决西瓜数据集的分类问题。
介绍
在本实验中,你将实现决策树算法。实验之前需要上传图片:DecisionTree_figure.svg与DecisionTree_figure2.svg至默认路径。
评分标准如下:
- 要点1:计算信息熵-----------------------------(10分)
- 要点2:计算信息增益--------------------------(20分)
- 要点3:计算信息增益率------------------------(10分)
- 要点4:计算基尼值-----------------------------(10分)
- 要点5:计算基尼指数--------------------------(20分)
- 要点6:构造决策树-----------------------------(30分)
# 引入所需要的库文件
import numpy as np
import pandas as pd
import matplotlib.pyplot as plt
import os
from math import log2
%matplotlib inline
#创建模拟数据集
data = {"色泽":["乌黑", "乌黑", "浅白", "浅白"],
        "纹理":["清晰", "模糊", "清晰", "模糊"],
        "敲声":["浊响", "浊响", "浊响", "清脆"],
        "好瓜":["是", "是", "否", "否"]}
index = np.arange(4)+1
dataset= pd.DataFrame(data, index)

X=dataset.iloc[:,:3]
y=dataset.iloc[:,3]

dataset
**要点 1:** **计算信息熵**,公式如下
其中为第k类样本所占比例。 如果结果为1.0,则计算通过。
# ====================== 在这里填入代码 =======================
def Entropy(labels):
    label_counts = labels.value_counts()
    entropy = 0
    for i in label_counts:
        p = i / len(labels)
        entropy -= p * log2(p)
    return entropy
# =============================================================

total_entropy=Entropy(y)
print('划分前信息熵:\n',total_entropy)
# print(class_means)
**要点 2: 计算属性a�信息增益**,公式如下
其中V为属性a可能的取值情况数。 如果结果分别为1.0,0.0和0.31,则计算通过。
# ====================== 在这里填入代码 =======================
def InformationGain(dataset,split_attribute_name,target_name="好瓜"):
    total_entropy = Entropy(dataset[target_name])
    vals, counts = np.unique(dataset[split_attribute_name], return_counts=True)
    DEntropy = np.sum([(counts[i]/np.sum(counts)) * Entropy(dataset.where(dataset[split_attribute_name]==vals[i]).dropna()[target_name]) for i in range(len(vals))])
    Information_Gain = total_entropy - DEntropy
    return Information_Gain
# =============================================================
Information_Gain_color=InformationGain(dataset,'色泽',target_name="好瓜")
Information_Gain_texture=InformationGain(dataset,'纹理',target_name="好瓜")
Information_Gain_sound=InformationGain(dataset,'敲声',target_name="好瓜")
print('色泽的信息增益:\n',Information_Gain_color)
print('纹理的信息增益:\n',Information_Gain_texture)
print('敲声的信息增益:\n',np.around(Information_Gain_sound,decimals=2))
**要点 3:** **计算信息增益率**,公式如下:
其中IV(a)为属性a的固有值(intrinsic value),具体定义如下:
如果结果分别为1.0,0.0和0.38,则计算通过。
# ====================== 在这里填入代码 =======================
def GainRatio(dataset,split_attribute_name,target_name="好瓜"):
    Information_Gain = InformationGain(dataset, split_attribute_name, target_name)
    v, counts = np.unique(dataset[split_attribute_name], return_counts=True)
    IV = np.sum([-(counts[i]/np.sum(counts)) * log2(counts[i]/np.sum(counts)) for i in range(len(v))])
    Gain_Ratio = Information_Gain / IV
    return Gain_Ratio
# =============================================================
Gain_Ratio_color=GainRatio(dataset,'色泽',target_name="好瓜")
Gain_Ratio_texture=GainRatio(dataset,'纹理',target_name="好瓜")
Gain_Ratio_sound=GainRatio(dataset,'敲声',target_name="好瓜")
print('色泽的信息增益率:\n',Gain_Ratio_color)
print('纹理的信息增益率:\n',Gain_Ratio_texture)
print('敲声的信息增益率:\n',np.around(Gain_Ratio_sound,decimals=2))
**要点 4:** **计算基尼值**,定义如下:
其中为第k类样本所占比例,K为总类别数。 如果结果为0.5, 则计算通过。
# ====================== 在这里填入代码 =======================
def Gini(labels):
    label_counts = labels.value_counts()
    Gini = 1
    for i in label_counts:
        Gini -= (i / len(labels)) ** 2
    return Gini
# =============================================================
Gini_value=Gini(y)
print('划分前基尼值:\n',Gini_value)
**要点 5:** **计算基尼指数**,定义如下:
其中V为属性a可能的取值情况数。 如果结果为0.0,0.5和0.33,则计算通过。
# ====================== 在这里填入代码 =======================
def GiniIndex(dataset,split_attribute_name,target_name="好瓜"):
    v, counts = np.unique(dataset[split_attribute_name], return_counts=True)
    Gini_Index = np.sum([(counts[i]/np.sum(counts)) * Gini(dataset.where(dataset[split_attribute_name]==v[i]).dropna()[target_name]) for i in range(len(v))])
    return Gini_Index
# =============================================================
Gini_Index_color=GiniIndex(dataset,'色泽',target_name="好瓜")
Gini_Index_texture=GiniIndex(dataset,'纹理',target_name="好瓜")
Gini_Index_sound=GiniIndex(dataset,'敲声',target_name="好瓜")
print('色泽的基尼指数:\n',Gini_Index_color)
print('纹理的基尼指数:\n',Gini_Index_texture)
print('敲声的基尼指数:\n',np.around(Gini_Index_sound,decimals=2))
**要点 6:** 调用sklearn中的tree.DecisionTreeClassifier函数对西瓜数据集进行分类并可视化构造的决策树.
import matplotlib.pyplot as plt
from sklearn.tree import DecisionTreeClassifier
from sklearn.tree import plot_tree

%config InlineBackend.figure_format = 'svg'
%matplotlib inline

# 创建西瓜数据集
data = {"color":[0,0,0,1,1],
        "texture":[1, 1,0, 0, 1],
        "sound":[1, 0, 1,1, 1],
        "goodness":[1, 1, 0, 0, 0]}
index = np.arange(5)+1
dataset= pd.DataFrame(data, index)

X=dataset.iloc[:,:3]
y=dataset.iloc[:,3]
target_names=['bad','good']
feature_names = dataset.columns.values[:-1]

dataset
# ====================== 在这里填入代码 =======================
clf = DecisionTreeClassifier()
clf.fit(X, y)
plt.figure(figsize = (10, 8))
plot_tree(clf, filled = True, feature_names = feature_names,class_names = target_names)
plt.show()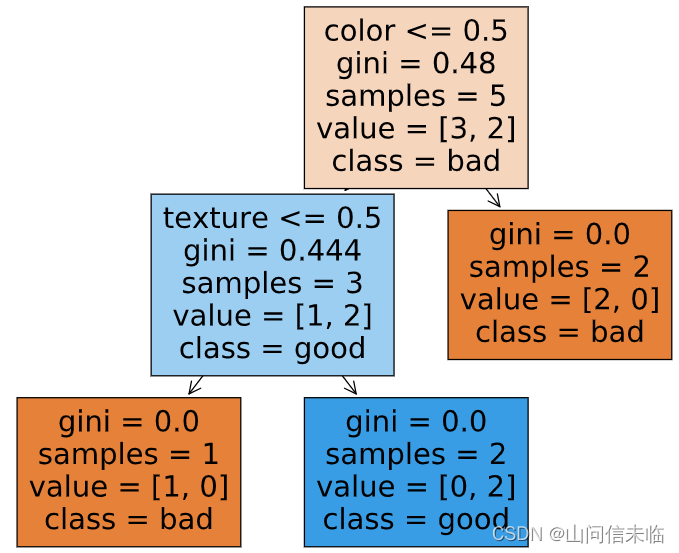


 3万+
3万+


 被折叠的 条评论
为什么被折叠?
被折叠的 条评论
为什么被折叠?
 到【灌水乐园】发言


