


写在前面
在自然语言处理的系列学习中,我们已经探讨了词汇分析、句法分析和语篇分析等基础任务。本文将聚焦语义分析的两大核心任务:命名实体识别(NER)和关系抽取(RE)。作为语义理解的关键技术,NER负责识别文本中特定类型的实体,而RE则致力于挖掘实体间的语义关联。这两项技术不仅是构建知识图谱的基础,更为智能问答、信息检索等应用提供了重要支撑。随着深度学习的发展,NER和RE在准确率和泛化能力上都取得了显著提升,但如何降低对标注数据的依赖仍是当前研究的重点方向。
本系列文章是我的学习笔记,涵盖了入门的基础知识与模型以及对应的上机实验,截图截取自老师的课程ppt。
- 概论
- 词汇分析
- 句法分析
- 语篇分析
- 语义分析--命名实体识别与关系抽取
- 语义计算
- 语言模型
- 文本摘要
- 情感分析
- 部分对应上机实验
目录
命名实体识别(Named Entity Recognition,NER)
命名实体识别(Named Entity Recognition,NER)
NER的核心任务是定位实体边界并分类实体类型,其难点在于处理语言的多样性(如中文无空格)、嵌套实体、领域适应性等。它是信息抽取、机器翻译、智能问答等NLP任务的基础步骤。
NER任务
1. 识别实体边界
- 从文本中定位并划分出实体的起始和结束位置。(先抠词再分类)
- 句子:
“马云创立了阿里巴巴。” - 实体边界:
[马云](人名)、[阿里巴巴](机构名)。
- 句子:
2. 确定实体类别
- 为识别出的实体分配预定义的类别标签。常见的类别包括:
- 人名(PER):如
“刘德华”、“Elon Musk”。 - 地名(LOC):如
“北京”、“New York”。 - 机构名(ORG):如
“腾讯”、“United Nations”。 - 时间(TIME):如
“2023年”、“July 4th”。 - 专有名词(MISC):如
“图灵奖”、“iPhone”。 - 其他领域特定实体:如医疗领域的
“糖尿病”(疾病名)、金融领域的“纳斯达克”(股票指数)。
- 人名(PER):如
3. 处理复杂情况
- 嵌套实体:如
“北京大学校长郝平”中,“北京大学”(ORG)和“郝平”(PER)是嵌套实体。 - 跨语言实体:如中文文本中的英文实体(
“Steve Jobs”)。 - 别名和缩写:如
“阿里”是“阿里巴巴”的简称。
NER现状
通用NER的局限性
- 领域受限:
- NER在有限的文本类型(如新闻语料)中表现较好,但在其他领域(如医疗、法律、社交媒体)效果较差。
- 例如,医学文本中的疾病名(如“糖尿病”)、基因名(如“BRCA1”)需要特定领域的标注数据。
- 实体类别有限:大多数系统仅支持基础类别(人名、地名、机构名等),但实际应用需要更细粒度的分类(如电影名、产品型号等)。
- 数据量小,易过拟合:相比其他NLP任务(如机器翻译),NER的标注数据集规模较小,导致模型容易过拟合。
中文NER的特殊挑战
- 分词依赖性强:
- 英文通过大写字母和空格天然分割实体(如
“New York”),而中文需先分词(如“北京大学”是一个词,而非“北京”+“大学”)。 - 错误分词会导致实体边界错误(如
“上海银行”是机构名,但可能被误分为“上海”+“银行”)。
- 英文通过大写字母和空格天然分割实体(如
- 缺乏形式标志:中文实体无大小写等显式标记,依赖上下文语义(如
“马云”是人名,但“白云”是普通名词)。 - 中英文混合实体:如
“iPhone 14 Pro Max”(产品名)、“Tony老师”(英文名+中文称谓)。 - 译名问题:外国人名/地名音译(如
“特朗普”vs“川普”)、简称(如“纽交所”指“纽约证券交易所”)。
其他关键问题
- 高召回率 vs 高准确率:信息检索领域更看重准确率(减少误标),但NER通常追求召回率(尽量不漏标),导致两者目标冲突。
- 领域迁移困难:在新闻数据上训练的模型,直接用于医疗/金融文本时性能大幅下降。
- 未登录词(OOV)问题:新实体(如网络流行词
“奥利给”)难以被识别。
NER方法
命名实体识别(NER)的方法主要分为四大类:
基于规则和词典的方法
- 原理:
- 人工编写规则模板(如正则表达式、关键词列表、上下文模式)。
- 结合领域词典(如人名库、地名库)进行匹配。
- 示例规则:
- 模式:
"[A-Z][a-z]+"→ 匹配英文人名(如"John")。 - 关键词:
“公司”前后词 → 可能为机构名(如“腾讯公司”)。
- 模式:
- 优点:
- 高准确率(规则明确时)。
- 无需训练数据。
- 缺点:
- 低召回率(无法覆盖新词、变体)。
- 人工成本高,难以跨领域迁移。
import re

# 定义简单规则:大写单词为人名,带"公司"结尾为机构
text = "苹果公司 CEO Tim Cook visited Beijing in 2019."
rules = [
    (r'\b[A-Z][a-z]+\b', 'PER'),    # 人名
    (r'\b\w+公司\b', 'ORG'),        # 机构
    (r'\b\d{4}\b', 'DATE')          # 时间
]

for pattern, label in rules: # 遍历rules列表中的各个元组(规则)
    print(f"匹配规则: {pattern}, 类型: {label}")
    for match in re.finditer(pattern, text):
        print(f"实体: {match.group()}, 类型: {label}, 位置: {match.span()}")
匹配规则: \b[A-Z][a-z]+\b, 类型: PER
实体: Tim, 类型: PER, 位置: (9, 12)
实体: Cook, 类型: PER, 位置: (13, 17)
实体: Beijing, 类型: PER, 位置: (26, 33)
匹配规则: \b\w+公司\b, 类型: ORG
实体: 苹果公司, 类型: ORG, 位置: (0, 4)
匹配规则: \b\d{4}\b, 类型: DATE
实体: 2019, 类型: DATE, 位置: (37, 41)基于统计机器学习的方法
- 原理:将NER视为序列标注任务,使用标注数据训练分类模型。
- 常用模型:
- 隐马尔可夫模型(HMM):基于状态转移概率。
- 最大熵(MaxEnt):依赖特征工程。
- 支持向量机(SVM):适合小样本。
- 条件随机场(CRF):主流方法,建模标签间依赖关系。
- 特征工程:词特征(当前词、前后词)、词性(POS)、前缀/后缀、实体类型等。
- 优点:比规则方法泛化能力更强。
- 缺点:
- 依赖大量标注数据。
- 特征设计复杂(如
POS、WordNet、依存分析)
import sklearn_crfsuite
from sklearn_crfsuite import metrics

# 修正后的特征函数 - 返回简单字符串特征
def word2features(sent, i):
    word = sent[i][0]  # 现在 sent[i] 是 ('Apple', 'B-ORG') 这样的元组
    return {
        'word': word,
        'word.lower()': word.lower(),
        'word.isupper()': word.isupper(),
        'word.istitle()': word.istitle(),
    }

# 训练数据格式修正
train_data = [
    [('Apple', 'B-ORG'), ('CEO', 'O'), ('Tim', 'B-PER'), ('Cook', 'I-PER')]
]

# 准备特征和标签
X_train = [[word2features(sent, i) for i in range(len(sent))] for sent in train_data]
y_train = [[label for (word, label) in sent] for sent in train_data]

# 创建并训练CRF模型
crf = sklearn_crfsuite.CRF(
    algorithm='lbfgs',
    c1=0.1,
    c2=0.1,
    max_iterations=100,
    all_possible_transitions=True
)
crf.fit(X_train, y_train)

# 预测示例
test_sent = [('Microsoft', ''), ('founder', ''), ('Bill', ''), ('Gates', '')]
X_test = [word2features(test_sent, i) for i in range(len(test_sent))]
pred = crf.predict_single(X_test)
print(list(zip([word for word, label in test_sent], pred)))
[('Microsoft', 'B-ORG'), ('founder', 'O'), ('Bill', 'B-PER'), ('Gates', 'I-PER')]混合方法
- 原理:结合规则与统计方法,或融合多种机器学习模型。
- 常见策略:
- 用规则过滤候选实体,再用统计模型分类。
- 级联模型(如HMM粗标 + CRF精标)。
- 优点:
- 平衡准确率与召回率。
- 减少纯规则或纯数据的局限性。
- 缺点:系统复杂度高。
基于神经网络的方法
- 原理:
- 端到端模型:输入文本 → 词向量(Embedding)→ 神经网络特征提取 → 每个token的标签预测。
- 常用模型:
- LSTM-CRF:BiLSTM提取上下文特征,CRF约束标签逻辑。
- CNN-CRF:CNN捕捉局部n-gram特征。
- BERT等预训练模型:利用Transformer编码全局语义。
- 优点:
- 无需人工特征工程。
- 在大量数据下表现最优。
- 缺点:
- 需要大规模标注数据。
- 模型可解释性差(黑箱)。
import torch
from transformers import AutoTokenizer, AutoModelForTokenClassification

# 使用预训练模型(需安装transformers)
tokenizer = AutoTokenizer.from_pretrained("dslim/bert-base-NER")
model = AutoModelForTokenClassification.from_pretrained("dslim/bert-base-NER")

inputs = tokenizer("Tim Cook works at Apple", return_tensors="pt")
outputs = model(**inputs)
predictions = torch.argmax(outputs.logits, dim=2)

# 输出预测标签
print([model.config.id2label[p] for p in predictions[0].tolist()[1:-1]])
# 输出: ['B-PER', 'I-PER', 'O', 'O', 'B-ORG']
NER工具包
- 中文首选:HanLP、Stanford NER(中文模型)。
- HanLP:开源中文NLP工具包,支持多种模型(CRF、BiLSTM-CRF等),覆盖人名、地名、机构名等。
- 斯坦福NER:基于条件随机场(CRF),支持英文、中文等,预训练模型可直接使用。
import hanlp

# 加载HanLP多任务模型(中文)
# OPEN_TOK_POS_NER_SRL_DEP_SDP_CON_ELECTRA_SMALL_ZH 包含分词、词性标注、NER等功能
hanlp_model = hanlp.load(hanlp.pretrained.mtl.OPEN_TOK_POS_NER_SRL_DEP_SDP_CON_ELECTRA_SMALL_ZH)

# 示例中文文本
text = "华为公司成立于1987年,总部位于中国广东省深圳市,创始人任正非。"

# 进行命名实体识别
result = hanlp_model(text, tasks='ner')  # 指定只运行NER任务

# 输出原始结果(列表格式)
print("原始NER结果:")
print(result)

# 结构化输出
print("\n结构化实体信息:")
for entity in result['ner']:
    print(f"实体: {entity[0]}, 类型: {entity[1]}, 位置: {entity[2:]}")
原始NER结果:
{
"tok": [
"华为",
"公司",
"成立",
"于",
"1987年",
",",
"总部",
"位",
"于",
"中国",
"广东省",
"深圳市",
",",
"创始人",
"任正非",
"。"
],
"ner": [
["华为公司", "ORGANIZATION", 0, 2],
["1987年", "DATE", 4, 5],
["中国", "LOCATION", 9, 10],
["广东省", "LOCATION", 10, 11],
["深圳市", "LOCATION", 11, 12],
["任正非", "PERSON", 14, 15]
]
}
结构化实体信息:
实体: 华为公司, 类型: ORGANIZATION, 位置: (0, 2)
实体: 1987年, 类型: DATE, 位置: (4, 5)
实体: 中国, 类型: LOCATION, 位置: (9, 10)
实体: 广东省, 类型: LOCATION, 位置: (10, 11)
实体: 深圳市, 类型: LOCATION, 位置: (11, 12)
实体: 任正非, 类型: PERSON, 位置: (14, 15)- 英文首选:SpaCy、Stanford NER。
- SpaCy:工业级高效NLP库,内置预训练NER模型(仅支持英文)。
import spacy
from spacy.training import Example
from spacy.util import minibatch
import random

# 1. 创建空白模型
nlp = spacy.blank("en")

# 2. 添加NER管道
if "ner" not in nlp.pipe_names:
    ner = nlp.add_pipe("ner")
else:
    ner = nlp.get_pipe("ner")

# 3. 添加实体标签
ner.add_label("ORG")
ner.add_label("PERSON")

# 4. 准备训练数据 (spaCy需要的格式)
TRAIN_DATA = [
    ("Apple CEO Tim Cook", {"entities": [(0, 5, "ORG"), (10, 18, "PERSON")]}),
    ("Microsoft founder Bill Gates", {"entities": [(0, 9, "ORG"), (18, 28, "PERSON")]})
]

# 5. 训练模型
optimizer = nlp.begin_training()
for itn in range(100):
    random.shuffle(TRAIN_DATA)
    losses = {}
    for batch in minibatch(TRAIN_DATA, size=2):
        for text, annotations in batch:
            doc = nlp.make_doc(text)
            example = Example.from_dict(doc, annotations)
            nlp.update([example], drop=0.5, losses=losses)
    print(f"Iteration {itn}, Losses: {losses}")

# 6. 测试模型
doc = nlp("Google CEO Sundar Pichai spoke at the event")
print([(ent.text, ent.label_) for ent in doc.ents])
Iteration 0, Losses: {'ner': 7.1289584040641785}
Iteration 1, Losses: {'ner': 6.880933701992035}
Iteration 2, Losses: {'ner': 6.545637130737305}
Iteration 3, Losses: {'ner': 6.3315123319625854}
Iteration 4, Losses: {'ner': 6.052604019641876}
Iteration 5, Losses: {'ner': 5.624814391136169}
Iteration 6, Losses: {'ner': 5.796444594860077}
Iteration 7, Losses: {'ner': 4.980358123779297}
Iteration 8, Losses: {'ner': 5.307676553726196}
Iteration 9, Losses: {'ner': 4.722010642290115}
Iteration 10, Losses: {'ner': 4.869860976934433}
Iteration 11, Losses: {'ner': 4.539664730429649}
Iteration 12, Losses: {'ner': 4.132974535226822}
Iteration 13, Losses: {'ner': 4.789979979395866}
Iteration 14, Losses: {'ner': 4.851956307888031}
Iteration 15, Losses: {'ner': 4.5493451952934265}
Iteration 16, Losses: {'ner': 3.4231309667229652}
Iteration 17, Losses: {'ner': 3.716500975191593}
Iteration 18, Losses: {'ner': 3.167138397693634}
Iteration 19, Losses: {'ner': 3.4022119343280792}
Iteration 20, Losses: {'ner': 3.8505417481064796}
Iteration 21, Losses: {'ner': 3.0302358637563884}
Iteration 22, Losses: {'ner': 2.720695700496435}
Iteration 23, Losses: {'ner': 3.4088390804827213}
Iteration 24, Losses: {'ner': 4.005276516079903}
Iteration 25, Losses: {'ner': 3.007639850024134}
Iteration 26, Losses: {'ner': 3.5371302022831514}
Iteration 27, Losses: {'ner': 2.228917439468205}
Iteration 28, Losses: {'ner': 1.7478160709142685}
Iteration 29, Losses: {'ner': 1.199865807313472}
Iteration 30, Losses: {'ner': 2.7217560708522797}
Iteration 31, Losses: {'ner': 0.8954440694578807}
Iteration 32, Losses: {'ner': 1.6925407168455422}
Iteration 33, Losses: {'ner': 0.43000943679362535}
Iteration 34, Losses: {'ner': 0.14092907468148042}
Iteration 35, Losses: {'ner': 0.007625606749229519}
Iteration 36, Losses: {'ner': 0.03525358538905721}
Iteration 37, Losses: {'ner': 0.000743979389596916}
Iteration 38, Losses: {'ner': 0.004483427809118059}
Iteration 39, Losses: {'ner': 0.013673553042602647}
Iteration 40, Losses: {'ner': 8.576726050838249e-05}
Iteration 41, Losses: {'ner': 0.00040919567180805526}
Iteration 42, Losses: {'ner': 4.9809929543698575e-05}
Iteration 43, Losses: {'ner': 5.61289600400916e-06}
Iteration 44, Losses: {'ner': 1.2091687489951513e-05}
Iteration 45, Losses: {'ner': 3.2793414411024588e-06}
Iteration 46, Losses: {'ner': 0.00013960484685817512}
Iteration 47, Losses: {'ner': 9.232360238904546e-06}
Iteration 48, Losses: {'ner': 1.4583739805445697e-06}
Iteration 49, Losses: {'ner': 5.1207336648051876e-05}
Iteration 50, Losses: {'ner': 4.307033023892293e-07}
Iteration 51, Losses: {'ner': 2.0032933715523623e-07}
Iteration 52, Losses: {'ner': 4.7241160718637265e-07}
Iteration 53, Losses: {'ner': 1.1168967697270989e-07}
Iteration 54, Losses: {'ner': 1.3491527036871393e-05}
Iteration 55, Losses: {'ner': 6.3567061920285e-06}
Iteration 56, Losses: {'ner': 3.329199602077202e-07}
Iteration 57, Losses: {'ner': 5.644809948322348e-06}
Iteration 58, Losses: {'ner': 9.30714328683298e-07}
Iteration 59, Losses: {'ner': 2.0198017668806055e-07}
Iteration 60, Losses: {'ner': 8.052878923566322e-07}
Iteration 61, Losses: {'ner': 1.3556877936140387e-07}
Iteration 62, Losses: {'ner': 1.6787315968514487e-08}
Iteration 63, Losses: {'ner': 4.3883607856020347e-05}
Iteration 64, Losses: {'ner': 2.8263908500122297e-07}
Iteration 65, Losses: {'ner': 7.288400615704463e-07}
Iteration 66, Losses: {'ner': 3.1297457792035475e-06}
Iteration 67, Losses: {'ner': 1.3137275214063547e-07}
Iteration 68, Losses: {'ner': 1.877383074244929e-08}
Iteration 69, Losses: {'ner': 4.460759837896823e-05}
Iteration 70, Losses: {'ner': 8.96787221126849e-08}
Iteration 71, Losses: {'ner': 1.2690845511028211e-05}
Iteration 72, Losses: {'ner': 1.0163876648321705e-07}
Iteration 73, Losses: {'ner': 4.359017564950263e-07}
Iteration 74, Losses: {'ner': 5.267811369522e-06}
Iteration 75, Losses: {'ner': 1.8665950148424598e-07}
Iteration 76, Losses: {'ner': 0.0009181727346048111}
Iteration 77, Losses: {'ner': 3.052249030844912e-07}
Iteration 78, Losses: {'ner': 2.4579868615175988e-05}
Iteration 79, Losses: {'ner': 8.022726407860134e-07}
Iteration 80, Losses: {'ner': 1.8030761449989886e-06}
Iteration 81, Losses: {'ner': 2.2421845152632224e-07}
Iteration 82, Losses: {'ner': 3.5754793695580246e-07}
Iteration 83, Losses: {'ner': 0.0020643170912578116}
Iteration 84, Losses: {'ner': 3.581079605330239e-06}
Iteration 85, Losses: {'ner': 9.236649958335984e-09}
Iteration 86, Losses: {'ner': 6.386899576633547e-06}
Iteration 87, Losses: {'ner': 7.162933649980654e-05}
Iteration 88, Losses: {'ner': 0.00020096071617984132}
Iteration 89, Losses: {'ner': 6.190568865881248e-05}
Iteration 90, Losses: {'ner': 1.185558317708724e-10}
Iteration 91, Losses: {'ner': 1.9071922175487903e-07}
Iteration 92, Losses: {'ner': 3.985370254826216e-10}
Iteration 93, Losses: {'ner': 5.680533425551633e-06}
Iteration 94, Losses: {'ner': 1.086225875206152e-08}
Iteration 95, Losses: {'ner': 1.4016616439524766e-06}
Iteration 96, Losses: {'ner': 6.82492353959172e-09}
Iteration 97, Losses: {'ner': 1.907166544575268e-07}
Iteration 98, Losses: {'ner': 1.2043272423967358e-05}
Iteration 99, Losses: {'ner': 1.2039220198511503e-05}
[('Google', 'ORG'), ('Sundar Pichai', 'PERSON'), ('at the', 'PERSON'), ('event', 'ORG')]- 自定义训练:CRFsuite、MALLET。
- MALLET:由麻省大学开发,包含序列标注工具,需自行训练模型。
- 学习与科研:NLTK。
- Python平台通用NLP工具,NER需结合其他库(如Stanford NER)。
PDF推荐工具与方法的对应关系
- 规则/词典:HanLP(内置词典)、NLTK(规则模板)。
- 统计学习:CRFsuite、MALLET。
- 神经网络:SpaCy(内置预训练模型)、HanLP(BiLSTM-CRF)。
NER相关数据集
- 语言:西班牙语、荷兰语
- 实体类型:人名、地名、机构名等。
- 领域:口语理解
- 语言:中文
- 任务:对话中的实体识别与槽填充。
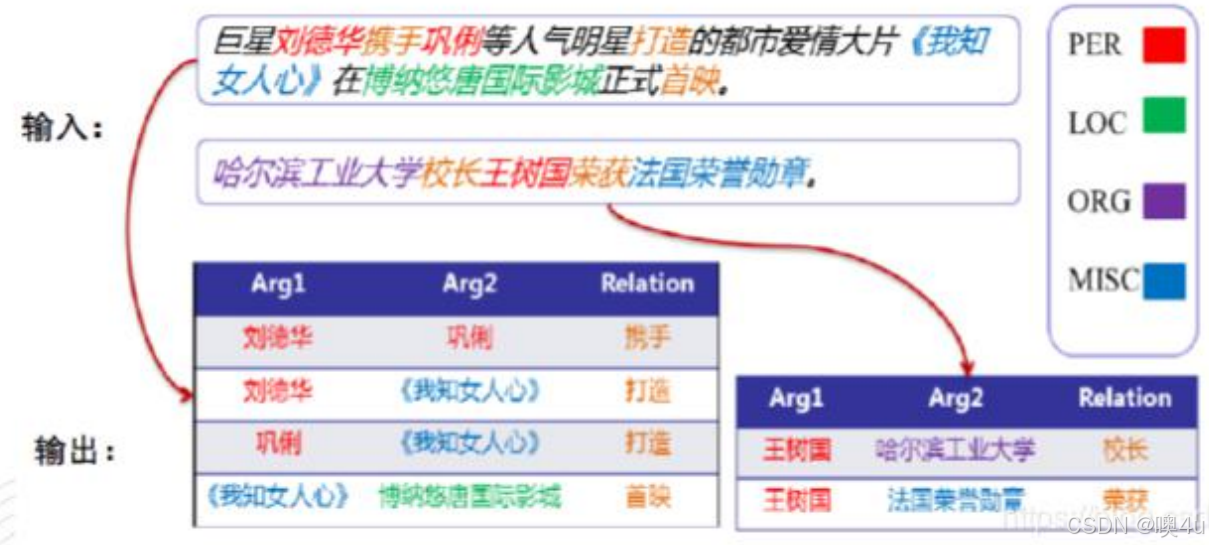
关系抽取(Relation Extraction,RE)
关系抽取(Relation Extraction, RE)是自然语言处理中的核心任务,旨在从文本中识别实体之间的语义关系,形成结构化三元组(entity1, relation, entity2)。
-
预先给定的实体对,或通过命名实体识别(NER)获得。
关系抽取的核心是从非结构化文本中提取结构化关系,面临隐式表达、数据稀疏等挑战。其输出为知识图谱、问答系统等提供基础支持。
与关系分类的区别
- 关系抽取:判断句子中两实体是否存在指定关系(二分类)。
- 关系分类:判断两实体属于哪种预定义关系(多分类)。
典型挑战
- 关系表达隐晦:
- 例句:“特朗普2025年执掌着美国的行政大权。”
- 隐含关系:
<特朗普,任职总统,美国>,但无显式关键词。
- 表达多样性:同一关系可有多种表述:
- “特朗普是美国总统”
- “特朗普入驻白宫”
- “特朗普执政期间…”
- 数据稀缺:人工标注训练样本成本高。
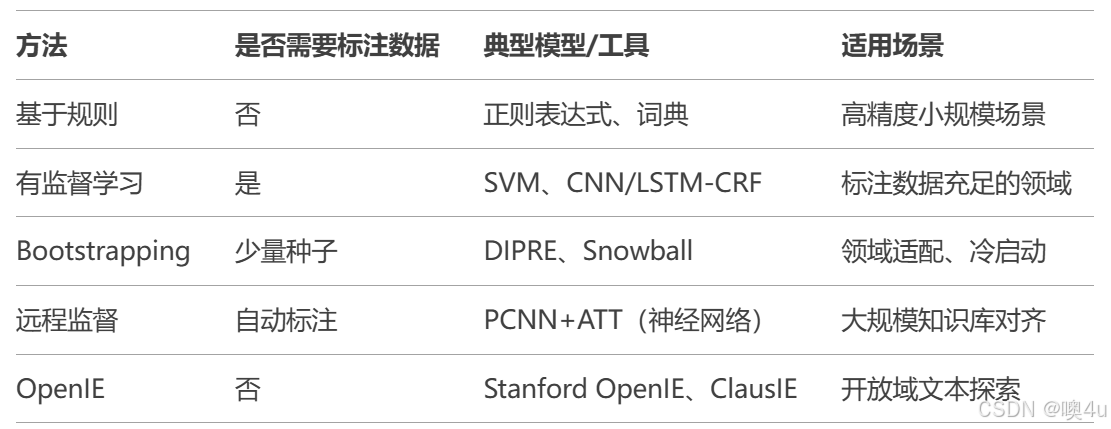
RE方法
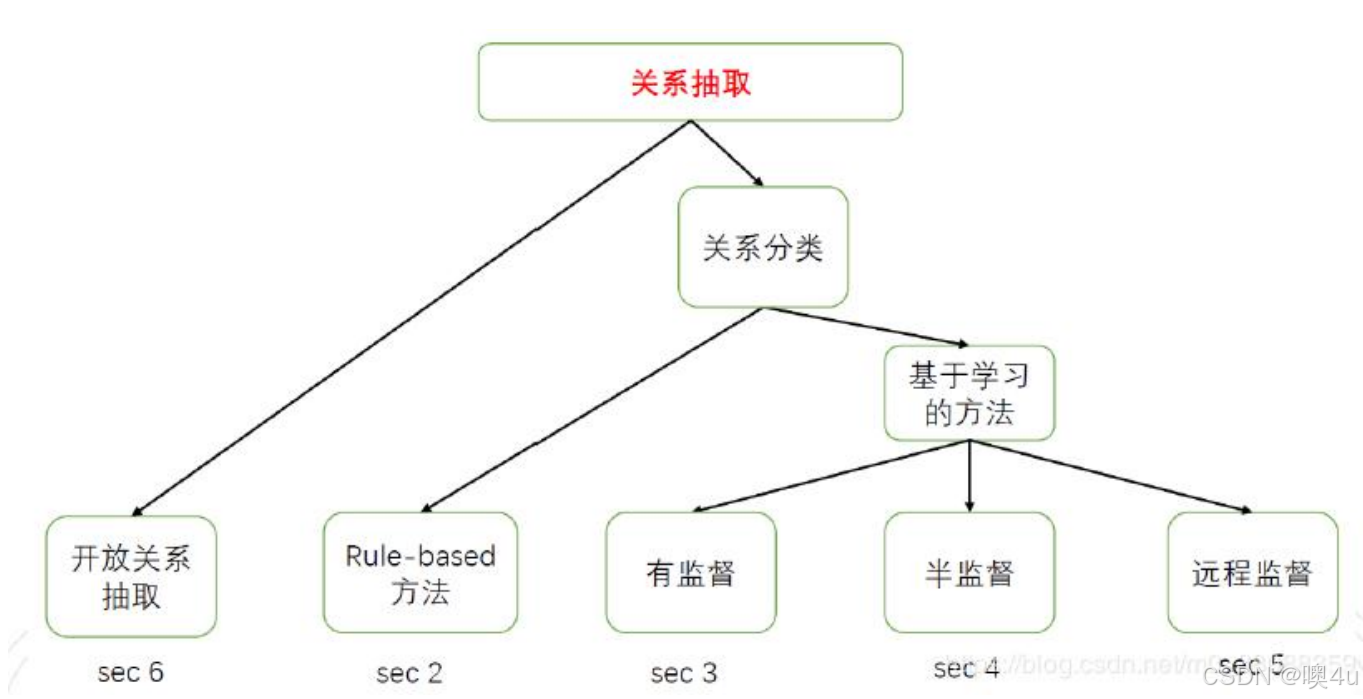
根据关系集合是否预先给定,关系抽取分为两类:
-
关系分类(Relation Classification)
-
目标:判断实体对属于预定义的哪种关系类型(多分类问题)。
-
示例:
-
句子:“Bill Gates works at Microsoft Inc.”
-
预定义关系:
Person-Affiliation -
输出:
Person-Affiliation(Bill Gates, Microsoft Inc)
-
-
-
开放关系抽取(OpenIE)
-
目标:直接从文本中抽取关系短语,无需预定义关系集合。
-
步骤:
-
抽取文本中的关系描述(如动词、介词短语)。
-
可选:将文本关系映射到知识库的规范关系。
-
-
示例:
-
句子:“Hudson was born in Hampstead, which is a suburb of London.”
-
输出:
-
(Hudson, was born in, Hampstead) -
(Hampstead, is a suburb of, London)
-
-
-
基于规则的关系抽取
- 核心思想:通过人工编写规则模板(词汇、句法、语义模式)匹配文本中的关系。
- 工作流程:
- 设计规则(如
X is the CEO of Y→CEO-of(X,Y))。 - 匹配文本并抽取实体对。
- 设计规则(如
- 示例:
- 规则:
"X is the founder of Y" - 句子:
"Jobs is the founder of Apple." - 输出:
(Jobs, founder-of, Apple)
- 规则:
- 优缺点:
- ✅ 高准确率(规则明确时)。
- ❌ 低召回率(无法覆盖多样表达),人工成本高。
import re

text = "马云创立了阿里巴巴。"
pattern = r"(.*?)创立了(.*?)[。]"

match = re.search(pattern, text)
if match:
    print(f"三元组: ({match.group(1)}, 创立, {match.group(2)})")
三元组: (马云, 创立, 阿里巴巴)有监督关系抽取
- 核心思想:将关系抽取视为分类问题,使用标注数据训练模型。
- 步骤:
- 标注数据:标记句子中的实体对及关系类型,准备好训练数据。
- 特征工程:提取词法(实体上下文)、实体类型及其组合特征(词性)、句法(依存路径、依存树、句法树)、语义(WordNet)等特征。(特征向量)
- 训练分类器:常用SVM、最大熵、神经网络(如CNN/LSTM+CRF)。
- 示例特征:实体间词序列:
["was", "born", "in"]→born-in关系。 - 优缺点:
- ✅ 泛化能力优于规则方法。
- ❌ 依赖大量标注数据,特征工程复杂。
基于Bootstrapping的关系抽取(半监督)
- 核心思想:从少量种子实体对出发,迭代扩展模式和实例(“滚雪球”)。
- 流程:
- 输入种子(如
(马云, 阿里巴巴)、(任正非, 华为))。 - 从语料中匹配包含种子对的句子,抽取出新模式(如
"X创立了Y")。 - 用新模式抽取新实体对,迭代优化。
- 输入种子(如
- 示例:
- 种子:
(周杰伦, 台湾)→ 匹配句子"周杰伦出生于台湾"→ 提取模式"X出生于Y"→ 发现新实体对(林俊杰, 新加坡)。
- 种子:
- 优缺点:
- ✅ 减少人工标注需求。
- ❌ 易语义漂移(如错误扩展
"河南是中国首都")。
from itertools import product
import re

# 初始化数据
seed_pairs = [("马云", "阿里巴巴"), ("马化腾", "腾讯")]
texts = ["马云创立阿里巴巴", "马化腾创办腾讯", "比尔盖茨创立微软"]

# 存储发现的模式和对应句子
patterns = []
matched_sentences = []

# 第一阶段:从种子发现模式
print("=== 模式发现阶段 ===")
for text, (e1, e2) in product(texts, seed_pairs):
    if e1 in text and e2 in text:
        pattern = text.replace(e1, "E1").replace(e2, "E2")+ "$"#在正则后面加上句子终止符匹配,比如 $(代表行尾),让正则知道 E2 必须是结尾内容
        patterns.append(pattern)
        matched_sentences.append(text)
        print(f"发现模式: {pattern} (来自句子: '{text}')")

# 第二阶段:用新模式抽取新实体
print("\n=== 实体抽取阶段 ===")
new_pairs = []
for pattern in patterns:
    # 跳过已用于训练的句子
    for text in [t for t in texts if t not in matched_sentences]:
        if "E1" in pattern and "E2" in pattern:
            # 构造正则表达式模式
            regex_pattern = pattern.replace("E1", "(.*?)").replace("E2", "(.*?)")
            match = re.search(regex_pattern, text)
            if match:
                new_e1, new_e2 = match.group(1), match.group(2)
                new_pairs.append((new_e1, new_e2))
                print(f"用模式 '{pattern}' 发现新实体对: ({new_e1}, {new_e2})")

# 第三阶段:验证并加入种子
print("\n=== 结果汇总 ===")
print("新增实体对:", new_pairs)
# 实际应用中会加入人工验证环节
final_pairs = seed_pairs + new_pairs
print("最终实体对集合:", final_pairs)
=== 模式发现阶段 ===
发现模式: E1创立E2$ (来自句子: '马云创立阿里巴巴')
发现模式: E1创办E2$ (来自句子: '马化腾创办腾讯')
=== 实体抽取阶段 ===
用模式 'E1创立E2$' 发现新实体对: (比尔盖茨, 微软)
=== 结果汇总 ===
新增实体对: [('比尔盖茨', '微软')]
最终实体对集合: [('马云', '阿里巴巴'), ('马化腾', '腾讯'), ('比尔盖茨', '微软')]基于远程监督的关系抽取
- 核心思想:利用知识库(如Freebase)自动标注训练数据。
- 假设:若知识库中存在
(A, R, B),则所有包含A和B的句子都表达R。 - 步骤:
- 对齐知识库与文本:找到包含实体对的句子。
- 启发式标注:将知识库关系赋予句子。
- 训练分类模型(需处理噪声标签)。
- 示例:
- 知识库:
CEO-of(Steve Jobs, Apple) - 标注句子:
"Jobs led Apple to success."→ 标签CEO-of(可能错误)。
- 知识库:
- 优缺点:
- ✅ 无需人工标注,可扩展至海量数据。
- ❌ 噪声大(错误假设问题)。
开放式关系抽取(OpenIE)
- 核心思想:无预定义关系,直接从文本抽关系短语。
- 流程:
- 识别实体对(如
(Bill Gates, Microsoft))。 - 抽取中间关系短语(如
"works at")。 - 可选:规范化短语(如
works at→Employment)。
- 识别实体对(如
- 示例:
- 句子:
"Kafka, a writer born in Prague, wrote 'The Metamorphosis'." - 输出:
(Kafka, born in, Prague)(Kafka, wrote, The Metamorphosis)
- 句子:
- 优缺点:
- ✅ 适应开放域文本。
- ❌ 输出非结构化,需后处理。
from openie import StanfordOpenIE

# 初始化Stanford OpenIE
client = StanfordOpenIE()

text = "马云在杭州创立了阿里巴巴"
triples = client.annotate(text)

for triple in triples:
    print(f"({triple['subject']}, {triple['relation']}, {triple['object']})")
# 输出: (马云, 在, 杭州) 和 (马云, 创立, 阿里巴巴)
总结
命名实体识别(NER)和关系抽取(RE)是语义分析的两大核心任务。NER负责识别文本中的人名、地名等实体并分类,面临分词依赖、跨领域迁移等挑战,方法包括规则匹配、统计模型(如CRF)和神经网络(如BiLSTM-CRF)。RE则抽取实体间的语义关系(如"创立"),分为基于规则、有监督、半监督(Bootstrapping)、远程监督和开放抽取(OpenIE)五类,需解决关系表达隐晦、数据稀疏等问题。两者共同支撑知识图谱、智能问答等应用,其中NER提供实体基础,RE构建实体关联。当前趋势是结合深度学习与弱监督方法,以降低标注成本并提升跨领域适应性。


 1531
1531

 被折叠的 条评论
为什么被折叠?
被折叠的 条评论
为什么被折叠?
 到【灌水乐园】发言


