


出于学习研究目的简单翻译github上的开源项目v2e中readme.md。本人不是英语专业,计算机英语也不太好,希望收到您的反馈和修改意见。
GitHub - SensorsINI/v2e: V2E: From video frames to DVS events
v2e
许可证:麻省理工学院 在Colab开放
Python torch+opencv代码,从低帧率的传统频闪视频帧转变为具有更高有效定时精度的逼真合成DVS事件流。v2e包括有限强度依赖的光感受器带宽、高斯像素到像素事件阈值变化和噪声“泄漏”事件。
有关视频和更多信息,请参阅v2e主页。
我们关于v2e的论文(如下)暴露了当前计算机视觉文献中普遍存在的关于事件摄像机的错误断言。
有关示例输入文件,请参阅v2e示例输入数据。
投票支持v2e的新功能。
v2e的开发得到了瑞士国家机器人技术中心(NCCR Robotics)的支持。
新闻资讯
查看更新日志了解最新消息
联系方式
Yuhuang Hu (yuhuang.hu@ini.uzh.ch) Tobi Delbruck (tobi@ini.uzh.ch)
引用
如果您使用v2e,我们感谢您引用下面的论文。更多背景文件请参见v2e主页。
胡,刘,德尔布鲁克。v2e:从视频帧到真实的DVS事件。2021年IEEE/CVF计算机视觉和模式识别研讨会(CVPRW),网址:https://arxiv.org/abs/2006.07722, 2021
要复制论文的实验,请找到这个存储库。
关于转换时间的建议
我们建议在CUDA GPU上运行v2e,否则它会非常慢,特别是在使用SuperSloMo上采样时。即使使用低端GTX-1050,v2e的运行速度也比使用10倍减速系数和346x260视频的实时速度慢约50-200倍。
转换速度与所需DVS时间戳分辨率的倒数呈线性关系。如果你要求100us的精细分辨率,那么预计每秒源视频的计算时间会有很多分钟。它在带有GPU的Google colab上运行,每秒需要500秒的12FPS源视频,因为超过800X的非常高的上采样率和DVS建模所需的220k帧。
我们建议在开始长时间转换之前使用--stop选项进行试运行。
在Google CoLab中使用v2e
如果你不想安装,请尝试在谷歌colab中打开v2e。
https://colab.research.google.com/drive/1czx-GJnx-UkhFVBbfoACLVZs8cYlcr_M?usp=sharing
本地安装
一般有3个步骤
1、创建conda环境
2、将pytoch和其他conda分布式软件包安装到此环境中
3、使用pip将其余的包和v2e安装到conda环境中。
需要pip,因为conda存储库中有些包不可用。按此顺序进行很重要,因为conda通常不知道pip的安装。
创建conda环境
将v2e安装到单独的Python环境,如conda环境:
conda create -n v2e python=3.10  # create a new environment
conda activate v2e  # activate the environment
确保您已启用CUDA GPU加速pytorch
请参阅https://pytorch.org/get-started/locally/生成正确的conda安装命令以启用GPU加速的CUDA。例如,在windows 10上,此工具生成了以下命令。v2e不使用torchaudio,所以你可以省略它。
conda install pytorch torchvision torchaudio cudatoolkit=11.3 -c pytorch您可能想检查这个stackoverflow问题:https://stackoverflow.com/questions/57238344/i-have-a-gpu-and-cuda-installed-in-windows-10-but-pytorchs-torch-cuda-is-availa
使用pip安装其余软件包和v2e
将pytorch安装到CUDA环境后,要在开发人员模式下安装v2e(以便对源代码的编辑立即生效),请在激活的conda环境中的终端中运行以下命令。python -m pip install -e,命令运行setup.py,以安装更多包,并在conda环境python路径中添加一个脚本,从命令行运行v2e;看https://stackoverflow.com/questions/39023758/what-does-pip-install-dot-mean:
conda activate v2e # activate your env with pytoch already installed by conda
git clone https://github.com/SensorsINI/v2e
cd v2e
python -m pip install -e . # use pip to install requirements from setup.py in user mode (so your edits to source files in v2e take effect immediately
如果你想要一个额外的Windows GUI界面,你需要安装Gooey软件包。此软件包在Windows上效果最佳:
pip install Gooey在Linux上,Gooey可能很难安装。
有关使用粘性GUI进行转换的示例,请参阅 https://youtu.be/THJqRC_q2kY
下载SuperSloMo模型
我们使用优秀的Super SloMo框架来插值APS帧。然而,由于APS帧只记录光强度,我们在灰度图像上对其进行了重新训练。
从Google Drive SuperSloMo39.ckpt(151 MB)下载我们的预训练模型检查点,并将其保存到输入文件夹。--slomo_model参数的默认值设置为此位置。
特别感谢 哲和 恢复检查点文件。
下载示例输入数据
用于尝试v2e的示例输入视频位于google drive上的 v2e-sample-input-data。
下载tennis.mov视频并将其放入输入文件夹中以运行下面的示例。
使用方法
v2e具有多种用途。如果您想将其适应您自己的应用程序,请阅读代码。在这里,我们只介绍从传统视频和特定数据集生成DVS事件的用法。
从传统视频中渲染模拟的DVS事件。
v2e.py读取标准视频(例如.avi、.mp4、.mov或.wmv)或图像文件夹,并以上采样的时间戳分辨率生成模拟的DVS事件。
不要被大量的选择吓倒。运行不带参数的v2e.py会设置合理的值,并打开一个文件浏览器,让您选择输入视频。检查日志输出是否有提示。
提示:注意选项[--dvs128|--dvs240|--dvs346|--dvs640|--advs1024];他们为流行的DVS相机设置输出大小和宽度。
在没有图形输出的无头平台上,使用--no_preview选项来抑制OpenCV窗口。
usage: v2e.py [-h] [-o OUTPUT_FOLDER] [--avi_frame_rate AVI_FRAME_RATE]
[--output_in_place [OUTPUT_IN_PLACE]] [--overwrite]
[--unique_output_folder [UNIQUE_OUTPUT_FOLDER]]
[--skip_video_output]
[--auto_timestamp_resolution [AUTO_TIMESTAMP_RESOLUTION]]
[--timestamp_resolution TIMESTAMP_RESOLUTION]
[--dvs_params DVS_PARAMS] [--pos_thres POS_THRES]
[--neg_thres NEG_THRES] [--sigma_thres SIGMA_THRES]
[--cutoff_hz CUTOFF_HZ] [--leak_rate_hz LEAK_RATE_HZ]
[--shot_noise_rate_hz SHOT_NOISE_RATE_HZ]
[--photoreceptor_noise]
[--leak_jitter_fraction LEAK_JITTER_FRACTION]
[--noise_rate_cov_decades NOISE_RATE_COV_DECADES]
[--refractory_period REFRACTORY_PERIOD]
[--dvs_emulator_seed DVS_EMULATOR_SEED]
[--show_dvs_model_state SHOW_DVS_MODEL_STATE [SHOW_DVS_MODEL_STATE ...]]
[--save_dvs_model_state]
[--record_single_pixel_states RECORD_SINGLE_PIXEL_STATES]
[--output_height OUTPUT_HEIGHT] [--output_width OUTPUT_WIDTH]
[--dvs128 | --dvs240 | --dvs346 | --dvs640 | --dvs1024]
[--disable_slomo] [--slomo_model SLOMO_MODEL]
[--batch_size BATCH_SIZE] [--vid_orig VID_ORIG]
[--vid_slomo VID_SLOMO] [--slomo_stats_plot] [-i INPUT]
[--input_frame_rate INPUT_FRAME_RATE]
[--input_slowmotion_factor INPUT_SLOWMOTION_FACTOR]
[--start_time START_TIME] [--stop_time STOP_TIME] [--crop CROP]
[--hdr] [--synthetic_input SYNTHETIC_INPUT]
[--dvs_exposure DVS_EXPOSURE [DVS_EXPOSURE ...]]
[--dvs_vid DVS_VID] [--dvs_vid_full_scale DVS_VID_FULL_SCALE]
[--no_preview] [--ddd_output] [--dvs_h5 DVS_H5]
[--dvs_aedat2 DVS_AEDAT2] [--dvs_text DVS_TEXT]
[--label_signal_noise] [--cs_lambda_pixels CS_LAMBDA_PIXELS]
[--cs_tau_p_ms CS_TAU_P_MS] [--scidvs]
v2e: generate simulated DVS events from video.
optional arguments:
-h, --help show this help message and exit
Output: General:
-o OUTPUT_FOLDER, --output_folder OUTPUT_FOLDER
folder to store outputs.
--avi_frame_rate AVI_FRAME_RATE
frame rate of output AVI video files; only affects
playback rate.
--output_in_place [OUTPUT_IN_PLACE]
store output files in same folder as source video (in
same folder as frames if using folder of frames).
--overwrite overwrites files in existing folder (checks existence
of non-empty output_folder).
--unique_output_folder [UNIQUE_OUTPUT_FOLDER]
If specifying --output_folder, makes unique output
folder based on output_folder, e.g. output1 (if non-
empty output_folder already exists)
--skip_video_output Skip producing video outputs, including the original
video, SloMo video, and DVS video. This mode also
prevents showing preview of output (cf --no_preview).
DVS timestamp resolution:
--auto_timestamp_resolution [AUTO_TIMESTAMP_RESOLUTION]
(Ignored by --disable_slomo or --synthetic_input.) If
True (default), upsampling_factor is automatically
determined to limit maximum movement between frames to
1 pixel. If False, --timestamp_resolution sets the
upsampling factor for input video. Can be combined
with --timestamp_resolution to ensure DVS events have
at most some resolution.
--timestamp_resolution TIMESTAMP_RESOLUTION
(Ignored by --disable_slomo or --synthetic_input.)
Desired DVS timestamp resolution in seconds;
determines slow motion upsampling factor; the video
will be upsampled from source fps to achieve the at
least this timestamp resolution.I.e. slowdown_factor =
(1/fps)/timestamp_resolution; using a high resolution
e.g. of 1ms will result in slow rendering since it
will force high upsampling ratio. Can be combind with
--auto_timestamp_resolution to limit upsampling to a
maximum limit value.
DVS model:
--dvs_params DVS_PARAMS
Easy optional setting of parameters for DVS
model:None, 'clean', 'noisy'; 'clean' turns off noise,
sets unlimited bandwidth and makes threshold variation
small. 'noisy' sets limited bandwidth and adds leak
events and shot noise.This option by default will
disable user set DVS parameters. To use custom DVS
paramters, use None here.
--pos_thres POS_THRES
threshold in log_e intensity change to trigger a
positive event.
--neg_thres NEG_THRES
threshold in log_e intensity change to trigger a
negative event.
--sigma_thres SIGMA_THRES
1-std deviation threshold variation in log_e intensity
change.
--cutoff_hz CUTOFF_HZ
photoreceptor IIR lowpass filter cutoff-off 3dB
frequency in Hz - see
https://ieeexplore.ieee.org/document/4444573.CAUTION:
See interaction with timestamp_resolution and
auto_timestamp_resolution; check output logger
warnings. The input sample rate (frame rate) must be
fast enough to for accurate IIR lowpass filtering.
--leak_rate_hz LEAK_RATE_HZ
leak event rate per pixel in Hz - see
https://ieeexplore.ieee.org/abstract/document/7962235
--shot_noise_rate_hz SHOT_NOISE_RATE_HZ
Temporal noise rate of ON+OFF events in darkest parts
of scene; reduced in brightest parts.
--photoreceptor_noise
Create temporal noise by injecting Gaussian noise to
the log photoreceptor before lowpass filtering.This
way, more accurate statistics of temporal noise will
tend to result (in particular, alternating ON and OFF
noise events)but the noise rate will only approximate
the desired noise rate; the photoreceptor noise will
be computed to result in the --shot_noise_rate noise
value. Overrides the default shot noise mechanism
reported in 2020 v2e paper.
--leak_jitter_fraction LEAK_JITTER_FRACTION
Jitter of leak noise events relative to the (FPN)
interval, drawn from normal distribution
--noise_rate_cov_decades NOISE_RATE_COV_DECADES
Coefficient of Variation of noise rates (shot and
leak) in log normal distribution decades across pixel
arrayWARNING: currently only in leak events
--refractory_period REFRACTORY_PERIOD
Refractory period in seconds, default is 0.5ms.The new
event will be ignore if the previous event is
triggered less than refractory_period ago.Set to 0 to
disable this feature.
--dvs_emulator_seed DVS_EMULATOR_SEED
Set to a integer >0 to use a fixed random seed.default
is 0 which means the random seed is not fixed.
--show_dvs_model_state SHOW_DVS_MODEL_STATE [SHOW_DVS_MODEL_STATE ...]
One or more space separated list model states. Do not
use '='. E.g. '--show_dvs_model_state all'. Possible
models states are (without quotes) either 'all' or
chosen from dict_keys(['new_frame', 'log_new_frame',
'lp_log_frame', 'scidvs_highpass',
'photoreceptor_noise_arr', 'cs_surround_frame',
'c_minus_s_frame', 'base_log_frame', 'diff_frame'])
--save_dvs_model_state
save the model states that are shown (cf
--show_dvs_model_state) to avi files
--record_single_pixel_states RECORD_SINGLE_PIXEL_STATES
Record internal states of a single pixel specified by
(x,y) tuple to 'pixel-states.dat'.The file is a
pickled binary dict that has the state arrays over
time imcluding a time array.Pixel location can also be
specified as x,y without ()
DVS camera sizes (selecting --dvs346, --dvs640, etc. overrides --output_width and --output_height:
--output_height OUTPUT_HEIGHT
Height of output DVS data in pixels. If None, same as
input video. Use --output_height=260 for Davis346.
--output_width OUTPUT_WIDTH
Width of output DVS data in pixels. If None, same as
input video. Use --output_width=346 for Davis346.
--dvs128 Set size for 128x128 DVS (DVS128)
--dvs240 Set size for 240x180 DVS (DAVIS240)
--dvs346 Set size for 346x260 DVS (DAVIS346)
--dvs640 Set size for 640x480 DVS (DAVIS640)
--dvs1024 Set size for 1024x768 DVS (not supported for AEDAT-2.0
output since there is no jAER DVS1024 camera
SloMo upsampling (see also "DVS timestamp resolution" group):
--disable_slomo Disables slomo interpolation; the output DVS events
will have exactly the timestamp resolution of the
source video (which is perhaps modified by
--input_slowmotion_factor).
--slomo_model SLOMO_MODEL
path of slomo_model checkpoint.
--batch_size BATCH_SIZE
Batch size in frames for SuperSloMo. Batch size 8-16
is recommended if your GPU has sufficient memory.
--vid_orig VID_ORIG Output src video at same rate as slomo video (with
duplicated frames). Specify emtpy string or 'None' to
skip output.
--vid_slomo VID_SLOMO
Output slomo of src video slowed down by
slowdown_factor.Specify emtpy string or 'None' to skip
output.
--slomo_stats_plot show a plot of slomo statistics
Input file handling:
-i INPUT, --input INPUT
Input video file or a image folder; leave empty for
file chooser dialog.If the input is a folder, the
folder should contain a ordered list of image files.In
addition, the user has to set the frame rate manually.
--input_frame_rate INPUT_FRAME_RATE
Either override the video file metadata frame rate or
manually define the video frame rate when the video is
presented as a list of image files. Overrides the
stored (metadata) frame rate of input video. This
option overrides the --input_slowmotion_factor
argument in case the input is from a video file.
--input_slowmotion_factor INPUT_SLOWMOTION_FACTOR
(See --input_frame_rate argument too.) Sets the known slow-motion factor of the input video,
i.e. how much the video is slowed down, i.e.,
the ratio of shooting frame rate to playback frame rate.
input_slowmotion_factor<1 for sped-up video and
input_slowmotion_factor>1 for slowmotion video.
If an input video is shot at 120fps yet is presented as a 30fps video
(has specified playback frame rate of 30Hz,
according to file's FPS setting),
then set --input_slowdown_factor=4.
It means that each input frame represents (1/30)/4 s=(1/120)s.
If input is video with intended frame intervals of
1ms that is in AVI file
with default 30 FPS playback spec,
then use ((1/30)s)*(1000Hz)=33.33333.
--start_time START_TIME
Start at this time in seconds in video. Use None to
start at beginning of source video.
--stop_time STOP_TIME
Stop at this time in seconds in video. Use None to end
at end of source video.
--crop CROP Crop input video by (left, right, top, bottom) pixels.
E.g. CROP=(100,100,0,0) crops 100 pixels from left and
right of input frames. CROP can also be specified as
L,R,T,B without ()
--hdr Treat input video as high dynamic range (HDR)
logarithmic, i.e. skip the linlog conversion step. Use
--hdr for HDR input with floating point gray scale
input videos. Units of log input are based on white
255 pixels have values ln(255)=5.5441
Synthetic input:
--synthetic_input SYNTHETIC_INPUT
Input from class SYNTHETIC_INPUT that has methods
next_frame() and total_frames(). Disables file input
and SuperSloMo frame interpolation and the DVS
timestamp resolution is set by the times returned by
next_frame() method. SYNTHETIC_INPUT.next_frame()
should return a tuple (frame, time) with frame having
the correct resolution (see DVS model arguments) which
is array[y][x] with pixel [0][0] at upper left corner
and pixel values 0-255. The time is a float in
seconds. SYNTHETIC_INPUT must be resolvable from the
classpath. SYNTHETIC_INPUT is the module name without
.py suffix. See example moving_dot.py.
Output: DVS video:
--dvs_exposure DVS_EXPOSURE [DVS_EXPOSURE ...]
Mode to finish DVS frame event integration:
duration time: Use fixed accumulation time in seconds, e.g.
--dvs_exposure duration .005;
count n: Count n events per frame,e.g.
--dvs_exposure count 5000;
area_count M N: frame ends when any area of N x N pixels fills with M events, e.g.
-dvs_exposure area_count 500 64
source: each DVS frame is from one source frame (slomo or original, depending on if slomo is used)
--dvs_vid DVS_VID Output DVS events as AVI video at frame_rate. To
suppress, supply empty argument or 'None'.
--dvs_vid_full_scale DVS_VID_FULL_SCALE
Set full scale event count histogram count for DVS
videos to be this many ON or OFF events for full white
or black.
--no_preview disable preview in cv2 windows for faster processing.
Output: DVS events:
--ddd_output Save frames, frame timestamp and corresponding event
index in HDF5 format used for DDD17 and DDD20
datasets. Default is False.
--dvs_h5 DVS_H5 Output DVS events as hdf5 event database.
--dvs_aedat2 DVS_AEDAT2
Output DVS events as DAVIS346 camera AEDAT-2.0 event
file for jAER; one file for real and one file for v2e
events. To suppress, supply argument None.
--dvs_text DVS_TEXT Output DVS events as text file with one event per line
[timestamp (float s), x, y, polarity (0,1)].
--label_signal_noise append to the --dvs_text file a column,containing list
of signal and shot noise events. Each row of the CSV
appends a 1 for signal and 0 for noise.** Notes: 1:
requires activating --dvs_text option; 2: requires
disabling --photoreceptor_noise option (because when
noise arises from photoreceptor it is impossible to
tell if event was caused by signal or noise.3: Only
labels shot noise events (because leak noise events
arise from leak and cannot be distinguished from
photoreceptor input).
Center-Surround DVS:
--cs_lambda_pixels CS_LAMBDA_PIXELS
space constant of surround in pixels, None to disable.
This space constant lambda is sqrt(1/gR) where g is
the transverse conductance and R is the lateral
resistance.
--cs_tau_p_ms CS_TAU_P_MS
time constant of photoreceptor center of diffuser in
ms, or 0 to disable for instantaneous surround.
Defined as C/g where C is capacitance and g is the
transverse conductance from photoreceptor to
horizontal cell network. This time isthe time constant
for h cell diffuser network response time to global
input to photoreceptors. If set to zero, then the
simulation of diffuser runs until it converges, i.e.
until the maximum change between timesteps is smaller
than a threshold value
SCIDVS pixel:
--scidvs Simulate proposed SCIDVS pixel with nonlinear
adapatation and high gain
Run with no --input to open file dialog
您可以将tennis.mov放入输入文件夹中,使用下面的命令行进行尝试。或者省略所有选项,只使用文件选择器选择电影。
从v2e的根目录运行以下命令
python v2e.py -i input/tennis.mov --overwrite --timestamp_resolution=.003 --auto_timestamp_resolution=False --dvs_exposure duration 0.005 --output_folder=output/tennis --overwrite --pos_thres=.15 --neg_thres=.15 --sigma_thres=0.03 --dvs_aedat2 tennis.aedat --output_width=346 --output_height=260 --stop_time=3 --cutoff_hz=15运行上面的命令,将在名为output/network的文件夹中创建以下文件。
dvs-video.avi
dvs-video-frame_times.txt
tennis.aedat
v2e-args.txt
video_orig.avi
video_slomo.avi
vs-video.avi:dvs视频(播放速率为30Hz),但帧率(dvs时间戳分辨率)由源视频帧率乘以slowddown_factor设置。
dvs-video-frame_times.txt:dvs帧的时间。当使用--dvs_exposure计数或--dvs_exposure面积计数方法时很有用。
tennis.aedat:aedat-2.0文件,用于在jAER中播放和算法实验(使用AEChip Davis346Blue播放此文件。)
v2e-args.txt:运行的所有参数和日志输出。
videoorig.avi:输入视频,但转换为亮度,调整大小以输出(宽度、高度),并具有重复的帧,以便与slomo.avi进行比较。
video_slomo.avi:慢动作视频(播放速率为30Hz),但被slowd_factor减慢了速度。
v2e网站展示了这些视频。
编写v2e脚本
有关从终端运行v2e的shell和cmd脚本的各种示例,请参阅scripts文件夹。
综合输入
python模块的scripts文件夹中也有示例,用于生成v2e的合成输入,例如particles.py
你可以使用命令行选项将粒子指定为生成输入帧以生成DVS事件的类
v2e --synthetic_input scripts.particles ...你的合成输入类应该子类base_synthetic_class.py。你应该重写构造函数和next_frame()方法。
- 有关更多信息,请参阅base_synthetic_input.py。
- 您可以将命令行参数传递到类中;例如,请参见particles.py。
模型参数
DVS ON和OFF阈值标称值由pos_thres和neg_three设置。像素间的变化由sigma_thres设置。像素截止频率(Hz)由cutff_Hz设置。泄漏事件率由leak_rate_hz设置。
-dvs_params参数为高光和低光条件设置合理的dvs模型参数。
有关这些参数的更多信息,请参阅我们的技术论文。
自动与手动DVS时间戳分辨率
输出DVS时间戳将根据所选选项量化为某个值。
- --disable_slomo将禁用slomo插值,DVS事件将具有与输入视频完全相同的时间,可能由--input_slowmotion_factor修改
- --timestamp_resolution=X将根据需要进行上采样,以秒为单位获得所需的时间戳分辨率X。如果设置了auto_timestamp_resolution,则timestamp _resolution仍将设置最小时间戳分辨率,即如果自动时间戳将导致5ms的时间戳,但timestamp _resolve为1ms,则1ms仍将是时间戳分辨率。
- --auto_timestampresolution将在每个-batch_size帧中使用计算出的光流进行上采样,以将每帧的运动限制在最多1个像素。在这种情况下,打开--slomo_stats_plot将生成如下图,该图来自驾驶视频,其中汽车在视频的一部分加速:
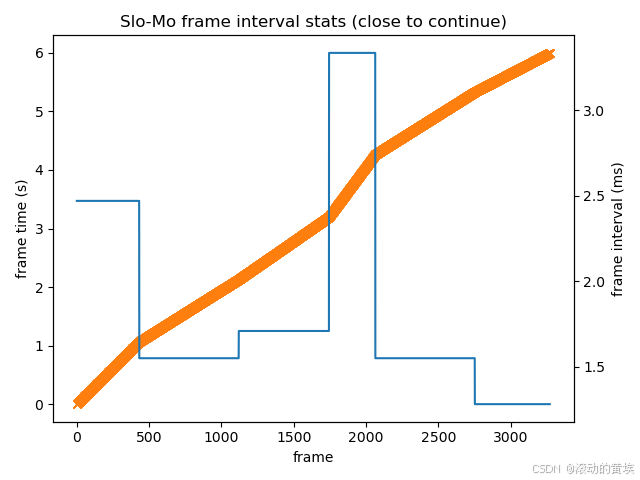
此图显示了插值帧的实际时间戳(橙色)和每批帧的帧间隔(蓝色)。
感光器低通滤波
v2e包括光强度的强度相关的一阶低通滤波;详见论文。如果您设置了一个非零的--cutfffreq_hz,那么采样率必须足够高,以允许IIR低通滤波器正确更新,也就是说,低通滤波器的时间常数tau必须至少是帧间隔的3倍。检查控制台输出是否存在低通滤波采样不足的警告。
v2e中的帧率和DVS时间戳分辨率
v2e中有几种不同的“帧率”。打开输入视频时,v2e读取视频的帧率,并假设视频是实时拍摄的,但如果视频已经是慢动作视频,则可以指定--input_slowmotion_factor-slowdown_factor。将所需的DVS时间戳分辨率与源帧率相结合,以计算慢动作上采样因子。然后使用--DVS曝光方法生成输出DVS AVI视频。
- --avi_frame_rate:只设置播放输出avi文件的帧率
- --dvs暴露:见下一节
- --input_slowmotion_factor:指定输入视频的减速系数。
每个(子)帧多个事件的影响
每当源(或上采样源)视频每帧生成超过1个事件时,这些事件都需要在帧之间的时间上分布。v2e任意堆叠它们,如下面的示例所示,导致事件金字塔和每帧事件的周期性整体爆发。也就是说,v2e首先计算任何像素的最大事件数,然后用这个数字细分帧间间隔,然后将所有有1个事件的像素放在帧上,然后将有2个事件的像素的事件放在第一个子间隔上,以此类推。为了减少这种影响,使用较小的时间戳分辨率。
DVS帧曝光模式
DVS允许任意帧率。 v2e提供了3种“曝光”DVS视频帧的方法,这些方法由 --dvs_exposure 参数选择:
1、恒定持续时间(Constant-Duration):--dvs_exposure duration T:-每帧具有恒定持续时间T。
2、常数计数(Const-Count):--dvs_exposure_count N:-每一帧都有相同数量的dvs事件,如Delbruck,Tobi.2008中首次描述的那样。“无帧动态数字视觉”,载于《国际研讨会论文集》。关于安全生活电子,高级电子产品促进优质生活和社会,1:21-26。日本东京:东京。
https://drive.google.com/open?id=0BzvXOhBHjRheTS1rSVlZN0l2MDg
3、区域事件(Area-Event):--dvs_exposure Area_Event N M:-帧被累积,直到任何MxM像素块被N个事件填满,如Liu、Min和T.Delbruck首次描述的那样。2018.“动态视觉传感器的自适应时间片块匹配光流算法”,发表于《英国机器视觉会议论文集》(BMVC 2018)。英国泰恩河畔纽卡斯尔:BMVC 2018会议记录。https://doi.org/10.5167/uzh-168589
4、源(Source):--dvs_exposure source:dvs时间戳基于源视频时间戳。每帧的额外事件根据该帧的最大事件数在帧之间间隔。
- 恒定持续时间类似于普通视频,即以规则的、理想的奈奎斯特速率采样。
- 恒定计数帧每帧具有相同数量的像素亮度变化事件。但是,如果场景的纹理非常丰富(即繁忙),那么帧可能会变得非常短暂,而只有一个小对象移动的输入部分可能会有很长的帧。
- 区域事件通过在任何像素块以恒定计数填充时结束曝光,在一定程度上补偿了这种影响。
DAVIS相机转换数据集
v2e可以转换DDD20和原始DDD17的记录,这是第一个使用DAVIS事件+帧相机的汽车驾驶端到端公共训练数据集。它允许您将真实的DVS数据与转换进行比较。该数据集由神经信息学研究所的传感器研究小组维护。
为了您的方便,我们通过谷歌硬盘提供来自DDD20(我们较新的DDD数据集)的洛杉矶街头驾驶800秒的记录。该文件位于Google Drive中的aug04/rec1501902136.hdf5[link],供您使用v2e进行尝试(警告:2GB 7z压缩,5.4 GB未压缩)。
mkdir -p input
mv rec1501902136.hdf5 ./input注意:您必须使用-m package.script.py符号运行这些脚本,而不是直接指向.py文件。
从DDD记录中提取数据
ddd_h5_extract_data.py 将ddd记录的DVS事件提取到jAER .aedat 和video .avi 文件中。
jAER
用于地址事件表示(Address-Event Representation AER)神经形态处理的Java工具。
ddd_extract_data.py -h
usage: ddd_extract_data.py [-h] [-i INPUT] -o OUTPUT_FOLDER [--start_time START_TIME] [--stop_time STOP_TIME] [--rotate180] [--overwrite] [--dvs240] [--dvs346]

Extract data from DDD recording

optional arguments:
  -h, --help            show this help message and exit
  -i INPUT, --input INPUT
                        input video file; leave empty for file chooser dialog (default: None)
  -o OUTPUT_FOLDER, --output_folder OUTPUT_FOLDER
                        folder to store outputs (default: None)
  --start_time START_TIME
                        start at this time in seconds in video (default: None)
  --stop_time STOP_TIME
                        stop point of video stream (default: None)
  --rotate180           rotate output 180 deg (default: False)
  --overwrite           overwrites files in existing folder (checks existance of non-empty output_folder) (default: False)
  --dvs240              Set size for 240x180 DVS (Davis240). Use for DDD17 recording. (default: False)
  --dvs346              Set size for 346x260 DVS (Davis346). Use for DDD20 recording. (default: False)

Run with no --input to open file dialog
然后,您可以从生成的DDD APS video .avi文件中合成事件,并将其与提取到AEDAT-2.0文件中的真实事件进行比较。
使用JER DAVIS录音
像记录DDD17和DDD20的DAVIS相机通常与jAER一起使用(尽管DDD记录是用caer周围的自定义python包装器制作的)。v2e将输出jAER使用的aedat-2.0 format的jAER兼容.aedat文件。
要使用现有的jAER DAVIS.aedat,您可以使用jAER EventFilter DavisFrameAVIWriter导出DAVIS APS帧;请参阅jAER用户指南,特别是关于使用DavisFrameAVIWriter的部分。在DavisFrameAVIWriter中,不要忘记将帧率设置为DAVIS帧的实际帧率(您可以在jAER显示的顶部看到)。这将使转换具有大约正确的DVS事件定时。(如果DVS事件太多,jAER可以丢弃APS帧,所以不要指望这一点。)一旦你从jAER获得了AVI,你就可以用v2e.py从中生成v2e事件,并通过在jAER中播放导出的v2e.aedat文件来查看它们与jAER的原始DVS事件的比较。
v2e主页上展示了这种转换和比较的示例。
技术细节
请参阅v2e主页。


 1820
1820

 被折叠的 条评论
为什么被折叠?
被折叠的 条评论
为什么被折叠?
 到【灌水乐园】发言


