


对于Cardboard的介绍终于到了最终篇,感谢一路走来的你们!!
下一个阶段会推出一些示例demo,网上关于unity VR的demo很少,学习的资源也很贫乏,很多东西仍然需要自己钻研琢磨。
开始今天的主题。
最后部分来到的是人与虚拟世界的互动环节,分为了两部分,关于head tracking实现的技术比较复杂,涉及到Android高级传感器编程,所以对于头部跟踪这里只进行综述以及对其他交互技术的介绍。重点落在后者(Gaze)上面。
一、头部跟踪技术
Cardboard将头部跟踪数据的调取实现细节封装了,只提供一个Get HeadPose()来返回一个位置数组,然后对位置数组进行处理。
之前看到过一篇介绍android四元数的文章,有兴趣的同学可以仔细研究一下头部跟踪技术以及android端是怎么实现的:
http://blog.csdn.net/d_uanrock/article/details/50502840
介绍现有的一些交互技术:
眼球追踪:
http://v.youku.com/v_show/id_XMTY4NDE4Mjg0MA==.html
通过眼部运动来旋转一个地球。
http://v.youku.com/v_show/id_XMTY4NDE3ODQ0NA==.html
通过眼部运动操作一些图片。
手柄控制:
比较原始的方法,也是现在普遍采用的。
空间手势识别:
leap motion(这个强烈推荐!!!将会代替手柄的下一代技术,震撼感很强)
二、Gaze的实现
Gaze英译是凝视,它代表了一个不需要其他输入设备的一个输入,我们一般将Gaze点取在屏幕的中央,当Gaze点位于某控件上方一定时间时,会触发事件(比如说Gaze位于Button上方超过了0.1s,触发了按下按钮的事件),这样的Gaze,实际上是代替了眼球运动和手势运动的一种简化版输入,当我们在使用手机VR的时候,不能通过一个touch来操作屏幕,也没有很多高端的技术提供外部的输入,那怎么去和虚拟世界发生交互呢?显然,只能通过一个Gaze。
但是,触发事件的方式可以是多种多样的,可以是超过一定时间触发,也可以是手柄触发,等等。
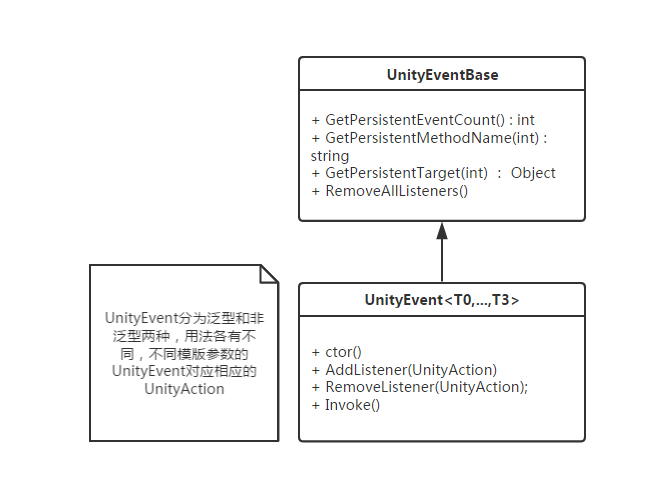
Cardboard实现Gaze的方式不能说简单,但是对于熟悉Unity的同学来说也并不很复杂,在介绍Gaze的基础上,我们需要知道Unity的事件系统。
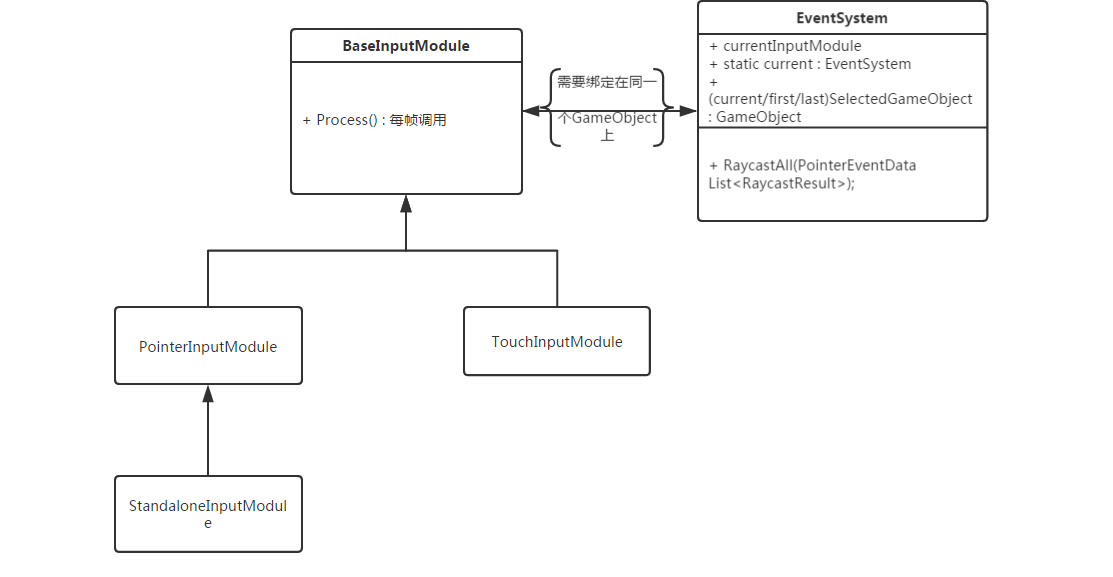
首先介绍的是BaseInputModule这个类,它是Unity当中所有输入模块的基类,而且是Unity事件系统的组件,我们见的比较多的比如说TouchInputModule等都继承自它,平时我们用的会比较少因为手游的话,一些已有的模块已经足够我们使用,但是在这里,我们还需要外部的拓展模块来提供输入,所以需要将新建的类继承自它。
BaseInputModule当中有不少的方法需要去重写,我们重写的函数大概有这些:
ShouldActivateModule()
DeactivateModule()
IsPointerOverGameObject(int pointerId)
Process()
每一个函数有什么作用我们后面再介绍。
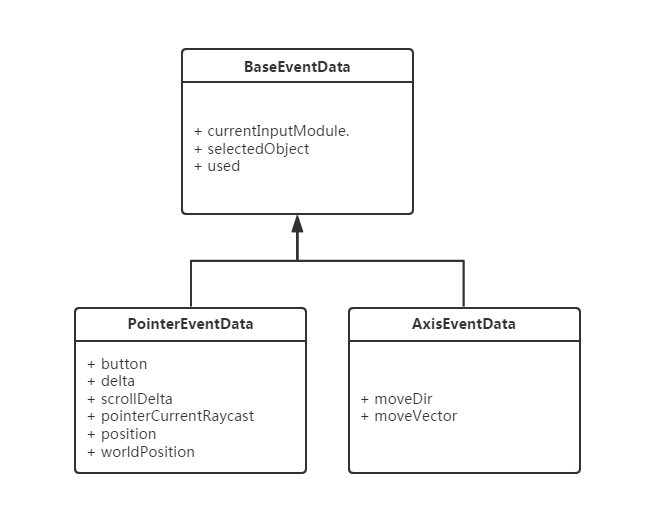
PointerEventData这个类存储着每一次点击事件的信息,它存储着一系列变量,譬如变量button(每一次点击button时触发),click count在触发时点击的次数,click time两次点击的时间间隔,position存储点击位置等...具体就不介绍了,我们只需要知道PointerEventData这个类支持InputModel,它给每一个Input提供数据。
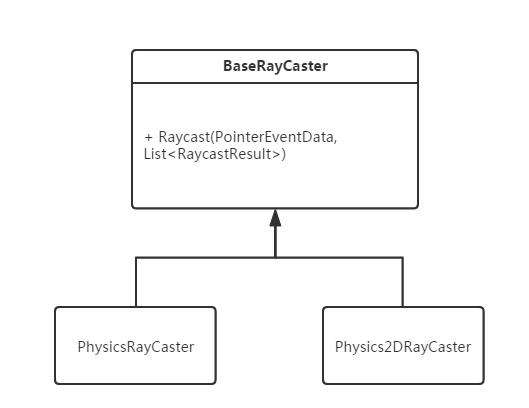
除此之外,触发事件当然少不了Raycast,Unity的射线系统是每一个使用过Unity的人都会烂熟于心的,射线将我们在屏幕上的touch对应到3D场景中的GameObject,所以只要涉及到了物体触发事件,就必然有Raycast的过程(甚至GUI的事件也会用射线)。
/******************************************************************************************************************************************/
using UnityEngine;
using UnityEngine.EventSystems;

public class GazeInputModule : BaseInputModule {
  [Tooltip("Whether gaze input is active in VR Mode only (true), or all the time (false).")]
  public bool vrModeOnly = false;

  [Tooltip("Optional object to place at raycast intersections as a 3D cursor. " +
           "Be sure it is on a layer that raycasts will ignore.")]
  public GameObject cursor;

  // Time in seconds between the pointer down and up events sent by a magnet click.
  // Allows time for the UI elements to make their state transitions.
  [HideInInspector]
  public float clickTime = 0.1f;  // Based on default time for a button to animate to Pressed.

  // The pixel through which to cast rays, in viewport coordinates.  Generally, the center
  // pixel is best, assuming a monoscopic camera is selected as the Canvas' event camera.
  [HideInInspector]
  public Vector2 hotspot = new Vector2(0.5f, 0.5f);

  private PointerEventData pointerData;

  public override bool ShouldActivateModule() {
    if (!base.ShouldActivateModule()) {
      return false;
    }
    return Cardboard.SDK.VRModeEnabled || !vrModeOnly;
  }

  public override void DeactivateModule() {
    base.DeactivateModule();
    if (pointerData != null) {
      HandlePendingClick();
      HandlePointerExitAndEnter(pointerData, null);
      pointerData = null;
    }
    eventSystem.SetSelectedGameObject(null, GetBaseEventData());
    if (cursor != null) {
      cursor.SetActive(false);
    }
  }

  public override bool IsPointerOverGameObject(int pointerId) {
    return pointerData != null && pointerData.pointerEnter != null;
  }

  public override void Process() {
    CastRayFromGaze();
    UpdateCurrentObject();
    PlaceCursor();
    HandlePendingClick();
    HandleTrigger();
  }

  private void CastRayFromGaze() {
    if (pointerData == null) {
      pointerData = new PointerEventData(eventSystem);
    }
    pointerData.Reset();
    pointerData.position = new Vector2(hotspot.x * Screen.width, hotspot.y * Screen.height);
    eventSystem.RaycastAll(pointerData, m_RaycastResultCache);
    pointerData.pointerCurrentRaycast = FindFirstRaycast(m_RaycastResultCache);
    m_RaycastResultCache.Clear();
  }

  private void UpdateCurrentObject() {
    // Send enter events and update the highlight.
    var go = pointerData.pointerCurrentRaycast.gameObject;
    HandlePointerExitAndEnter(pointerData, go);
    // Update the current selection, or clear if it is no longer the current object.
    var selected = ExecuteEvents.GetEventHandler<ISelectHandler>(go);
    if (selected == eventSystem.currentSelectedGameObject) {
      ExecuteEvents.Execute(eventSystem.currentSelectedGameObject, GetBaseEventData(),
                            ExecuteEvents.updateSelectedHandler);
    }
    else {
      eventSystem.SetSelectedGameObject(null, pointerData);
    }
  }

  private void PlaceCursor() {
    if (cursor == null)
      return;
    var go = pointerData.pointerCurrentRaycast.gameObject;
    cursor.SetActive(go != null);
    if (cursor.activeInHierarchy) {
      Camera cam = pointerData.enterEventCamera;
      // Note: rays through screen start at near clipping plane.
      float dist = pointerData.pointerCurrentRaycast.distance + cam.nearClipPlane;
      cursor.transform.position = cam.transform.position + cam.transform.forward * dist;
    }
  }

  private void HandlePendingClick() {
    if (!pointerData.eligibleForClick || !Cardboard.SDK.Triggered
        && Time.unscaledTime - pointerData.clickTime < clickTime) {
      return;
    }

    // Send pointer up and click events.
    ExecuteEvents.Execute(pointerData.pointerPress, pointerData, ExecuteEvents.pointerUpHandler);
    ExecuteEvents.Execute(pointerData.pointerPress, pointerData, ExecuteEvents.pointerClickHandler);

    // Clear the click state.
    pointerData.pointerPress = null;
    pointerData.rawPointerPress = null;
    pointerData.eligibleForClick = false;
    pointerData.clickCount = 0;
  }

  private void HandleTrigger() {
    if (!Cardboard.SDK.Triggered) {
      return;
    }
    var go = pointerData.pointerCurrentRaycast.gameObject;

    // Send pointer down event.
    pointerData.pressPosition = pointerData.position;
    pointerData.pointerPressRaycast = pointerData.pointerCurrentRaycast;
    pointerData.pointerPress =
        ExecuteEvents.ExecuteHierarchy(go, pointerData, ExecuteEvents.pointerDownHandler)
        ?? ExecuteEvents.GetEventHandler<IPointerClickHandler>(go);

    // Save the pending click state.
    pointerData.rawPointerPress = go;
    pointerData.eligibleForClick = true;
    pointerData.clickCount = 1;
    pointerData.clickTime = Time.unscaledTime;
  }
}
脚本开始还是注释了一些供用户使用的量:
public bool vrModeOnly = false;
//"Whether gaze input is active in VR Mode only (true), or all the time (false)."
gaze的输入是否在非VR模式当中有效,默认是false,即在非VR模式当中gaze也是有效的。
public GameObject cursor;
//Optional object to place at raycast intersections as a 3D cursor.Be sure it is on a layer that raycasts will ignore.
在射线交汇点放置的可见3D物体,注意射线在某一层是否会碰撞。这个东西是一个object,也就是我们能看到它。
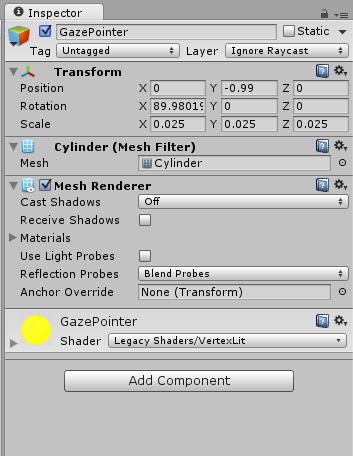
在Inspector界面中,看到这是一个圆柱体,颜色是黄色,这个就是在gaze停留在控件上时,显示的样式。
我们把gaze停留在正方体上,发现中央出现了一个小黄点,GazePointer的active属性处于enable的状态,也就是物体被激活,我们可以看见它。
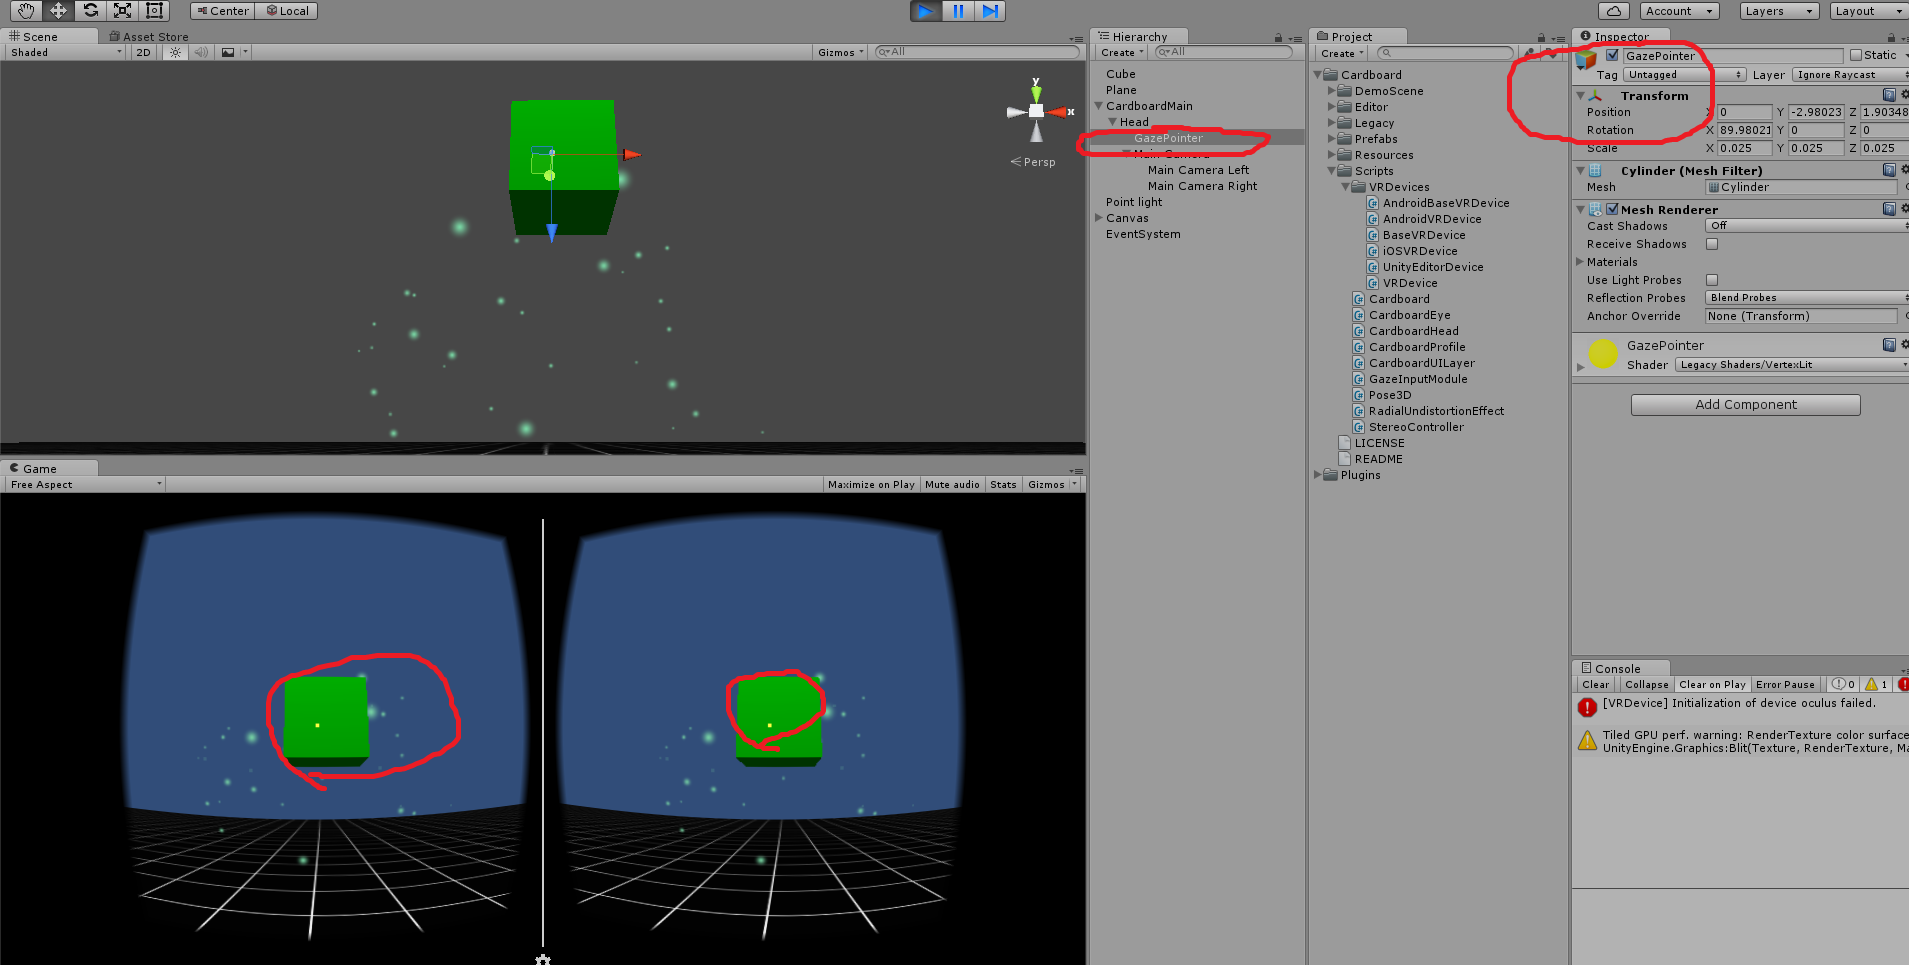
同样gaze停留在地面上时,也是可见的。

但是当gaze停留在天空盒处时(这里没有天空盒,相当于蓝色的背景),物体没有激活,是不可见的
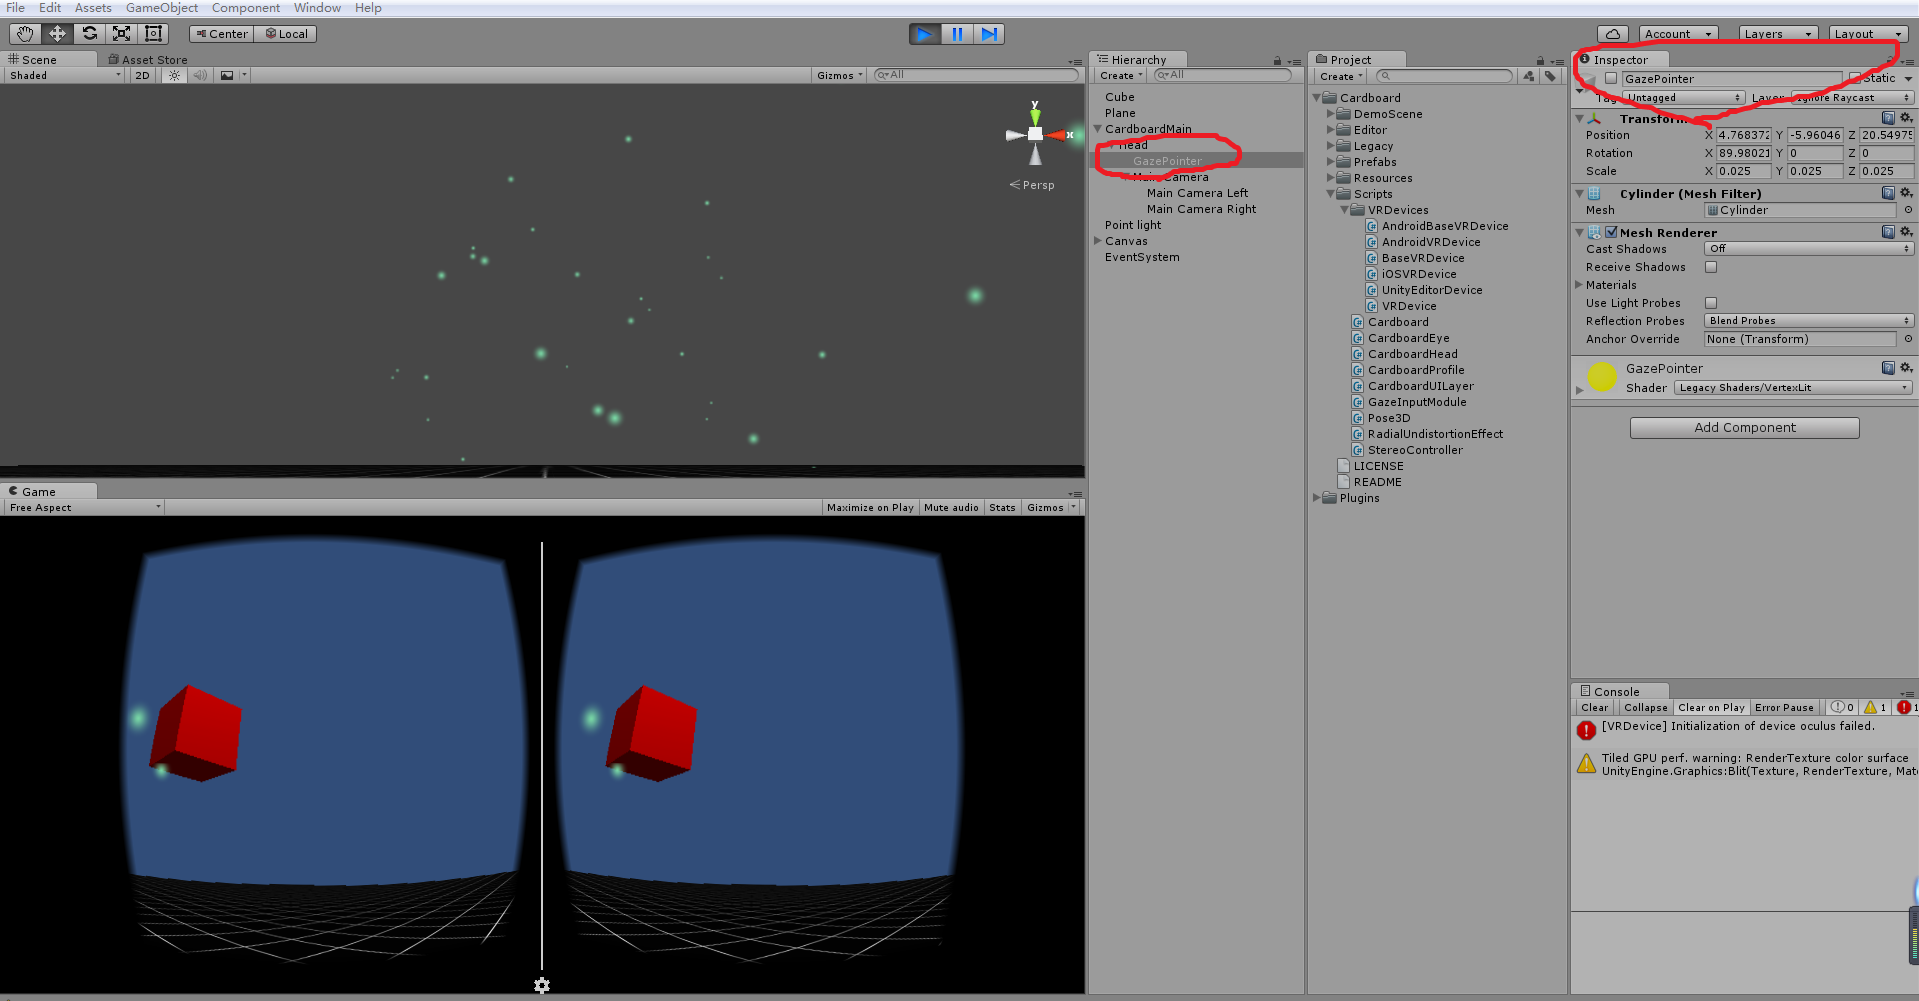
这就是Cardboard当中gaze的大概使用方法。
OK,简要的介绍做完了,再让我们回到脚本。
我们又定义了两个非用户级的变量:
public float clickTime = 0.1f;在点击事件中控制点击时间
public Vector2 hotspot = new Vector2(0.5f, 0.5f);这个变量表示我们的gaze在viewport上的位置,默认是在屏幕的中心
接下来是函数ShouldActivateModule()的重写,此函数用于判断该输入模块是否被激活,我们需要引入变量vrModeOnly用以判断是否模块应该激活
函数DeactivateModule()的重写,此模块被关闭时调用,之所以要重写,是因为我们要在关闭Gaze的时候依然需要能触发点击事件
函数IsPointerOverGameObject(int pointerId)的重写,用来判断point的位置是否在含有eventsystem组件的物体上
函数Process()的重写,此函数是核心函数,它每一帧都会被执行。接下来我们重点分析一下这个函数。
public override void Process() {
CastRayFromGaze();
UpdateCurrentObject();
PlaceCursor();
HandlePendingClick();
HandleTrigger();
}
第一步CastRayFromGaze();所做的操作是实例化了一个PointerEventData型的对象,然后我们将position属性赋值,在当前情形下,点击的position就是屏幕的中心点
pointerData.position = new Vector2(hotspot.x * Screen.width, hotspot.y * Screen.height);
然后进行Raycasr,返回了与之碰撞的n个物体,存在一个List中,这里我们只需要第一个碰撞的物体
pointerData.pointerCurrentRaycast = FindFirstRaycast(m_RaycastResultCache);
第二步UpdateCurrentObject();得到射线碰撞物体
var go = pointerData.pointerCurrentRaycast.gameObject;
后面的操作实现了gaze进出物体时,物体能检测到并且做出相应的变化,如我们的demo中就是gaze的进出会带来正方体颜色的变化
第三步PlaceCursor();就是要放置我们的黄色圆点了,具体放在什么位置脚本用了如下的方法
Camera cam = pointerData.enterEventCamera;
float dist = pointerData.pointerCurrentRaycast.distance + cam.nearClipPlane;
cursor.transform.position = cam.transform.position + cam.transform.forward * dist;
就是通过camera的近裁面距离与到碰撞点的距离求和,来获得camera到positon的距离。这种方法在此环境下确实很方便。
第四步HandlePendingClick();HandleTrigger();就是处理点击事件了,只是对PointerEventData数据赋值,然后进行Raycast,其过程并不复杂。


 2673
2673

 被折叠的 条评论
为什么被折叠?
被折叠的 条评论
为什么被折叠?
 到【灌水乐园】发言


