


Ubuntu进程奔溃自启动管理supervisor
root 用户安装
// Install the supervisor
sudo apt-get install supervisor
使用方法
cd /etc/supervisor/conf.d/
进入/etc/supervisor/conf.d/目录后,创建应用进程配置文件.conf。
touch myApp.conf
添加配置内容:
[program:myApp]
command=python3 -u myApp.py   ; 要执行的命令
numprocs=1                    ; 启动1个进程
directory=/home/xxx/          ; myApp.py所在的目录
autostart=true                ; 自动运行
autorestart=true              ; myApp.py程序奔溃,自动重启
startretries=10               ; 最多重启次数
startsecs=3					  ; 判定myApp运行成功的时间
exitcodes=0                   ; 正常退出代码
stopsignal=KILL               ; kill进程的信号(参看Supervisor官网)
stopwaitsecs=10               ; stopsignal的等待时间
redirect_stderr=true          ; 重定向stderr到stdout,等于执行program 2>&1
stdout_logfile=/home/xxx/logfile.log       ; 指定日志文件
注释
-
stopsignal 可以是任意一个参数如 TERM, HUP, INT, QUIT, KILL, USR1, o或者USR2.
-
startsecs (The total number of seconds which the program needs to stay running after a startup to consider the start successful) 即: supervisor判定myApp运行成功的时间
至此,root用户的设置部分介绍完了。
Supervisor常用命令
启动myApp进程: $supervisorctl start myApp
重启myApp进程: $supervisorctl restart myApp
停止所有进程: $supervisorctl stop all
$supervisorctl reload
$ supervisorctl reread
$supervisorctl update
supervisor日志文件的目录: /var/log/supervisor/supervisord.log
windows端口映射
添加端口映射
netsh interface portproxy add v4tov4 listenport=[win10端口] listenaddress=0.0.0.0 connectport=[wsl端口] connectaddress=[wsl的ip地址] protocol=tcp(这部分可以不写,默认tcp协议)
比如映射8888端口到wsl的8888端口
netsh interface portproxy add v4tov4 listenport=8888 listenaddress=0.0.0.0 connectport=8888 connectaddress=xxxx
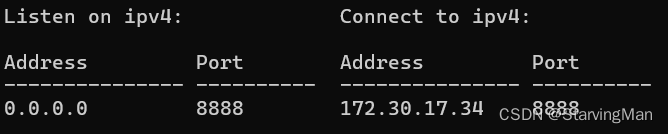
显示所有已经映射的端口
netsh interface portproxy show all
删除某个已经映射的端口
netsh interface portproxy delete v4tov4 listenport=8888 listenaddress=0.0.0.0
设置某个端口映射
netsh interface portproxy set v4tov4 listenport=8888 listenaddress=0.0.0.0 connectport=8888 connectaddress=xxxx
非root用户supervisor安装和设置
激活某个conda环境后,再运行如下
// Install the supervisor
pip install supervisor
生成配置文件
echo_supervisord_conf > 需要指定的绝对路径/supervisord.conf
修改生成的配置文件,找到include这一行
[include]
files=xxx/conf.d/*.conf

如要修改日志文件存放地址,可以从如下位置找到
[supervisord]
进入xxx/conf.d/目录后,创建应用进程配置文件.conf。
touch myApp.conf
添加配置内容:
[program:myApp]
command=bash myApp.sh   ; 要执行的命令
numprocs=1                    ; 启动1个进程
directory=/home/xxx/          ; myApp.py所在的目录
autostart=true                ; 自动运行
autorestart=true              ; myApp.py程序奔溃,自动重启
startretries=10               ; 最多重启次数
startsecs=3					  ; 判定myApp运行成功的时间
exitcodes=0                   ; 正常退出代码
stopsignal=KILL               ; kill进程的信号(参看Supervisor官网)
stopwaitsecs=10               ; stopsignal的等待时间
redirect_stderr=true          ; 重定向stderr到stdout,等于执行program 2>&1
stdout_logfile=/home/xxx/logfile.log       ; 指定日志文件
运行程序
supervisord -c /xxxx/supervisord.conf
或者
supervisord -c /xxxx/supervisord.conf reload
启动对应的服务
supervisorctl status
supervisorctl start myApp
supervisorctl restart myApp


 1415
1415


 被折叠的 条评论
为什么被折叠?
被折叠的 条评论
为什么被折叠?
 到【灌水乐园】发言


