


其实是鞭策chatGPT写的
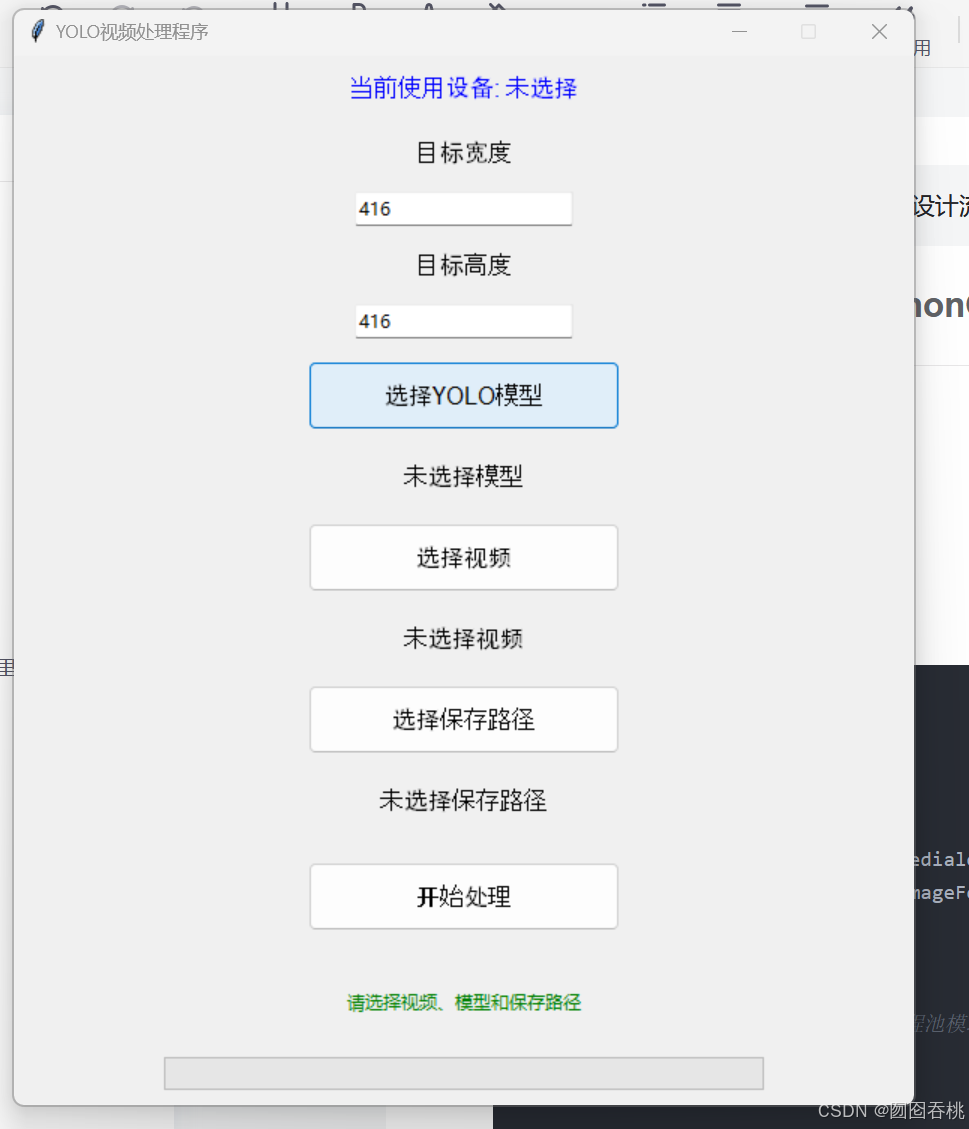
功能简介:
1.可以自动检测计算机上有无配置CUDA,如果没有,则使用CPU
2.使用CUDA或CPU并行处理,加快执行速度
3.使用pillow绘制边框,不同类型边框颜色具有其独特性
功能说明:
1.目标宽度和目标高度是使用yolov11训练图像时,限定的传入的宽度和高度,也就是
model.train()这个函数下的imgsz参数,通常为640或416,使用640则输入宽度和高度同为640,416类似。
代码:
代码如下,如果喜欢就麻烦点个赞
# 这个是最终版

import cv2
import numpy as np
from ultralytics import YOLO
from tkinter import Tk, Button, filedialog, Label, Entry, ttk
from PIL import Image, ImageDraw, ImageFont
import threading
import torch
import os
import concurrent.futures  # 引入线程池模块
import hashlib
from time import time

# 设置最大线程数
max_threads = os.cpu_count()  # 获取系统的最大线程数
torch.set_num_threads(max_threads)  # 设置PyTorch使用的线程数
os.environ["OMP_NUM_THREADS"] = str(max_threads)  # 设置OpenMP使用的线程数

# 设置CUDA优化
torch.backends.cudnn.benchmark = True  # 优化计算,对于固定输入大小的模型
torch.backends.cudnn.deterministic = False  # 非确定性模式,优化性能

# 创建GUI窗口
root = Tk()
root.title("YOLO视频处理程序")
root.geometry("600x700")
root.resizable(False, False)

# 设置背景色和字体
root.configure(bg="#f0f0f0")

style = ttk.Style()
style.configure("TButton", font=("Arial", 12), width=20, padding=10)
style.configure("TLabel", font=("Arial", 12), padding=5)
style.configure("TEntry", font=("Arial", 12), width=30)
style.configure("TProgressbar", thickness=30)

# 全局变量
video_path = None
model_path = None
output_path = None
target_width = 416
target_height = 416

# 创建进度条
progress = ttk.Progressbar(root, length=400, mode='determinate', maximum=100)
progress.pack(side="bottom", pady=10)

# 加载YOLO模型
def load_model():
    global model_path
    model_path = filedialog.askopenfilename(title="选择模型文件", filetypes=[("PT files", "*.pt")])
    if model_path:
        model_label.config(text=f"选择的模型: {model_path.split('/')[-1]}")
    else:
        model_label.config(text="未选择模型")

# 选择视频文件
def choose_video():
    global video_path
    video_path = filedialog.askopenfilename(title="选择视频文件", filetypes=[("MP4 files", "*.mp4")])
    if video_path:
        video_label.config(text=f"选择的视频: {video_path.split('/')[-1]}")
    else:
        video_label.config(text="未选择视频")

# 选择输出文件保存路径
def choose_output():
    global output_path
    output_path = filedialog.asksaveasfilename(defaultextension=".mp4", filetypes=[("MP4 files", "*.mp4")])
    if output_path:
        output_label.config(text=f"保存路径: {output_path}")
    else:
        output_label.config(text="未选择保存路径")

# 生成基于类别标签的颜色
def generate_color(label):
    # 使用MD5哈希生成一个固定的颜色
    hash_object = hashlib.md5(label.encode())
    hash_value = hash_object.hexdigest()

    # 提取MD5的前6个字符并转换为RGB
    r = int(hash_value[:2], 16)
    g = int(hash_value[2:4], 16)
    b = int(hash_value[4:6], 16)

    # 增强颜色的鲜艳程度,通过增大RGB分量来提高亮度
    # 保证RGB值在 180-255 范围内,这样可以确保颜色较鲜明
    r = min(255, max(180, r + 50))  # 增加红色分量,确保它足够鲜艳
    g = min(255, max(180, g + 50))  # 增加绿色分量
    b = min(255, max(180, b + 50))  # 增加蓝色分量

    return (r, g, b)

# 并行处理每一帧
def process_frame(frame, model, device, width, height, target_width, target_height):
    original_frame = frame.copy()
    frame_resized = cv2.resize(frame, (target_width, target_height))

    # 使用 YOLO 进行对象检测
    results = model(frame_resized)

    # 获取检测框和标签信息
    boxes = results[0].boxes
    labels = results[0].names  # 分类标签
    confs = boxes.conf  # 检测置信度

    # 将检测框的坐标按比例映射回原始图像的大小
    for i, box in enumerate(boxes.xyxy):  # 遍历每个检测框
        # 获取YOLO输出框的坐标 (xyxy: [x1, y1, x2, y2])
        x1, y1, x2, y2 = box

        # 缩放回到原始尺寸
        x1 = int(x1 * width / target_width)
        y1 = int(y1 * height / target_height)
        x2 = int(x2 * width / target_width)
        y2 = int(y2 * height / target_height)

        # 防止框超出图像边界
        x1 = max(0, x1)
        y1 = max(0, y1)
        x2 = min(width, x2)
        y2 = min(height, y2)

        # 获取类别标签和置信度
        label = f"{labels[int(boxes.cls[i])]} {confs[i]:.2f}"

        # 根据类别标签生成颜色
        color = generate_color(labels[int(boxes.cls[i])])

        # 绘制检测框
        cv2.rectangle(original_frame, (x1, y1), (x2, y2), color, 2)  # 使用类别颜色绘制框

        # 将文本绘制在框的上方
        original_frame = draw_text_with_chinese(original_frame, label, (x1, y1 - 30), color)  # 使用类别颜色绘制文本

    return original_frame

# 使用Pillow加载字体(这里假设您的系统中有中文字体文件)
def draw_text_with_chinese(frame, text, position, color, font_path="C:\\Windows\\Fonts\\simhei.ttf", font_size=20):
    # 使用Pillow创建Image对象
    pil_img = Image.fromarray(frame)
    draw = ImageDraw.Draw(pil_img)

    # 加载中文字体
    font = ImageFont.truetype(font_path, font_size)

    # 在图像上绘制文本
    x, y = position
    draw.text((x, y), text, font=font, fill=color)

    # 将Pillow Image对象转换回OpenCV格式
    return np.array(pil_img)

# 在 GUI 初始化时定义 device_label
device_label = Label(root, text="当前使用设备: 未选择", fg="blue", font=("Arial", 12))
device_label.pack(pady=10)

# 执行视频处理任务(此函数将用于线程)
def process_video_task():
    global target_width, target_height
    target_width = int(target_width_entry.get())  # 获取用户输入的宽度
    target_height = int(target_height_entry.get())  # 获取用户输入的高度

    if not video_path or not model_path or not output_path:
        status_label.config(text="请选择视频、模型和保存路径")
        return

    # 检测是否支持 CUDA
    device = 'cuda' if torch.cuda.is_available() else 'cpu'
    device_label.config(text=f"当前使用设备: {device.upper()}")

    # 每个线程加载自己的模型
    model = YOLO(model_path).to(device)
    model.eval()  # 将模型设置为评估模式
    model.fuse()  # 手动融合模型

    # 打开视频文件
    cap = cv2.VideoCapture(video_path)

    # 获取视频的帧率和尺寸
    fps = cap.get(cv2.CAP_PROP_FPS)
    width = int(cap.get(cv2.CAP_PROP_FRAME_WIDTH))
    height = int(cap.get(cv2.CAP_PROP_FRAME_HEIGHT))

    # 输出标记视频文件
    fourcc = cv2.VideoWriter_fourcc(*"mp4v")
    out = cv2.VideoWriter(output_path, fourcc, fps, (width, height))  # 输出视频尺寸与原视频一致

    # 获取视频总帧数以便设置进度条最大值
    total_frames = int(cap.get(cv2.CAP_PROP_FRAME_COUNT))
    progress['maximum'] = total_frames

    # 使用线程池并行处理每一帧
    with concurrent.futures.ThreadPoolExecutor(max_workers=max_threads) as executor:
        futures = []
        frame_count = 0
        start_time = time()

        while True:
            ret, frame = cap.read()
            if not ret:
                break  # 如果视频结束,退出循环

            futures.append(executor.submit(process_frame, frame, model, device, width, height, target_width, target_height))

            # 等待某一帧完成,写入文件
            if len(futures) >= 10:  # 限制最大并行帧数
                result_frame = futures.pop(0).result()
                out.write(result_frame)
                frame_count += 1
                progress['value'] = frame_count
                root.update_idletasks()  # 更新GUI,以便进度条能实时显示

        # 写入剩余的帧
        for future in futures:
            result_frame = future.result()
            out.write(result_frame)
            frame_count += 1
            progress['value'] = frame_count
            root.update_idletasks()

        end_time = time()
        status_label.config(text=f"处理完成,耗时: {end_time - start_time:.2f}秒")

    # 释放资源
    cap.release()
    out.release()

# 开始处理视频
def start_processing():
    status_label.config(text="处理中,请稍候...")
    threading.Thread(target=process_video_task).start()

# 选择目标宽度和高度
target_width_label = ttk.Label(root, text="目标宽度")
target_width_label.pack(pady=5)

target_width_entry = ttk.Entry(root)
target_width_entry.insert(0, "416")  # 默认值
target_width_entry.pack(pady=5)

target_height_label = ttk.Label(root, text="目标高度")
target_height_label.pack(pady=5)

target_height_entry = ttk.Entry(root)
target_height_entry.insert(0, "416")  # 默认值
target_height_entry.pack(pady=5)

# 模型和视频选择界面
model_button = ttk.Button(root, text="选择YOLO模型", command=load_model)
model_button.pack(pady=10)

model_label = ttk.Label(root, text="未选择模型")
model_label.pack(pady=5)

video_button = ttk.Button(root, text="选择视频", command=choose_video)
video_button.pack(pady=10)

video_label = ttk.Label(root, text="未选择视频")
video_label.pack(pady=5)

output_button = ttk.Button(root, text="选择保存路径", command=choose_output)
output_button.pack(pady=10)

output_label = ttk.Label(root, text="未选择保存路径")
output_label.pack(pady=5)

# 开始处理按钮
start_button = ttk.Button(root, text="开始处理", command=start_processing)
start_button.pack(pady=20)

# 状态栏
status_label = Label(root, text="请选择视频、模型和保存路径", fg="green")
status_label.pack(pady=20)

# 启动GUI主循环
root.mainloop()


 8339
8339

 被折叠的 条评论
为什么被折叠?
被折叠的 条评论
为什么被折叠?
 到【灌水乐园】发言


