


文章目录
- PyTorch中的常用操作
- 序号001
- torchTensor.item()
- A.numel()=a, B.numel()=b, 已知a>b, 从A中随机采样b个元素赋值给B, 方法是对索引0~a-1随机排序后取前b个, 即:
- 打印输出 list[5Tensor] 中Tensor的shape
- torch.nonzero(..., as_tuple=False).squeeze(1)的使用
- 找出Tensor中的非零元素
- 找出Tensor中的非重复元素
- 找出Tensor中的非重复元素的出现次数
- 从索引集inds_A中随机选出n个索引构成索引集inds_B
- 利用set()得到获取从pos_inds中去除sampled_inds之后的索引
- torch.topk()和torch.sort()
- torch.cat()和torch.stack()
- torch.contiguous()
- torch.view(-1)
- F.interpolate()上采样
- 计算二维空间中两个点之间的距离
- 初上手PyTorch
- 使用PyTorch时易弄错的地方
- torch.Tensor的数据类型
- 搭建子网络
- PyTorch 可视化
- PyTorch模型训练
- the method `tensor.new()` in Pytorch
- `torch.Tensor.scatter_`用法理解
- torch.gather
- 保持Tensor的索引对齐(或者说索引一致性)
- 在共有的前提条件inds_B_in_A下, 由inds_C_in_B求inds_C_in_A 和 由inds_C_in_A求inds_C_in_B
- PyTorch中模型的保存与加载
- PyTorch中tensor和nn.Module的复制 Copy.deepcopy() v.s. clone()
- .clone(), .detach(), new_tensor(), .copy_()
- 报错问题记录
- 查看torch所在的虚拟环境信息
- one of the variables needed for gradient computation has been modified by an inplace operation
- ImportError: torch.utils.ffi is deprecated. Please use cpp extensions instead.
- PyTorch: cannot import name `container_abc` form torch._six
- Unable to find a valid cuDNN algorithm to run convolution
- 待补充
- 二级标题
- 待补充
- 分割线
- 分割线
PyTorch中的常用操作
序号001
- *** Pytorch的Broadcast,合并与分割,数学运算,属性统计以及高阶操作!_布衣小张-CSDN博客 20191213
- * (Pytorch中功能特强大的函数)Pytorch, einsum is all you needed! 20230502
torch.randn(4, 3)
torch.randint(5, (2, 2))

tmp_b = torch.empty(tmp_a.size(), device=self.device, dtype=torch.float32).shape
tmp_b = torch.zeros(tmp_a.size(), device=self.device, dtype=torch.float32).shape

torch.squeeze()

torch.cat(), torch.stack()操作时, list里的Tensor应都位于cpu或者cuda上;

.reshape(-1) 或 .reshape(1, -1) 将数组横向平铺, -1所在的那个维度会自动计算shape
.reshape(-1, 1) 将数组纵向平铺, -1所在的那个维度会自动计算shape
[numpy或pandas中reshape(-1)等用法 20190708](https://www.jianshu.com/p/0b6bc5ebf24a)

# mmdet/models/dense_heads/anchor_head.py
if not inside_flags.any():  # hc-y_note:如果inside_flags中没有一个元素为True
	return (None, ) * 7

assert ~torch.isnan(tmp_a).any(), 'some elements of tmp_a is NaN'
assert isinstance(scores, (torch.Tensor, np.ndarray))
assert refine_type in [None, 'conv', 'non_local']

temp_a = dict(loss_rpn_cls=1, loss_rpn_bbox=2)
[_temp for _temp in temp_a.keys() if 'loss' in _temp]

avg_factor = max(torch.sum(label_weights > 0).float().item(), 1.)

# 1. assign -1 by default
assigned_gt_inds = overlaps.new_full((num_bboxes, ),-1,dtype=torch.long)

If you are trying to invert a mask, use the `~` or `logical_not()` operator instead.

tensor矩阵相乘可用@, tensor矩阵逐个元素相乘可用*;
[关于pytorch中@和*的用处 - 回忆瞬间 - 博客园 20200726](https://www.cnblogs.com/peixu/p/13382962.html)
torchTensor.item()
torchTensor.item(): Returns the value of this tensor as a standard Python number. This only works for tensors with one element.
关于pytorch中.item()的用法_千律的博客-CSDN博客 20200918
A.numel()=a, B.numel()=b, 已知a>b, 从A中随机采样b个元素赋值给B, 方法是对索引0~a-1随机排序后取前b个, 即:
A.numel()=a, B.numel()=b, 已知a>b, 从A中随机采样b个元素赋值给B, 方法是对索引0~a-1随机排序后取前b个, 即:
perm = torch.randperm(A.numel(), device=A.device)[:b]
B = A[perm]
打印输出 list[5Tensor] 中Tensor的shape
mlvl_anchors = [torch.zeros(110592, 4), torch.zeros(27648, 4), torch.zeros(6912, 4), torch.zeros(1728, 4), torch.zeros(432, 4)]

print([mlvl_anchors[i].shape for i in range(len(mlvl_anchors))])
[torch.Size([110592, 4]), torch.Size([27648, 4]), torch.Size([6912, 4]), torch.Size([1728, 4]), torch.Size([432, 4])]

print([mlvl_anchors[i].size(0) for i in range(len(mlvl_anchors))])
[110592, 27648, 6912, 1728, 432]

print(sum([mlvl_anchors[i].size(0) for i in range(len(mlvl_anchors))]))
147312
torch.nonzero(…, as_tuple=False).squeeze(1)的使用
通常情况下, 直接使用以下这一句代码就行了, 后面无论len(tmp_d_inds)是否为0, torch.cat([tmp_d1_inds, tmp_d2_inds])均不会报错的;
tmp_inds = torch.nonzero(tmp_a < -2, as_tuple=False).squeeze(1)
tmp_a = torch.rand(6)
tmp_b_inds = torch.nonzero(tmp_a < 0.5, as_tuple=False)
tmp_b_inds.shape  # torch.Size([5, 1])
tmp_b_inds.numel()  # 5
tmp_a[tmp_b_inds].shape  # torch.Size([5, 1])
if tmp_b_inds.numel() != 0:
    tmp_b_inds = tmp_b_inds.squeeze(1)
tmp_a[tmp_b_inds].shape  # torch.Size([5])
tmp_c_inds = torch.nonzero(tmp_a < -2, as_tuple=False)
tmp_c_inds.shape  # torch.Size([0, 1])
tmp_a[tmp_c_inds].shape  # torch.Size([0, 1])
tmp_c_inds.numel()  # 0
if tmp_c_inds.numel() != 0:
    tmp_c_inds = tmp_c_inds.squeeze(1)
tmp_a[tmp_c_inds].shape  # torch.Size([0])

torch.cat([tmp_c_inds.squeeze(1), tmp_b_inds.squeeze(1)])
Out[24]: tensor([1, 2, 3, 4, 5])

torch.cat([tmp_c_inds, tmp_b_inds.squeeze(1)])
Traceback (most recent call last):
  File "D:\OtherProgramFiles\Anaconda3\envs\my_cpu_py3\lib\site-packages\IPython\core\interactiveshell.py", line 3331, in run_code
    exec(code_obj, self.user_global_ns, self.user_ns)
  File "<ipython-input-25-7062907c68bf>", line 1, in <module>
    torch.cat([tmp_c_inds, tmp_b_inds.squeeze(1)])
RuntimeError: Tensors must have same number of dimensions: got 2 and 1

torch.cat([tmp_c_inds, tmp_c_inds.squeeze(1)])
Out[26]: tensor([], size=(0, 1), dtype=torch.int64)

torch.cat([tmp_c_inds, tmp_c_inds])
Out[27]: tensor([], size=(0, 1), dtype=torch.int64)


# 因此通常情况下, 直接使用以下这一句代码就行了, 后面无论
# len(tmp_d_inds)是否为0, torch.cat([tmp_d1_inds, tmp_d2_inds])均不会报错的;
tmp_d_inds = torch.nonzero(tmp_a < -2, as_tuple=False).squeeze(1)
tmp_a = torch.arange(0, 20)
tmp_a
Out[53]:
tensor([ 0,  1,  2,  3,  4,  5,  6,  7,  8,  9, 10, 11, 12, 13, 14, 15, 16, 17,
        18, 19])

tmp_1_inds = torch.nonzero((tmp_a > 5) & (tmp_a < 9), as_tuple=False).squeeze(1)
tmp_1_inds
Out[77]: tensor([6, 7, 8])
tmp_1_inds.shape
Out[78]: torch.Size([3])

tmp_2_inds = torch.nonzero(tmp_a < -2, as_tuple=False)
if tmp_2_inds.numel() != 0:
    tmp_2_inds = tmp_2_inds.squeeze(1)
tmp_2_inds
Out[79]: tensor([], size=(0, 1), dtype=torch.int64)

torch.cat([tmp_1_inds, tmp_2_inds])
Traceback (most recent call last):
  File "E:\OtherProgramFiles\Anaconda3\envs\my_gpu_py3\lib\site-packages\IPython\core\interactiveshell.py", line 3343, in run_code
    exec(code_obj, self.user_global_ns, self.user_ns)
  File "<ipython-input-80-23d09aebcb16>", line 1, in <module>
    torch.cat([tmp_1_inds, tmp_2_inds])
RuntimeError: invalid argument 0: Tensors must have same number of dimensions: got 1 and 2 at C:\Users\builder\AppData\Local\Temp\pip-req-build-e5c8dddg\aten\src\TH/generic/THTensor.cpp:603

tmp_2_inds.shape
Out[81]: torch.Size([0, 1])
tmp_2_inds.numel()
Out[82]: 0
tmp_2_inds.item()
Traceback (most recent call last):
  File "E:\OtherProgramFiles\Anaconda3\envs\my_gpu_py3\lib\site-packages\IPython\core\interactiveshell.py", line 3343, in run_code
    exec(code_obj, self.user_global_ns, self.user_ns)
  File "<ipython-input-83-debb1cc7c3ef>", line 1, in <module>
    tmp_2_inds.item()
ValueError: only one element tensors can be converted to Python scalars

tmp_2_inds.squeeze(1).shape
Out[84]: torch.Size([0])
tmp_2_inds.squeeze(1).numel()
Out[85]: 0
tmp_2_inds.squeeze(1).item()
Traceback (most recent call last):
  File "E:\OtherProgramFiles\Anaconda3\envs\my_gpu_py3\lib\site-packages\IPython\core\interactiveshell.py", line 3343, in run_code
    exec(code_obj, self.user_global_ns, self.user_ns)
  File "<ipython-input-86-21520687e0d0>", line 1, in <module>
    tmp_2_inds.squeeze(1).item()
ValueError: only one element tensors can be converted to Python scalars
找出Tensor中的非零元素
20200919记:
import torch
import time


A = torch.tensor([100, 101, 0, 103, 104, 0, 106, 107])

flag_method = True
# flag_method = False
if flag_method:  # 方法一
	time_start = time.time()
	pos_inds_in_A = torch.nonzero(A > 0, as_tuple=False).squeeze(1)
	print('方法一耗时%10.7f sec' % (time.time() - time_start))  # 方法一耗时 0.0009987 sec
else:
	time_start = time.time()
	pos_inds_in_A = torch.where(A > 0)[0]  # 方法二
	print('方法二耗时%10.7f sec' % (time.time() - time_start))  # 方法二耗时 0.0009885 sec

print('pos_inds_in_A的shape:', pos_inds_in_A.shape)
print('pos_inds_in_A的值:', pos_inds_in_A)
import torch
tmp_a = torch.randint(0, 5, (2, 5))
错误写法:tmp_b = torch.nonzero((0 < tmp_a < 2), as_tuple=False)
错误写法:tmp_b = torch.nonzero((tmp_a > 0 & tmp_a < 2), as_tuple=False)
正确写法:tmp_b = torch.nonzero((tmp_a > 0) & (tmp_a < 2), as_tuple=False)
找出Tensor中的非重复元素
torch.unique()
torch.Tensor.unique()
找出Tensor中的非重复元素的出现次数
torch.unique(*args, **kwargs): Returns the unique elements of the input tensor. 那么, 是否有什么方法可以返回 counts of each unique element 呢?
How to efficiently perform averaging across predefined groups in a tensor - PyTorch Forums 20181012
ptrblck 20181012
You could usescatter_addand a small hack to get the unique counts of your indices:x = torch.arange(1, 7, dtype=torch.float) idx = torch.tensor([0, 1, 0, 1, 2, 2]) idx_unique = idx.unique(sorted=True) idx_unique_count = torch.stack([(idx==idx_u).sum() for idx_u in idx_unique]) res = torch.zeros(len(idx_unique)).scatter_add(0, idx, x) res /= idx_unique_count.float()I think it’s time to add a
return_countsoption totorch.unqiue.
从索引集inds_A中随机选出n个索引构成索引集inds_B
mmdet/core/bbox/samplers/iou_balanced_neg_sampler.py
# 从索引集inds_A中随机选出n个索引构成索引集inds_B
if len(inds_) > n:
	inds_ = self.random_choice(inds_, num_per_gt)


if len(inds_A) > n:
	inds_B = self.random_choice(inds_A, num_per_gt)
else:
	inds_B = inds_A


if inds_A.numel() <= n:
	inds_B = inds_A
else:
	inds_B = self.random_choice(inds_A, num_per_gt)
利用set()得到获取从pos_inds中去除sampled_inds之后的索引
mmdet/core/bbox/samplers/iou_balanced_neg_sampler.py
# 求两个set的交集
floor_neg_inds = list(floor_set & neg_set)

# 利用set()得到获取从pos_inds中去除sampled_inds之后的索引
list(set(pos_inds.cpu().numpy()) - set(sampled_inds.cpu().numpy()))
list(set(pos_inds.cpu()) - set(sampled_inds.cpu()))

tmp_inds = np.array(list(set(np.array(pos_inds.clone().cpu())) & set(np.array(sampled_inds.clone().cpu()))))
tmp_inds = torch.from_numpy(tmp_inds).to(gt_bboxes.device).long()

# 如果某个张量后面在cuda上不需要再次用到, 可以省略.clone()操作
tmp_inds = np.array(list(set(pos_inds.cpu().numpy()) & set(sampled_inds.cpu().numpy())))
torch.topk()和torch.sort()
摘自mmdet/models/dense_heads/v1_rpn_head.py
# sort is faster than topk
# _, topk_inds = scores.topk(cfg.nms_pre)
ranked_scores, rank_inds = scores.sort(descending=True)
topk_inds = rank_inds[:cfg.nms_pre]
scores = ranked_scores[:cfg.nms_pre]
# torch.topk()的使用示例
num_dim0, num_dim1 = (3, 6)
tmp_a = torch.randint(18, (num_dim0, num_dim1))  # torch.Size([num_dim0, num_dim1])
tmp_a
Out[65]:
tensor([[17, 11, 12,  8, 17,  7],
        [ 0, 10, 14,  6,  8, 10],
        [16,  8, 13, 11,  6,  4]])

topk_values, topk_idxs = tmp_a.topk(2, dim=0, largest=False)  # torch.Size([2, num_dim1]), torch.Size([2, num_dim1])
topk_values
Out[67]:
tensor([[ 0,  8, 12,  6,  6,  4],
        [16, 10, 13,  8,  8,  7]])
topk_idxs
Out[68]:
tensor([[1, 2, 0, 1, 2, 2],
        [2, 1, 2, 0, 1, 0]])

tmp_a[topk_idxs[0][0]]  # tensor([17, 11, 12,  8, 17,  7])

tmp_a[topk_idxs, torch.arange(num_dim1)]  # 这种方式取出的才是top2_values, 也即是topk_values
Out[69]:
tensor([[ 0,  8, 12,  6,  6,  4],
        [16, 10, 13,  8,  8,  7]])

tmp_a[topk_idxs, :].shape
Out[71]: torch.Size([2, 6, 6])
torch.cat()和torch.stack()
# 沿着指定的当前dim连接seq中的tensor, 所有的tensor必须有相同的shape或为empty, 其相反的操作为torch.split()和torch.chunk()
torch.cat(seq,dim=0,out=None)

# 沿着新插入的某个指定dim连接seq中的tensor, 所有的tensor必须有相同的shape或为empty
torch.stack(seq, dim=0, out=None)

# 注: torch.cat()和torch.stack()的区别在于:
# cat会增加现有维度的值, 可以理解为续接;
# stack会新增加一个维度, 可以理解为叠加;
>>> a=torch.Tensor([1,2,3])
torch.Size([3])
>>> torch.stack((a,a)).size()
torch.Size([2, 3])
>>> torch.cat((a,a)).size()
torch.Size([6])
torch.contiguous()
- pytorch .contiguous().view()_qq_35608277的博客-CSDN博客 20190429
- Pytorch中的contiguous理解_gdymind的博客-CSDN博客 20180912
torch.view(-1)
注意torch.view(-1)是横向相连的; 对shape为torch.Size([num_dim0, num_dim1])的Tensor执行torch.Tensor.view(-1)操作, 得到的shape是torch.Size([num_dim1*num_dim0]);
# 示例
num_dim0, num_dim1 = (3, 6)
tmp_a = torch.randint(18, (num_dim0, num_dim1))  # torch.Size([num_dim0, num_dim1])
tmp_a
Out[60]:
tensor([[ 5,  9,  6,  1,  6,  3],
        [15,  9,  7,  7, 14,  2],
        [13, 11, 16,  5,  3, 12]])
tmp_a.view(-1)  # 横向相连的; torch.Size([num_dim1*num_dim0])
Out[59]: tensor([ 5,  9,  6,  1,  6,  3, 15,  9,  7,  7, 14,  2, 13, 11, 16,  5,  3, 12])

tmp_a.view(-1, 1)  # 横向相连的; torch.Size([num_dim1*num_dim0, 1])
Out[59]:
tensor([[ 5],
        [ 9],
        [ 6],
        [ 1],
        [ 6],
        [ 3],
        [15],
        [ 9],
        [ 7],
        [ 7],
        [14],
        [ 2],
        [13],
        [11],
        [16],
        [ 5],
        [ 3],
        [12]])

tmp_a.view(1, -1)  # 横向相连的; torch.Size([1, num_dim1*num_dim0])
Out[59]: tensor([[ 5,  9,  6,  1,  6,  3, 15,  9,  7,  7, 14,  2, 13, 11, 16,  5,  3, 12]])

tmp_a.transpose(1, 0).contiguous().view(-1)  # 竖向相连的; torch.Size([num_dim0*num_dim1])
Out[58]: tensor([ 5, 15, 13,  9,  9, 11,  6,  7, 16,  1,  7,  5,  6, 14,  3,  3,  2, 12])

tmp_b = tmp_a[0]  # tensor([5, 9, 6, 1, 6, 3])
tmp_b.view(1, -1).expand(num_dim0, num_dim1).contiguous().view(-1)  # torch.Size([num_dim1*num_dim0])
Out[51]: tensor([5, 9, 6, 1, 6, 3, 5, 9, 6, 1, 6, 3, 5, 9, 6, 1, 6, 3])

tmp_a.view(-1).view(num_dim0, -1)
Out[74]:
tensor([[ 5,  9,  6,  1,  6,  3],
        [15,  9,  7,  7, 14,  2],
        [13, 11, 16,  5,  3, 12]])
- xxx
在这里插入代码片
- xxx
在这里插入代码片
F.interpolate()上采样
torch.nn.functional.interpolate(input, size=None, scale_factor=None, mode='nearest', align_corners=None, recompute_scale_factor=None)
PyTorch学习笔记(10)——上采样和PixelShuffle_g11d111的博客 20180927
计算二维空间中两个点之间的距离
输入: p1_xy with shape (B,m,2), p2_xy with shape (B,n,2);
输出: dist_p with shape (B,m,n);
以下两种方式均可以:
dist_p = torch.pow(p1_xy[..., :, None, :] - p2_xy[..., None, :, :], 2.).sum(dim=-1)
dist_p_ = torch.cdist(p1_xy, p2_xy, p=2.)**2  # ((dist_p_ - dist_p) > 0.0000001).sum()
- torch.cdist — PyTorch 1.12 documentation
- torch.pow — PyTorch 1.12 documentation
- torch.cdist—求解正则项p-norm_繁华落尽,寻一世真情的博客-CSDN博客 20201220
初上手PyTorch
学习PyTorch,感觉官方的 Tutorials 才是最好的教程。
*** Introduction to PyTorch | Learn OpenCV 20190531
Pytorch 教程系列 | 莫烦Python
深度学习之PyTorch实战(1)——基础学习及搭建环境 - 战争热诚 - 博客园 20181024
本篇博客涵盖以下内容:
- Tensor的数据类型
- Tensor的基本数学运算
- 搭建一个简易神经网络
- 自动梯度torch.autograd
*** pytorch入坑一 | Tensor及其基本操作_我是天才很好-CSDN博客 20191205
本篇博客涵盖以下内容: - Tensor的属性
- Tensor的创建
- 直接创建
- 从Numpy生成
- 创建指定数值的Tensor
- 创建随机数值的Tensor
- Tensor的操作
- 基本操作: indexing, joining, clicing, mutation
- 点对点操作: 三角函数, 加减乘除, 对数运算, 幂函数, 指数函数, 数值截断, 其它
- 降维操作
- 对比操作
- 频谱操作
- 其它操作
- 其它tips
[干货] 史上最全的 PyTorch 学习资源汇总 import torch as tf - V2EX 20190507
使用PyTorch时易弄错的地方
张量索引时, 注意tmp_a[:, tmp_b_inds]和tmp_a[torch.arange(len(tmp_b_inds)), tmp_b_inds]之间的不同
tmp_a.shape = torch.Size([4, 3])
tmp_b_inds.shape = torch.Size([3])
tmp_a[:, tmp_b_inds]
在使用tmp_b_inds索引tmp_a中的元素值时,
- 如果tmp_b_inds的dtype=torch.bool, 则tmp_a[:, tmp_b_inds]和tmp_a[tmp_b_inds, :]属于布尔索引;
- 如果tmp_b_inds的dtype不是torch.bool, 则tmp_a[tmp_b_inds, :]属于常规索引, tmp_a[:, tmp_b_inds]会得不到期望的结果, 应改用tmp_a[torch.arange(4), tmp_b_inds];
张量索引时, 注意核查一下是否会改变原始张量中的元素值
有时候, 对张量A的索引切片进行操作会改变原始张量A中的元素值; 如果需要利用张量A中的元素值, 同时避免对原始张量A中的元素值作修改, 可以预先新建一个张量B, 然后用原始张量A的索引切片给张量B的索引切片赋值;
- A[int(), :] 索引
# 案例1
tmp_a = torch.arange(0, 15).reshape(3, 5)
tmp_a
Out[5]:
tensor([[ 0,  1,  2,  3,  4],
        [ 5,  6,  7,  8,  9],
        [10, 11, 12, 13, 14]])

# 会改变原始张量中的元素值; 此处相当于给tmp_a中的一部分切片取了个别名, 对tmp_b的操作会改变tmp_a中的元素值;
tmp_b = tmp_a[2, :]
tmp_b
Out[7]: tensor([10, 11, 12, 13, 14])
tmp_b[-3:] = 0

tmp_b
Out[9]: tensor([10, 11,  0,  0,  0])
tmp_a
Out[10]:
tensor([[ 0,  1,  2,  3,  4],
        [ 5,  6,  7,  8,  9],
        [10, 11,  0,  0,  0]])
- A[torch.arange(1, 3), :] 索引
# 案例2
tmp_a = torch.arange(0, 15).reshape(3, 5)
tmp_a
Out[11]:
tensor([[ 0,  1,  2,  3,  4],
        [ 5,  6,  7,  8,  9],
        [10, 11, 12, 13, 14]])

# 不会改变原始张量中的元素值; 此处给tmp_a中的一部分切片创建了个副本, 对tmp_c的操作不会改变tmp_a中的元素值;
tmp_c_inds = torch.arange(1, 3)
tmp_c = tmp_a[:, tmp_c_inds]
tmp_c
Out[14]:
tensor([[ 1,  2],
        [ 6,  7],
        [11, 12]])
tmp_c[:, 0] = -1

tmp_c
Out[16]:
tensor([[-1,  2],
        [-1,  7],
        [-1, 12]])
tmp_a
Out[17]:
tensor([[ 0,  1,  2,  3,  4],
        [ 5,  6,  7,  8,  9],
        [10, 11, 12, 13, 14]])
- A[torch.nonzero(xxx, as_tuple=False).squeeze(1), :] 索引
tmp_a = torch.arange(0, 20)
tmp_a
Out[53]:
tensor([ 0,  1,  2,  3,  4,  5,  6,  7,  8,  9, 10, 11, 12, 13, 14, 15, 16, 17,
        18, 19])

# 不会改变原始张量中的元素值; 此处给tmp_a中的一部分切片创建了个副本, 对tmp_d的操作不会改变tmp_a中的元素值;
tmp_d_inds = torch.nonzero((tmp_a > 5) & (tmp_a < 9), as_tuple=False).squeeze(1)
tmp_d_inds
Out[54]: tensor([6, 7, 8])
tmp_d = tmp_a[tmp_d_inds]
tmp_d
Out[57]: tensor([6, 7, 8])

tmp_d[:] = 0
tmp_d
Out[59]: tensor([0, 0, 0])

tmp_a
Out[60]:
tensor([ 0,  1,  2,  3,  4,  5,  6,  7,  8,  9, 10, 11, 12, 13, 14, 15, 16, 17,
        18, 19])
# 如果需要利用张量tmp_a中的元素值, 同时避免对原始张量tmp_a中的元素值作修改, 可以预先新建一个张量tmp_b, 然后用原始张量tmp_a的索引切片给张量tmp_b的索引切片赋值;
tmp_a = torch.arange(0, 15).reshape(3, 5)
tmp_a
Out[5]:
tensor([[ 0,  1,  2,  3,  4],
        [ 5,  6,  7,  8,  9],
        [10, 11, 12, 13, 14]])

tmp_b = tmp_a.new_zeros(tmp_a.shape)
# tmp_c = tmp_a.new_full(tmp_a.shape, -1, dtype=torch.long)

tmp_b[2, :] = tmp_a[2, :]
tmp_b
Out[63]:
tensor([[ 0,  0,  0,  0,  0],
        [ 0,  0,  0,  0,  0],
        [10, 11, 12, 13, 14]])
张量索引进行左赋值时, 注意只能使用一层索引
20211217记:
在索引张量进行左赋值时, 切记只能使用一层索引, 使用多层索引不改变张量的值; 例如,
tmp_a[sub_splice1][ssub_splice2] = 0.  # 此时tmp_a的值不会发生改变
tmp_a[sub_splice3[ssub_splice4]] = 1.  # 此时tmp_a的值会发生改变
非空张量才可执行torch.max()操作
在执行torch.Tensor.max()操作之前得先判断一下该tensor是否为空, 否则会报错;
tmp_a = torch.tensor([])
max_tmp_a, argmax_tmp_a = tmp_a.max(dim=0)
RuntimeError: cannot perform reduction function max on tensor with no elements because the operation does not have an identity

# 判断Tensor是否为空
if tmp_a.numel():  # max(tmp_a.size()) != 0
	print("this tensor is not empty")
else:
	print("this tensor is empty")
什么情况下Tensor的shape会是torch.Size([])呢?
Zero-dimensional tensor concatenation problem · Issue #69
当某个Tensor只有1个维度时,该张量的单个切片值的shape是torch.Size([]);示例,如下:
tmp_a = torch.randint(0, 10, (5,))
tmp_b = tmp_a[3]

>>> tmp_b.shape
Out[7]: torch.Size([])

>>> tmp_b
Out[13]: tensor(2)

>>> torch.tensor([2]).shape
Out[14]: torch.Size([1])

>>> (2.).shape
Traceback (most recent call last):
  File "/lib/python3.8/site-packages/IPython/core/interactiveshell.py", line 3343, in run_code
    exec(code_obj, self.user_global_ns, self.user_ns)
  File "<ipython-input-17-ee5b9fde90c4>", line 1, in <module>
    (2.).shape
AttributeError: 'float' object has no attribute 'shape'
当某个Tensor的shape是torch.Size([])时, 它是不能与其它Tensor被concatenate到一起的;示例,如下:
torch.cat((tmp_a, tmp_a, tmp_b))
Traceback (most recent call last):
  File "/lib/python3.8/site-packages/IPython/core/interactiveshell.py", line 3343, in run_code
    exec(code_obj, self.user_global_ns, self.user_ns)
  File "<ipython-input-19-3eaec3a9fef0>", line 1, in <module>
    torch.cat((tmp_a, tmp_a, tmp_b))
RuntimeError: zero-dimensional tensor (at position 2) cannot be concatenated
报错IndexError: too many indices for tensor of dimension 0
20201207记:
导致IndexError: too many indices for tensor of dimension 0错误的情形有:
- 对于tmp_sub_a_1[mask_sub_a_2],当tmp_sub_a_1.shape为torch.Size([]), 而mask_sub_a_2.shape为torch.Size([1])时,就会报该错误;为此,一种解决途径是:
tmp_a = torch.randint(0, 10, (5,))
mask_a = tmp_a > threshold_1
inds_a = mask_a.nonzero().squeeze()
tmp_sub_a_1 = tmp_a[0]
mask_sub_a_2 = tmp_a[mask_a] > threshold_2
if tmp_sub_a_1.shape == torch.Size([]):  # 一种很少见的报错
	tmp_sub_a_1= torch.tensor([tmp_sub_a_1])

tmp_b = tmp_sub_a_1[mask_sub_a_2]
tmp_a = torch.randint(0, 10, (5,))
mask_a = tmp_a == tmp_a[0]
inds_a = mask_a.nonzero().squeeze()
tmp_sub_a_1 = tmp_a[0]

tmp_sub_a_1.shape
Out[1]: torch.Size([])

# 特别注意一下:mask_sub_a_2值 与 mask_sub_a_1, mask_sub_a_3值 的不同
mask_sub_a_1 = tmp_sub_a_1 == tmp_a[0]
# 建议使用tmp_a[inds_a] > thr 而不是tmp_a[mask_a] > thr, 以免报错IndexError: too many indices for tensor of dimension 0
mask_sub_a_2 = tmp_a[mask_a] == tmp_a[0]  # 可见mask_sub_a_2.shape始终不会为torch.Size([])的
mask_sub_a_3 = tmp_a[inds_a] == tmp_a[0]

mask_sub_a_1.shape
Out[2]: torch.Size([])
mask_sub_a_2.shape
Out[3]: torch.Size([1])
mask_sub_a_3.shape
Out[4]: torch.Size([])

mask_sub_a_1
Out[5]: tensor(True)
mask_sub_a_2
Out[6]: tensor([True])
mask_sub_a_3
Out[7]: tensor(True)


tmp_sub_a_1[mask_sub_a_1]  # 可索引出期望值
Out[8]: tensor([5])
tmp_sub_a_1[mask_sub_a_2]
Traceback (most recent call last):
  File "/python3.8/site-packages/IPython/core/interactiveshell.py", line 3343, in run_code
    exec(code_obj, self.user_global_ns, self.user_ns)
  File "<ipython-input-39-ca3a2991ad33>", line 1, in <module>
    tmp_b[tmp_d]
IndexError: too many indices for tensor of dimension 0
tmp_sub_a_1[mask_sub_a_3]  # 可索引出期望值
Out[9]: tensor([5])

torch.tensor([tmp_sub_a_1])[mask_sub_a_1]
Out[10]: tensor([[5]])
torch.tensor([tmp_sub_a_1])[mask_sub_a_2]  # 可索引出期望值
Out[11]: tensor([5])
torch.tensor([tmp_sub_a_1])[mask_sub_a_3]
Out[10]: tensor([[5]])
torch.Tensor的数据类型
torch.Tensor — PyTorch 1.6.0 documentation
值类型(value type)与引用类型(reference type)
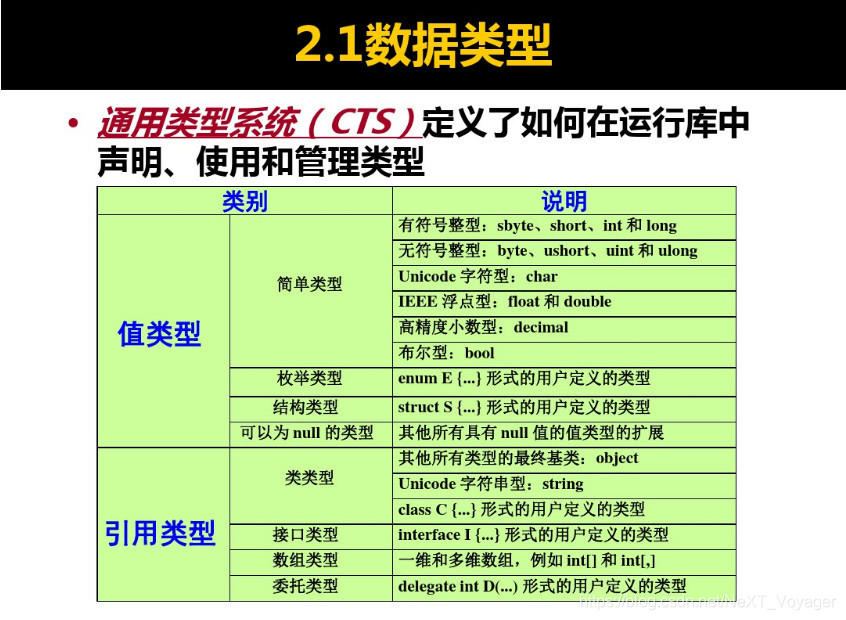
C#语言中,通用类型系统(CTS)定义了如何在运行库中声明、使用和管理类型;可划分为两大类:
-
值类型(value type):
- 简单类型(simple type)
- 枚举类型(enum type)
- 结构类型(struct type)
- 值为null的类型(nullable type)
-
引用类型(reference type)
- 类类型(class type)
- 接口类型(interface type)
- 数组类型(array type)
- 委托类型(delegate type)
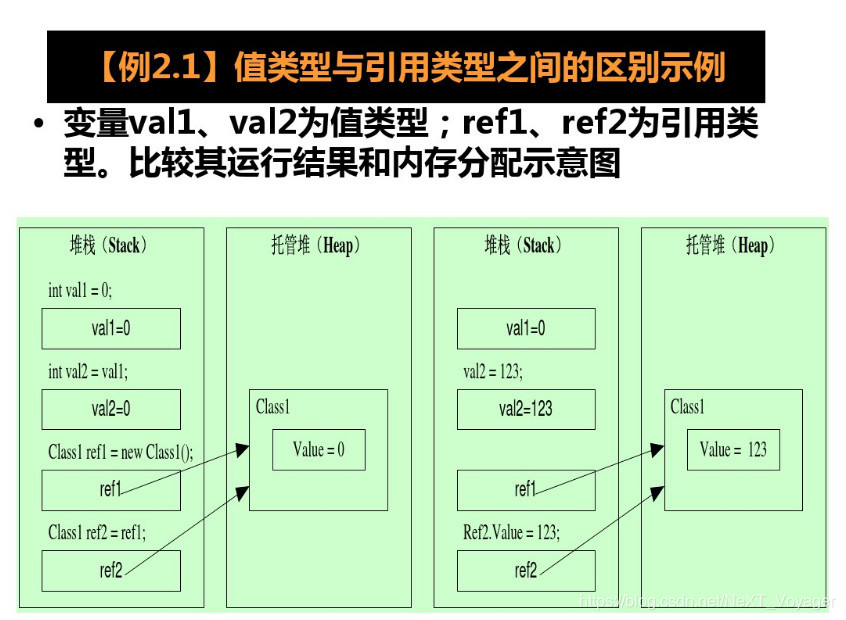
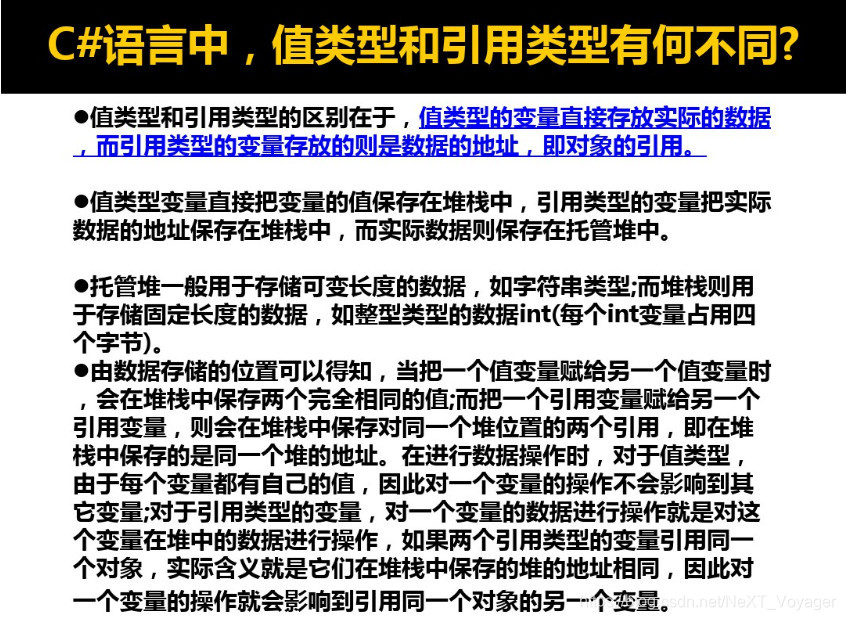
值类型(value type)的变量在堆栈(stack)中直接包含其数据,每个变量都有自己的数据副本(除ref和out参数变量外),因此对一个变量的操作不影响另一个变量;
C#的值类型分为简单类型(simple type)、枚举类型(enum type)、结构类型(struct type)、值为null的类型(nullable type);
引用类型(reference type)的变量在堆栈(stack)中存储对数据(对象)的引用(地址),数据(对象)存储在托管运行环境管理的堆(Heap)中。对于引用类型,两个变量可能引用同一个对象,因此对一个变量的操作可能影响另一个变量所引用的对象;
C#的引用类型分为类类型(class type)、接口类型(interface type)、数组类型(array type)、委托类型(delegate type);
单精度(float)与双精度(double)
-
浮点型数据类型简介
浮点型简单来说就是表示带有小数的数据类型,而恰恰小数点可以在相应的二进制的不同位置浮动,可能是这样就被定义成浮点型了。浮点型主要有:单精度float、双精度double; -
单精度与双精度之间的区别
在IEEE754标准中,单精度(float)在32位机器上用4个字节来存储的;而双精度(double)是用8个字节来存储的,这是他们最本质的区别。由于存储位不同,他们能表示的数值的范围就不同,也就是能准确表示的数的位数就不同。
单精度浮点数在机内占4个字节、有效数字8位、表示范围:-3.40E+38 ~ +3.40E+38;
双精度浮点数在机内占8个字节、有效数字16位、表示范围:-1.79E+308 ~ +1.79E+308;
浮点数在计算机中存储方式:

Floating Point Representation - Basics - GeeksforGeeks -
写代码时什么时候用单精度浮点型,什么时候用双精度浮点型?
分具体情况而言,一般为了节省空间用单精度float就行(也可以用double,不过占用空间大);- 如果只有整数的情况,就用整型;
- 可能有小数,但是位数不多或者对保留的小数位数要求不高,就用单精度;
- 小数位数比较多或者对精度要求较高(6位以上),用双精度;
- 如果可能有非数字类型的,就用字符型;
写代码时什么时候用单精度浮点型什么时候用双精度浮点型?_慕课猿问20160813
torch.Tensor的数据类型转换
Pytorch的数据类型为各式各样的Tensor,Tensor可以理解为高维矩阵。与Numpy中的Array类似。Pytorch中的Tensor又包括CPU上的数据类型和GPU上的数据类型,一般GPU上的Tensor是CPU上的Tensor加cuda()函数得到。通过使用type()函数可以查看变量类型。一般默认采用torch.FloatTensor类型。例如data = torch.Tensor(2,3)是一个2*3的张量,类型为torch.FloatTensor;data.cuda()就转换为GPU上的张量类型,torch.cuda.FloatTensor类型。
(1) 数据类型转换
- 使用诸如self.float()的方法: self.int(), self.long(), self.float(), self.double()等;self.float() is equivalent to self.to(torch.float32);
- 使用诸如self.to(torch.float)的方法: self.to(torch.int), self.to(torch.long), self.to(torch.float), self.to(torch.double)等;
- 使用self.type(torch.float)方法;
tensor_1.type_as(tensor_2) is equivalent to tensor_1.type(tensor_2.type());
Pytorch变量类型转换_zchenack个人专栏-CSDN博客 20180124
(2) CPU/GPU转换
- self.cpu();
- self.cuda()或者cuda0 = torch.device(‘cuda:0’) \n self.to(cuda0)
[Pytorch学习]在GPU上训练_crabstew的博客-CSDN博客20190403
(3) tensor/np.adarray转换
- np.adarray to tensor
import numpy as np
a = np.ones(5)
b = torch.from_numpy(a) - tensor to np.adarray
self.numpy(); 注意,转换后的tensor与np.adarray指向同一地址,所以改变一方的值,另一方的值也随之改变; - 将GPU上的Tensor存储为np.adarray; 因为numpy()不能直接读取cuda上存储的Tensor;
self.data.cpu().numpy() - 注意检索官方文档区分torch.from_numpy()和torch.as_tensor()
torch.from_numpy(ndarray) → Tensor
torch.as_tensor(data, dtype=None, device=None) → Tensor
torch.as_tensor()_Wanderer001的博客-CSDN博客 20200320
(待阅读) pytorch中把Tensor保存到可读文件的艰辛历程 20181005
(待阅读) Save a tensor to file - PyTorch Forums 20200219
(待阅读) What is the recommended format to save data in pytorch? - PyTorch Forums 20200714
搭建子网络
Most machine learning workflows involve
- working with data,
- creating models,
- optimizing model parameters,
- saving the trained models,
- loading the saved models;
A collection of various deep learning architectures, models, and tips
- GitHub - yunjey/pytorch-tutorial: PyTorch Tutorial for Deep Learning Researchers 20200706
- GitHub - rasbt/deeplearning-models: A collection of various deep learning architectures, models, and tips
PyTorch打印输出网络结构
model.trian()与model.eval()
model.trian()及model.eval() - Parallax - 博客园 20200703
区分理解BatchNorm,LayerNorm, InstanceNorm和GroupNorm
- *** pytorch常用normalization函数 - 慢行厚积 - 博客园 20190521
- BatchNorm、LayerNorm、InstanceNorm、GroupNorm区别_页页读-CSDN博客 20200831
- 通过代码理解BatchNorm,LayerNorm, InstanceNorm和GroupNorm归一化方式。_哔哩哔哩_bilibili 20210731
- PyTorch学习之归一化层(BatchNorm、LayerNorm、InstanceNorm、GroupNorm)_mingo_敏-CSDN博客 20181218
- Batch Norm 与 Group Norm_NEUXia的博客-CSDN博客 20190316
BatchNorm2d 的 affine, track_running_stats 参数
-
.train()状态时, BatchNorm2d 的 track_running_stats=True时, running_mean 和 running_var 会跟踪整个训练过程中所有 mini-batch 的统计特性, 而不只是仅仅依赖于当前 mini-batch 的统计特性; -
.eval()状态时, BatchNorm2d 的 track_running_stats=True时, running_mean 和 running_var 使用的则是训练时得到的统计特性值, 该值在.eval()状态下是不会变化的; -
xxx
-
.train()状态时, BatchNorm2d 的 track_running_stats=False时, running_mean 和 running_var 仅仅依赖于当前 mini-batch 的统计特性; 此时如果batch_size 比较小, 那么其统计特性就会和全局统计特性有着较大偏差, 可能导致糟糕的效果; -
.eval()状态时, BatchNorm2d 的 track_running_stats=False时, running_mean 和 running_var 仅仅依赖于当前 mini-batch 的统计特性; 此时如果batch_size 比较小, 那么其统计特性就会和全局统计特性有着较大偏差, 可能导致糟糕的效果; -
xxx
-
BatchNorm2d 的 track_running_stats=False时, 加载同一个已经训练好的模型在同一个测试集上进行模型评估, 每次模型评估的结果会都不一样(因为数据是先经过 shuffle 后再组成 mini-batch 的, 当前 mini-batch 的统计特性会发生变化); track_running_stats=True时, 每次模型评估的结果则都一样;
-
*** BatchNorm2d原理、作用及其pytorch中BatchNorm2d函数的参数讲解_LS_learner的博客-CSDN博客 20200816
-
BatchNorm2d — PyTorch 1.10.1 documentation
- γ \gamma γ and β \beta β are learnable parameter vectors of size C C C;
-
E
[
x
]
E[x]
E[x] and
V
a
r
[
x
]
Var[x]
Var[x] are the computed mean
running_meanand variancerunning_varof this layer; 在训练时, 这两个参数 are calculated per-dimension over the mini-batches; - affine – a boolean value that when set to
True, this module has learnable affine parameters ( γ \gamma γ and β \beta β). Default:True.
激活函数
- PyTorch之nn.ReLU与F.ReLU的区别_鹊踏枝-码农的专栏-CSDN博客 20190122
- 23种激活函数_梦的灰色边沿…-CSDN博客 20191107
- 激活函数(sigmoid、tanh、ReLU、softmax)_sigmoid函数图像_CityD的博客-CSDN博客 20220407
PyTorch中的梯度计算, backward, requires_grad属性, zero_grad(),
pytorch的梯度计算以及backward方法_步步拾遗-CSDN博客 20190321
深入Pytorch中的Tensor,梯度以及权重_NeilPy的博客-CSDN博客 20190808
** 机器学习9:关于pytorch中的zero_grad()函数_小娜美要努力努力的博客-CSDN博客 20191121
*** argmax为什么不能求导,然而最大池化却可以求导? - gongel的回答 - 知乎 20200628
PyTorch中的计算图, retain_graph
**** Pytorch: detach 和 retain_graph,和 GAN的原理解析_qxqsunshine的博客-CSDN博客 20181008
Pytorch 中retain_graph的用法_happyday_d的博客-CSDN博客 20190101
PyTorch 可视化
How to use TensorBoard with PyTorch
- torch.utils.tensorboard — PyTorch 1.10.1 documentation
- Visualizing Models, Data, and Training with TensorBoard — PyTorch Tutorials 1.10.1+cu102 documentation
- PyTorch TensorBoard Support — PyTorch Tutorials 1.10.1+cu102 documentation
- How to use TensorBoard with PyTorch — PyTorch Tutorials 1.10.1+cu102 documentation
- [PyTorch]Tensorboard可视化实现 | 大海 20211121
PyTorch 自带的可视化工具
Feature extraction for model inspection
PyTorch模型训练
PyTorch提升数据加载速度
PyTorch 创建 data.DataLoader 时, 参数 pin_memory 的理解
- pytorch创建data.DataLoader时,参数pin_memory的理解_敲代码的小风-CSDN博客 20201216
- torch的dataloader中的‘pin_memory’指的是什么 · 大专栏 20191227
梯度下降
寻找同样的学习率SGD收敛,但Adam不收敛的问题 - 简书 20201229
本篇博客涵盖以下内容:SGD, Adagrad, Nesterov, RMSPropAdam;
PyTorch DDP模式单机多卡训练
PyTorch DDP模式单机多卡训练 - 简书 20200914
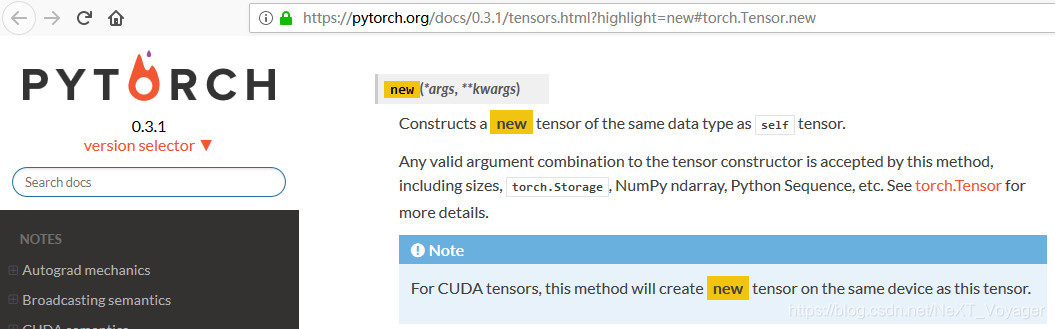
the method tensor.new() in Pytorch
the method tensor.new() in Pytorch的作用:
for example, x.data.new(x.size()) will create a tensor of same type and same size on the same device as x.
nonempty = torch.FloatTensor([[0, 0, 10, 9],])
empty = torch.FloatTensor([])
rows,cols=1,1  # 0,1
nonempty.new(rows,cols).shape
# gpu到cpu的例子; compute overlap and assign gt on CPU when number of GT is large
if assign_on_cpu:
	device = bboxes.device
	bboxes = bboxes.cpu()
	gt_bboxes = gt_bboxes.cpu()
Pytorch beginner : tensor.new method - Stack Overflow
torch.Tensor.scatter_用法理解
torch.Tensor.scatter_(dim, index, src) → Tensor

incase value (float) is not specified, 即利用src张量中的元素来scatter
为避免混淆,这里用scatter_(param_dim, param_index, src) → Tensor表示scatter_(dim, index, src) → Tensor;
Writes all values from the tensor src into self at the indices specified in the param_index tensor. For each value in src, its output index is specified by its index in src for dimension != param_dim and by the corresponding value in param_index for dimension = param_dim.
如果用self[a][b][c]表示self中的元素,则self的index指的是 位于dimension=0维度上的[a]、位于dimension=1维度上的[b]、位于dimension=2维度上的[c];
# For a 3-D tensor, self is updated as:
self[index[i][j][k]][j][k] = src[i][j][k]  # if dim == 0
self[i][index[i][j][k]][k] = src[i][j][k]  # if dim == 1
self[i][j][index[i][j][k]] = src[i][j][k]  # if dim == 2
在上述示例中,等号左边表示的是each value in src的output index (也即是self的index),等号右边表示的是each value in src其本身的index;
从右边往左边看,src[i][j][k]表示的是a value in src,
if dim == 0, 则由于
- 右边 src的[i] 位于dimension=0维度上,该维度==0,故the output index is specified by the corresponding value in param_index,即由param_index[i][j][k]指定; the corresponding value的含义是src[i][j][k]位于src中哪个位置,就取param_index中哪个位置的值;因此the size of param_index应该与the size of src一致;
- 右边 src的[j] 位于dimension=1维度上,该维度!==0,故the output index is specified by its index in src;
- 右边 src的[k] 位于dimension=2维度上,该维度!==0,故the output index is specified by its index in src;
因此,self[index[i][j][k]][j][k] = src[i][j][k]。
# Example:
>>> x = torch.rand(2, 5)
>>> x
tensor([[ 0.3992,  0.2908,  0.9044,  0.4850,  0.6004],
        [ 0.5735,  0.9006,  0.6797,  0.4152,  0.1732]])
>>> y1 = torch.zeros(3, 5).scatter_(0, torch.tensor([[0, 1, 2, 0, 0], [2, 0, 0, 1, 2]]), x)
>>> y1
tensor([[ 0.3992,  0.9006,  0.6797,  0.4850,  0.6004],
        [ 0.0000,  0.2908,  0.0000,  0.4152,  0.0000],
        [ 0.5735,  0.0000,  0.9044,  0.0000,  0.1732]])
>>> y2 = torch.zeros(3, 5).scatter_(0, torch.tensor([[0, 1, 2, 0, 0], [0, 0, 0, 1, 2]]), x)
>>> y2
tensor([[ 0.5735,  0.9006,  0.6797,  0.4850,  0.6004],
        [ 0.0000,  0.2908,  0.0000,  0.4152,  0.0000],
        [ 0.0000,  0.0000,  0.9044,  0.0000,  0.1732]])
此例中self是y1,y1 is a 2-D tensor,由于param_dim=0,故self[param_index[i][j]][j] = src[i][j],因而有:
00 11 22 03 04
20 01 02 13 24
- 由于param_index[0][0]=0,故将x[0][0]=0.3992写入y1[param_index[0][0]][0]中,即写入y1[0][0]中;
- 由于param_index[0][1]=1,故将x[0][1]=0.2908写入y1[param_index[0][1]][1]中,即写入y1[1][1]中;
- 由于param_index[0][2]=2,故将x[0][2]=0.9044写入y1[param_index[0][2]][2]中,即写入y1[2][2]中;
- 依次类推…param_index[0][3], param_index[0][4],
- 由于param_index[1][0]=2,故将x[1][0]=0.5735写入y1[param_index[1][0]][0]中,即写入y1[2][0]中;注意到:当param_index[i][0]和param_index[i][1]相同时,会发生覆盖写入,例如y2[0][0]与y2[1][0]都是取0值,则x[1][0]=0.5735会覆盖掉x[0][0]=0.3992对y2[0][0]的写入。
- 依次类推…param_index[3][0], param_index[4][0], …
incase src (Tensor) is not specified, 即利用value标量来scatter
# Example:
>>> y1 = torch.zeros(3, 5).scatter_(0, torch.tensor([[0, 1, 2, 0, 0], [2, 0, 0, 1, 2]]), 6)
>>> y1
tensor([[6., 6., 6., 6., 6.],
        [0., 6., 0., 6., 0.],
        [6., 0., 6., 0., 6.]])
此例中self是y1,y1 is a 2-D tensor,由于param_dim=0,故self[param_index[i][j]][j] = value,因而有:
00 11 22 03 04
20 01 02 13 24
- 由于param_index[0][0]=0,故将 6 写入y1[param_index[0][0]][0]中,即写入y1[0][0]中;
- 由于param_index[0][1]=1,故将 6 写入y1[param_index[0][1]][1]中,即写入y1[1][1]中;
- 由于param_index[0][2]=2,故将 6 写入y1[param_index[0][2]][2]中,即写入y1[2][2]中;
- 依次类推…param_index[0][3], param_index[0][4],
- 由于param_index[1][0]=2,故将 6 写入y1[param_index[1][0]][0]中,即写入y1[2][0]中;注意到:当param_index[i][0]和param_index[i][1]相同时,同样会发生覆盖写入。
- 依次类推…param_index[3][0], param_index[4][0], …
# Example:
>>> z = torch.zeros(2, 4).scatter_(1, torch.tensor([[2], [3]]), 1.23)
>>> z
tensor([[ 0.0000,  0.0000,  1.2300,  0.0000],
        [ 0.0000,  0.0000,  0.0000,  1.2300]])
此例中self是z,z is a 2-D tensor,由于param_dim=1,故self[i][param_index[i][j]] = value,因而有:
00
10
- 由于param_index[0][0]=2,故将 1.23 写入z[0][param_index[0][0]]中,即写入z[0][2]中;
- 由于param_index[1][0]=3,故将 1.23 写入z[1][param_index[0][1]]中,即写入z[1][3]中;
torch.Tensor.scatter_() 一般可以用来对标签进行one-hot 编码,
这属于典型的利用标量来修改张量的例子。
# Example:
>>> import numpy as np
>>> index_a = np.array(3).astype('int64')
>>> print("index_a的shape:", index_a.shape, "\n", index_a)  # ()   3
>>> index_a = index_a[np.newaxis, np.newaxis]
>>> print("index_a的shape:", index_a.shape, "\n", index_a)  # (1,1)   [[3]]
>>> index_a = torch.from_numpy(index_a)  # torch.Size([1, 1]), index_a中只有1个元素,用index_a[0][0]索引
# torch.zeros(1, 10).shape为torch.Size([1, 10])
# 由于param_index[0][0]=3,故将 1 写入one_hot[0][param_index[0][0]]中,即写入one_hot[0][3]中;
>>> one_hot = torch.zeros(1, 10).scatter_(1, index_a, 1)  # self[0][index[0][0]] = 1
>>> print("one_hot的shape:", one_hot.shape, "\n", one_hot)
one_hot的shape: torch.Size([1, 10])
 tensor([[0., 0., 0., 1., 0., 0., 0., 0., 0., 0.]])


# Example:
>>> import torch
>>> class_num = 10
>>> batch_size = 4
>>> label = torch.tensor([[6], [0], [3], [2]])  # class_num
>>> print("label的shape:", label.shape, "\n", label)
label的shape: torch.Size([4, 1])
 tensor([[6],
        [0],
        [3],
        [2]])
>>> one_hot = torch.zeros(batch_size, class_num).scatter_(1, label, 1)
>>> print("one_hot的shape:", one_hot.shape, "\n", one_hot)  # 沿着dimension=1看,每行可看作是一个one-hot编码
one_hot的shape: torch.Size([4, 10])
 tensor([[0., 0., 0., 0., 0., 0., 1., 0., 0., 0.],
        [1., 0., 0., 0., 0., 0., 0., 0., 0., 0.],
        [0., 0., 0., 1., 0., 0., 0., 0., 0., 0.],
        [0., 0., 1., 0., 0., 0., 0., 0., 0., 0.]])
torch.gather

torch.gather(input, param_dim, param_index, out=None, sparse_grad=False) → Tensor
Gathers values along an axis specified by param_dim.
# For a 3-D tensor the output is specified by:
out[i][j][k] = input[index[i][j][k]][j][k]  # if dim == 0
out[i][j][k] = input[i][index[i][j][k]][k]  # if dim == 1
out[i][j][k] = input[i][j][index[i][j][k]]  # if dim == 2
在上述示例中,从左边往右边看。
# Example:
>>> input = torch.tensor([[1,2,3],[4,5,6]])
>>> output = torch.gather(input, 1, torch.tensor([[0,0],[2,0]]))
>>> output
tensor([[ 1,  1],
        [ 6,  4]])

>>> output = torch.gather(input, 1, torch.tensor([[0,0],[3,0]]))  # input.size(1) - 1 = 2, 3超出了范围
Traceback (most recent call last):
  File "D:\***\Anaconda3\envs\my_cpu_py3\lib\site-packages\IPython\core\interactiveshell.py", line 3326, in run_code
    exec(code_obj, self.user_global_ns, self.user_ns)
  File "<ipython-input-19-f8c13e5b33f8>", line 1, in <module>
    output = torch.gather(input, 1, torch.tensor([[0,0],[3,0]]))
RuntimeError: Invalid index in gather at C:\w\1\s\tmp_conda_3.7_160731\conda\conda-bld\pytorch_1570810122324\work\aten\src\TH/generic/THTensorEvenMoreMath.cpp:657
此例中param_index is a 2-D tensor,故output2也是a 2-D tensor,由于param_dim=1,故out[i][j] = input[i][param_index[i][j]],因而有:
- 对于output[0][0],由于param_index[0][0]=0,故output[0][0]取input[0][0]=1;
- 对于output[0][1],由于param_index[0][1]=0,故output[0][1]取input[0][0]=1;
- 对于output[1][0],由于param_index[1][0]=2,故output[1][0]取input[1][2]=6;
- 对于output[1][1],由于param_index[1][1]=0,故output[1][1]取input[1][0]=4;
Moreover, as for gather(), the values of param_index must be between 0 and self.size(param_dim) - 1 inclusive, and all values in a row along the specified dimension param_dim must be unique.
在上例中,param_index中的值必须位于0到input.size(1) - 1范围之内,否则会报错,后半句"all values in a row along the specified dimension param_dim must be unique"暂时没明白是什么意思。
保持Tensor的索引对齐(或者说索引一致性)
若需要将cls_scores转换成shape为torch.Size([2, 121515])的concat_cls_scores, 可以通过以下方法:
mmdet/models/dense_heads/anchor_head.py
def loss():
	cls_scores的shape: list[5Tensor], 5Tensor的shape分别为:
	torch.Size([2, 3, 200, 152])
	torch.Size([2, 3, 100, 76])
	torch.Size([2, 3, 50, 38])
	torch.Size([2, 3, 25, 19])
	torch.Size([2, 3, 13, 10])

	若需要将cls_scores转换成shape为torch.Size([2, 121515])的concat_cls_scores, 可以通过以下方法:
	concat_cls_scores = torch.cat(
                [cls_score.permute(0, 2, 3, 1).reshape(2, -1) for cls_score in cls_scores], 1)
	注: 由于从anchor_list到concat_anchor_list时沿dim=0方向.cat: 91200+22800+5700+1425+390=121515, 故这里是先操作.reshape()再操作.cat();

	torch.Size([2, 200, 152, 3])
	torch.Size([2, 100, 76, 3])
	torch.Size([2, 50, 38, 3])
	torch.Size([2, 25, 19, 3])
	torch.Size([2, 13, 10, 3])

	torch.Size([2, 91200])
	torch.Size([2, 22800])
	torch.Size([2, 5700])
	torch.Size([2, 1425])
	torch.Size([2, 390])

	torch.Size([2, 121515])
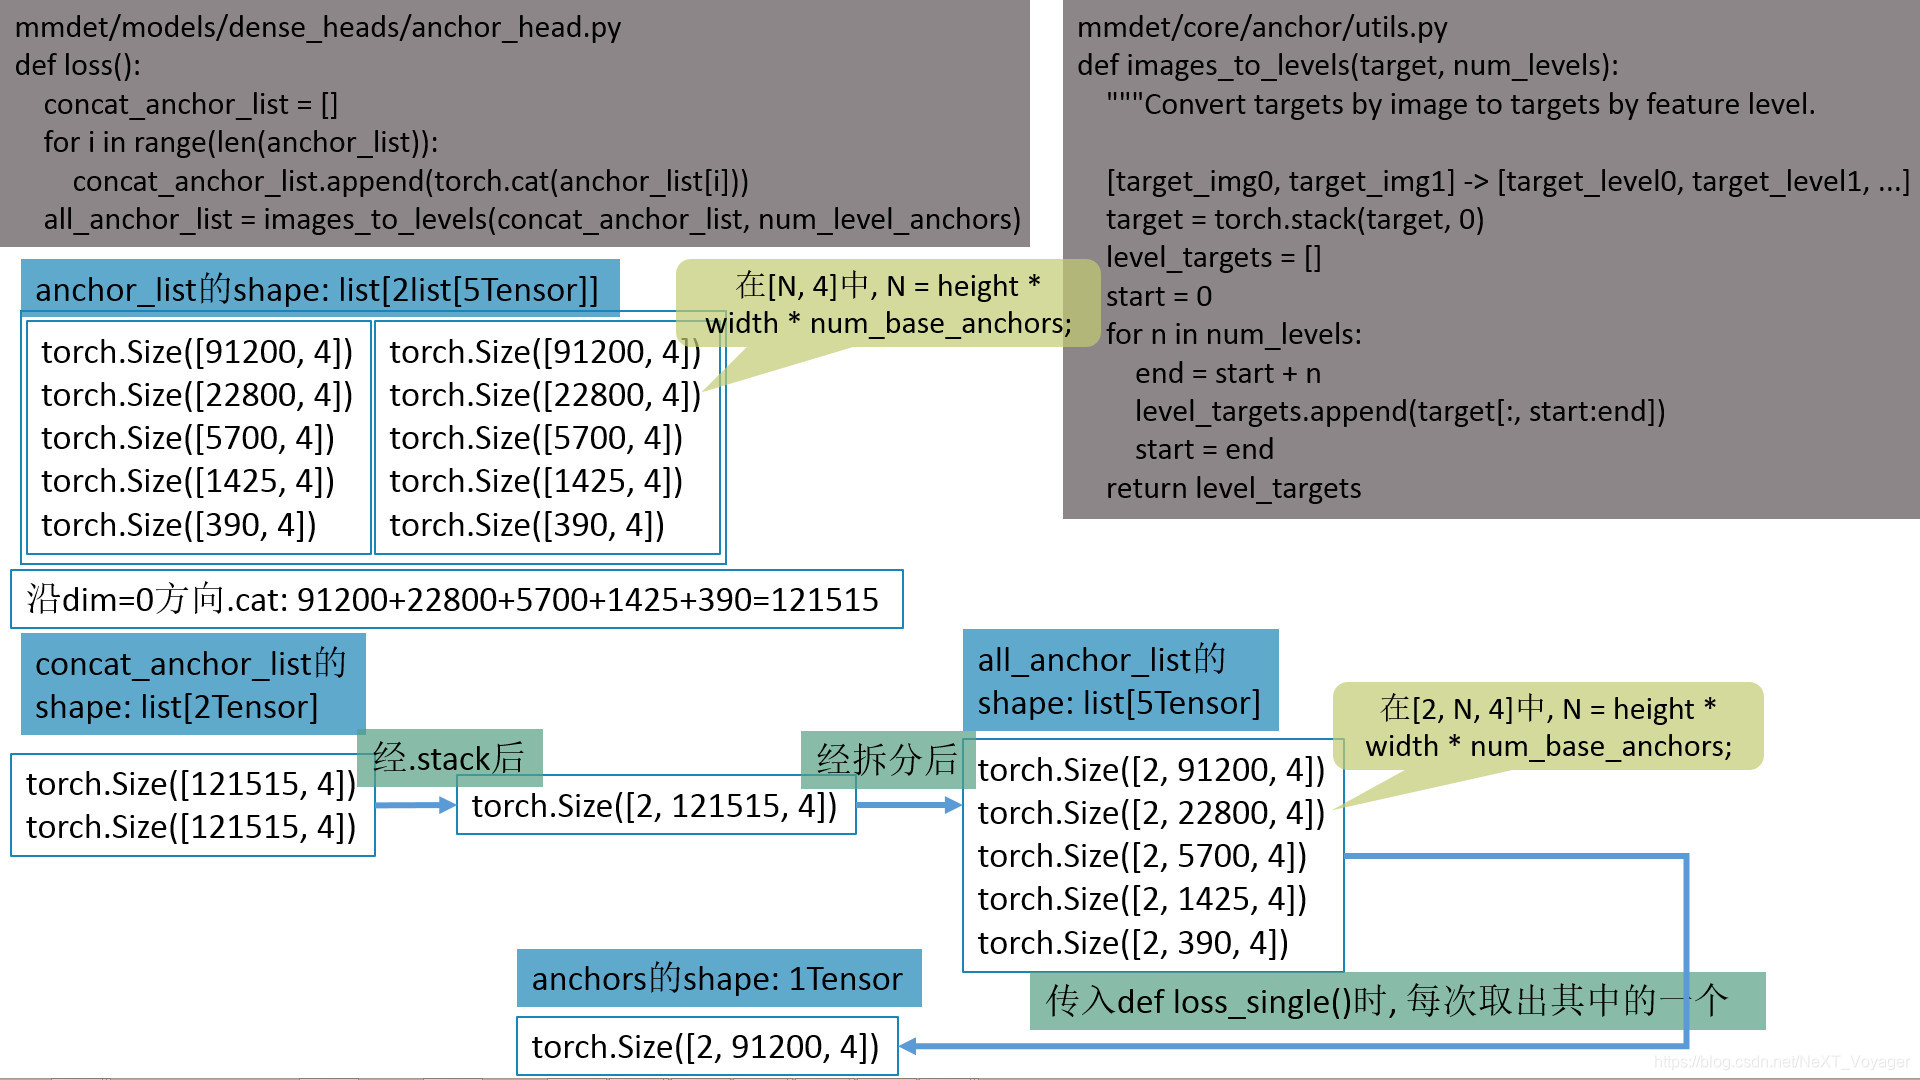
mmdet/core/anchor/utils.py
def images_to_levels(target, num_levels):
"""Convert targets by image to targets by feature level.
[target_img0, target_img1] -> [target_level0, target_level1, ...]
"""
target = torch.stack(target, 0)
level_targets = []
start = 0
for n in num_levels:
end = start + n
# level_targets.append(target[:, start:end].squeeze(0))
level_targets.append(target[:, start:end])
start = end
return level_targets
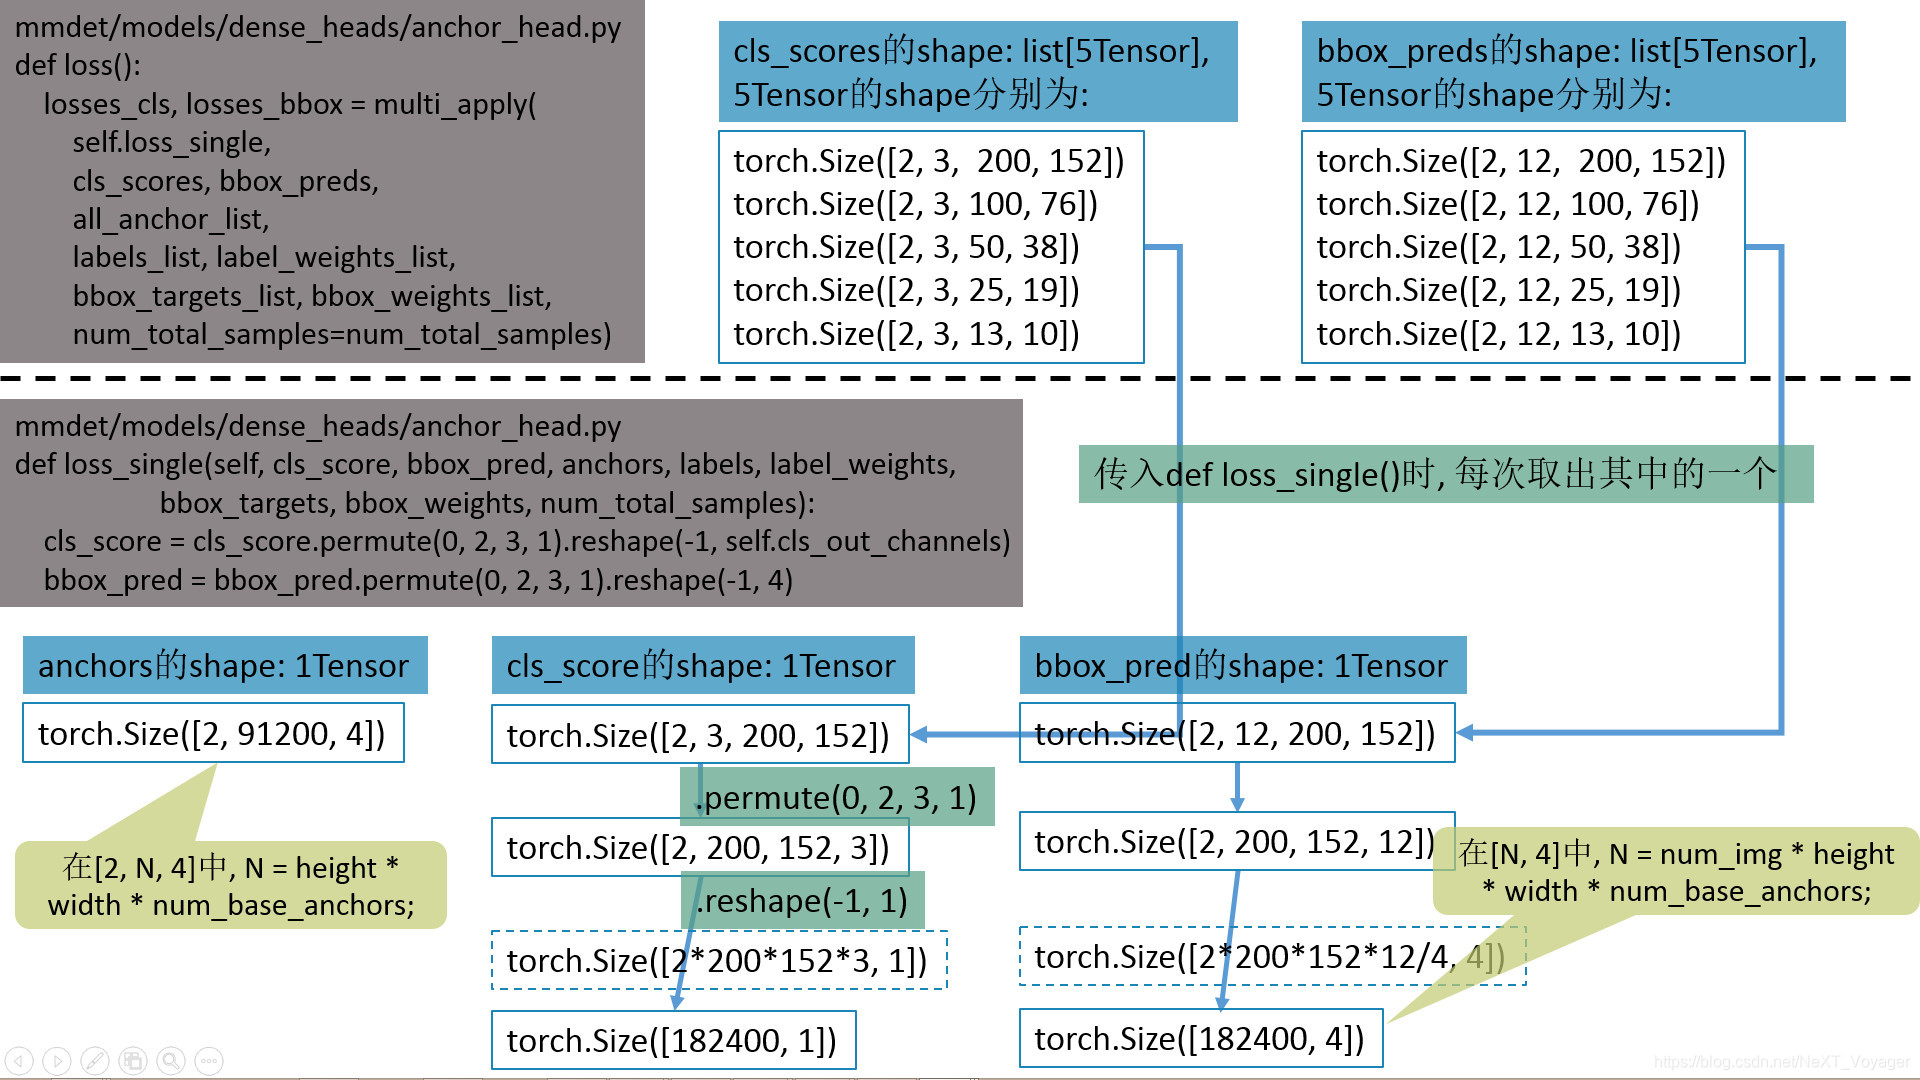
mmdet/models/dense_heads/anchor_head.py
def loss():
concat_anchor_list = []
for i in range(len(anchor_list)):
concat_anchor_list.append(torch.cat(anchor_list[i]))
all_anchor_list = images_to_levels(concat_anchor_list, num_level_anchors)
losses_cls, losses_bbox = multi_apply(
self.loss_single,
cls_scores, bbox_preds,
all_anchor_list,
labels_list, label_weights_list,
bbox_targets_list, bbox_weights_list,
num_total_samples=num_total_samples)
anchor_list的shape: list[2list[5Tensor]], 5Tensor的shape分别为:
torch.Size([91200, 4]) # 在[N, 4]中, N = height * width * num_base_anchors;
torch.Size([22800, 4])
torch.Size([5700, 4])
torch.Size([1425, 4])
torch.Size([390, 4])
concat_anchor_list的shape: list[2Tensor], 2Tensor的shape分别为:
torch.Size([121515, 4])
torch.Size([121515, 4])
all_anchor_list的shape: list[5Tensor], 5Tensor的shape分别为:
torch.Size([2, 91200, 4]) # 在[2, N, 4]中, N = height * width * num_base_anchors;
torch.Size([2, 22800, 4])
torch.Size([2, 5700, 4])
torch.Size([2, 1425, 4])
torch.Size([2, 390, 4])
cls_scores的shape: list[5Tensor], 5Tensor的shape分别为:
torch.Size([2, 3, 200, 152])
torch.Size([2, 3, 100, 76])
torch.Size([2, 3, 50, 38])
torch.Size([2, 3, 25, 19])
torch.Size([2, 3, 13, 10])
bbox_preds的shape: list[5Tensor], 5Tensor的shape分别为:
torch.Size([2, 12, 200, 152])
torch.Size([2, 12, 100, 76])
torch.Size([2, 12, 50, 38])
torch.Size([2, 12, 25, 19])
torch.Size([2, 12, 13, 10])
mmdet/models/dense_heads/anchor_head.py
def loss_single(self, cls_score, bbox_pred, anchors, labels, label_weights,
bbox_targets, bbox_weights, num_total_samples):
cls_score = cls_score.permute(0, 2, 3, 1).reshape(-1, self.cls_out_channels)
bbox_pred = bbox_pred.permute(0, 2, 3, 1).reshape(-1, 4)
anchors的shape: 1Tensor
torch.Size([2, 91200, 4]) # 在[2, N, 4]中, N = height * width * num_base_anchors;
cls_score的shape: 1Tensor
torch.Size([2, 3, 200, 152]) --> torch.Size([2, 200, 152, 3]) --> torch.Size([182400, 1])
bbox_pred的shape: 1Tensor
torch.Size([2, 12, 200, 152]) --> torch.Size([2, 200, 152, 12]) --> torch.Size([182400, 4])
# 在[N, 4]中, N = num_img * height * width * num_base_anchors;
在共有的前提条件inds_B_in_A下, 由inds_C_in_B求inds_C_in_A 和 由inds_C_in_A求inds_C_in_B
在共有的前提条件inds_B_in_A下, "已知inds_C_in_B, 求inds_C_in_A ?“和"已知inds_C_in_A, 求inds_C_in_B ?”;
- 共有的前提条件如下:
共有的前提条件如下:
import torch
import time


A = torch.tensor([100, 101, 102, 103, 104, 105, 106, 107])  # 则inds_A_in_A = torch.tensor([0, 1, 2, 3, 4, 5, 6, 7])
flags_B_in_A = torch.tensor([False, True, False, True, False, True, False, True])
B = A[flags_B_in_A]  # tensor([101, 103, 105, 107])
inds_B_in_A = torch.where(flags_B_in_A == True)[0]  # tensor([1, 3, 5, 7])
print('(B == A[inds_B_in_A]).all()的值:', (B == A[inds_B_in_A]).all())
- 例子一:已知inds_C_in_B, 求inds_C_in_A ?
例子一:已知inds_C_in_B, 求inds_C_in_A ?
inds_C_in_B = torch.tensor([2, 0])
C = B[inds_C_in_B]  # tensor([105, 101])

inds_C_in_A = torch.where(flags_B_in_A == True)[0][inds_C_in_B]
print('(C == A[inds_C_in_A]).all()的值:', (C == A[inds_C_in_A]).all())
- 例子二:已知inds_C_in_A, 求inds_C_in_B ?
例子二:已知inds_C_in_A, 求inds_C_in_B ?
inds_C_in_A = torch.tensor([5, 1])
C = A[inds_C_in_A]  # tensor([105, 101])

方法一:利用torch.where()找出ind_C_in_A在inds_B_in_A中的索引;
time_start = time.time()
inds_C_in_B = []
for i in range(inds_C_in_A.size(0)):
	ind_C_in_B = torch.where(inds_B_in_A == inds_C_in_A[i])[0]
	inds_C_in_B.append(ind_C_in_B)
inds_C_in_B = torch.cat(inds_C_in_B)
print('方法一耗时%10.7f sec' % (time.time() - time_start))  # 方法一耗时 0.0006711 sec
print('(C == B[inds_C_in_B]).all()的值:', (C == B[inds_C_in_B]).all())

方法二:计算flags_B_in_A中ind_C_in_A前面有多少个元素为True(假设有x个), 则在ind_C_in_B = x;
time_start = time.time()
inds_C_in_B = []
for i in range(inds_C_in_A.size(0)):
	ind_C_in_B = torch.where(flags_B_in_A[:inds_C_in_A[i]] == True)[0].size(0)
	inds_C_in_B.append(ind_C_in_B)
inds_C_in_B = torch.tensor(inds_C_in_B)
print('方法二耗时%10.7f sec' % (time.time() - time_start))  # 方法二耗时 0.0009015 sec
print('(C == B[inds_C_in_B]).all()的值:', (C == B[inds_C_in_B]).all())
PyTorch中模型的保存与加载
*** PyTorch入门学习(六):model的保存与加载 20180130
PyTorch中tensor和nn.Module的复制 Copy.deepcopy() v.s. clone()
20201113记:
Copy.deepcopy() vs clone() - PyTorch Forums
spanev Serge Panev 20190903 comment:
Hi @Shisho_Sama,
For Tensors in most cases, you should go for.clone()since this is a PyTorch operation that will be recorded by autograd.
When it comes to Module, there is no clone method available so you can either usecopy.deepcopy()or create a new instance of the model and just copy the parameters, as proposed in this post Deep copying PyTorch modules 894.
Deep copying PyTorch modules - PyTorch Forums
jpeg729 20180110 comment:
If I had to deep copy a model, I would do something like this…
model_copy = type(mymodel)()  # get a new instance
model_copy.load_state_dict(mymodel.state_dict())  # copy weights and stuff
I can’t see how that would help you “save it somewhere else in a database”. I assume you have read the docs on serialising models 303 and the recommendations and warnings on that page.
.clone(), .detach(), new_tensor(), .copy_()
Pytorch张量(Tensor)复制_winycg的博客-CSDN博客 20190913
pytorch中的detach和detach_ - 那抹阳光1994 - 博客园 20181119
此节转载自:【Pytorch】对比clone、detach以及copy_等张量复制操作_guofei_fly的博客 20200224
编程速记(25):Pytorch篇-张量(Tensor)复制_weixin_38316806的博客-CSDN博客 20191223
1 .clone()
返回一个和源张量同shape、dtype和device的张量,与源张量不共享数据内存,但提供梯度的回溯。
下面,通过例子来详细说明:
示例:
(1)定义
import torch

a = torch.tensor(1.0, requires_grad=True, device="cuda", dtype=torch.float64)

a_ = a.clone()
print(a_)   # tensor(1., device='cuda:0', dtype=torch.float64, grad_fn=<CloneBackward>)
报错问题记录
查看torch所在的虚拟环境信息
#!/usr/bin/env python3
# -*- coding: utf-8 -*-
from __future__ import print_function
import torch
print(torch.__version__)  # 得到结果’1.4.0’
x = torch.rand(5, 3)
print(x)
print(torch.cuda.is_available())
进入以下路径,运行命令python collect_env.py,便可获取当前的环境信息:
- Linux系统下,进入\envs\my_gpu_py3\lib\python3.7\site-packages\torch\utils路径下;
- Win系统下,进入\Anaconda3\envs\my_cpu_py3\lib\site-packages\torch\utils路径下;
(my_gpu_py3) E:\OtherProgramFiles\Anaconda3\envs\my_gpu_py3\lib\site-packages\to
rch\utils>python collect_env.py
Collecting environment information...
PyTorch version: 1.4.0
Is debug build: No
CUDA used to build PyTorch: Could not collect

OS: Microsoft Windows 8.1 China
GCC version: Could not collect
CMake version: version 3.11.0

Python version: 3.8
Is CUDA available: No
CUDA runtime version: 8.0.60
GPU models and configuration: GPU 0: GeForce GTX 750
Nvidia driver version: 376.51
cuDNN version: E:\Program Files\NVIDIA Corporation\NVIDIA GPU Computing Toolkit\
CUDA\v8.0\bin\cudnn64_7.dll

Versions of relevant libraries:
[pip3] numpy==1.18.5
[pip3] numpydoc==1.1.0
[pip3] torch==1.4.0
[pip3] torchsummary==1.5.1
[pip3] torchvision==0.5.0
[conda] _pytorch_select           0.1                       cpu_0
[conda] blas                      1.0                         mkl
[conda] mkl                       2020.1                      216
[conda] mkl-service               2.3.0            py38hb782905_0
[conda] mkl_fft                   1.1.0            py38h45dec08_0
[conda] mkl_random                1.1.1            py38h47e9c7a_0
[conda] pytorch                   1.4.0           cpu_py38ha775e86_0
[conda] torchsummary              1.5.1                    pypi_0    pypi
[conda] torchvision               0.5.0                    pypi_0    pypi

(my_gpu_py3) E:\OtherProgramFiles\Anaconda3\envs\my_gpu_py3\lib\site-packages\to
rch\utils>
one of the variables needed for gradient computation has been modified by an inplace operation
20201008记:
报错信息如下:

one of the variables needed for gradient computation has been modified by an inplace operation:
[torch.cuda.FloatTensor [48, 1]] is at version 16; expected version 14 instead. Hint: enable
anomaly detection to find the operation that failed to compute its gradient,
with torch.autograd.set_detect_anomaly(True).
(***此博客分析了可能导致该报错的可能原因) pytorch detach函数 - fjlruo - 博客园 20201121
ImportError: torch.utils.ffi is deprecated. Please use cpp extensions instead.
- **【已解决】ImportError: torch.utils.ffi is deprecated. Please use cpp extensions instead._ShuqiaoS的博客-CSDN博客 20190312
- torch.utils.cpp_extension对c++/cuda进行拓展 - 知乎20200602
- PyTorch运行时提示’ImportError: torch.utils.ffi is deprecated. Please use cpp extensions instead.’ – 默默的点滴20191116
- torch.utils.ffi is deprecated. How do I use cpp extensions instead? • Issue #15645 • pytorch/pytorch • GitHub20190101
最省事的情况是降级torch版本到0.4,强烈建议使用Anaconda创建独立的Python开发环境,然后在干净的环境中运行。(博主注:未经测试此解决方案是否可行)
PyTorch: cannot import name container_abc form torch._six
Unable to find a valid cuDNN algorithm to run convolution
问题描述:
开始
原因分析and解决方案:
很有可能是 GPU 显存不够的原因, 尝试把 batch_size 改小一点问题得以解决;
【问题解决】YOLOv5遇到Unable to find a valid cuDNN algorithm to run convolution_Gorgeous_wxd-CSDN博客 20210927
Unable to find a valid cuDNN algorithm to run convolution_weixin_43615569的博客-CSDN博客 20201005
待补充
二级标题
待补充
待补充
数学公式粗体
\textbf{}
或者
m
e
m
o
r
y
{\bf memory}
memory
数学公式粗斜体
\bm{}
摘录自“bookname_author”
此文系转载,原文链接:名称 20200505
高亮颜色说明:突出重点
个人觉得,:待核准个人观点是否有误
分割线
分割线
我是颜色为00ffff的字体
我是字号为2的字体
我是颜色为00ffff, 字号为2的字体
我是字体类型为微软雅黑, 颜色为00ffff, 字号为2的字体
分割线
分割线
问题描述:
原因分析:
解决方案:


 510
510

 被折叠的 条评论
为什么被折叠?
被折叠的 条评论
为什么被折叠?
 到【灌水乐园】发言


