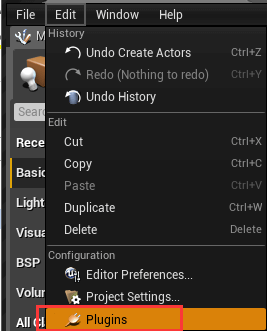
编写ue4插件
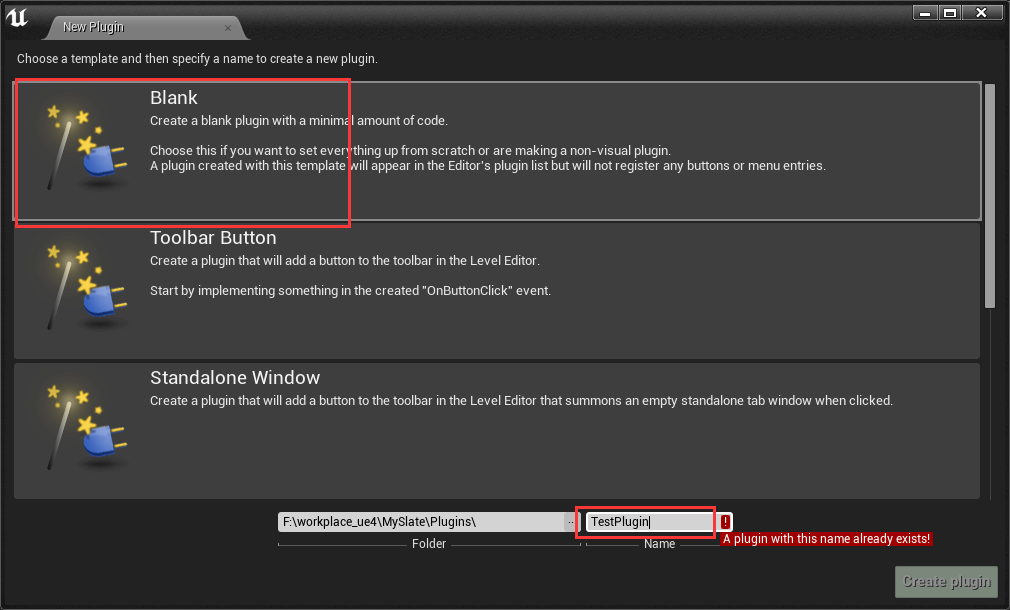
1、直接从Editor中生成一个空的插件模板
然后最右下角

2、关掉vs,右键生成一下工程文件,把Plugins扫进去
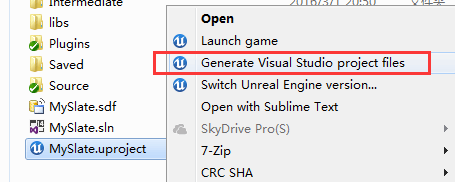
打开解决方案开始编写插件
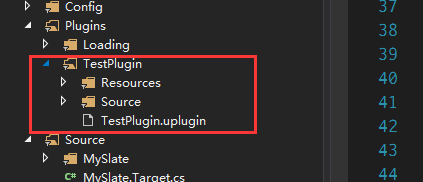
瞧,插件加进来了
3、编写插件
1- 首先把插件的配置文TestPlugin.uplugin件改一下(被这个坑了两天)
这个LoadingPhase的值默认为Default,必须修改为PreDefault,不然重启Editor会报关联不上插件源码的错误,切记!

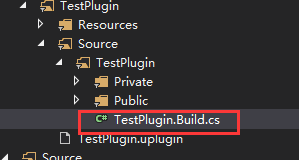
2- 修改编译模块配置TestPlugin.Build.cs文件,c#文件
详细代码,里面有注释
using UnrealBuildTool;
using System.IO;
public class TestPlugin : ModuleRules
{
private string ModulePath
{
get { return Path.GetDirectoryName(RulesCompiler.GetModuleFilename(this.GetType().Name)); }
}
private string ThirdPartyPath
{
get { return Path.GetFullPath(Path.Combine(ModulePath, "../../ThirdParty/")); }
}
private string MyTestLibPath
{
get { return Path.GetFullPath(Path.Combine(ThirdPartyPath, "MyTestLib")); }
}
public TestPlugin(TargetInfo Target)
{
PublicIncludePaths.AddRange(
new string[] {
"TestPlugin/Public"
}
);
PrivateIncludePaths.AddRange(
new string[] {
"TestPlugin/Private"
}
);
PublicDependencyModuleNames.AddRange(
new string[]
{
"Core"
}
);
PrivateDependencyModuleNames.AddRange(
new string[]
{
"CoreUObject",
"Engine",
"Slate",
"SlateCore",
}
);
DynamicallyLoadedModuleNames.AddRange(
new string[]
{
}
);
LoadThirdPartyLib(Target);
}
public bool LoadThirdPartyLib(TargetInfo Target)
{
bool isLibrarySupported = false;
if ((Target.Platform == UnrealTargetPlatform.Win64) || (Target.Platform == UnrealTargetPlatform.Win32))
{
isLibrarySupported = true;
System.Console.WriteLine("----- isLibrarySupported true");
string PlatformSubPath = (Target.Platform == UnrealTargetPlatform.Win64) ? "Win64" : "Win32";
string LibrariesPath = Path.Combine(MyTestLibPath, "Lib");
PublicAdditionalLibraries.Add(Path.Combine(LibrariesPath, PlatformSubPath, "TestLib.lib"));
}
if (isLibrarySupported)
{
System.Console.WriteLine("----- PublicIncludePaths.Add true");
PublicIncludePaths.Add(Path.Combine(MyTestLibPath, "Include"));
}
return isLibrarySupported;
}
}
- 1
- 2
- 3
- 4
- 5
- 6
- 7
- 8
- 9
- 10
- 11
- 12
- 13
- 14
- 15
- 16
- 17
- 18
- 19
- 20
- 21
- 22
- 23
- 24
- 25
- 26
- 27
- 28
- 29
- 30
- 31
- 32
- 33
- 34
- 35
- 36
- 37
- 38
- 39
- 40
- 41
- 42
- 43
- 44
- 45
- 46
- 47
- 48
- 49
- 50
- 51
- 52
- 53
- 54
- 55
- 56
- 57
- 58
- 59
- 60
- 61
- 62
- 63
- 64
- 65
- 66
- 67
- 68
- 69
- 70
- 71
- 72
- 73
- 74
- 75
- 76
- 77
- 78
- 79
- 80
- 81
- 82
- 83
- 84
- 85
- 86
3- 写个自定义的char – TestChar,继承自Character
先看下文件结构,需要蓝图可见的必须丢到Public下
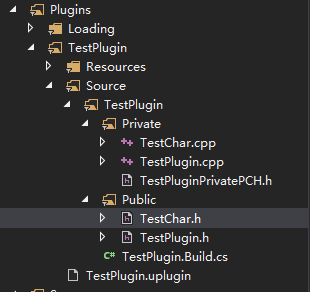
1、先修改预编译头文件TestPluginPrivatePCH.h,必须包含CoreUObject,不然编译不过,切记!
#include "TestPlugin.h"
#include "CoreUObject.h"
#include "GameFramework/Character.h"
2、头文件,正常编写自定义的类一样
#pragma once
#include "GameFramework/Character.h"
#include "TestChar.generated.h"
UCLASS()
class ATestChar : public ACharacter
{
GENERATED_BODY()
public:
ATestChar();
UPROPERTY(EditAnywhere, Category = "Test Char")
int32 mAge;
UPROPERTY(EditAnywhere, Category = "Test Char")
FString mName;
};
- 1
- 2
- 3
- 4
- 5
- 6
- 7
- 8
- 9
- 10
- 11
- 12
- 13
- 14
- 15
- 16
- 17
- 18
- 19
- 1
- 2
- 3
- 4
- 5
- 6
- 7
- 8
- 9
- 10
- 11
- 12
- 13
- 14
- 15
- 16
- 17
- 18
- 19
3、 cpp文件,包含的是预编译文件和类的头文件
#include "TestPluginPrivatePCH.h"
#include "TestChar.h"
#include "TestLib.h"
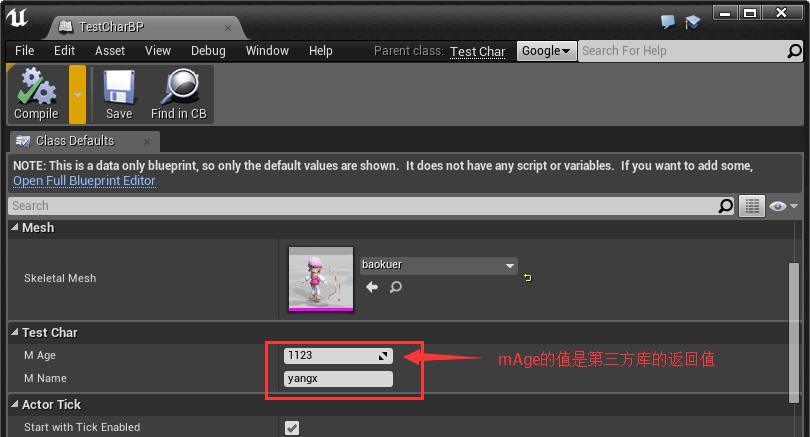
ATestChar::ATestChar() : Super()
{
mAge = myPrint("hello world", 123);
mName = "yangx";
}
//第三方库打成了一个静态库TestLib.lib
TestLib.h
#ifndef __TEST_LIB_H__
#define __TEST_LIB_H__
#include <string>
#include <iostream>

int myPrint(std::string _name, int _age);

#endif
TestLib.cpp
#include "TestLib.h"

int myPrint(std::string _name, int _age)
{
    return _age + 1000;
}
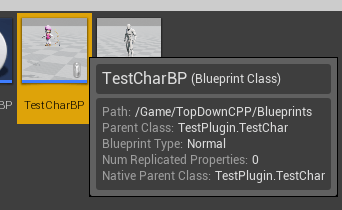
4、编译运行,在Editor中create一个Blueprint继承自这个TestChar类
5、拖到场景运行游戏


 8023
8023

 被折叠的 条评论
为什么被折叠?
被折叠的 条评论
为什么被折叠?
 到【灌水乐园】发言


