


dynamixel_motor
github: dynamixel_motor
ROS1 只有这三个版本
Tutorials
1. Beginner (Setting Up)
1.1 Connecting to Dynamixel bus
This tutorial describes how to connect and examine raw feedback from Robotis Dynamixel servos.
1.1.1 Step 1: Create a package
If the Dynamixel Controllers driver is not installed open the terminal and type:
sudo apt-get install ros-<distro>-dynamixel-controllers
Before we begin we need to create a package that has proper dependencies and will contain all the files we create in this tutorial.
Note: before executing command listed below make sure that the current directory is in one of the directories of the ROS_PACKAGE_PATH environment variable. Refer to the environment tutorials for how to best create a workspace and overlay directory.
# You should have created this in the Creating a Workspace Tutorial
cd ~/catkin_ws/src
catkin_create_pkg my_dynamixel_tutorial dynamixel_controllers std_msgs rospy roscpp
1.1.2 Step 2: Create a launch file for the manager node
We assume that the Dynamixel servos are connected to /dev/ttyUSB0 serial port.
First we need to start up the controller manager that will connect to the motors and publish raw feedback data (e.g. current position, goal position, error, etc.) at a specified rate. The easiest way to do that is to write a launch file that will set all necessary parameters. Let’s copy and paste the following text into a controller_manager.launch file.
<!-- -*- mode: XML -*- -->

<launch>
    <node name="dynamixel_manager" pkg="dynamixel_controllers" type="controller_manager.py" required="true" output="screen">
        <rosparam>
            namespace: dxl_manager
            serial_ports:
                pan_tilt_port:
                    port_name: "/dev/ttyUSB0"
                    baud_rate: 1000000
                    min_motor_id: 1
                    max_motor_id: 25
                    update_rate: 20
        </rosparam>
    </node>
</launch>
Note: Make sure you set your baud rate correctly. If you are using RX-28 motors, it should be set to 57142. If you have further problems, see if your user account needs to be added to the dialout group and if the USB port needs to be made writeable.
Now if we execute:
roslaunch my_dynamixel_tutorial controller_manager.launch
We should see the status output similar to the following:
[INFO] [WallTime: 1295282870.051953] pan_tilt_port: Pinging motor IDs 1 through 25...
[INFO] [WallTime: 1295282870.103676] pan_tilt_port: Found 4 motors - 4 AX-12 [4, 5, 6, 13], initialization complete.
Naturally the output depends on what motors are connected to the USB bus.
1.1.3 Step 3: Examine motor feedback
Now the controller manager is publishing feedback on /motor_states/pan_tilt_port topic. First, let’s check that the topic is there:
rostopic list
The output should look similar to the one shown below:
/motor_states/pan_tilt_port
/rosout
/rosout_agg
One of the topic in the list should be the /motor_states/pan_tilt_port topic. Let’s see what kind of information is published:
rostopic echo /motor_states/pan_tilt_port
In this case we have four AX-12+ motors connected:
motor_states:
motor_states:
  -
    timestamp: 1351555461.28
    id: 4
    goal: 517
    position: 527
    error: 10
    speed: 0
    load: 0.3125
    voltage: 12.4
    temperature: 39
    moving: False
  -
    timestamp: 1351555461.28
    id: 5
    goal: 512
    position: 483
    error: -29
    speed: 0
    load: 0.0
    voltage: 12.6
    temperature: 40
    moving: False
  -
    timestamp: 1351555461.28
    id: 6
    goal: 511
    position: 516
    error: 5
    speed: 0
    load: 0.0
    voltage: 12.3
    temperature: 41
    moving: False
  -
    timestamp: 1351555461.28
    id: 13
    goal: 256
    position: 256
    error: 0
    speed: 0
    load: 0.0
    voltage: 12.3
    temperature: 38
    moving: False
---
That’s it! In the next tutorial you’ll learn how to connect to several motors.
1.2 Creating a meta controller
Meta controller is an action server that allows you to group up any number of motors and control it by an action client.
1.2.1 Step1: Specify controllers parameters
First we need to create a configuration file that will contain all parameters that are necessary for our controller. Paste the text below following into tilt.yaml file:
joint3_controller:
    controller:
        package: dynamixel_controllers
        module: joint_position_controller
        type: JointPositionController
    joint_name: claw_1f
    joint_speed: 1.0
    motor:
        id: 1
        init: 0
        min: 0
        max: 4095

joint4_controller:
    controller:
        package: dynamixel_controllers
        module: joint_torque_controller
        type: JointTorqueController
    joint_name: traction_1f
    joint_speed: 1.0
    motor:
        id: 3
        init: 0
        min: 0
        max: 2047

joint5_controller:
    controller:
        package: dynamixel_controllers
        module: joint_position_controller
        type: JointPositionController
    joint_name: joint_1f
    joint_speed: 1.0
    motor:
        id: 4
        init: 0
        min: 0
        max: 4095
Note: Make sure that the motor id matches the id assigned to your dynamixel actuator.
1.2.2 Step2: Specify meta controller parameters
We need to create a configuration file that group up all controllers and made it an action server. Paste the text below following into joints_trajectory_controller.yaml file:
f_arm_controller:
    controller:
        package: dynamixel_controllers
        module: joint_trajectory_action_controller
        type: JointTrajectoryActionController
    joint_trajectory_action_node:
        min_velocity: 0.1
        constraints:
            goal_time: 0.25
Note: Make sure that the motor id matches the id assigned to your dynamixel actuator. The goal_time parameter in the .yaml file changes only the time period between each action and does not interfere in the motor’s velocity.
1.2.3 Step 3: Create a launch file
Next we need to create a launch file that will load controller parameters to the parameter server and start up the controller. Paste the following text into start_meta_controller.launch file:
<launch>
<!-- Start tilt joint controller -->
    <rosparam file="$(find my_dynamixel_tutorial)/tilt.yaml" command="load"/>
    <node name="controller_spawner" pkg="dynamixel_controllers" type="controller_spawner.py"
          args="--manager=dxl_manager
                --port dxl_USB0
                joint3_controller
                joint4_controller
                joint5_controller
                "
          output="screen"/>

  <!-- Start joints trajectory controller controller -->
    <rosparam file="$(find my_dynamixel_tutorial)/joints_trajectory_controller.yaml" command="load"/>
    <node name="controller_spawner_meta" pkg="dynamixel_controllers" type="controller_spawner.py"
          args="--manager=dxl_manager
                --type=meta
                f_arm_controller
                joint3_controller
                joint4_controller
                joint5_controller
               "
          output="screen"/>
</launch>
1.2.4 Step 4: Start the controller
We need to start up the controller manager node first. Please refer to the previous tutorial on how to do that.
After the controller manager is up and running we finally load our controller:
roslaunch my_dynamixel_tutorial start_meta_controller.launch
This node will load the controller and then exit, the output will look similar to the one below:
[INFO] [WallTime: 1412948063.493818] dxl_USB0 controller_spawner: All services are up, spawning controllers...
[INFO] [WallTime: 1412948063.556084] Controller joint3_controller successfully started.
[INFO] [WallTime: 1412948063.578977] meta controller_spawner: All services are up, spawning controllers...
[WARN] [WallTime: 1412948063.608758] [f_arm_controller] not all dependencies started, still waiting for ['joint4_controller', 'joint5_controller']...
[INFO] [WallTime: 1412948063.609689]
[WARN] [WallTime: 1412948063.626055] [f_arm_controller] not all dependencies started, still waiting for ['joint5_controller']...
[INFO] [WallTime: 1412948063.626438] Controller joint4_controller successfully started.
[INFO] [WallTime: 1412948063.720389] Controller joint5_controller successfully started.
[controller_spawner_meta-3] process has finished cleanly
log file: /home/vitor/.ros/log/d553b226-5081-11e4-ba96-0c84dc3fa970/controller_spawner_meta-3*.log
[controller_spawner-2] process has finished cleanly
log file: /home/vitor/.ros/log/d553b226-5081-11e4-ba96-0c84dc3fa970/controller_spawner-2*.log
If everything started up cleanly, you should see that all of controllers were started. If however it gets stuck on
[WARN] [WallTime: 1412948063.608758] [f_arm_controller] not all dependencies started, still waiting for ['joint4_controller', 'joint5_controller']...
replace dxl_USB0 in start_meta_controller.launch with pan_tilt_port.
Next, let’s list the topics and services that our controller provides:
rostopic list
Relevant topics:
/f_arm_controller/command
/f_arm_controller/follow_joint_trajectory/cancel
/f_arm_controller/follow_joint_trajectory/feedback
/f_arm_controller/follow_joint_trajectory/goal
/f_arm_controller/follow_joint_trajectory/result
/f_arm_controller/follow_joint_trajectory/status
/f_arm_controller/state
/joint3_controller/command
/joint3_controller/state
/joint4_controller/command
/joint4_controller/state
/joint5_controller/command
/joint5_controller/state
/jointX_controller/command topic expects a message of type std_msgs/Float64 which sets the angle of the joint.
/jointX_controller/state topic provides the current status of the motor, the message type used is dynamixel_msgs/JointState.
/f_arm_controller/command /f_arm_controller/follow_joint_trajectory/cancel
/f_arm_controller/follow_joint_trajectory/feedback
/f_arm_controller/follow_joint_trajectory/goal
/f_arm_controller/follow_joint_trajectory/result
/f_arm_controller/follow_joint_trajectory/status
/f_arm_controller/state topics are created by our meta controller, they are an action server so we should control it by a action client. It will be done at the next tutorial.
Relevant services:
/dxl_manager/dxl_USB0/restart_controller
/dxl_manager/dxl_USB0/start_controller
/dxl_manager/dxl_USB0/stop_controller
/dxl_manager/meta/restart_controller
/dxl_manager/meta/start_controller
/dxl_manager/meta/stop_controller
/dynamixel_manager/get_loggers
/dynamixel_manager/set_logger_level
/joint3_controller/set_compliance_margin
/joint3_controller/set_compliance_punch
/joint3_controller/set_compliance_slope
/joint3_controller/set_speed
/joint3_controller/set_torque_limit
/joint3_controller/torque_enable
/joint4_controller/set_compliance_margin
/joint4_controller/set_compliance_punch
/joint4_controller/set_compliance_slope
/joint4_controller/set_speed
/joint4_controller/set_torque_limit
/joint4_controller/torque_enable
/joint5_controller/set_compliance_margin
/joint5_controller/set_compliance_punch
/joint5_controller/set_compliance_slope
/joint5_controller/set_speed
/joint5_controller/set_torque_limit
/joint5_controller/torque_enable
A few services are provided that change the parameters of the joint, like speed, motor torque limit, compliance margin and slope, etc.
You can change and look at the motor parameters in the next tutorial.
1.3 Setting up Dynamixel
This tutorial should help beginners to get used to Dynamixel and how to set it’s parameters in order to control it.
1.3.1 Introduction
First of all, we must understand the basic concepts of Dynamixel. It is a servomotor in which the user can easily use it by giving certain paramaters through ROS, which is going to be covered up later. Also, there are three ways we can control our Dynamixel:
- Joint Mode
- Wheel Mode
- Multi-turn Mode
It’s very important to say that every time we want to configure any mode of our Dynamixel we always must run our controller manager.
1.3.2 Pinging the Motor
There is an easy way to ping your motor using a Python script. The interface is easy to use as shown below You can find the complete package at:git

For instance, if we connect a Dynamixel to our computer, then suppose we don’t know the id nor the baud rate, so we would select all baud rates and select a range of IDs (from 1 to 10)
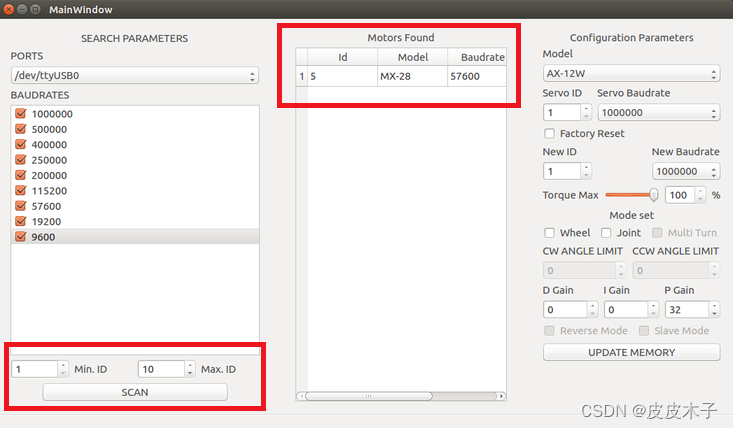
Realize that the motor found is a MX-28 with 57600 baud rate and ID 5. Those data are fundamentally important for anything we want to do with Dynamixel.
1.3.3 Joint Mode
First, let’s understand what a joint is, imagine you want to control the arm of a robot, therefore you should rotate a certain angle and then the arm should freeze at the given angle, that’s what a joint does. Configurating the Dynamixel to joint mode is the simplest configuration you can do.
1.3.4 Wheel Mode
To use Wheel Mode, we must look up for the following package in our terminal
$ rosrun dynamixel_drivers set_servo_config.py
Realize that inside the package “dynamixel_drivers” there is a python script called “set_servo_config.py”, which is the script to set parameters to Dynamixel. When giving the previous command we should see something like this in the terminal:
Options:
  -h, --help            show this help message and exit
  -p PORT, --port=PORT  motors of specified controllers are connected to PORT
                        [default: /dev/ttyUSB0]
  -b BAUD, --baud=BAUD  connection to serial port will be established at BAUD
                        bps [default: 1000000]
  -r RATE, --baud-rate=RATE
                        set servo motor communication speed
  -d DELAY, --return-delay=DELAY
                        set servo motor return packet delay time
  --cw-angle-limit=CW_ANGLE
                        set servo motor CW angle limit
  --ccw-angle-limit=CCW_ANGLE
                        set servo motor CCW angle limit
  --min-voltage-limit=MIN_VOLTAGE
                        set servo motor minimum voltage limit
  --max-voltage-limit=MAX_VOLTAGE
                        set servo motor maximum voltage limit
There are plenty of parameters, in this case we just want to put the Dynamixel in wheel mode. Now we give the following command
$ rosrun dynamixel_drivers set_servo_config.py 5 --baud=57600 --cw-angle-limit=0
--ccw-angle-limit=0
The first parameter, which is “5” is related to our Dynamixel’s ID, in this case you should see your Dynamixel’s ID before. The second parameter is the baud rate, there are plenty of baud rates available, you should also check it before. The two new parameters here are “–cw-angle-limit” and “–ccw-angle-limit”. CW means clockwise and CCW means counterclockwise, so it makes sense to say that if we want our motor to fully rotate, then both CW and CCW limits should be 0.
1.3.5 Multi-turn Mode
This mode allows the dynamixel to receive a goal bigger than 4095 (4095 beign a full rotation). It’s important to say that the Multi-turn mode is only available in some servos from Dynamixel, you should check the documentation before trying anything.
1.3.6 An easy way
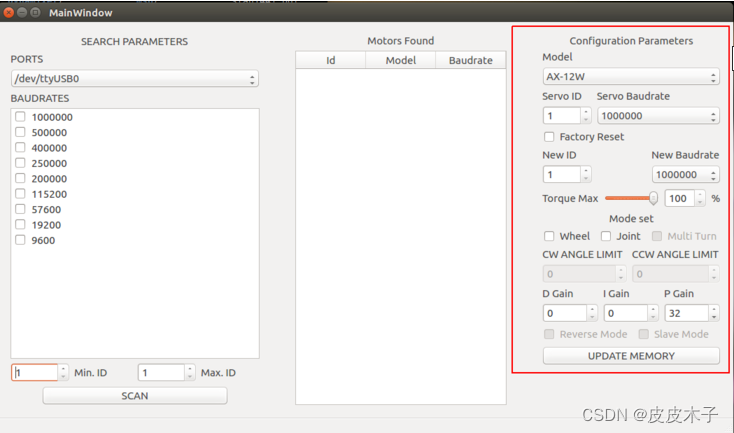
Instead of having all this hard work, we could simply use the script above, it also gives the ability of setting Dynamixel to any mode we want, such as setting gains, new baud rates, IDs and maximum torque.
2. Intermediate (Motor Control)
2.1 Creating a joint controller
This tutorial describes how to create a joint controller with one or more Robotis Dynamixel motors.
2.1.1 Step1: Specify controller parameters
First we need to create a configuration file that will contain all parameters that are necessary for our controller. Paste the text below following into tilt.yaml file:
tilt_controller:
    controller:
        package: dynamixel_controllers
        module: joint_position_controller
        type: JointPositionController
    joint_name: tilt_joint
    joint_speed: 1.17
    motor:
        id: 4
        init: 512
        min: 0
        max: 1023
Note: Make sure that the motor id matches the id assigned to your dynamixel actuator.
Now, let’s understand the .yaml file. Realize that in the section “motor” there are four parameters: “id”, “init”, “min” and “max”.
- The id parameter is arbitrary, you can choose whatever number you like it, except if you are using other dynamixels, then the dynamixel id must be unique.
- The init parameter has 4096 values, so it varies from 0 to 4095. This parameter is related to the joint initial position, hence init. Since a full rotation is 360 degrees, setting init: 1365 would leave the initial state of the motor 120 degrees from the original reference 0.
- The min parameter is the minimum rotation the motor can do, it follows the same rule as the init parameter.
- The max parameter is the maximum rotation the motor can do, it also follows the same rule as the previous parameters.
2.1.2 Step 2: Create a launch file
Next we need to create a launch file that will load controller parameters to the parameter server and start up the controller. Paste the following text into start_tilt_controller.launch file:
<launch>
    <!-- Start tilt joint controller -->
    <rosparam file="$(find my_dynamixel_tutorial)/tilt.yaml" command="load"/>
    <node name="tilt_controller_spawner" pkg="dynamixel_controllers" type="controller_spawner.py"
          args="--manager=dxl_manager
                --port pan_tilt_port
                tilt_controller"
          output="screen"/>
</launch>
2.1.3 Step 3: Start the controller
We need to start up the controller manager node first. Please refer to the previous tutorial on how to do that.
After the controller manager is up and running we finally load our controller:
roslaunch my_dynamixel_tutorial start_tilt_controller.launch
This node will load the controller and then exit, the output will look similar to the one below:
process[tilt_controller_spawner-1]: started with pid [4567]
[INFO] 1295304638.205076: ttyUSB0 controller_spawner: waiting for controller_manager to startup in global namespace...
[INFO] 1295304638.217088: ttyUSB0 controller_spawner: All services are up, spawning controllers...
[INFO] 1295304638.345325: Controller tilt_controller successfully started.
[tilt_controller_spawner-1] process has finished cleanly.
If everything started up cleanly, you should see “Controller tilt_controller successfully started.” message printed to the terminal.
Next, let’s list the topics and services that the Dynamixel controller provides:
rostopic list
Relevant topics:
/motor_states/ttyUSB0
/tilt_controller/command
/tilt_controller/state
/tilt_controller/command topic expects a message of type std_msgs/Float64 which sets the angle of the joint.
/tilt_controller/state topic provides the current status of the motor, the message type used is dynamixel_msgs/JointState.
Relevant services:
/restart_controller/ttyUSB0
/start_controller/ttyUSB0
/stop_controller/ttyUSB0
/tilt_controller/set_compliance_margin
/tilt_controller/set_compliance_punch
/tilt_controller/set_compliance_slope
/tilt_controller/set_speed
/tilt_controller/set_torque_limit
/tilt_controller/torque_enable
A few services are provided that change the parameters of the joint, like speed, motor torque limit, compliance margin and slope, etc.
2.1.4 Step 4: Moving the motor
To actually move the motor we need to publish a desired angle to /tilt_controller/command topic, like so:
rostopic pub -1 /tilt_controller/command std_msgs/Float64 -- 1.5
That’s it, see the motor move! Want to control two motors in position mode? Learn how to do it in the next tutorial.
2.2 Creating a dual joint position controller
This tutorial describes how to create a dual joint position controller with a Robotis Dynamixel motors.
2.2.1 Step1: Specify controller parameters
First we need to create a configuration file that will contain all parameters that are necessary for our controller. Paste the text below following into dual_motor.yaml file:
dual_motor_controller:
    controller:
        package: dynamixel_controllers
        module: joint_position_controller_dual_motor
        type: JointPositionControllerDual
    joint_name: dual_motor
    joint_speed: 1.17
    motor_master:
        id: 7
        init: 0
        min: -2047
        max: 2047
    motor_slave:
        id: 15
Note: Make sure that the both motors ids matches the ids assigned to your dynamixel actuator and both dynamixel motor are working on joint mode.
2.2.2 Step 2: Create a launch file
Next we need to create a launch file that will load controller parameters to the parameter server and start up the controller. Paste the following text into start_dual_motor_controller.launch file:
<launch>
    <!-- Start dual_motor joint controller -->
    <rosparam file="$(find my_dynamixel_tutorial)/dual_motor.yaml" command="load"/>
    <node name="dual_motor_controller_spawner" pkg="dynamixel_controllers" type="controller_spawner.py"
          args="--manager=dxl_manager
                --port your_dynamixel_usb_port
                dual_motor_controller"
          output="screen"/>
</launch>
2.2.3 Step 3: Start the controller
We need to start up the controller manager node first. Please refer to the previous tutorial on how to do that.
After the controller manager is up and running we finally load our controller:
roslaunch my_dynamixel_tutorial start_dual_motor_controller.launch
This node will load the controller and then exit, the output will look similar to the one below:
process[tilt_controller_spawner-1]: started with pid [4567]
[INFO] 1295304638.205076: ttyUSB0 controller_spawner: waiting for controller_manager to startup in global namespace...
[INFO] 1295304638.217088: ttyUSB0 controller_spawner: All services are up, spawning controllers...
[INFO] 1295304638.345325: Controller pan_controller successfully started.
[tilt_controller_spawner-1] process has finished cleanly.
If everything started up cleanly, you should see “Controller pan_controller successfully started.” message printed to the terminal.
Next, let’s list the topics and services that the Dynamixel controller provides:
rostopic list
Relevant topics:
/motor_states/ttyUSB0
/dual_motor_controller/command
/dual_motor_controller/state
/dual_motor_controller/command topic expects a message of type std_msgs/Float64 which sets the position of the joint.
/dual_motor_controller/state topic provides the current status of the master and the slave motor, the message type used is dynamixel_msgs/JointState.
Relevant services:
/restart_controller/ttyUSB0
/start_controller/ttyUSB0
/dual_motor_controller/ttyUSB0
/dual_motor_controller/set_compliance_margin
/dual_motor_controller/set_compliance_punch
/dual_motor_controller/set_compliance_slope
/dual_motor_controller/set_speed
/dual_motor_controller/set_torque_limit
/dual_motor_controller/torque_enable
A few services are provided that change the parameters of the joint, like position, motor torque limit, compliance margin and slope, etc.
2.2.4 Step 4: Moving the motor
To actually move the motor we need to publish a desired positions to /dual_motor_controller/command topic, like so:
rostopic pub -1 /dual_motor_controller/command std_msgs/Float64 -- 1.5
That’s it, see the both motors move!
Learn how to control a dynamixel motor on wheel mode in next tutorial.
2.3 Creating a joint torque controller
This tutorial describes how to create a joint torque controller with a Robotis Dynamixel motor.
2.3.1 Step1: Specify controller parameters
First we need to create a configuration file that will contain all parameters that are necessary for our controller. Paste the text below following into pan.yaml file:
pan_controller:
    controller:
        package: dynamixel_controllers
        module: joint_torque_controller
        type: JointTorqueController
    joint_name: pan_joint
    joint_speed: 1.17
    motor:
        id: 4
        init: 0
        min: 0
        max: 4095
Note: Make sure that the motor id matches the id assigned to your dynamixel actuator and dynamixel motor is on wheel mode. You can use the set_servo_config.py with the --ccw-angle-limit=0 argument to turn the wheel mode ON.
2.3.2 Step 2: Create a launch file
Next we need to create a launch file that will load controller parameters to the parameter server and start up the controller. Paste the following text into start_pan_controller.launch file:
<launch>
    <!-- Start pan joint controller -->
    <rosparam file="$(find my_dynamixel_tutorial)/pan.yaml" command="load"/>
    <node name="pan_controller_spawner" pkg="dynamixel_controllers" type="controller_spawner.py"
          args="--manager=dxl_manager
                --port your_dynamixel_usb_port
                pan_controller"
          output="screen"/>
</launch>
2.3.3 Step 3: Start the controller
We need to start up the controller manager node first. Please refer to the previous tutorial on how to do that.
After the controller manager is up and running we finally load our controller:
roslaunch my_dynamixel_tutorial start_pan_controller.launch
This node will load the controller and then exit, the output will look similar to the one below:
process[tilt_controller_spawner-1]: started with pid [4567]
[INFO] 1295304638.205076: ttyUSB0 controller_spawner: waiting for controller_manager to startup in global namespace...
[INFO] 1295304638.217088: ttyUSB0 controller_spawner: All services are up, spawning controllers...
[INFO] 1295304638.345325: Controller pan_controller successfully started.
[tilt_controller_spawner-1] process has finished cleanly.
If everything started up cleanly, you should see “Controller pan_controller successfully started.” message printed to the terminal.
Next, let’s list the topics and services that the Dynamixel controller provides:
rostopic list
Relevant topics:
/motor_states/ttyUSB0
/pan_controller/command
/pan_controller/state
/pan_controller/command topic expects a message of type std_msgs/Float64 which sets the velocity of the joint.
/pan_controller/state topic provides the current status of the motor, the message type used is dynamixel_msgs/JointState.
Relevant services:
/restart_controller/ttyUSB0
/start_controller/ttyUSB0
/stop_controller/ttyUSB0
/pan_controller/set_compliance_margin
/pan_controller/set_compliance_punch
/pan_controller/set_compliance_slope
/pan_controller/set_speed
/pan_controller/set_torque_limit
/pan_controller/torque_enable
A few services are provided that change the parameters of the joint, like speed, motor torque limit, compliance margin and slope, etc.
2.3.4 Step 4: Moving the motor
To actually move the motor we need to publish a desired velocity to /pan_controller/command topic, like so:
rostopic pub -1 /pan_controller/command std_msgs/Float64 -- 1.0
That’s it, see the motor move!
2.4 Creating a dual joint torque controller
This tutorial describes how to create a dual joint torque controller with a Robotis Dynamixel motors.
2.4.1 Step1: Specify controller parameters
First we need to create a configuration file that will contain all parameters that are necessary for our controller. Paste the text below following into dual_motor.yaml file:
dual_motor_controller:
    controller:
        package: dynamixel_controllers
        module: joint_torque_controller_dual_motor
        type: JointTorqueControllerDualMotor
    joint_name: dual_motor
    joint_speed: 1.17
    motor_master:
        id: 7
        init: 0
        min: -2047
        max: 2047
    motor_slave:
        id: 15
Note: Make sure that the both motors ids matches the ids assigned to your dynamixel actuator and both dynamixel motor are working on wheel mode.
2.4.2 Step 2: Create a launch file
Next we need to create a launch file that will load controller parameters to the parameter server and start up the controller. Paste the following text into start_dual_motor_controller.launch file:
<launch>
    <!-- Start dual_motor joint controller -->
    <rosparam file="$(find my_dynamixel_tutorial)/dual_motor.yaml" command="load"/>
    <node name="dual_motor_controller_spawner" pkg="dynamixel_controllers" type="controller_spawner.py"
          args="--manager=dxl_manager
                --port your_dynamixel_usb_port
                dual_motor_controller"
          output="screen"/>
</launch>
2.4.3 Step 3: Start the controller
We need to start up the controller manager node first. Please refer to the previous tutorial on how to do that.
After the controller manager is up and running we finally load our controller:
roslaunch my_dynamixel_tutorial start_dual_motor_controller.launch
This node will load the controller and then exit, the output will look similar to the one below:
process[tilt_controller_spawner-1]: started with pid [4567]
[INFO] 1295304638.205076: ttyUSB0 controller_spawner: waiting for controller_manager to startup in global namespace...
[INFO] 1295304638.217088: ttyUSB0 controller_spawner: All services are up, spawning controllers...
[INFO] 1295304638.345325: Controller pan_controller successfully started.
[tilt_controller_spawner-1] process has finished cleanly.
If everything started up cleanly, you should see “Controller pan_controller successfully started.” message printed to the terminal.
Next, let’s list the topics and services that the Dynamixel controller provides:
rostopic list
Relevant topics:
/motor_states/ttyUSB0
/dual_motor_controller/command
/dual_motor_controller/state
/dual_motor_controller/command topic expects a message of type std_msgs/Float64 which sets the velocity of the joint.
/dual_motor_controller/state topic provides the current status of the master and the slave motor, the message type used is dynamixel_msgs/JointState.
Relevant services:
/restart_controller/ttyUSB0
/start_controller/ttyUSB0
/dual_motor_controller/ttyUSB0
/dual_motor_controller/set_compliance_margin
/dual_motor_controller/set_compliance_punch
/dual_motor_controller/set_compliance_slope
/dual_motor_controller/set_speed
/dual_motor_controller/set_torque_limit
/dual_motor_controller/torque_enable
A few services are provided that change the parameters of the joint, like speed, motor torque limit, compliance margin and slope, etc.
2.4.4 Step 4: Moving the motor
To actually move the motor we need to publish a desired velocity to /dual_motor_controller/command topic, like so:
rostopic pub -1 /dual_motor_controller/command std_msgs/Float64 -- 1.0
That’s it, see the both motors move!
2.5 Creating a multi turn joint controller
This tutorial describes how to configure the joint controller to multi turn mode.
2.5.1 The multiturn mode
The multiturn mode allows the servo to receive a goal position value bigger than 4095 (4095 is equivalent to 2pi, since this is its resolution). With multiturn mode enabled the servo will support a maximum goal position range equivalent to 6 or 7 turns, in this example the reference will be the dynamixel MX-28, that when in multi turn mode initial value is 0 and range is from -24576 to 24576.
Multiturn mode is available only on some servos, please check your servo documentation to check if it is available and the limits.
2.5.2 Values and Messages
It’s important to reinforce that, when you are giving the servo parameters in the .yaml file, the angle limits are represented by the dynamixel binary value (in the first tutorial set as 0/4095), while the value that in published in the joint_controller/command is in rad. So, if you want the servo to have 1 turn of limit and you will only publish positive position values , the limits will be set as 0/4095, and the initial position of the servo will be considered as 0, and if you want the servo to go to the position equivalent to its maximum(4095) the value published will be around 6.28 (2pi).
2.5.3 Configuring the multi turn mode
There are many ways to configure your dynamixel to multiturn mode, the ros package dynamixel_driver, included in dynamixel_motor, provides nodes that configures its limits, but there are some alternatives like Mixcell , and Dynamixel Workbench and Smart Servo Framework.
2.5.4 Config file
Assuming that you want to give your servo max turn limits, and that it is already configured as multiturn mode and its ID is 1, the config file should look like this.
tilt_controller:
    controller:
        package: dynamixel_controllers
        module: joint_position_controller
        type: JointPositionController
    joint_name: tilt_joint
    joint_speed: 1.0
    motor:
        id: 1
        init: 24576
        min: 0
        max: 49152
2.5.5 Understanding the limits
The initial value as set as 24576, it will be considered as our zero position, if we send a negative goal position the servo will spin in the CCW direction, while if we send a positive value it will move in the CW direction, since the negative and positive values have their reference in the 24576. The maximum value achieve by the servo will be around 37.7, since it is the turn limit multiplied by 2pi.
        init: 24576
        min: 0
        max: 49152
2.5.6 Running
Launch the controller_manager.
roslaunch my_dynamixel_tutorial controller_manager.launch
Launch the tilt_controller
roslaunch my_dynamixel_tutorial start_tilt_controller.launch
2.5.7 Move it
To move it , it’s the same thing as the past tutorial, but now it can receives values bigger than 2pi.
rostopic pub -1 /tilt_controller/command std_msgs/Float64 -- 9
2.6 Creating a dynamixel action client controller
This tutorial describes how to create a joint controller with one or more Robotis Dynamixel motors.
2.6.1 Step1: Create a client
#!/usr/bin/env python
import roslib
roslib.load_manifest('my_dynamixel_tutorial')

import rospy
import actionlib
from std_msgs.msg import Float64
import trajectory_msgs.msg
import control_msgs.msg
from trajectory_msgs.msg import JointTrajectoryPoint
from control_msgs.msg import JointTrajectoryAction, JointTrajectoryGoal, FollowJointTrajectoryAction, FollowJointTrajectoryGoal

class Joint:
        def __init__(self, motor_name):
            #arm_name should be b_arm or f_arm
            self.name = motor_name
            self.jta = actionlib.SimpleActionClient('/'+self.name+'_controller/follow_joint_trajectory', FollowJointTrajectoryAction)
            rospy.loginfo('Waiting for joint trajectory action')
            self.jta.wait_for_server()
            rospy.loginfo('Found joint trajectory action!')

        def move_joint(self, angles):
            goal = FollowJointTrajectoryGoal()
            char = self.name[0] #either 'f' or 'b'
            goal.trajectory.joint_names = ['joint_1'+char, 'joint_2'+char,'joint_3'+char]
            point = JointTrajectoryPoint()
            point.positions = angles
            point.time_from_start = rospy.Duration(3)
            goal.trajectory.points.append(point)
            self.jta.send_goal_and_wait(goal)

def main():
            arm = Joint('f_arm')
            arm.move_joint([0.5,1.5,1.0])
            arm.move_joint([6.28,3.14,6.28])

if __name__ == '__main__':
      rospy.init_node('joint_position_tester')
      main()
The Code Explained
Now, let’s break down the code piece by piece.
Error: No code_block found Library used for send a trajectory point
Error: No code_block found Remember to add the dependecies to your manifest
Error: No code_block found Library with action messages
Error: No code_block found Create a client through the topic namespace/name_of_server.In this case the namespace is self.name wich would be b_arm f_arm depends on witch arm do you wanna move, so remember to create a meta controller for b_arms and for f_arms, you can check this at previous tutorial.
Error: No code_block found Get the namespace first character that should be b or f and then add this to the trajectory joint names, that should match with joint names in your configuration file (config.yaml), you can review at previous tutorial.
Error: No code_block found send 0.5,1.5,1.0 positions for respectives joints joint_1x, joint_2x, joint_3x
2.6.2 Step2: Executing a client
After you create the client you should launch the controllers and spawners created in previous tutorial.
roslaunch my_dynamixel_tutorial start_meta_controller.launch
and then execute the client
roscd my_dynamixel_tutorial
python trajectory_client.py
now see motors move in a trajectory!!
3. Advanced (Robotics)
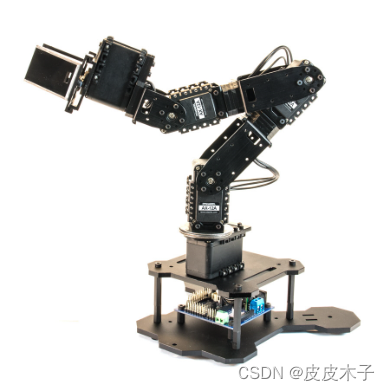
3.1 Controlling the PhantomX Pincher Robot Arm
This tutorial shows how to control the PhantomX Pincher Robot Arm with ROS via FTDI.
It has come the time to move a precious didactic robot, the PhantomX Pincher AX-12 Robot Arm. This manipulator has 4 degrees of freedom, and it can be controlled with ROS via a FTDI interface.
3.1.1
Be aware the robot is well mounted in the base where you are going to use it.
With certain speed the robot may fall down or damage parts close to it.
Connect the robot via FTDI following the next diagram:
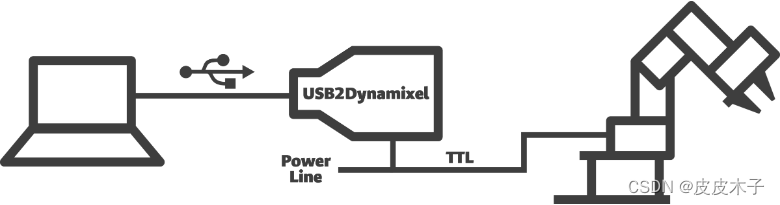
You should result with something like:

note that the Power Hub is being used here. Also note the computer being used here is a Raspberry Pi 3 Model B, however any computer with ROS in it should do the work.
3.1.2 Specifying the Controller Parameters
It is time to specify the parameters that will receive the dynamixel-controllers package in order to connect to the motors. It is assumed that you already know the motor ids, obtained in the tutorial Connecting to Dynamixel Bus.
The Parameters
Create a YAML file named tilt.yaml and paste the following in it.
waist_controller:
    controller:
        package: dynamixel_controllers
        module: joint_position_controller
        type: JointPositionController
    joint_name: waist_joint
    joint_speed: 0.17
    motor:
        id: 1
        init: 0
        min: 0
        max: 1023

shoulder_controller:
    controller:
        package: dynamixel_controllers
        module: joint_position_controller
        type: JointPositionController
    joint_name: shoulder_joint
    joint_speed: 0.17
    motor:
        id: 2
        init: 0
        min: 0
        max: 1023

elbow_controller:
    controller:
        package: dynamixel_controllers
        module: joint_position_controller
        type: JointPositionController
    joint_name: elbow_joint
    joint_speed: 0.17
    motor:
        id: 3
        init: 0
        min: 0
        max: 1023

wrist_controller:
    controller:
        package: dynamixel_controllers
        module: joint_position_controller
        type: JointPositionController
    joint_name: wrist_joint
    joint_speed: 0.17
    motor:
        id: 4
        init: 0
        min: 0
        max: 1023

hand_controller:
    controller:
        package: dynamixel_controllers
        module: joint_position_controller
        type: JointPositionController
    joint_name: hand_joint
    joint_speed: 0.17
    motor:
        id: 5
        init: 0
        min: 0
        max: 1023
The YAML file explained
A quick look at the objects created before let us know the parameters that are being sent to the dynamixel_controllers package
waist_controller:
sets an object called waist_controller (this can be changed at your will, it will also change the topic name for the commands you send to it), with 4 attributes: controller, joint_name, joint_speed and motor. From these for parameters, the only arbitrary is the joint_name.
    controller:
        package: dynamixel_controllers
        module: joint_position_controller
        type: JointPositionController
Makes the controller package to be dynamixel_controllers and lets it know the motor is being set will be working in joint mode (not wheel mode).
joint_speed: 0.17
Sets the motor speed to 0.17 radians per second, this is very important for the set up because when running the controller it will go to the initial position, if the speed is too high damage can be made to the robot. This can be changed in your node after you set things up 😉.
    motor:
        id: 1
        init: 0
        min: 0
        max: 1023
The motor attribute also has sub-attributes, between them, the motor id, it is important that you remember which motor you are setting with each object you are creating here and that you can recall the name of the object for each motor.
init sets the initial position for the motor, you may refer to Creating a Joint Controller for more information about the motor’s actual angle limits.
You don’t want to exceed the 1023 value in either of the joints if you don’t want to hurt your robot.
min and max are the minimum and maximum angle values, respectively, and the previous note also applies for these values.
The rest of the file represents the objects created for the other motors.
3.1.3
The controller manager created in Connecting to Dynamixel Bus shall be linked to by means of using another launch file.
<launch>
    <!-- Start tilt joint controller -->
    <rosparam file="$(find my_dynamixel_tutorial)/tilt.yaml" command="load"/>
    <node name="tilt_controller_spawner" pkg="dynamixel_controllers" type="controller_spawner.py"
          args="--manager=dxl_manager
                --port pan_tilt_port
                waist_controller
                shoulder_controller
                elbow_controller
                wrist_controller
                hand_controller"
          output="screen"/>
</launch>
3.1.4
In order to use the controller run
roslaunch my_dynamixel_tutorial controller_manager.launch
To make the controller manager available and to prove accessibility to the robot motors, then run
roslaunch my_dynamixel_tutorial start_tilt_controller.launch
3.1.5
A quick look at rostopic list let us see the topics available, among which we will find waist_controller/command, shoulder_controller/command, elbow_controller/command, wrist_controller/command and hand_controller/command, there are the topics you have to publish to in order to move the robot.
You may want to try the following in a terminal.
rostopic pub -1 /waist_controller/command std_msgs/Float64 -- 2.61
rostopic pub -1 /shoulder_controller/command std_msgs/Float64 -- 2.61
rostopic pub -1 /elbow_controller/command std_msgs/Float64 -- 2.61
rostopic pub -1 /wrist_controller/command std_msgs/Float64 -- 2.61
rostopic pub -1 /hand_controller/command std_msgs/Float64 -- 2.61
3.1.6
This tutorial was created by Hans Toquica, feel free to contact me at toquica@engineer.com in case you have any questions in regards of this way of connecting to the robot.


 1811
1811


 被折叠的 条评论
为什么被折叠?
被折叠的 条评论
为什么被折叠?
 到【灌水乐园】发言


