


Step 1 Hardware Hook-Up
Since our object is to drive an actual stepper motor with an Arduino, we’ll need some hardware. Before we jump into the software, we need to connect our motor and driver to the Arduino. I’ll also briefly discuss the driver and motor types and their strengths and weaknesses. Here are the most common motor types and the drivers used with them. You can find much more detail in the references above, but I’ll try to hit the key points and add some links with details.
Steppers are either unipolar or bipolar in construction and can usually be identified by how many wires they have. Those with five wires will always be unipolar. Those with four wires are bipolar. A six wire motor may be hooked up as bipolar by leaving the center two wires unconnected, or hooked up as unipolar by connecting the two center wires together and using them as the fifth wire.
To connect a motor to a driver, you must know which wires are pairs. This is most easily done with a multimeter. The process is described here.
Stepper motor wiring tutorial Thorough discussion of identifying 4 and 6 wire motors.
How to Wire a Stepper Motor Not as good, but adds info about 5 wire motors.
Drivers are a little harder to characterize. They may be designed for unipolar or bipolar operation, and also provide constant voltage or constant current operation. Unipolar drivers are simply an array of FETs and provide constant voltage operation. The ULN2003 is used to drive small steppers. It is cheap and easy to use. Here’s an example.
Control 28BYJ-48 Stepper Motor with ULN2003 Driver & Arduino
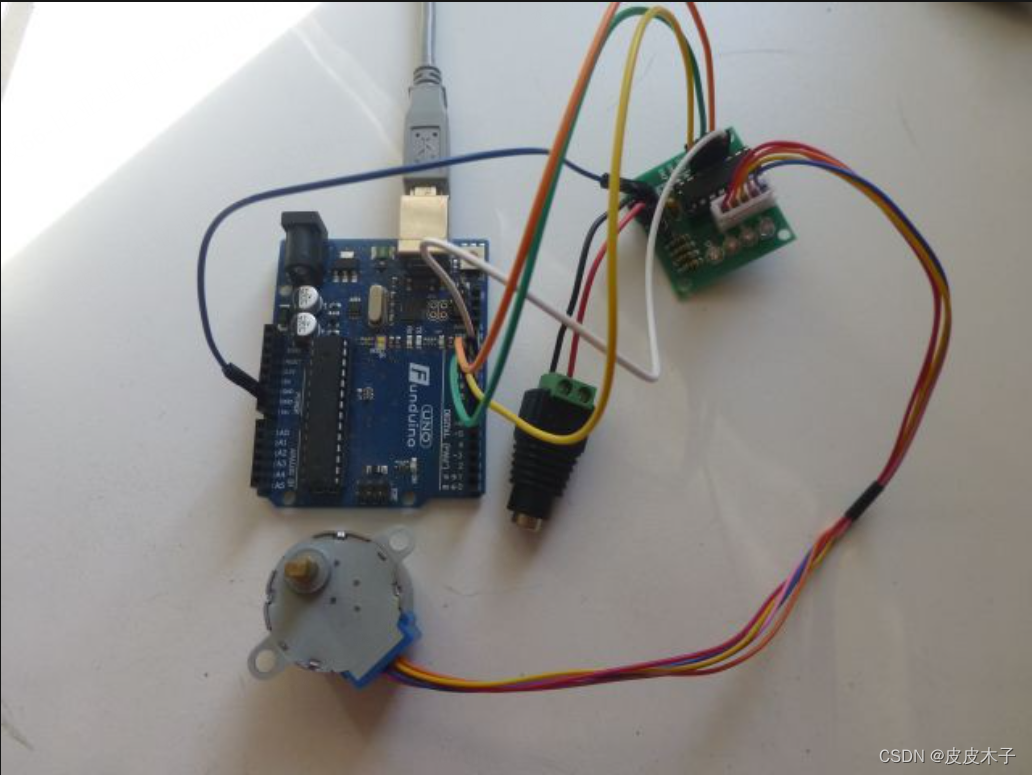
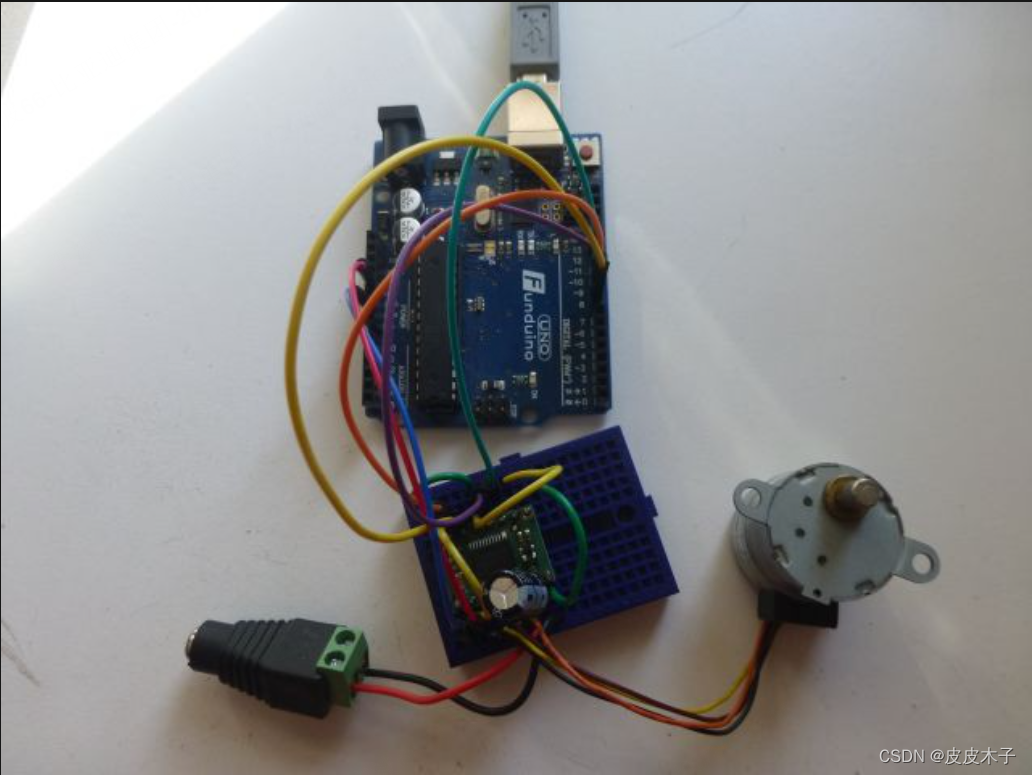
Here is my setup that I used to test the examples in this tutorial.
With this simple way to drive a stepper, why limit ourselves to small motors? Can’t a six wire stepper be connected as a unipolar? There are two reasons this isn’t done. Only 1/2 as much power is available from the motor since only half of each coil is used at a time. Since bipolar drivers are now very inexpensive, unipolar motors and drivers have fallen out of favor. The other reason is that constant current operation is not as easy for these drivers.
Bipolar stepper motors must be driven by an HBridge. Examples include the TB6612 or L298 constant voltage HBridge drivers.
assembly
stepper-motor-l298n-arduino-tutorial
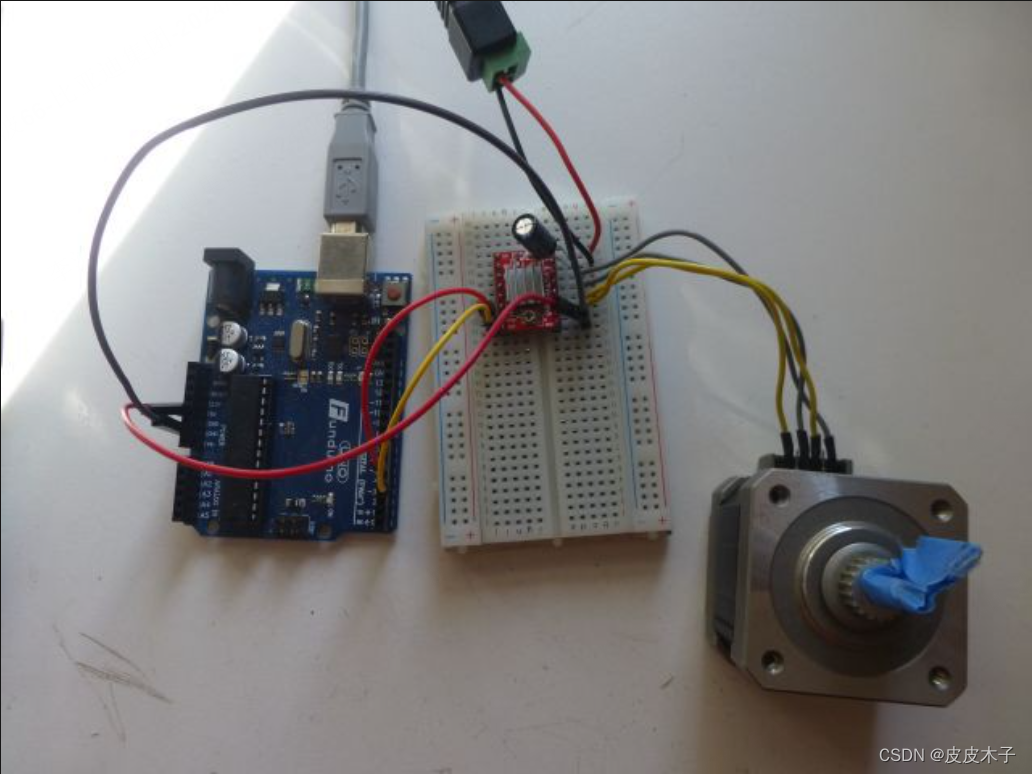
Here’s my setup with a TB6612 from Pololu driving a small bipolar stepper…
Since these drivers supply a constant voltage to the stepper, the current is limited by the value of the voltage and the resistance of the motor coils. We measured the resistance when we figured out which wires were pairs, so it’s easy to calculate current using Ohm’s law. if the voltage is 5 volts and the coil resistance is 50 Ohms, then the current is (i = v/r) 100mA. Even small motors can handle that without heating up. But if the voltage supply is 12 volts and the coil resistance is 2 Ohms, then the current is 6A! That’s a lot and will heat up even a larger motor. Now, the fact is that we want to use 12 volts to make the motor move quickly, but we don’t need all that current. That’s where constant current drivers come in. Using a driver like the a4988, we can drive with 12 volts, yet limit current to only 1 Amp.
Constant current drivers typically only require step and direction inputs, using only two wires instead of the four control wires needed by the previous drivers. Due to the popularity of 3D printing, the cost of these drivers has dropped significantly in the last few years. These drivers and motors are usually the best bang for the buck if small, cheap motors don’t work.
a4988-stepper-motor-driver-arduino-tutorial
My a4988 driver/bipolar motor setup.
There is just a little more information to share about these drivers:
You must provide a large (100uF) capacitor between Vmot and ground to protect driver from transients.
Don’t connect or disconnect wires to the stepper with Vmot applied! That’s true for any driver.
A lot is written explaining how to adjust the current to your stepper. You are most welcome to try any of these methods, but here’s the method I’ve used on many motors. Adjusting the pot on the driver, turn it all the way down, then increase it slowly until the motor performs properly. If you hear a lot of noise from the motor, try turning the current down.
One additional topic worth mentioning is microstepping. This means moving the stepper less than a full step per commanded increment. It is a capability built into many drivers like the a4988. The main advantage is smoother motion. the disadvantages are that the top speed is limited and less power is available. Since AccelStepper doesn’t care if microstepping is being used or not, I’m not going to discuss it further but leave it for you to experiment with.
Step 2 First AccelStepper Sketch
Suggested reading:
Constructing an AccelStepper Object
Now that you have learned to connect your motor to a suitable driver, and have it hooked to your Arduino, it’s time to start a first sketch. The first one we will look at is really simple. Load the UnoAccelStepper_ConstantSpeed.ino sketch (found in the Files section) into the Arduino IDE and follow along as I break it down.
// UnoAccelStepper_ConstantSpeed.ino

// Include the AccelStepper Library
#include <AccelStepper.h>

// Motor Connections (unipolar motor driver)
const int In1 = 8;
const int In2 = 9;
const int In3 = 10;
const int In4 = 11;
// Motor Connections (constant voltage bipolar H-bridge motor driver)
const int AIn1 = 8;
const int AIn2 = 9;
const int BIn1 = 10;
const int BIn2 = 11;
// Motor Connections (constant current, step/direction bipolar motor driver)
const int dirPin = 4;
const int stepPin = 5;

// Creates an instance - Pick the version you want to use and un-comment it. That's the only required change.
// AccelStepper myStepper(AccelStepper::FULL4WIRE, AIn1, AIn2, BIn1, BIn2);  // works for TB6612 (Bipolar, constant voltage, H-Bridge motor driver)
// AccelStepper myStepper(AccelStepper::FULL4WIRE, In1, In3, In2, In4);    // works for ULN2003 (Unipolar motor driver)
AccelStepper myStepper(AccelStepper::DRIVER, stepPin, dirPin); // works for a4988 (Bipolar, constant current, step/direction driver)

void setup()
{
   myStepper.setMaxSpeed(1000); // this limits the value of setSpeed(). Raise it if you like.
   myStepper.setSpeed(50);      // runSpeed() will run the motor at this speed - set it to whatever you like.
}

void loop()
{
   myStepper.runSpeed(); // This will run the motor forever.
}
Let’s look at the start of the sketch. Here are the first two lines.
// Include the AccelStepper Library
#include <AccelStepper.h>
We must include the AccelStepper header file in our sketch. That’s what happens here.
Next we’ll define the pins our driver will use. The details here are explained in the Missing Manual. If you skipped the suggested reading and are feeling lost, by all means stop and read now.
// Motor Connections (unipolar motor driver)
const int In1 = 8;
const int In2 = 9;
const int In3 = 10;
const int In4 = 11;
// Motor Connections (constant voltage bipolar H-bridge motor driver)
const int AIn1 = 8;
const int AIn2 = 9;
const int BIn1 = 10;
const int BIn2 = 11;
// Motor Connections (constant current, step/direction bipolar motor driver)
const int dirPin = 4;
const int stepPin = 5;

// Creates an instance - Pick the version you want to use and un-comment it. That's the only required change.
//AccelStepper myStepper(AccelStepper::FULL4WIRE, AIn1, AIn2, BIn1, BIn2);  // works for TB6612 (Bipolar, constant voltage, H-Bridge motor driver)
//AccelStepper myStepper(AccelStepper::FULL4WIRE, In1, In3, In2, In4);    // works for ULN2003 (Unipolar motor driver)
AccelStepper myStepper(AccelStepper::DRIVER, stepPin, dirPin);           // works for a4988 (Bipolar, constant current, step/direction driver)
Consider each of the three driver types examined in Step 1.
First the pins are assigned symbolic names, then the AccelStepper object is instantiated. You can ignore or remove any definitions you don’t use; alter the others to the pins your driver uses. I like to leave them all in so it’s easy to try different drivers and motors. One additional consideration is to keep the interrupt pins available - D2 and D3 on an Uno.
Here’s the setup() routine.
void setup()
{
   myStepper.setMaxSpeed(1000);   // this limits the value of setSpeed(). Raise it if you like.
   myStepper.setSpeed(50);	   // runSpeed() will run the motor at this speed - set it to whatever you like.
}
Since this example simply runs a stepper at constant speed, we only need to set the maximum speed and the desired actual speed.
Finaly, here’s the loop() function.
void loop()
{
   myStepper.runSpeed();   // This will run the motor forever.
}
The motor will run forever at constant speed.
If you want the motor to run in the opposite direction, change the value of setSpeed() from 100 to -100. Your stepper will run the other way.
Step 3 Reporting Results
While the sketch from Step 2 will run a stepper, it would be desirable to have some information reported to the screen. This makes it easy to experiment and build intuition. Let’s add some code to report speed and position every second.
To begin, load the UnoAccelStepperExper_1.ino sketch into the Arduino environment on your computer and follow along. Functionally, this sketch is identical to UnoAccelStepper_ConstantSpeed.ino that we just used.
// UnoAccelStepperExper_1.ino

// Include the AccelStepper Library
#include <AccelStepper.h>
#include <elapsedMillis.h>

// Motor Connections (unipolar motor driver)
const int In1 = 8;
const int In2 = 9;
const int In3 = 10;
const int In4 = 11;
// Motor Connections (constant voltage bipolar H-bridge motor driver)
const int AIn1 = 8;
const int AIn2 = 9;
const int BIn1 = 10;
const int BIn2 = 11;
// Motor Connections (constant current, step/direction bipolar motor driver)
const int dirPin = 4;
const int stepPin = 5;

// Creates an instance - Pick the version you want to use and un-comment it. That's the only required change.
// AccelStepper myStepper(AccelStepper::FULL4WIRE, AIn1, AIn2, BIn1, BIn2);  // works for TB6612 (Bipolar, constant voltage, H-Bridge motor driver)
// AccelStepper myStepper(AccelStepper::FULL4WIRE, In1, In3, In2, In4);    // works for ULN2003 (Unipolar motor driver)
AccelStepper myStepper(AccelStepper::DRIVER, stepPin, dirPin); // works for a4988 (Bipolar, constant current, step/direction driver)

elapsedMillis printTime; // one second info printout timer.

void setup()
{
  Serial.begin(115200);
  // set the maximum speed and initial speed. The initial speed will be the only
  // speed used. No acceleration will happen - only runSpeed is used. Runs forever.
  myStepper.setMaxSpeed(400.0); // must be equal to or greater than desired speed.
  myStepper.setSpeed(100.0);    // desired speed to run at
  // myStepper.setSpeed(-200.0);    // use this to run in opposite direction
}

void loop()
{
  if (printTime >= 1000)
  {
    printTime = 0;
    float mSpeed = myStepper.speed();
    Serial.print(mSpeed);
    Serial.print("  ");
    Serial.println(myStepper.currentPosition());
  }
  myStepper.runSpeed();
}
We’re going to only look at the changes needed to add reporting code.
First, include the ElapsedMillis header file.
#include <elapsedMillis.h>
Now create an ElapsedMillis object just before the setup() function.
elapsedMillis printTime; // one second info printout timer.
Note that Serial.begin(115200) is added to the setup() function. This enables writing data over USB quickly.
Finally, use the ElapsedMillis object to trigger a report every second.
void loop() {
  if (printTime >= 1000) {
    printTime = 0;
    float mSpeed = myStepper.speed();
    Serial.print(mSpeed);
    Serial.print("  ");
    Serial.println(myStepper.currentPosition());
  }
      myStepper.runSpeed();
}
Here’s the results of running this sketch, as reported in the Arduino serial window.
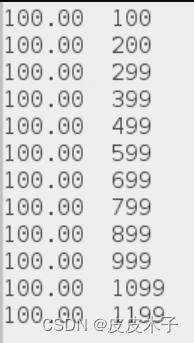
Experiments to try include setting max speed and speed to very high values and see if your motor will run or stall.
Let’s learn how to use a pot to interact with a stepper. We’ll use the pot to vary the speed. Load UnoAccelStepper_speedControl.ino which includes results reporting from above.
// UnoAccelStepper_speedControl.ino
// Include the AccelStepper Library
#include <AccelStepper.h>
#include <elapsedMillis.h>

// Motor Connections (unipolar motor driver)
const int In1 = 8;
const int In2 = 9;
const int In3 = 10;
const int In4 = 11;
// Motor Connections (constant voltage bipolar H-bridge motor driver)
const int AIn1 = 8;
const int AIn2 = 9;
const int BIn1 = 10;
const int BIn2 = 11;
// Motor Connections (constant current, step/direction bipolar motor driver)
const int dirPin = 4;
const int stepPin = 5;

// Creates an instance - Pick the version you want to use and un-comment it. That's the only required change.
// AccelStepper myStepper(AccelStepper::FULL4WIRE, AIn1, AIn2, BIn1, BIn2);  // works for TB6612 (Bipolar, constant voltage, H-Bridge motor driver)
// AccelStepper myStepper(AccelStepper::FULL4WIRE, In1, In3, In2, In4);    // works for ULN2003 (Unipolar motor driver)
AccelStepper myStepper(AccelStepper::DRIVER, stepPin, dirPin); // works for a4988 (Bipolar, constant current, step/direction driver)

elapsedMillis printTime;

const int maxSpeedLimit = 1000.0; // set this to the maximum speed you want to use.

void setup()
{
  Serial.begin(115200);
  // set the maximum speed and initial speed.
  myStepper.setMaxSpeed(maxSpeedLimit);
  myStepper.setSpeed(maxSpeedLimit / 5.0); // initial speed target
}

void loop()
{
  float mSpeed;
  if (printTime >= 1000)
  { // print every second
    printTime = 0;
    mSpeed = myStepper.speed();
    Serial.print(mSpeed);
    Serial.print("  ");
    Serial.println(myStepper.currentPosition());
  }
  // read the sensor value:
  int sensorReading = analogRead(A0);
  // map it to a the maximum speed range
  int motorSpeed = map(sensorReading, 0, 1023, 5, maxSpeedLimit);
  // set the motor speed:
  if (motorSpeed > 0)
  {
    myStepper.setSpeed((float)motorSpeed);
  }
  myStepper.runSpeed();
}
The first part of the sketch is identical to the one we just worked with. A definition for the maximum speed is added, and the initial speed is defined as one fifth of it. The code to report the results is the same. Here’s the code added to the loop.
  // read the sensor value:
  int sensorReading = analogRead(A0);
  // map it to a the maximum speed range
  int motorSpeed = map(sensorReading, 0, 1023, 5, maxSpeedLimit);
  // set the motor speed:
  if (motorSpeed > 0) {
    myStepper.setSpeed((float)motorSpeed);
  }
This takes a pot reading, maps it to the maximum speed range, and limits it to positive values (not really necessary). The setSpeed() function sets this speed as the value runSpeed() will use. We can experiment with speeds and accelerations easily now. Connect a 10K pot between 5V and Ground and the wiper to A0. Then run the sketch to control your stepper. Just be sure to instantiate the correct driver.
Step 4 Accelerating Your Motor
By now you have seen how runSpeed() is used and the set up that must preceed it. Before we go on you should do this suggested reading.
Suggested reading: Setup Functions and Motion Functions
In the last sketches, we used runSpeed() which simply runs a stepper at a constant speed set by setSpeed() and limited by setMaxSpeed(). But AccelStepper can do much more! As the name implies, it can accelerate a stepper as well. This is done using run(). The run() function will accelerate a motor to the speed set by setMaxSpeed() at the acceleration rate set by setAcceleration(). It will step the motor for the number of steps set by moveTo(), called the target. When the motor nears the target, AccelStepper will decelerate the motor to a smooth stop at the target. The following examples will demonstrate this. For more details, by all means refer to the suggested reading in the Missing Manual.
Open the UnoAccelStepperRunSimple.ino sketch in the Arduino environment.
// UnoAccelStepperRunSimple.ino

// Include the AccelStepper Library
#include <AccelStepper.h>

// Motor Connections (unipolar motor driver)
const int In1 = 8;
const int In2 = 9;
const int In3 = 10;
const int In4 = 11;
// Motor Connections (constant voltage bipolar H-bridge motor driver)
const int AIn1 = 8;
const int AIn2 = 9;
const int BIn1 = 10;
const int BIn2 = 11;
// Motor Connections (constant current, step/direction bipolar motor driver)
const int dirPin = 4;
const int stepPin = 5;

// Creates an instance - Pick the version you want to use and un-comment it. That's the only required change.
// AccelStepper myStepper(AccelStepper::FULL4WIRE, AIn1, AIn2, BIn1, BIn2);  // works for TB6612 (Bipolar, constant voltage, H-Bridge motor driver)
// AccelStepper myStepper(AccelStepper::FULL4WIRE, In1, In3, In2, In4);    // works for ULN2003 (Unipolar motor driver)
AccelStepper myStepper(AccelStepper::DRIVER, stepPin, dirPin); // works for a4988 (Bipolar, constant current, step/direction driver)

void setup()
{
  // set the maximum speed, acceleration factor,
  // and the target position
  myStepper.setMaxSpeed(1000.0);
  myStepper.setAcceleration(50.0);
  myStepper.moveTo(2000);
}

void loop()
{
  // Change direction once the motor reaches target position
  /*
    if (myStepper.distanceToGo() == 0)   // this form also works - pick your favorite!
    myStepper.moveTo(-myStepper.currentPosition());

    // Move the motor one step
    myStepper.run();
  */
  if (!myStepper.run())
  { // run() returns true as long as the final position has not been reached and speed is not 0.
    myStepper.moveTo(-myStepper.currentPosition());
  }
}
You will see that it begins like the previous examples. The changes start in setup(). To use run(), the maximum speed, acceleration, and a target position must be specified.
void setup() {
  // set the maximum speed, acceleration factor,
  // and the target position
  myStepper.setMaxSpeed(1000.0);
  myStepper.setAcceleration(50.0);
  myStepper.moveTo(2000);
}
There is no need to call
setSpeed()since it will be ignored anyway. Therun()function will accelerate until the maximum speed as set is reached.
In loop() we call run() as part of an if statement.
void loop() {
  // Change direction once the motor reaches target position
  /*
    if (myStepper.distanceToGo() == 0)   // this form also works - pick your favorite!
    myStepper.moveTo(-myStepper.currentPosition());

    // Move the motor one step
    myStepper.run();
  */
  if (!myStepper.run()) {   // run() returns true as long as the final position has not been reached and speed is not 0.
    myStepper.moveTo(-myStepper.currentPosition());
  }
}
As noted, the run() function will return true as long as the stepper is running and the target position has not been reached. When run() returns false, we negate the current position (our old target) and make that our new target. The stepper runs back and forth, accelerating, slowing as the target nears, then reversing and accelerating again. Next, we’ll add the code to report every second like we did above.
Load UnoAccelStepperRunDemo.ino into the Arduino environment. Let’s have a look at it. You’ll quickly note that it is very similar to the previous sketch, but run() is just called continuously. This will result in running to the target position and stopping. Further calls to run() cause no further motion.
// UnoAccelStepperRunDemo.ino

void setup()
{
  Serial.begin(115200);
  // set the maximum speed, acceleration factor, and the target position.
  myStepper.setMaxSpeed(200.0);    // the motor accelerates to this speed exactly without overshoot. Try other values.
  myStepper.setAcceleration(50.0); // try other acceleration rates.
  myStepper.moveTo(10000);
  // For negative rotation
  // myStepper.moveTo(-10000);    // This will demonstrate a move in the negative direction.
}
int count = 0; // tracks seconds to trigger an action if desired.
void loop()
{
  float mSpeed;
  if (printTime >= 1000)
  { // reports speed and position each second
    printTime = 0;
    mSpeed = myStepper.speed();
    Serial.print(mSpeed);
    Serial.print("  ");
    Serial.print(myStepper.currentPosition());
    Serial.print("  ");
    Serial.println(count);
    if (count++ == 4)
    { // uncomment an action to see the response in the serial monitor
      myStepper.moveTo(100);
      // myStepper.move(100);
      // myStepper.stop();
    }
  }
  myStepper.run();
}
One trick is added in loop(). Besides printing every second, the seconds are also counted and an action can be taken when a desired count is reached.
    // if (count++ == 4){      // uncomment an action to see the response in the serial monitor
      // myStepper.moveTo(100);
      //myStepper.move(100);
      //myStepper.stop();
   // }
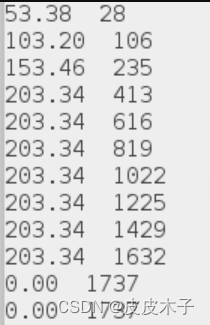
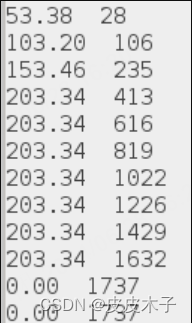
This output can be very instructive to aid understanding of how run() behaves. Here’s the output when no action is taken.
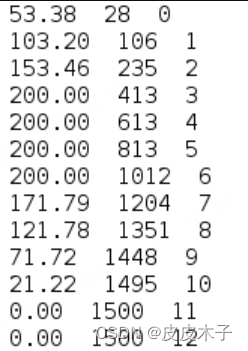
The target position is set to 1500 for this test. The first output column is speed (steps/second), the second is position (steps) and the third is the elapsed time in seconds. We see the motor accelerate to 200 steps per second after 4 seconds, run at constant speed until the target nears, then decelerate to stop after exactly 1500 steps.
Next we’ll uncomment the first action to set a new target of 100 steps using moveTo(), after 4 seconds.
    if (count++ == 4){      // uncomment an action to see the response in the serial monitor
      myStepper.moveTo(100);
      //myStepper.move(100);
      //myStepper.stop();
    }

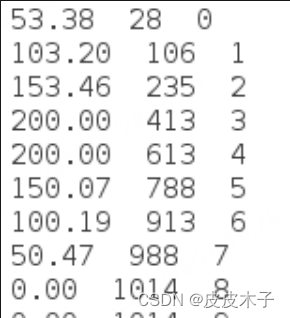
We see several interesting details. As soon as the new target is set, the motor starts to decelerate but is still running in the original direction. It takes about 4 seconds to stop from 200 steps per second. That makes sense because the acceleration is 50 steps per second per second. When it comes to a stop, it immediately begins accelerating toward the new target. As it nears, the motor slows to a stop at 100. Note that speed became negative meaning movement in the other direction. It took 13 seconds to reach the new target and went about 400 additional steps in the original direction before reversing.
Now we use move() to set a target that is 100 steps from the current position. That’s done by commenting out the moveTo() and removing the comments on the move() statement.
    if (count++ == 4){      // uncomment an action to see the response in the serial monitor
      // myStepper.moveTo(100);
      myStepper.move(100);
      //myStepper.stop();
    }

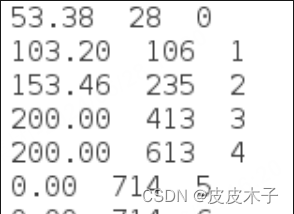
The move() happened at step 613 and added 100 steps to set a new target at 713. Note that the motor runs past the new target as it slows to a stop. Then it reverses and moves as quickly as it can to the new target, slowing and stopping.
Our final experiment will use the stop() function. Again, comment and uncomment as needed.
    if (count++ == 4){      // uncomment an action to see the response in the serial monitor
      // myStepper.moveTo(100);
      // myStepper.move(100);
      myStepper.stop();
    }
The stop() function will bring the motor to a stop as quickly as possible using the current speed and acceleration. The motor stops in four seconds, decelerating at 50 steps per second per second.
Since stop() uses the current value of acceleration, we can stop faster if we increase it.
Put the statement myMotor.setAcceleration(200.0) just before the call to stop(). Here’s the result.
    if (count++ == 4){      // uncomment an action to see the response in the serial monitor
      // myStepper.moveTo(100);
      // myStepper.move(100);
      myStepper.setAcceleration(200.0);
      myStepper.stop();
    }
We see that the motor stops now in one second! It decelerates at 200 steps per second per second. The limitation to this technique is physical reality. Can your motor actually decelerate at the rate you set? This must be determined in each case.
Step 5 Advanced AccelStepper Control
Suggested Reading: If you haven’t already done so, read Using the
AccelStepperLibrary - Overview, and Motion Overview. Read the rest of the Manual as you have more questions.
In this section, we begin learning one of the most useful tools for AccelStepper applications. Our goal will be to accelerate our stepper to a target speed using run(), then keep running at a constant speed using runSpeed(). Using a state machine implemented in our Arduino sketch will allow us to separate command and control inputs from the motion producing functions like run() and runSpeed().
To start, load the UnoAccelStepperExper_2.ino sketch into the Arduino environment and follow along.
// UnoAccelStepperExper_2.ino

// Include the AccelStepper Library
#include <AccelStepper.h>
#include <elapsedMillis.h>

// Motor Connections (unipolar motor driver)
const int In1 = 8;
const int In2 = 9;
const int In3 = 10;
const int In4 = 11;
// Motor Connections (constant voltage bipolar H-bridge motor driver)
const int AIn1 = 8;
const int AIn2 = 9;
const int BIn1 = 10;
const int BIn2 = 11;
// Motor Connections (constant current, step/direction bipolar motor driver)
const int dirPin = 4;
const int stepPin = 5;

// Creates an instance - Pick the version you want to use and un-comment it. That's the only required change.
// AccelStepper myStepper(AccelStepper::FULL4WIRE, AIn1, AIn2, BIn1, BIn2);  // works for TB6612 (Bipolar, constant voltage, H-Bridge motor driver)
// AccelStepper myStepper(AccelStepper::FULL4WIRE, In1, In3, In2, In4);    // works for ULN2003 (Unipolar motor driver)
AccelStepper myStepper(AccelStepper::DRIVER, stepPin, dirPin); // works for a4988 (Bipolar, constant current, step/direction driver)

// State definitions
#define RSPD 01
#define RJSTR 02
// State variable
int state;

elapsedMillis printTime;

void setup()
{
  Serial.begin(115200);
  state = RJSTR; // initial state is run, just run
  // set the maximum speed, acceleration factor,
  // and the target position
  // myStepper.setMaxSpeed(1000.0);
  myStepper.setMaxSpeed(400.0); // by setting this to the desired speed, the motor accelerates to this speed exactly without overshoot.
  myStepper.setAcceleration(50.);
  myStepper.moveTo(10000); // need a target for run() to use. Must allow time to accelerate to target speed.
  // For negative rotation
  // myStepper.moveTo(-10000);    // need a target for run() to use. Must allow time to accelerate to target speed.
}

void loop()
{
  float mSpeed;
  if (printTime >= 1000)
  {
    printTime = 0;
    mSpeed = myStepper.speed();
    Serial.print(mSpeed);
    Serial.print("  ");
    Serial.println(myStepper.currentPosition());
    // if (mSpeed <= -200.0) {       // for negative rotation
    if (mSpeed >= 200.0)
    {               // for positive rotation
      state = RSPD; // switch to run speed state when target speed is reached
    }
  }
  switch (state)
  {
  case RSPD:
    myStepper.runSpeed();
    break;
  case RJSTR:
    myStepper.run();
    break;
  }
}
Note that this sketch is very similar to UnoAccelStepperExper_1.ino that we looked at in Step 3.
First, we define two states and create a variable called state just before setup().
// State definitions
#define RSPD 01
#define RJSTR 02
// State variable
int state;
An initial value of RJSTR is assigned the variable state in setup().
Now let’s examine the state machine itself.
  switch (state) {
    case RSPD:
      myStepper.runSpeed();
      break;
    case RJSTR:
      myStepper.run();
      break;
  }
As long as state is RJSTR, the run() function is called. If the state is RSPD, the runSpeed() function will be called instead. All we need is a way to change the state.
We do that by adding a conditional to our one second reporting code.
    if (mSpeed >= 200.0) {      // for positive rotation
      state = RSPD;   // switch to run speed state when target speed is reached
    }
Speed is checked once per second and if it equals or exceeds 200.0 steps per second, the state will be switched to RSPD and the stepper will continue running at that speed indefinitely.
The target speed is slightly exceeded. If a more precise result is needed, we could test more often or we could set the maximum speed to our target speed. While the state machine in this case is quite simple, we will find that the same approach can be used to control much more complex behavior.
Step 6 Coupled State Machines
Let’s add a little complexity to the state machine. Load UnoAccelStepperExper_3.ino into Arduino.
// Load UnoAccelStepperExper_3.ino

// Include the AccelStepper Library
#include <AccelStepper.h>
#include <elapsedMillis.h>

// Motor Connections (unipolar motor driver)
const int In1 = 8;
const int In2 = 9;
const int In3 = 10;
const int In4 = 11;
// Motor Connections (constant voltage bipolar H-bridge motor driver)
const int AIn1 = 8;
const int AIn2 = 9;
const int BIn1 = 10;
const int BIn2 = 11;
// Motor Connections (constant current, step/direction bipolar motor driver)
const int dirPin = 4;
const int stepPin = 5;

// Creates an instance - Pick the version you want to use and un-comment it. That's the only required change.
// AccelStepper myStepper(AccelStepper::FULL4WIRE, AIn1, AIn2, BIn1, BIn2);  // works for TB6612 (Bipolar, constant voltage, H-Bridge motor driver)
// AccelStepper myStepper(AccelStepper::FULL4WIRE, In1, In3, In2, In4);    // works for ULN2003 (Unipolar motor driver)
AccelStepper myStepper(AccelStepper::DRIVER, stepPin, dirPin); // works for a4988 (Bipolar, constant current, step/direction driver)

// define the time limit to run before stopping
const int timeLimit = 10; // number of seconds

// State definitions
#define RSPD 01
#define RJSTR 02
#define STOPPED 03
// State variable
int state;

elapsedMillis printTime;

void setup()
{
  Serial.begin(115200);
  state = RJSTR; // initial state is run, just run
  // set the maximum speed, acceleration factor,
  // and the target position
  myStepper.setMaxSpeed(400.);
  myStepper.setAcceleration(50.0);
  myStepper.moveTo(10000);
}
int lCount = 0; // elapsed seconds
void loop()
{
  float mSpeed;
  if (printTime >= 1000)
  {
    printTime = 0;
    lCount++;
    mSpeed = myStepper.speed();
    Serial.print(mSpeed);
    Serial.print("  ");
    Serial.println(myStepper.currentPosition());
    switch (state)
    {
    // digitalWrite(markerPin,HIGH);    // just for testing
    case RSPD:
      if (lCount >= timeLimit)
      {
        myStepper.setAcceleration(200.0); // this makes motor stop much quicker!
        myStepper.stop();
        myStepper.runToPosition(); // go immediately to stop position!
        state = STOPPED;
      }
      break;
    case RJSTR:
      if (mSpeed >= 200.0)
      {
        state = RSPD; // switch to run speed state when target speed is reached
      }
      break;
    case STOPPED:
      break;
    }
  }
  switch (state)
  {
  case RSPD:
    myStepper.runSpeed();
    break;
  case RJSTR:
    myStepper.run();
    break;
  case STOPPED:
    break;
  }
}
Our goal will be to add a control input to the last example to stop the motor after 10 seconds.
First, let’s define a new state called STOPPED.
// State definitions
#define RSPD 01
#define RJSTR 02
#define STOPPED 03
// State variable
int state;
Second, we define the STOPPED action. All we do is: Nothing!
  switch (state) {
    case RSPD:
      myStepper.runSpeed();
      break;
    case RJSTR:
      myStepper.run();
      break;
    case STOPPED:
      break;
  }
Finally, we’ll add another state machine to provide the control to stop after 10 seconds.
The two state machines are coupled by having the same states, and have one state machine controlling the other by changing the state.
    switch (state) {
      //digitalWrite(markerPin,HIGH);    // just for testing
      case RSPD:
        if (lCount >= timeLimit) {
          myStepper.setAcceleration(200.0);  // this makes motor stop much quicker!
          myStepper.stop();
          myStepper.runToPosition();   // go immediately to stop position!
          state = STOPPED;
        }
        break;
      case RJSTR:
        if (mSpeed >= 200.0) {
          state = RSPD;   // switch to run speed state when target speed is reached
        }
        break;
      case STOPPED:
        break;
    }
Now when we’re in RSPD state, we check to see if we’ve reached the time limit and then stop. First we increase the acceleration, then call stop() and finally call runToPosition() which blocks further program execution until the motor reaches its final postion (determined by the call to stop()). Then we enter the STOPPED state and nothing more happens as we loop through the program.
Here are the results.
Since our goal in this tutorial is to understand the AccelStepper library, let us note that the STOPPED state is not really necessary. We can accomplish the same goal by just modifying the control logic. Have a look at UnoAccelStepperExper_3A.ino. Notice that all references to STOPPED have been commented out. As soon as the timer elapses, we change the acceleration and call stop() as before, but now we enter RJSTR state again. The run() function will be called and will step the motor until the final postion (determined by stop()) is reached. Further calls to run() will produce no motion. The results look like this.
This is exactly the same as the previous results. No surprise since runSpeedToPosition() simply calls run() to do the work.
One small difference is that we can now see the effect of changing the acceleration. Comment out the call to setAcceleration(200.0) just before the call to stop(). Now the acceleration will be left at 50. Here’s what happens.
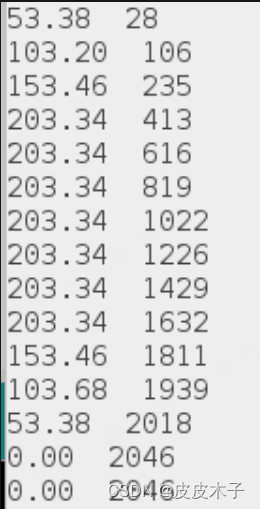
Instead of stopping at 1737 steps, the motor now stops at 2046 steps. Since stop() is called at the same point, it just takes longer to slow down.
Step 7 Stop on interrupt
For the final example, let’s complicate our state machine a bit more. Load UnoAccelStepperForum_1.ino into Arduino and follow along. This sketch was created in response to a question on the AccelStepper Forum. The stepper will be stopped when an interrupt, such as might come from a limit switch, occurs. After stopping, the stepper is returned to it’s initial (home) position. To begin, define a digital pin to use to trigger the interrupt. Pin D9 is used, but you can use whatever pin is convenient. Jumper from the trigger pin to the interrupt pin. Interrupt 0 is used here and maps to pin D2 on an Uno. (If none of this makes sense to you, then google a bit for Arduino interrupts.)
const int sensorPin = 9;  // used as an end stop sensor output - driven by a timer
// hook to pin D2 - or can drive D2 directly (tie low, then disconnect to cause interrupt)

// define the time limit to run before stopping if using sensorPin
const int timeLimit = 10;  // number of seconds
Note that a time delay before the trigger is defined also. Once the sketch is working, the time trigger can be removed and the interrupt triggered directly by connecting the jumper to D2 to ground to start, then lifting it to trigger the interrupt. This duplicates the effect of a limit switch, for example.
Next we modify the state machine, adding another state. The variable state is declared as volatile so that it can be reliably changed in the interrupt service routine.
// State definitions
#define RSPD 01
#define RJSTR 02
#define RUN_HOME 03
#define STOP_NOW 04
// State variable
volatile int state;   // must survive interrupts
In setup() we add the statement to activate the interrupt service routine, rising(), if a RISING edge is seen by interrupt 0. The flag that will enable the state change in the interrupt service routine is also set.
  attachInterrupt(0, rising, RISING);  // Interrupt 0 is pin D2
  enabFlag = 1; // enable the sensor interrupt
  pinMode (sensorPin, OUTPUT);
  state = RJSTR;   // initial state is run, just run
Looking at the first state machine that does the control, note that the action after 10 seconds is to take the sensor trigger pin high. If that pin is connected to D2, then an interrupt will be triggered.
    switch (state) {
      case RSPD:
        if (lCount >= timeLimit) {
          digitalWrite(sensorPin,HIGH);    // This will trigger interrupt
        }
        break;
      case RJSTR:
        if (mSpeed <= -200.0) {
          state = RSPD;   // switch to run speed state when target speed is reached
        }
        break;
      case RUN_HOME:
      case STOP_NOW:
        break;
    }
Note that the initial target and the speed target test are designed to cause motion in the negative direction, opposite what we’ve seen so far.
Now consider the other state machine that handles the action.
  switch (state) {    // happens each loop - about 70KHz
    case RSPD:
      myStepper.runSpeed();
      break;
    case RJSTR:
    case RUN_HOME:
      myStepper.run();
      break;
    case STOP_NOW:
      digitalWrite(sensorPin,LOW);    // removes interrupt signal
      myStepper.setAcceleration(200.0);  // this makes motor stop much quicker!
      myStepper.stop();
      myStepper.runToPosition();  // brings to a stop!
      myStepper.moveTo(0);  // now return to home position
      myStepper.setAcceleration(50.0);  // slow motor acceleration back down
      //myStepper.move(-myStepper.currentPosition()); // This should work also
      state = RUN_HOME;
      break;
  }
The main interest here is in the STOP_NOW state. First, the interrupt signal is cleared (won’t hurt if it wasn’t used), then the acceleration is increased and stop() is called. Then runToPosition() brings the motor to a stop. Finally, the home position is set as the new target and state RUN_HOME is entered and run() will be called to home the stepper.
One piece remains and that’s the interrupt service routine that causes the STOP_NOW state. When the interrupt service routine returns, the state will be changed and will immediately cause the expected action (just described).
//+++++++++++++++++ Interrupt service routine +++++++++++++++++++++++++++++
//  Come here if rising edge on D2.
//  If enable flag is true, enter state STOP_NOW
void rising() {
  if (enabFlag == 1) {
    state = STOP_NOW;
    enabFlag = 0;
  }
}
The enabFlag is used to ensure that additional interrupts don’t cause unexpected actions.
Let’s look at the results.
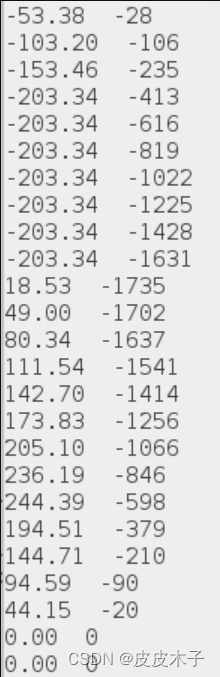
This is what happens when the timer times out and uses D9 to trigger the interrupt.
What if an asynchronous interrupt is generated as might happen with a limit switch?
Although the timing of the interrupt is random, the result in stopping the motor and homing it is similar - we end up in the same position, as we should.
The Missing Manual
原地址
Steppers motors deserve to be used in our projects much more than they are. Their use in 3D printers has brought the prices for the motors and drivers down dramatically. But the libraries to drive them lag behind. The Stepper library, part of Arduino, is very limited since it blocks and only allows one motor at a time to move. The AccelStepper library, created by Mike McCauley and easily installed using the Arduino Library Manager, overcomes these restrictions, but is considered difficult to use. The purpose of this manual is to explain AccelStepper so its use can become much more widespread.
Using the AccelStepper Library - Overview
The AccelStepper library is a library for Arduino written in C++. To use it, you construct (or “instantiate” in C++ speak) named objects of AccelStepper type. These software objects typically have “motor” or “stepper” as part of their names and are related directly to physical stepper motors and their interface electronics (“drivers”). Several different interfaces are supported. The appropriate one for an individual application must be specified when the object is constructed. Once an object is constructed, the various functions (called “member functions”) provided in the library may be used to control the objects. I find it helps to break these into groups. The first group is setup functions that specify physical capabilities (such as speed and acceleration) of the motor and physical values (such as position to move to). The next group are the functions that actually move the motor by sending it signals that will cause steps. These functions use the values from the setup functions to control the motion. Next are the functions that report information about the status of the motion. Then come the pin management functions that configure and control the pins that interact with the driver. These functions will be discussed below, but first it is good to understand how AccelStepper works.
Motion Overview
A stepper moves when it receives an electrical signal that causes the motor to take a step. The AccelStepper library only has one callable function that causes motion: runSpeed(). Other functions that result in motion call runSpeed() to produce the actual steps. Each such function has the word "run" in its name. The motion functions are of two types: constant speed (limited by the current value of speed), and variable speed (limited by settings of acceleration and maxSpeed, and by position relative to the target). Each of these types contains blocking and non-blocking functions. Blocking functions will run until a stop condition occurs, but no other code will run until they complete. Non-blocking functions cause a single step (if a step is due - see below) and return immediately in any case. Since each call to a non-blocking function only makes at most a single step, they must be called as often as possible; usually in the main loop. Otherwise the motor will not be stepped at the desired speed.
The function runSpeed() determines when a step is to be taken. runSpeed() subtracts the time of the last step from the current time. If the result is greater than or equal to the value of stepInterval ( we say, “A step is due.”), runSpeed will increment (or decrement, as required) currentPosition, call step(), and update the time the last step was taken. (step() is an internal function - not directly callable. It causes the correct electrical signal to be sent to the interface.) Each call to runSpeed() repeats this process, so runSpeed() must be called at least speed times per second. Usually, this means putting a call to runSpeed() in loop(). Calling runSpeed() when no step is due does nothing
The controlling variable for runSpeed() is stepInterval so we need to understand how AccelStepper calculates it. An internal variable, stepInterval is not directly manipulated by the user. In the simplest case, calling setSpeed() will cause a new value of speed - and stepInterval - to be calculated. The value of speed will be limited to +/- maxSpeed. That value may be changed with setMaxSpeed(). Speed and direction are tracked separately so that stepInterval is always positive; direction is dependent on the sign of speed (in setSpeed()), or the direction of currentPosition relative to targetPosition.
“Ok, fine,” you say. “I get constant speed, but how does a motor accelerate or run to a position?” Good question! To do both of those, the run() function is used. The run() function first calls runSpeed() to cause a step (if it is due, as defined above) at the current speed and direction. Then it calls computeNewSpeed(). The function computeNewSpeed() computes a new speed (stepInterval) and sets that as the current speed.
In full detail, computeNewSpeed() forces computation of a new instantaneous speed (stepInterval) and sets that as the current speed. It is called by the library:
- after each step if using
run()orrunToPosition()orrunToNewPosition(). - after a change to maxSpeed through setMaxSpeed().
- after a change to acceleration through setAcceleration().
- after a change to target position (relative or absolute) - through move() or moveTo().
- after a call to stop() - through move().
It will increase (or decrease) the speed based on position (distance to target determines if it’s time to slow down or speed up), acceleration (higher or lower), and maxSpeed (has it been reached?). Note that speed values set by setSpeed() are ignored and are indeed overwritten by this function. There is no need to call this function directly and that should not be done.
Other functions that will modify stepInterval include setCurrentPosition() which sets speed and stepInterval to 0. Also, any time setSpeed() is called, it calculates a new stepInterval based on the specified speed. The value will be limited by the value of maxSpeed. As mentioned above, this value will only be used if runSpeed() is used; it will be ignored and overwritten if run() is used. Finally, the constructor also sets stepInterval to 0, so there will be no motion until a function that sets it is called. Typically, setMaxSpeed() is called followed by either setSpeed() or moveTo().
The other functions that will cause motion include runSpeedToPosition(), which checks to see if the target position has been reached and calls runSpeed() if it hasn’t. Another is runToPosition(), which simply calls run() until the target position is reached - that is, it blocks until position is reached. Finally, runToNewPosition() allows a new position to be specified, then calls moveTo() to set that as the target, and calls runToPosition() to do the move.
Let’s summarize how AccelStepper works. When an AccelStepper object is created, maxSpeed and acceleration are set to 1.0. currentPosition and targetPosition are set to 0, and speed is set to 0.0. In the simplest case to begin motion, setSpeed() must be called to set a speed for subsequent calls to runSpeed(). Using the default values, speed will be limited to 1.0 steps per second. Now call runSpeed() as often as possible - usually in the main loop. The motor will run continually at a constant speed. SetSpeed() may be called with a negative number to cause motion in the opposite direction.(setMaxSpeed() does not have to be called, but speed will be limited to 1 step per second or less.)
Alternatively, moveTo() may be called to specify a new target position. Calling setSpeed() is unnecessary, since speed will be calculated by computeNewSpeed() which is called by moveTo(). Calling run() instead of runSpeed() will cause the motor to accelerate to maxSpeed and run toward the targetPosition. As the targetPosition is approached, the motor will be slowed and will stop when the target position is reached. Further calls to run() will cause no motion until a new moveTo() or move() call is made. If more rapid acceleration and deceleration are desired, then setAcceleration() should be used. Each time run() is called, the value of speed is calculated by computeNewSpeed() (an internal routine that should not be called directly). Any value set by setSpeed will be ignored. These functions will be described in full detail below.
With this understanding in place, let’s now look at the details of the functions in AccelStepper.
Constructing an AccelStepper Object
You can have multiple simultaneous steppers, all moving at different speeds and accelerations, provided you call their run(), or runSpeed(), functions at frequent enough intervals. These functions and their operation will be discussed further below in the Movement Functions section. To construct an AccelStepper object, you must know the type of driver being used and the pin numbers used to control it. Here is the constructor prototype:
AccelStepper(uint8_t interface = AccelStepper::FULL4WIRE, uint8_t pin1 = 2, uint8_t pin2 = 3, uint8_t pin3 = 4, uint8_t pin4 = 5, bool enable = true)
The key item is the type of interface (driver) being used. This will depend on the type of stepper motor you are using and possibly the mode it’s in. The type should be specified using terms that are defined in an enum in the AccelStepper.h file. The commonest drivers are the step-and-direction driver, such as the a4988 driver; the dual-H-bridge driver, such as the L298 or TB6612 driver; or the driver for unipolar motors, such as the ULN2003. These are specified, using the AccelStepper terminology, like this:
- AccelStepper::DRIVER (Step-and-direction Driver, 2 driver pins required. Note that any use of microstepping doesn’t matter here. The driver only cares about steps.)
- AccelStepper::FULL4WIRE (4 wire full stepper, 4 motor pins required. For a Dual-H-Bridge controller or unipolar driver. This is the default.)
The following interfaces are ones I have no experience with, but are supported by the library.
- AccelStepper::FULL2WIRE (2 wire stepper, 2 motor pins required.)
- AccelStepper::FULL3WIRE (3 wire stepper, such as HDD spindle, 3 motor pins required.)
- AccelStepper::HALF3WIRE (3 wire half stepper, such as HDD spindle, 3 motor pins required.)
- AccelStepper::HALF4WIRE (4 wire half stepper, 4 motor pins required.)
The last interface is used primarily by Adafruit for their motor interface board. It is best documented by Adafruit and I will not discuss it further.
- AccelStepper::FUNCTION (Use the functional interface, implementing your own driver functions, as Adafruit does.)
Many internet examples I have seen use numbers for the interface types instead of the values shown above. There is no reason to do this and is considered poor form. If a later revision of the library changed the values, direct use of numbers might fail. Using the enum names would always work.
After the interface type, the next arguments are the Arduino pins connected to the interface.
- Pin1: Arduino digital pin number for motor pin 1. Defaults to digital pin 2. For an AccelStepper::DRIVER (interface==1), this is the Step input to the driver. (Low to high transition means to step)
- Pin2: Arduino digital pin number for motor pin 2. Defaults to digital pin 3. For an AccelStepper::DRIVER (interface==1), this is the Direction input to the driver. High means one way; low the other.
- Pin3: Arduino digital pin number for motor pin 3. Defaults to digital pin 4.
- Pin4: Arduino digital pin number for motor pin 4. Defaults to digital pin 5.
The Arduino pins that the motor interface uses will be initialized to OUTPUT mode during the constructor by a call to enableOutputs(), so there is no need to initialize them in setup(). This behavior may be suppressed if not desired by using enable, the final argument to the constructor. If this is true (the default), enableOutputs() will be called to enable the output pins at construction time. If enable is false, enableOutputs() will not be called at construction. The user must call it before the motor will run. Although it may not be obvious, it is not required to make enable true in order to use the enableOutputs() and disableOutputs() functions, or to define an enable pin. This enable only causes the enableOutputs() function to be called when an AccelStepper object is constructed. EnableOutputs() and disableOutputs() are discussed below. If an enable line is also needed, call setEnablePin() after construction. You may also invert the interface pins using setPinsInverted(), as explained below.
//Example using a driver that accepts step/direction input. An enable pin is not used so enable = true (the default) need not be specified.
// Define pin connections
const int dirPin = 4;
const int stepPin = 5;
// Creates an instance
AccelStepper myStepper(AccelStepper::DRIVER, stepPin, dirPin);
//Example using a driver that needs four wire control. This could be for a dual H-bridge or a FET array like a ULN-2003 for a unipolar stepper. No enable pin is used.
// Motor Connections
const int In1 = 8;
const int In2 = 9;
const int In3 = 10;
const int In4 = 11;
// Creates an instance - Pins entered in sequence IN1-IN3-IN2-IN4 for proper step sequence
AccelStepper myStepper(AccelStepper::FULL4WIRE, In1, In3, In2, In4);
Setup Functions
These functions set values for later use by the motion functions. They should be called initially to set up desired conditions, then may be called again to change them. Positive and negative values for direction are arbitrary depending on how the driver is wired. The key point is that they move the motor in two opposite directions.
Positive and negative values for speed don’t matter, speed is stored as an absolute value.
moveTo((long) absolute_position)
- Argument: absolute_position in steps. The desired absolute position of type long. May be positive or negative.
Set the target position. The run() function will try to move the motor (at most one step per call) from the current position to the target position set by the most recent call to this function. Caution: moveTo() also recalculates the speed for the next step. If you are trying to use constant speed movements, you should call setSpeed() after calling moveTo(). If moveTo() is called while the motor is moving,the target position is changed immediately and the acceleration algorithm is used to calculate the new speed. If the motor is running at a high speed in a particular direction and the new target position is in the opposite direction, the motor will continue to run in the same direction, decelerate to stop, then accelerate in the new direction until it approaches the new target and slows to a stop.
Example to move to the absolute position 2038. The new value of targetPosition is 2038 after calling this function.
myStepper.moveTo(2038);
move((long) relative_movement)
- Argument: relative_movement in steps. Desired movement relative to the current position. Argument type is long and it may be positive or negative.
Set the target position relative to the current position.
Caution: move() also recalculates the speed for the next step. If you are trying to use constant speed movements, you should call setSpeed() after calling move(). If move() is called while the motor is moving, the result is just like moveTo(). The only difference is the way the new target position is calculated.
Example to move one step in the positive direction relative to the current position.
myStepper.move(1);
setMaxSpeed((float) speed)
- Argument: speed in steps per second. Desired maximum speed as a floating point value. A negative value may be passed, but will be stored as an absolute value.
Set the maximum allowable speed. Usually, this function will be the first one called when using an AccelStepper object (that is, a stepper motor.) If the run() function is used, then the motor will accelerate to this speed. Any speed value set by setSpeed() will be ignored. If runSpeed() is being used, then setSpeed() must be called after setMaxSpeed().
Caution: the maximum speed achievable depends on your processor and clock speed. Values as high as 4000.0 might work - but 1000.0 is a safe bet. Speeds that exceed the maximum speed supported by the processor may result in non-linear accelerations and decelerations. The default maxSpeed is 1.0 steps per second.
Example setting the maximum speed to 1000.0 steps per second.
myStepper.setMaxSpeed(1000.0);
setAcceleration((float) acceleration)
- Argument: acceleration in steps per second per second as a floating point value. May be specified as negative, but only the absolute value is stored.
Sets the acceleration/deceleration rate. Acceleration is used by run() to increase (or decrease) the speed the motor is being stepped at. This is an expensive call since it requires a square root to be calculated. Don’t call more often than needed. Default value is 1.0.
Example setting the acceleration to 50.0 steps per second per second.
myStepper.setAcceleration(50.0);
You might well ask, “I don’t get acceleration! Exactly what does steps per second per second mean?” Let me explain.
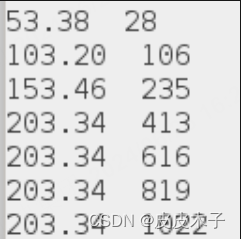
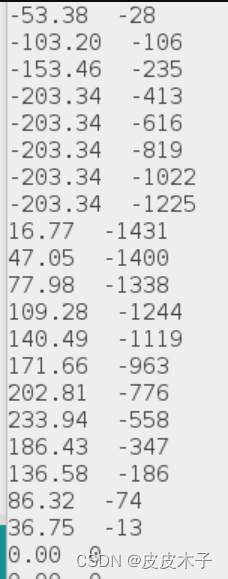
Start with the maxSpeed set to 200.0 steps per second and acceleration set to 50.0 steps per second per second. Let our program call run() repeatedly. The run() function will start moving the motor at 0.0 step per second and increase that speed by 50 steps per second every second the motor runs. Consider the speed and position at the end of one second. The motor will start at 0.0 steps per second and will have accelerated by 50 per second in one second. It will have moved about 25 steps (about the average speed for the first second; ~1/2 * 50). Acceleration is constant, so here are the values of speed and position (distance moved) as time passes. These are the actual results from UnoAccelStepperRunDemo.ino. Since each call to run() causes an update, the values reported each second are somewhat different than you might expect. You can experiment with that sketch to learn more about acceleration. You don’t even need to connect a motor or driver to see the results, but it’s more fun if you do!
| Second: | 1 | 2 | 3 | 4 | 5 | 6 |
|---|---|---|---|---|---|---|
| Speed: | 53 | 103 | 153 | 200 | 200 | 200 |
| Distance: | 28 | 106 | 235 | 413 | 613 | 813 |
What if acceleration is fractional? Works fine, just slow acceleration. An acceleration value of 1e-14 has been tested. The algorithm still works, but there will be no motion for a very long time. (I got tired of waiting!)
setSpeed((float) speed)
- Argument: speed in steps per second as a floating point value. May be positive or negative.
Sets the desired constant speed for use with runSpeed(). The speed will be limited by the current value of setMaxSpeed() to +/- maxSpeed. This speed will be used as long as runSpeed() is called and results in constant speed operation. If run() is called, this value will be ignored (and overwritten). Speeds of more than 1000 steps per second may be unreliable. Very slow speeds may be set (eg 0.00027777 for once per hour, approximately. Speed accuracy depends on the Arduino crystal. Jitter depends on how frequently you call the runSpeed() function.
Example setting the speed (for constant speed operation) to 200.0 steps per second.
myStepper.setSpeed(200.0);
setCurrentPosition((long) position)
- Argument: The desired value of the position in steps of wherever the motor happens to be right now. It can be positive or negative and is of type long.
This function will make the current motor position and the target position equal to the value specified. For example, if you have moved the motor to an initial position (say 213) and call setCurrentPosition(100), the current position and the target position will both be set to 100. it will take 100 positive steps to reach position 200 (if you call moveTo(200)) rather than 13 steps in the negative direction. This function will also reset the value of speed to 0.0. This function is most useful for setting a zero position on a stepper after an initial hardware positioning move.
Example setting the current position to 0 steps.
setCurrentPosition(0);
Warning: Do not call this function while a move is in process!
The values of current position and target position will be changed immediately and speed will be immediately set to 0. This will force the motor to try to stop instantly and will most likely result in missed steps and possible damage to your system. Be sure the stepper has come to a stop before calling setCurrentPostion().
stop()
This function will set a new target position that causes the stepper to stop as quickly as possible, using the current speed and acceleration parameters. A call to runToPosition() will bring the motor to a stop. Repeated calls to run() will do the same thing. The motor will take more steps in the direction it is going before stopping. This could be several steps if the motor is running fast and the acceleration is low.
Motion Functions
Full explanation of how AccelStepper uses these functions to control motion is given above in the Motion Overview section. By all means, take time to review that section when you need insight into how these motion functions work. These functions cause the motors to actually run - configuration and setup functions should be called before calling the motion functions.
Consider the non-blocking motion functions first.
runSpeed()
Move one step it if a step is due (as described above), implementing a constant speed as set by the most recent call to setSpeed(). You must call this frequently, but at least once per step interval. It produces constant speed operation. Since it does not seek a position, it can be used to run a motor continuously. Note that the currentPosition will be incremented or decremented by runSpeed(), but the targetPosition will be ignored.
The function will return true if the motor was stepped, and false if not. Note this is not the same as the behavior of run()! The runSpeed() function may be called several times before it actually causes a step to be taken. It will return false every time it does not step; true is returned only if it steps. On the other hand, run() may also be called many times before causing a step, but it will return true every time until the motor stops.
Caution: Since acceleration is not used by runSpeed(), setting a high value for speed, then calling runSpeed() may cause the motor to stall. To achieve maximum motor speed, use run() and allow the motor to accelerate.
Examples of use of runSpeed(): UnoAccelStepper_ConstantSpeed.ino (simplest version), UnoAccelStepperExper_1.ino (simple, but reports results every second), and also UnoAccelStepper_speedControl.ino which uses a pot to vary speed and reports results every second. Experiments to try include setting max speed and speed to very high values and see if your motor will run or stall. Then try same with speedControl to ramp up slowly and see if the high speed is possible.
run()
The run() function calls runSpeed(), then calls computeNewSpeed() (see description in Motion Overview, above). A step will be taken if it is due and currentPosition does not equal targetPosition. This function implements acceleration and de-acceleration to move the motor. You must call this as frequently as possible, but at least once per minimum step time interval, preferably in your main loop. The function will return true if the speed is not zero or the final position has not been reached. (That means the motor is being stepped.) If these conditions are met, true will be returned regardless of whether or not the motor stepped. Note that each call to run() will make at most one step, and then only when a step is due.
Example of use of run(): UnoAccelStepperRunSimple.ino- A simple demo of run(). Another sketch, UnoAccelStepperRunDemo.ino is a nice, clean run() demo also that reports every second to the serial monitor - helps to build insight into how AccelStepper works. Try various maximum speeds and accelerations and see what’s reported.
runSpeedToPosition()
Executes runSpeed() unless the targetPosition is reached. This function needs to be called often just like runSpeed() or run(). Runs the motor at the currently selected speed unless the target position is reached. Does not implement accelerations.
The function will return true if it stepped and false otherwise. If you want to know if the target position has been reached, call distanceToGo() described below.
Example of use of runSpeedToPosition(): UnoAccelStepper_ProportionalControl.ino Note use of setSpeed() after call to moveTo().
Now let’s look at the blocking motion functions. “Blocking” means no other program code runs until these functions complete.
runToPosition()
This function will continually call run() - blocking other statements - until it returns false - meaning the desired position has been reached. It moves the motor (with acceleration/deceleration) to the target position and blocks until it is at position.
runToNewPosition((long) absolute position)
Executes moveTo(position), then runToPosition().
Moves the motor (with acceleration/deceleration) to the new target position and blocks until it is at position.
- Argument: absolute_position in steps. The desired absolute position of type long. May be positive or negative.
Example of blocking move to 200.
runToNewPosition(200);
To summarize:
- Use
setMaxSpeed(), thensetSpeed()to initialize, then callrunSpeed()repeatedly to step the motor at constant speed. Stop callingrunSpeed()to stop the motor. - Use
setMaxSpeed(), thenmoveTo()ormove()to set a target, thensetSpeed()to initialize, then callrunSpeedToPosition()repeatedly to step the motor at constant speed until the target position is reached. - Use
setMaxSpeed(), thensetAcceleration(), thenmoveTo()ormove()to set a target, then callrun()repeatedly to accelerate the motor, move to the target, and decelerate to a stop.
Only one of the run functions needs to be called in the loop.
- If blocking behavior is desired, use
setMaxSpeed(), thensetAcceleration(), thenmoveTo()ormove()to set a target, then callrunToPosition(). The motor will behave as thoughrun()were repeatedly being called, but no other code can be executed until the target position is reached. Alternatively, usingrunToNewPosition()allows themove()ormoveTo()calls to be skipped.
It is a bad idea to put delay() calls in the loop with run()! This causes the loop to run slowly and will limit the speed of the motors.
Just to be very clear: if run() is being used, setSpeed() does not set the speed! Only computeNewSpeed() will set the speed as described in Motion Overview, above.
The function stop() does not stop the motor! It will set a new speed and target. Call run() or runToPosition() to cause a stop.
The functions move() and moveTo() do not cause motion. The function run() must be called to cause motion. (runToPosition() will also do it.)
If runSpeed() is being used, the value of speed is all that matters. The value of speed is the last value set by setSpeed(), or calculated by computeNewSpeed() if run() was used.
Information functions
These may be called to read back the values of certain variables, or check status of motion. Note that speed is always in steps per second and position is in steps from the 0 position. Direction is considered clockwise or counterclockwise, but these are arbitrary depending on how the motor is wired to the interface electronics. Positive values of position are opposite negative values.
maxSpeed()
Maximum speed as set by setMaxSpeed - in case you forgot. Returns a floating point value.
speed()
Return the most recent speed as a floating point value in steps per second. This could be speed set by setSpeed() if only runSpeed() has been called, or speed calculated if run() is called or if a positioning routine has been called.
targetPosition()
Target position as set by move() or moveTo(). Returns a long.
currentPosition()
Where the motor is currently. Returns a long.
distanceToGo()
Equal to targetPosition - currentPosition as a positive integer. Returns a long. The distance from the current position to the target position in steps.
isRunning()
Return true if the speed is not zero and distanceToGo is not 0.
Pin Management functions
The interface pins send the signals to cause stepping. These functions may be used to further configure and control them.
enableOutputs()
Enable interface pins as outputs by setting them to OUTPUT mode. Called automatically by the constructor. It only needs to be called directly if disableOutputs() has been called. If the enable pin has been defined, this function will also manage it.
disableOutputs()
Set the interface pin outputs to all LOW and invert (disable) the enable pin if it has been set. Depending on the design of your electronics this may turn off the power to the motor coils, saving power. This is useful to support Arduino low power modes: disable the outputs during sleep and then reenable with enableOutputs() before stepping again.
setPinsInverted()
This function can invert the sense of any interface pin. The pins are positional; setting the value for a pin true inverts it while setting it false leaves it un-inverted. This function is used most often to invert the enable signal. There are two forms of this function:
- setPinsInverted (directionPin, stepPin, enablePin) This form is for step/direction drivers. To set just the enable signal inverted, use setPinInverted(false, false, true). If an enable pin is not used, no value needs to be specified.
- setPinsInverted(pin1, pin2, pin3, pin4, enablePin) This form is for the 2, 3, and 4 pin driver types. Place a value of true in the position of any pin that is to be inverted. If an enable pin is not used, a value must still be specified! (This is a bug - but it’s easy to work around.)
If the enable pin is to be inverted, call setPinsInverted() before calling setEnablePin(). If pins other than the enable pin are to be inverted, you may want to create the AccelStepper objects with a concluding argument of false. That will keep the enableOutputs() function from being called until the pins are inverted. Then call enableOutputs().
Example inverting only the enable pin of a step/direction driver.
setPinsInverted (false, false, true);
Example inverting only the step/direction pins of a step/direction driver. The enable pin is not used and may be omitted.
setPinsInverted (true, true);
Example inverting the interface pins of a 4 pin driver. The enable pin is not used but must be specified anyway.
setPinsInverted (true, true, true, true, false);
setEnablePin(enablePin)
Specify the desired pin number to use to control the enable signal. If no enable pin signal is needed, there is no need to call this function. The pin will be configured as an OUTPUT, and the correct value will be set, when this function is called. For this reason, if the enable signal is to be inverted, setPinsInverted() should be called before setEnablePin(). As mentioned above, enableOutputs() and disableOutputs() will correctly manage the enable pin, along with any inversions.
Example setting the enable pin to pin 7.
setEnablePin(7);
setMinPulseWidth(unsigned int minWidth)
This function only affects the step pulse width for step/direction drivers.
Measuring with my oscilloscope, the minimum pulse width is 16uSec. Using this function, it is possible to increase the pulse witdth in increments of 1uSec. Most drivers seem to do fine without any adjustment to this value and I’d advise not to mess with it unless you know what you’re doing. That said, a recent thread in the forum revealed that the TB6600 driver did not work reliably until setMinPulseWitdth(20) was used, making the pulse 35uSec wide. YMMV.
// Example setting the minimum pulse width to 30 microseconds (15+15).
setMinPulseWidth(15);
Let’s consider how to use the pin management functions. Suppose we want to invert the Direction pin and use an Enable pin, also inverted. Here’s what we need to do. We must start with the construction of the stepper object and keep the interface pins from being initialized.
AccelStepper myStepper(AccelStepper::DRIVER, stepPin, dirPin, 0xff, 0xff, false);
Using "false" in this manner stops initialization of the interface pins so that the Direction pin can be inverted before it is used. Note that we must specify "0xff" (or whatever - it doesn’t matter, but 0xff is safe) for the two unused pins so that “false” is in the correct position. To initialize the pins, enableOutputs() must be called, but first any desired pins should be inverted and the enable pin defined.
Now we can invert the Direction pin and the enable pin. The Step pin is left alone. Invert the enable pin even though it hasn’t been defined yet.
myStepper.setPinsInverted (true, false, true);
Now define the enable pin on pin 7 (for example).
myStepper.setEnablePin(7);
The enable pin is now initialized, next we need to make sure it is in the disabled state.
myStepper.disableOutputs();
Everything is ready, so enable the outputs.
myStepper.enableOutputs();
The disableOutputs() function may be used now to power down the interface as desired. Use enableOutputs() to power it up again. NOTE: disableOutputs() will only change the state of the enable pin to the disabled state. That signal must be connected to your driver’s enable pin in order to power it down. If you continue to call run() or runSpeed(), steps will continue to be sent to the driver and if it does not have an enable pin, it will continue to step. To make use of disableOutputs() if your driver doesn’t have an enable pin, you should stop calling run() or runSpeed() before calling disableOutputs().
Example Programs
If you haven’t already done so, now would be a good time to have a look at the demo programs I’ve included. These were introduced above when runSpeed() and run() were discussed, but I want to be sure they are noticed. You can download them individually and pick only the ones you care about, or download the AccelStepperDemos.zip archive. Three driver types are supported. Just uncomment the one you want to use and comment out the others. These have all been tested on the Uno and the Duemilanova, but should run on any Arduino version supporting AccelStepper. The ElapsedMillis library is used to make printing at one second intervals easy. It can be downloaded using the library manager, or millis() could be used also with a tiny bit of effort.
- UnoAccelStepper_ConstantSpeed - Uses
runSpeed()to drive a single stepper. - UnoAccelStepperExper_1 - Easy
runSpeed()example with one second report. - UnoAccelStepper_speedControl - Uses pot to control speed. Has reporting. Uses
runSpeed()- can do lots of experiments. - UnoAccelStepperRunSimple - Stepper bounces between limits. Best simple
run()demo. - UnoAccelStepperRunDemo - shows how
run()works. Also demos effects of move and stop functions. Includes reporting every second. Works great for doing many experiments - reporting is very helpful to gain insight. - UnoAccelStepper_ProportionalControl - Uses pot input. Has optional port viewing routine. Prints position info. Shows use of
runSpeedToPosition()andsetSpeed()aftermoveTo().


 1136
1136

 被折叠的 条评论
为什么被折叠?
被折叠的 条评论
为什么被折叠?
 到【灌水乐园】发言


