


Overview
ROS
doc
git
The arbotix_python package provides a basic ROS interface to an ArbotiX RoboController over a USB serial connection, or XBEE wireless radios.
This package consists of three tools:
- the driver,
- a GUI for interacting with the driver,
- and a terminal tool for setting up your servos.
Driver Node
driver.py
Interface to an ArbotiX RoboController.
Subscribed Topics
<servo>/command (std_msgs/Float64)
Commanded position to move servo to, in radians.
Published Topics
/joint_states (sensor_msgs/JointState)
Servo position feedback. Servo meta-information must be configured via parameters.
Services
<servo>/relax (arbotix_msgs/Relax)
Relax servo (turn off torque) until next command is sent.
Parameters
~port (str, default: /dev/ttyUSB0)
Name of port to use.
~baud (int, default: 115200)
Baud rate, in bps.
~rate (int, default: 100)
Rate at which to run main loop.
~read_rate (float, default: 10)
Rate at which to read servos and publish joint_states topic.
~write_rate (float, default: 10)
Rate at which to write command updates to servo.
~sync_read (boolean, default: True)
Whether to use sync_read or not. Must be disabled when using hardware such as a USB2Dynamixel.
~sync_write (boolean, default: True)
Whether to use sync_write or not.
~dynamixels/<servo>/id (str)
Dynamixel ID for servo.
~dynamixels/<servo>/neutral (int, default: 512)
Neutral position for servo.
~dynamixels/<servo>/range (float, default: 300.0)
Range of servo, in degrees.
~dynamixels/<servo>/ticks (int, default: 1024)
Number of ticks, for EX-106s, you would pass in 4096, other servos likely won’t need this altered.
~dynamixels/<servo>/min_angle (float, default: -150.0)
Minimum angle in degrees.
~dynamixels/<servo>/max_angle (float, default: 150.0)
Maximum angle in degrees.
~dynamixels/<servo>/max_speed (float, default: 684.0)
Maximum speed in degrees/sec.
~dynamixels/<servo>/invert (boolean, default: false)
Whether to invert servo rotation or not.
~dynamixels/<servo>/readable (boolean, default: true)
Submodules
The arbotix_python package also offers several controllers which add higher-level interfaces to common hardware. These include:
- diff_controller - A controller for a differential drive base.
- follow_controller - A controller offering a
control_msgs/FollowJointTrajectoryActioninput.
This package also offers complete access to the digital and analog IO on the ArbotiX:
- io channels - for streaming digital and analog inputs and outputs.
Configuration
Because of the complexity of the parameters, the easiest way to configure the ArbotiX node is via a YAML file. For example, a simple robot with a differential drive base and a pan and tilt head (with a follow_controller) might look like:
port: /dev/ttyUSB1
rate: 15
dynamixels: {
    head_pan_joint: {id: 1, invert: true},
    head_tilt_joint: {id: 2, max_angle: 100, min_angle: -100}
}
controllers: {
  head_controller: {
  			type: follow_controller,
  			joints: [head_pan_joint, head_tilt_joint],
  			action_name: head_controller/follow_joint_trajectory },
  base_controller: {
  			type: diff_controller,
  			base_width: 0.140,
  			ticks_meter: 26145 }
}
If you saved such a YAML file in a package you have created, you could then start the ArbotiX node using a launch file such as:
<launch>
  <node name="arbotix" pkg="arbotix_python" type="driver.py" output="screen">
    <rosparam file="$(find your_package)/default.yaml" command="load" />
  </node>
</launch>
ControllerGUI
The ControllerGUI is a test/teleop node that allows you to control a mobile base and/or your Dynamixel servos. The ControllerGUI publishes geometry_msgs/Twist commands to the cmd_vel topic, and commands to individual servos. It will automatically determine the names and limits of your servos from your YAML specification file. Launching the ControllerGUI is as easy as:
rosrun arbotix_python controllerGUI.py
You should then see a window like:
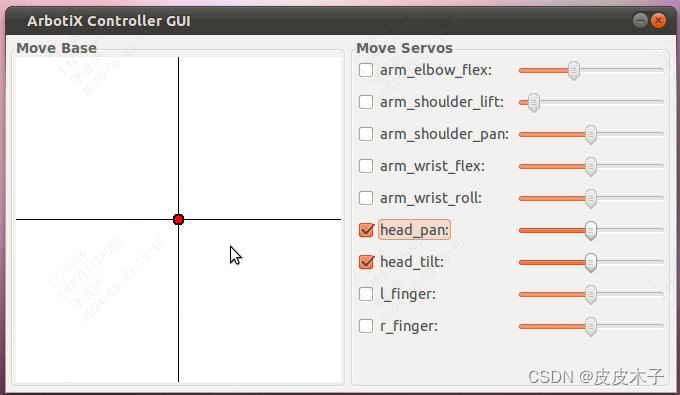
Moving the red dot up drives the robot forward, moving left/right turns in place, etc. The slider bars move servos, but must be checked to be enabled. When not enabled, they will be updated with the values of the last joint_states message, so that when enabled they will not snap to a position, but just torque-on in place. In the above image, only ·head_pan· and ·head_tilt· are enabled.
Terminal
Working with Dynamixel servos often requires some setup of the servos themselves. This is made easy with the ArbotiX terminal tool. The terminal works like a typical Linux terminal, you can type ls to query which servos are attached, mv 1 2 will move the servo with ID 1 to an ID of 2, etc:
$ rosrun arbotix_python terminal.py
ArbotiX Terminal --- Version 0.1
Copyright 2011 Vanadium Labs LLC
>>  ls
   1 .... .... .... .... .... .... .... ....
.... .... .... .... .... .... .... .... ....
>>  mv 1 2
OK
>>  ls
....    2 .... .... .... .... .... .... ....
.... .... .... .... .... .... .... .... ....
The terminal has several other commands. Typing help will list all commands:
>>  help
ArbotiX Terminal V0.1

valid commands:
 ls - list the servos found on the bus.
 mv id id2 - rename any servo with ID=id, to id2
 baud b - set baud rate of bus to b
 get param id - get a parameter value from a servo
 set param id val - set parameter on servo ID=id to val

valid parameters
 pos - current position of a servo, 0-1023
 baud - baud rate
 temp - current temperature, degrees C, READ ONLY


 1452
1452


 被折叠的 条评论
为什么被折叠?
被折叠的 条评论
为什么被折叠?
 到【灌水乐园】发言


