


 通过自定义TableView和Cell,本文详细介绍了如何在cocos2dx 3.2中实现键盘控制的网格视图,包括目标效果展示、实现思路、步骤以及关键代码实现,旨在实现流畅的界面滚动和指定位置定位。
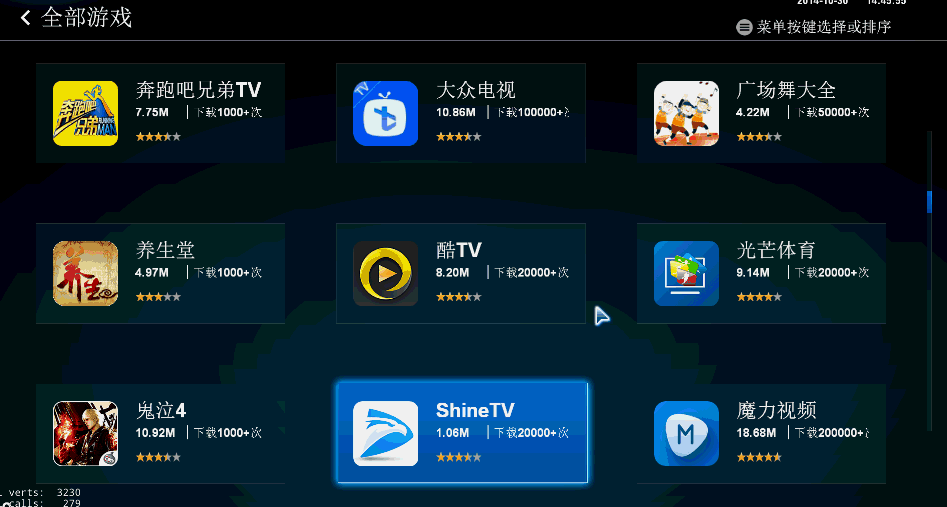
一、实现后的目标效果
有图有真相,首先上实现了的效果。
二 、思路
由于要加载较多数据,那么为了使得界面更近流畅,我采用TableView,其中他的Cell是可以复用的。创建10000个也是秒秒钟的事情。
那么使用上下排列的TableView,每个cell自定义三个Item即可,当然也可以N个,可以自己写好接口。
由于我们想使得tableView可以滚动到指定的cell位置,也就是一格一格滚动,那么我们最好自定义一个tableView继承于系统的tableView.
三 、实现步骤
如果你对于TableView不太熟悉,建议先看官方Testcpp例子.
如果你比较熟悉,那么我就不废话,继续往下讲了。
我们先来自定义一个TableViewcell。也就是自定义一行的内容。我相信这个非常简单。
四、准备工作
我们先来自定义一个TableViewcell。也就是自定义一行的内容。我相信这个非常简单。
cell头文件
class XTableViewCell : public cocos2d::extension::TableViewCell
{
public:
	XTableViewCell();
	virtual ~XTableViewCell();
	CREATE_FUNC(XTableViewCell);
	/************************************************************************/
	/*                  update item by data                                 */
	/************************************************************************/
	bool updateItemData(const unsigned int tag,
						const std::string icon,
						const std::string name,
						const std::string size,
						const std::string downnum,
						const std::string score);
	bool setItemSelected(const unsigned int tag,bool isSeleted);
CC_CONSTRUCTOR_ACCESS:
	bool init();
	//bool init
	bool initLayout();
	void update(float t);
private:
	cocos2d::Size _cellSize;  //the size of cell
	unsigned char _itemNum;   // the number of item
};
cell .源文件
/

/***************************CustomTableViewCell Class**************************************/


XTableViewCell::XTableViewCell():_itemNum(3),_cellSize(Size(1920,275))
{

}

XTableViewCell::~XTableViewCell()
{

}

bool XTableViewCell::init()
{
	IF_NULL_RETURN_FALSE(Node::init());
	IF_NULL_RETURN_FALSE(initLayout());
	//scheduleUpdate();
	//resumeSchedulerAndActions();
	return true;
}

bool XTableViewCell::initLayout()
{
	auto lout = ui::Layout::create();
	IF_NULL_RETURN_FALSE(lout);
	lout->setLayoutType(ui::Layout::Type::ABSOLUTE);
	lout->setTouchEnabled(true);
	lout->setLoopFocus(false);
	lout->setPassFocusToChild(true);
	lout->setContentSize(Size(_cellSize.width,200.0f));
	this->addChild(lout);
	lout->setTag(100);
	lout->setAnchorPoint(Vec2::ANCHOR_BOTTOM_LEFT);
	lout->setPosition(Vec2(0,75));
	for(int j =0;j<_itemNum;j++)
	{
		const std::string txt = StringUtils::format("%dt%d",0,j);//名称后面得重新修改
		GridItem* item = GridItem::create();
		IF_NULL_RETURN_FALSE(item);
		item->setPosition(Vec2(j*600+90,0));
		item->setName(txt);
		lout->addChild(item,1,j);
	}
	return true;
}

void XTableViewCell::update( float t )
{
	log("XTableViewCell::update");
}

bool XTableViewCell::updateItemData( const unsigned int tag,
									 const std::string icon,
									 const std::string name,
									 const std::string size,
									 const std::string downnum,
									 const std::string score )
{
	auto lout = this->getChildByTag(100);
	IF_NULL_RETURN_FALSE(lout);
	auto item  = (GridItem*)lout->getChildByTag(tag);
	IF_NULL_RETURN_FALSE(item);
	if(""!=icon)
	{
		item->updateIcon(icon);
	}
	if(""!=name)
	{
		item->updateName(name);
	}
	if(""!=size)
	{
		item->updateSize(size);
	}
	if(""!=downnum)
	{
		item->updateDownNum(downnum);
	}
	if(""!=score)
	{
		item->updateScore(score);
	}
	return true;
}

bool XTableViewCell::setItemSelected( const unsigned int tag,bool isSeleted )
{
	auto lout = this->getChildByTag(100);
	IF_NULL_RETURN_FALSE(lout);
	auto item  = (GridItem*)lout->getChildByTag(tag);
	IF_NULL_RETURN_FALSE(item);
	item->setSelected(isSeleted);
	return true;
}
里面都实现了什么,其实就是简单的添加了三个自定义Item.
然后,我们自定义一个TableView实现了两个方法。
一个是去实现滚动到指定cell的方法。
另外一个是我使用触摸的时候需要获得当前使用的cell去判断哪个Item位置位于触摸位置。
我们这里只讲键盘的。那么你可能就用不到这个函数了。
代码如下:
class XTableView : public cocos2d::extension::TableView
{
public:
	/**
	* @brief scroll to the Designated cell
	* @param index --- the idx of Designated cell
	**/
	void scrollToCellIndex(ssize_t index);
	/***************************************************
	* @decripition  if you need Analyzing touch item ,
	*  maby you will use this function to get used cell
	****************************************************/
	cocos2d::Vector<cocos2d::extension::TableViewCell*> getCurrentCells() const;
};
/
/***************************XTableView Class**************************************/
void XTa 最低0.47元/天 解锁文章


 3596
3596

 被折叠的 条评论
为什么被折叠?
被折叠的 条评论
为什么被折叠?
 到【灌水乐园】发言


