


PyQt5项目笔记
setStyleSheet方法
在PyQt5中,使用setStyleSheet方法时,可以传递各种CSS样式属性作为参数。以下是一些常用的CSS样式属性参数:
背景样式相关参数:
background-color: 设置背景颜色
background-image: 设置背景图片
background-repeat: 设置背景图片的重复方式
边框样式相关参数:
border-style: 设置边框样式,如solid, double, dotted, dashed等
border-width: 设置边框宽度
border-color: 设置边框颜色
border-radius: 设置边框的圆角半径
字体样式相关参数:
font-family: 设置字体
font-size: 设置字体大小
font-weight: 设置字体粗细,如bold, normal等
其他样式参数:
color: 设置文本颜色
padding: 设置内边距大小
margin: 设置外边距大小
这只是一些常用的CSS样式属性参数,实际上还有很多其他属性可供使用。你可以根据需要在setStyleSheet方法中定义自己的样式。
self.anniu.setStyleSheet("background-color: rgb(115,214,97);border-radius: 20px; border: 5px groove gray;border-style: outset;")
self.anniu.setFont(QFont('宋体', 20))
RGB配置网站:https://colors.masantu.com/#/?colorId=2077219

frame无边框
self.frame.setFrameShape(QFrame.NoFrame) # 设置为无边框
label显示图片
path="./2.png"
pixmap2=QPixmap(path)
self.label_2.setPixmap(pixmap2)
self.label_2.setAlignment(Qt.AlignCenter)
self.label_2.show()
显示ROS_cam视频流
使用多线程和回调实现,并且使用信号和槽
回调函数
    def image_callback(self, msg):
        cv_image = self.bridge.imgmsg_to_cv2(msg, "bgr8")
        self.image = cv2.cvtColor(cv_image, cv2.COLOR_BGR2RGB)
        pil_image = Image.fromarray(self.image)
        pil_image = pil_image.resize((500, 700))
        qt_image = QImage(pil_image.tobytes(), pil_image.width, pil_image.height, QImage.Format_RGB888)
        pixmap = QPixmap.fromImage(qt_image)
        self.updateImage.emit(pixmap)
多线程
class ROSNode(QThread):

    updateMainWindow = pyqtSignal(int)
    updateImage = pyqtSignal(QPixmap)
    updateImage2 = pyqtSignal(QPixmap)
    user_input = pyqtSignal(str)
    def __init__(self):
        QThread.__init__(self)
        self.run()
    def run(self):
        self.gui_sub = rospy.Subscriber('gui_control', Int16, self.gui_control_callback)
        self.img_sub = rospy.Subscriber("/usb_cam/image_raw", ImageMsg, self.image_callback)
        self.darknet_ros = rospy.Subscriber('darknet_ros', ImageMsg, self.darknet_img)
        self.user_input2 = rospy.Subscriber('user_input', String, self.input_callback)
        self.bridge = CvBridge()
显示到label
    def updateImage(self, q_image):
        self.cam_img=self.qtpixmap_to_cvimg(q_image)
        if self.img_show_control ==True:
            self.label_2.setPixmap(q_image)
            self.label_2.setAlignment(Qt.AlignCenter)
            self.label_2.show()
QPixmap转opencv
    # QPixmap转opencv
    def qtpixmap_to_cvimg(self,qtpixmap):
        qimg = qtpixmap.toImage()
        temp_shape = (qimg.height(), qimg.bytesPerLine() * 8 // qimg.depth())
        temp_shape += (4,)
        ptr = qimg.bits()
        ptr.setsize(qimg.byteCount())
        result = np.array(ptr, dtype=np.uint8).reshape(temp_shape)
        result = result[..., :3]
        return result
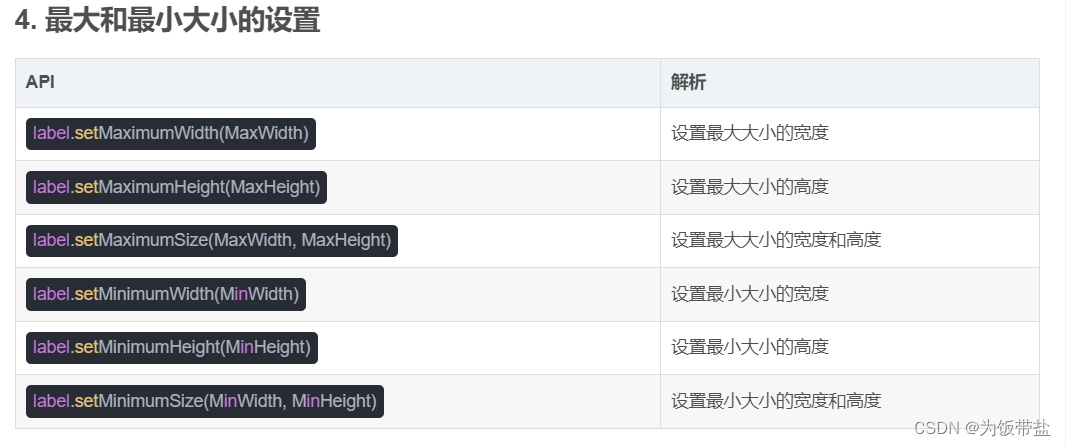
设置按钮高度
在布局里面设置
self.anniu.setMinimumHeight(100)
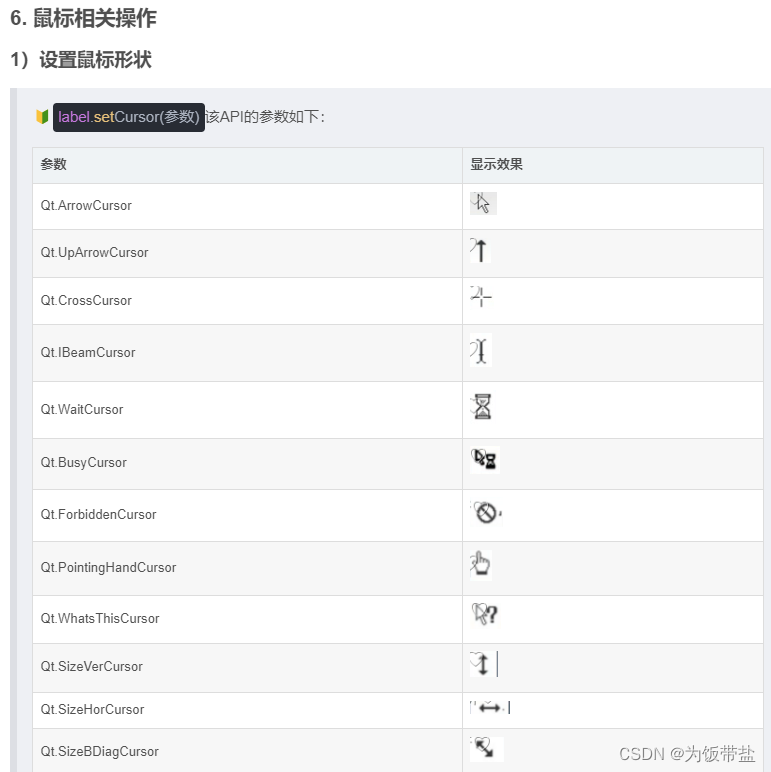
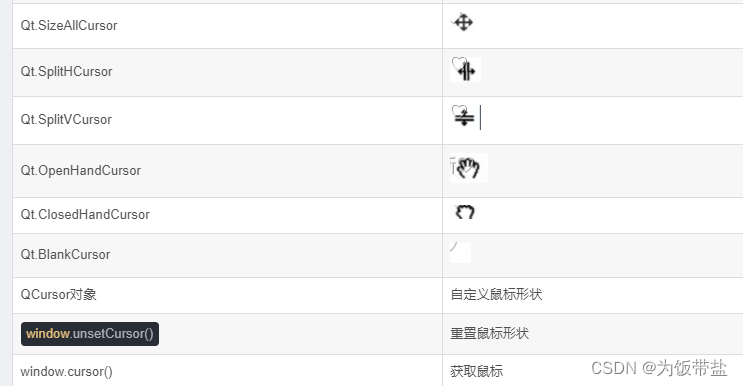
自定义鼠标
pixmap = QPixmap("qq.jpg")  # 图片对象
new_pixmap = pixmap.scaled(50, 50)  # 图片大小
cursor = QCursor(new_pixmap, 0, 0)  # 鼠标对象,及作用点坐标位置
window.setCursor(cursor)
鼠标跟踪
🔰window.hasMouseTracking():判定是否设置了鼠标跟踪;
🔰window.setMouseTracking(True):设置鼠标是否跟踪;
🔰所谓的鼠标跟踪,其实就是设置检测鼠标移动事件的条件;
🔰不跟踪:鼠标移动时,必须处于按下状态,才会触发mouseMoveEvent事件;
🔰跟踪:鼠标移动时,不处于按下状态,也会触发mouseMoveEvent事件;


 9040
9040


 被折叠的 条评论
为什么被折叠?
被折叠的 条评论
为什么被折叠?
 到【灌水乐园】发言


