


前言
公司目前使用jupyter来提供一个交互式的notebook,供给研究院、大数据部门、BI部门的相关同事通过web创建、分享python文档;无需再像以前那样登录服务器或者接口机编写代码;使用jupyter,简化了代码的编写、提交;更便于代码的分享;同时也节约了开发人员的学习成本。
但是jupyter相对单一,没有多用户管理,也就无法隔离开开发人员之间的权限。对于我们来说,这是致命的。
jupyterhub在支持jupyter所有功能的基础上,还支持多用户功能;因此准备将现有的jupyter缓存jupyterhub。前前后后花了约一个星期,终于完成了所有环境的搭建;下面分享下整个搭建过程以及遇到的一些坑。
准备工作
jupyterhub的github地址:https://github.com/jupyterhub/jupyterhub
官方安装文档: https://jupyterhub.readthedocs.io/en/latest/index.html
详细阅读上面两个链接,了解jupyterhub是干嘛的,有哪些功能。
我准备了一个centos7.4版本的阿里云ECS服务器;python默认版本是2.7.5
官方安装文档要求如下:
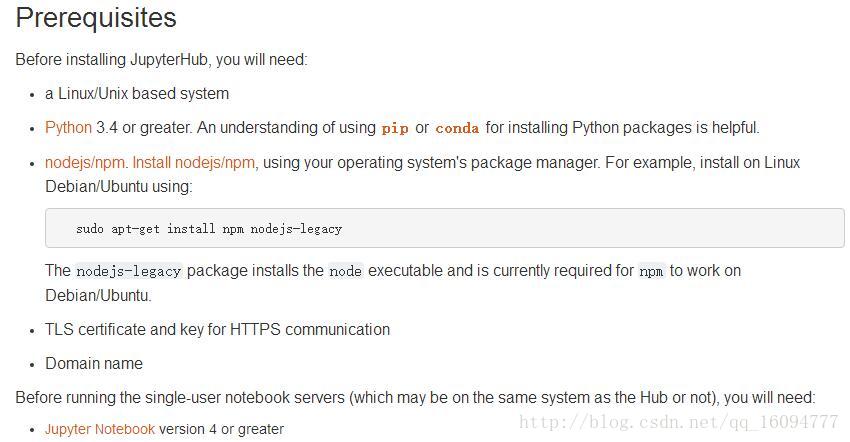
大概意思是:
1、一个linux操作系统;
2、python需要3.4或者以上的版本,且需要安装pip或者conda。
3、需要安装nodejs/npm;
4、jupyter notebook4或者以上版本;
安装
linux系统已经有了:centos7.4,但是默认的python版本2.7.5不符合要求,先安装python3.6.3;
1、 首先安装相关的依赖包:
yum groupinstall “Development tools”
yum -y install mysql-devel gcc gcc-c++ glibc geos cyrus-sasl-devel zlib-devel bzip2-devel openssl-devel ncurses-devel sqlite-devel readline-devel tk-devel
注: 上面的依赖包是我这边程序需要的;如果不需要那么多包,也可以不安装;
2、获取官方源码包:https://www.python.org/ftp/python/3.6.3/Python-3.6.3.tar.xz
3、解压文件:
xz -d Python-3.6.3.tar.xz
tar -xvf Python-3.6.3.tar
4、编译安装:
cd Python-3.6.3
./configure –prefix=/usr/local/python3
make && make install
5、配置环境变量:
ln -s /usr/local/python3/bin/python3 /usr/bin/python3
ln -s /usr/local/python3/bin/pip /usr/bin/pip3
截止到这一步,python3安装结束;
下面安装jupyterhub:
python3 -m pip install jupyterhub
npm install -g configurable-http-proxy #先pip install
python3 -m pip install notebook # needed if running the notebook servers locally
测试一下安装是否成功:
jupyterhub -h
configurable-http-proxy -h
如果操作系统没有默认安装nodejs/npm需要先安装下:yum install -y nodejs nodejs-npm
这样安装完的nodejs版本有点低,记得是6.*版本,我的业务需要更高版本。通过node的版本切换n来安装更高的版本:
npm install -g n
n latest
再检查node版本:
node -v:
v9.2.0
已经符合我的要求了。
完成以上安装后,可能还需要安装其他的pip包。也可以使用Anaconda来安装,这样会安装很多默认的包。此处不做详细叙述。有兴趣的可以试下。
配置
首先创建/etc/jupyterhub目录:
mkdir /etc/jupyterhub
进入上面的目录:
cd /etc/jupyterhub
创建jupyterhub配置文件:
jupyterhub –generate-config
此时会在/etc/jupyterhub目录下生成一个jupyterhub_config.py文件,包含jupyterhub的默认配置项;
启动jupyterhub:jupyterhub -f /etc/jupyterhub/jupyterhub_config.py
根据自己的需要更改相关配置。
我这边的配置内容如下:
c = get_config()
import os
pjoin = os.path.join
runtime_dir = os.path.join(‘/etc/jupyterhub’)
ssl_dir = pjoin(runtime_dir, ‘ssl’)
if not os.path.exists(ssl_dir):
os.makedirs(ssl_dir)
c.JupyterHub.admin_users = {‘dianwoda’}
c.JupyterHub.allow_named_servers = True
c.JupyterHub.ip = ‘...’ #本机ip
c.JupyterHub.cookie_secret_file = pjoin(runtime_dir, ‘cookie_secret’)
c.JupyterHub.db_url = pjoin(runtime_dir, ‘jupyterhub.sqlite’)
c.ConfigurableHTTPProxy.auth_token = ‘**********************’
c.JupyterHub.services = [
{
‘name’: ‘cull-idle’,
‘admin’: True,
‘command’: ‘python /etc/jupyterhub/cull_idle_servers.py –timeout=3600’.split(),
}
]
c.Spawner.cpu_limit = 0.5 #限制单个notebook的CPU
c.Spawner.mem_limit = ‘1G’#限制单个notebook的MEM
c.Spawner.notebook_dir = ‘~/notebooks’ #默认的notebook目录
c.LocalAuthenticator.create_system_users = True
c.PAMAuthenticator.encoding = ‘utf8’
from oauthenticator.gitlab import GitLabOAuthenticator
c.JupyterHub.authenticator_class = GitLabOAuthenticator #认证方式
c.GitLabOAuthenticator.oauth_callback_url = ‘http://ip:port/hub/oauth_callback’ #jupyterhub地址
c.GitLabOAuthenticator.client_id = ‘**********’
c.GitLabOAuthenticator.client_secret = ‘******’
因为我使用的是阿里云ECS,没有购买外网服务。需要通过nginx代理到外网;
nginx配置:
map
httpupgrade
connection_upgrade {
default upgrade;
” close;
}
server {
listen 8000;
index index.py index.html index.php;
server_name localhost;
    location / {
        proxy_pass  http://*.*.*.*:8000; #jupyterhub ip
        proxy_set_header X-Real-IP $remote_addr;
        proxy_set_header Host $http_host;
        proxy_set_header X-Forwarded-For $proxy_add_x_forwarded_for;
        # WebSocket support
        proxy_http_version 1.1;
        proxy_set_header Upgrade $http_upgrade;
        proxy_set_header Connection $connection_upgrade;
    }
    location ~ /.well-known {
    allow all;
    }
}
安全设置
官方文档说明:https://jupyterhub.readthedocs.io/en/latest/getting-started/security-basics.html
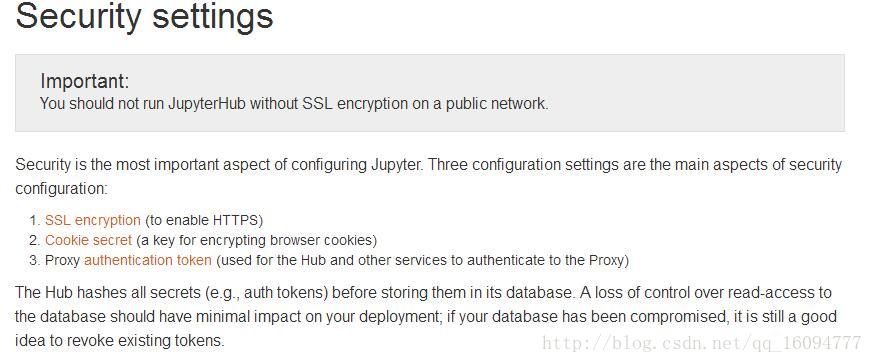
我这里仅配置了Proxy authentication token
参照官方说明文档,生成一个token配置上即可。
账号认证
JupyterHub支持一下服务的认证:
Auth0
Bitbucket
CILogon
GitHub
GitLab
Globus
Google
MediaWiki
Okpy
OpenShift
我们公司有私有的gitlab。所以我选择gitlab作为账号认证服务器;
具体的配置就是上面的:
from oauthenticator.gitlab import GitLabOAuthenticator
c.JupyterHub.authenticator_class = GitLabOAuthenticator #认证方式
c.GitLabOAuthenticator.oauth_callback_url = ‘http://ip:port/hub/oauth_callback’ #jupyterhub地址
c.GitLabOAuthenticator.client_id = ‘**********’
c.GitLabOAuthenticator.client_secret = ‘******’
需要说明的是,oauth_callback_url是jupyterhub的地址;
cilent_id和client_secret是gitlab生成的,具体方法参照官方说明:
http://docs.gitlab.com/ce/integration/oauth_provider.html
注意:
1、需要设置GITLAB_HOST环境变量,指定gitlab地址,或者直接修改/usr/local/python3/lib/python3.6/site-packages/oauthenticator/gitlab.py中的下面代码:
GITLAB_HOST = os.environ.get(‘GITLAB_HOST’) or ‘https://gitlab.com’
2、确认下你的gitlab API版本,默认的jupyterhub支持的gitlab API是V4版本,如果你使用的时候低版本的gitlab,需要设置GITLAB_API_VERSION环境变量,或者直接修改/usr/local/python3/lib/python3.6/site-packages/oauthenticator/gitlab.py中的下面代码:
GITLAB_API_VERSION = os.environ.get(‘GITLAB_API_VERSION’) or ‘4’
额外服务
配置了cull_idle_servers.py:监视和剔除闲置的单用户服务器
c.JupyterHub.services = [
{
‘name’: ‘cull-idle’,
‘admin’: True,
‘command’: ‘python /etc/jupyterhub/cull_idle_servers.py –timeout=3600’.split(),
}
]
脚本下载路径:https://github.com/jupyterhub/jupyterhub/blob/master/examples/cull-idle/cull_idle_servers.py
其他配置
jupyterhub配置nbextensions
参照:https://github.com/ipython-contrib/jupyter_contrib_nbextensions/issues/617执行如下命令:
pip install jupyter_contrib_nbextensions
jupyter contrib nbextension install –system


 228
228


 被折叠的 条评论
为什么被折叠?
被折叠的 条评论
为什么被折叠?
 到【灌水乐园】发言


