


 本文详细介绍了如何使用Python进行面部变形,包括网格变形算法的原理和实现步骤,涉及关键点检测、仿射变换和图像混合。通过OpenCV库实现面部关键点检测,计算中间面部并进行三角剖分,最终生成平滑过渡的变形图像。
0. 前言
面部变形 (face morphing) 的目的是在计算图像中两个面部之间的平均值,它并不是计算两张图像的平均值,而是计算面部区域的平均值。可以将该过程分解为以下两步:
- 对齐两个面部图像(使用仿射变换)
- 应用交叉溶解(利用
alpha融合执行图像线性组合)创建输出图像
但是该方法通常无法正确应用,我们通常需要使用(局部)特征匹配。例如,要执行面部变形,可以在关键点之间(例如鼻子与鼻子,眼睛与眼睛)进行匹配,这称为局部(非参数)扭曲。
1. 网格变形算法
使用网格变形算法实现面部变形的步骤如下:
- 定义对应关系:面部变形算法使用两个面部共同的一组特征点将源面部转换为目标面部,这些特征点可以手动创建,也可以使用面部特征检测算法自动生成的面部特征点,我们需要找到对齐面部之间的点对应关系(例如,使用两个面部上相同的关键点顺序以一致的方式标记特征点)
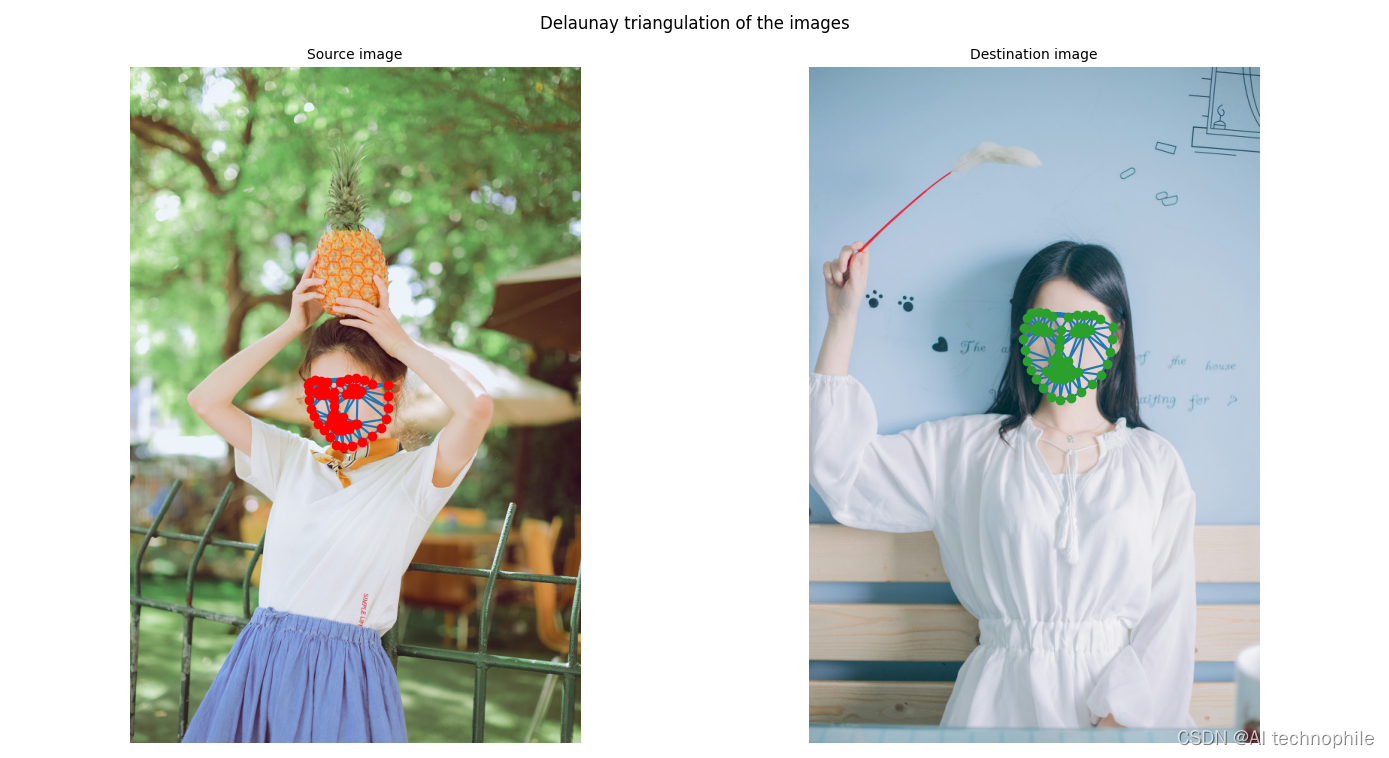
Delaunay三角剖分:需要提供用于变形的点的三角剖分;Delaunay三角剖分不会输出过细的三角形- 计算中间(变形)面部:在计算整个变形序列之前,计算源和目的地图像的中间面部,这需要计算平均形状,即两个面部中每个关键点位置的平均值
- 计算变形图像
M中特征点的位置:对于源图像中的每个三角形,计算将三角形的三个角映射到变形图像中三角形的对应角的仿射变换,然后使用刚刚计算的仿射变换将三角形内的所有像素变换到变形图像 - 最后,使用
alpha混合算法将两个图像混合在一起,得到最终变形图像
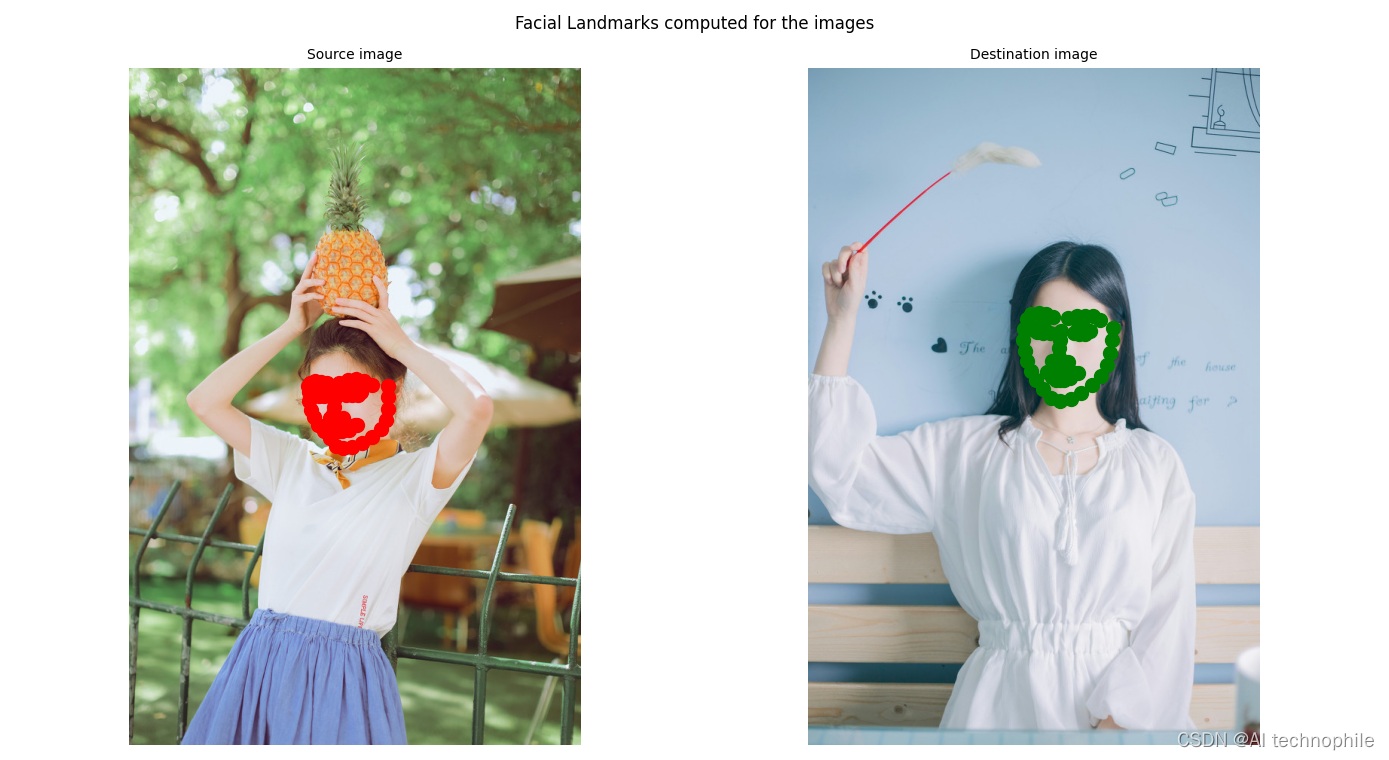
面部标志 (Facial landmarks) 是面部关键点/特征,用于标记/识别关键面部属性,并定位/表示面部的突出区域,如左/右眼、左/右眉毛、鼻子、嘴巴和下颌线等。面部关键点检测已经成功地应用于面部对齐、头部姿态估计、面部交换、眨眼检测等。
2. 实现面部变形
(1) 首先导入所有必需的库:
from scipy.spatial import Delaunay
from skimage.io import imread
import scipy.misc
import cv2
import dlib
import numpy as np
from matplotlib import pyplot as plt
(2) 使用 dlib 库的面部检测器和形状预测器,通过实现函数 extract_landmarks() 自动计算面部关键点。该函数获取输入图像,使用布尔标志指示是否添加边界点,并需要 dlib 库的 shape_predictor 模型的路径(即 dat 文件的路径,该文件是序列化的预训练的面部特征点提取器模型)。函数使用 dlib 的 shape_predictor() 函数(内部使用回归树集合)来估算 68 个关键点的位置 (x,y):
def extract_landmarks(img, add_boundary_points=True, predictor_path = 'models/shape_predictor_68_face_landmarks.dat'):
    detector = dlib.get_frontal_face_detector()
    predictor = dlib.shape_predictor(predictor_path)
    try:
        #points = stasm.search_single(cv2.cvtColor(img, cv2.COLOR_BGR2GRAY))
        dets = detector(img, 1)
        points = np.zeros((68, 2))
        for k, d in enumerate(dets):
            print("Detection {}: Left: {} Top: {} Right: {} Bottom: {}".format(
                k, d.left(), d.top(), d.right(), d.bottom()))
            # Get the landmarks/parts for the face in box d.
            shape = predictor(img, d)
            for i in range(68):
                points[i, 0] = shape.part(i).x
                points[i, 1] = shape.part(i).y
    except Exception as e:
        print('Failed finding face points: ', e)
        return []
    points = points.astype(np.int32)
    return points
可以在 GitCode 中下载 shape_predictor_68_face_landmarks.dat 文件。
(3) 使用函数 extract_landmarks() 提取源和目标面部图像的关键点:
src_path = '1.png'
dst_path = '2.png'

src_img = imread(src_path)
dst_img = imread(dst_path)

src_points = extract_landmarks(src_img)
dst_points = extract_landmarks(dst_img)
(4) 使用函数 weighted_average_points() 计算两组点和两个图像的 alpha 混合结果:
def weighted_average_points(start_points, end_points, percent=0.5):
    if percent <= 0:
        return end_points
    elif percent >= 1:
        return start_points
    else:
        return np.asarray(start_points*percent + end_points*(1-percent), np.int32)
(5) 实现函数 bilinear_interpolate() 对每个图像通道进行插值:
def bilinear_interpolate(img, coords):
    int_coords = np.int32(coords)
    x0, y0 = int_coords
    dx, dy = coords - int_coords

    # 4 Neighour pixels
    q11 = img[y0, x0]
    q21 = img[y0, x0+1]
    q12 = img[y0+1, x0]
    q22 = img[y0+1, x0+1]

    btm = q21.T * dx + q11.T * (1 - dx)
    top = q22.T * dx + q12.T * (1 - dx)
    inter_pixel = top * dy + btm * (1 - dy)

    return inter_pixel.T
(6) 实现函数 get_grid_coordinates() 生成输入点感兴趣区域 (region of interest, ROI) 内所有可能 (x,y) 网格坐标的数组:
def get_grid_coordinates(points):
    xmin = np.min(points[:, 0])
    xmax = np.max(points[:, 0]) + 1
    ymin = np.min(points[:, 1])
    ymax = np.max(points[:, 1]) + 1
    return np.asarray([(x, y) for y in range(ymin, ymax)
                        for x in range(xmin, xmax)], np.uint32)
(7) 实现函数 process_warp() 在 result_img 的 ROI 内扭曲 src_img 中的每个三角形:
def process_warp(src_img, result_img, tri_affines, dst_points, delaunay):
    roi_coords = get_grid_coordinates(dst_points)
    # indices to vertices. -1 if pixel is not in any triangle
    roi_tri_indices = delaunay.find_simplex(roi_coords)

    for simplex_index in range(len(delaunay.simplices)):
        coords = roi_coords[roi_tri_indices == simplex_index]
        num_coords = len(coords)
        out_coords = np.dot(tri_affines[simplex_index], np.vstack((coords.T, np.ones(num_coords))))
        x, y = coords.T
        result_img[y, x] = bilinear_interpolate(src_img, out_coords)
    return None
(8) 实现生成器函数 gen_triangular_affine_matrics() 计算从 dest_points 到 src_points 的每个三角形顶点 (x,y) 的仿射变换矩阵:
def get_triangular_affine_matrices(vertices, src_points, dest_points):
    ones = [1, 1, 1]
    for tri_indices in vertices:
        src_tri = np.vstack((src_points[tri_indices, :].T, ones))
        dst_tri = np.vstack((dest_points[tri_indices, :].T, ones))
        mat = np.dot(src_tri, np.linalg.inv(dst_tri))[:2, :]
        yield mat
(9) 实现函数 warp_image() 获取源/目标图像和相应的关键点,并使用定义的函数计算变形的输出图像和关键点的相应 Delaunay 三角测量:
def warp_image(src_img, src_points, dest_points, dest_shape, dtype=np.uint8):
    num_chans = 3
    src_img = src_img[:, :, :3]
    rows, cols = dest_shape[:2]
    result_img = np.zeros((rows, cols, num_chans), dtype)
    delaunay = Delaunay(dest_points)
    tri_affines = np.asarray(list(get_triangular_affine_matrices(delaunay.simplices, src_points, dest_points)))
    process_warp(src_img, result_img, tri_affines, dest_points, delaunay)
    return result_img, delaunay
(10) 绘制源和目标人脸图像以及面部标志(由形状预测器预测):
fig = plt.figure(figsize=(20,10))
plt.subplot(121)
plt.imshow(src_img)
for i in range(68):
    plt.plot(src_points[i,0], src_points[i,1], 'r.', markersize=20)
plt.title('Source image', size=10)
plt.axis('off')
plt.subplot(122)
plt.imshow(dst_img)
for i in range(68):
    plt.plot(dst_points[i,0], dst_points[i,1], 'g.', markersize=20)
plt.title('Destination image', size=10)
plt.axis('off')
plt.suptitle('Facial Landmarks computed for the images', size=12)
fig.subplots_adjust(wspace=0.01, left=0.1, right=0.9)
plt.show()
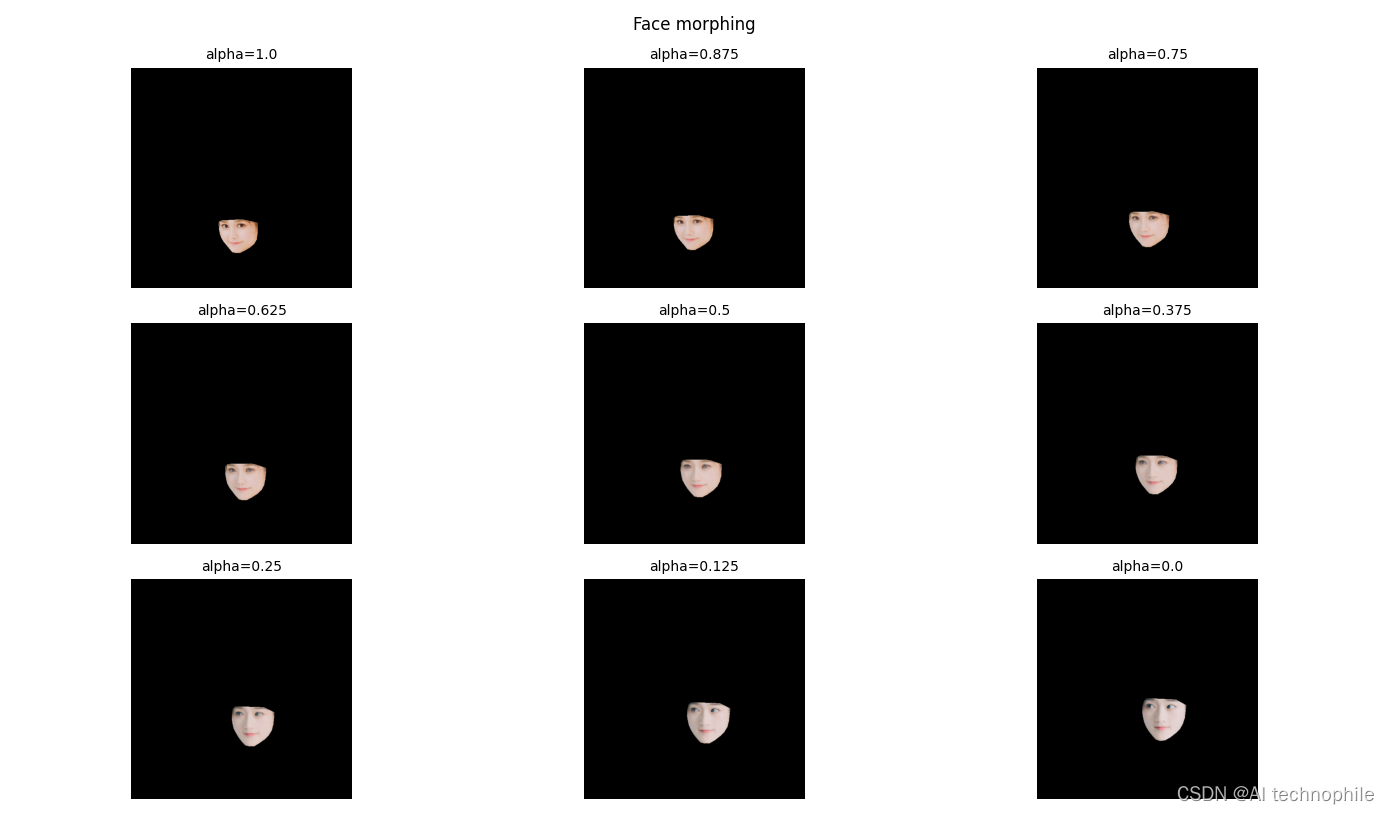
(11) 计算 alpha 值增加的变形图像,获得具有不同混合比例的变形图像,以观察从源图像到目标图像的平滑过渡:
fig = plt.figure(figsize=(20,20))
i = 1
for percent in np.linspace(1, 0, 9):
    points = weighted_average_points(src_points, dst_points, percent)
    src_face, src_d = warp_image(src_img, src_points, points, (600,600))
    end_face, end_d = warp_image(dst_img, dst_points, points, (600,600))
    average_face = weighted_average_points(src_face, end_face, percent)
    plt.subplot(3, 3, i)
    plt.imshow(average_face)
    plt.title('alpha=' + str(percent), size=10)
    plt.axis('off')
    i += 1
plt.suptitle('Face morphing', size=12)
fig.subplots_adjust(top=0.92, bottom=0, left=0.075, right=0.925, wspace=0.01, hspace=0.05)
plt.show()
(12) 可视化具有使用 Delaunay 三角测量获得的三角剖分面部,并将面部标志作为三角形的顶点:
fig = plt.figure(figsize=(20,10))
plt.subplot(121)
plt.imshow(src_img)
plt.triplot(src_points[:,0], src_points[:,1], src_d.simplices.copy())
plt.plot(src_points[:,0], src_points[:,1], 'o', color='red')
plt.title('Source image', size=10)
plt.axis('off')
plt.subplot(122)
plt.imshow(dst_img)
plt.triplot(dst_points[:,0], dst_points[:,1], end_d.simplices.copy())
plt.plot(dst_points[:,0], dst_points[:,1], 'o')
plt.title('Destination image', size=10)
plt.axis('off')
plt.suptitle('Delaunay triangulation of the images', size=12)
fig.subplots_adjust(wspace=0.01, left=0.1, right=0.9)
plt.show()
小结
面部图像处理是提取和分析人类面部信息的研究领域,人脸是图像处理中的最重要的对象之一。因此,在过去的几十年中,面部图像的自动处理和识别已经得到了研究人员的极大关注。在本节中,我们学习了如何使用 dlib 库执行面部变形操作。
系列链接
Python图像处理【1】图像与视频处理基础
Python图像处理【2】探索Python图像处理库
Python图像处理【3】Python图像处理库应用
Python图像处理【4】图像线性变换
Python图像处理【5】图像扭曲/逆扭曲
Python图像处理【6】通过哈希查找重复和类似的图像
Python图像处理【7】采样、卷积与离散傅里叶变换
Python图像处理【8】使用低通滤波器模糊图像
Python图像处理【9】使用高通滤波器执行边缘检测
Python图像处理【10】基于离散余弦变换的图像压缩
Python图像处理【11】利用反卷积执行图像去模糊
Python图像处理【12】基于小波变换执行图像去噪
Python图像处理【13】使用PIL执行图像降噪
Python图像处理【14】基于非线性滤波器的图像去噪
Python图像处理【15】基于非锐化掩码锐化图像
Python图像处理【16】OpenCV直方图均衡化
Python图像处理【17】指纹增强和细节提取
Python图像处理【18】边缘检测详解
Python图像处理【19】基于霍夫变换的目标检测
Python图像处理【20】图像金字塔
Python图像处理【21】基于卷积神经网络增强微光图像
Python图像处理【22】基于卷积神经网络的图像去雾
Python图像处理【23】分布式图像处理


 2918
2918

 被折叠的 条评论
为什么被折叠?
被折叠的 条评论
为什么被折叠?
 到【灌水乐园】发言


