


上一篇文章我介绍了网络组件的使用方法点击打开链接
本文介绍主角的创建
素材下载地:点击打开链接
(有什么问题或不足请多多指教)
【第一人称设计】
unity专业版给我们提供了第一人称控制器,这里我也只是使用官方提供的脚本,在必要地方做了一些些修改
首先将我提供的工程素材下载下来,将主角模型添加进去(可能你的材质需要自己拖进主角里)
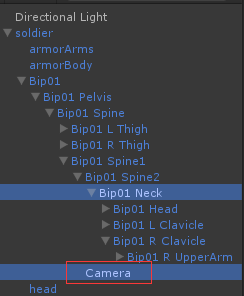
在主角上添加图下图必要的组件和脚本:
将我如下图标记处选择Mouse X 这样主角面向会随我们鼠标的在屏幕X方向的移动而旋转

接下来就是主角的视野问题
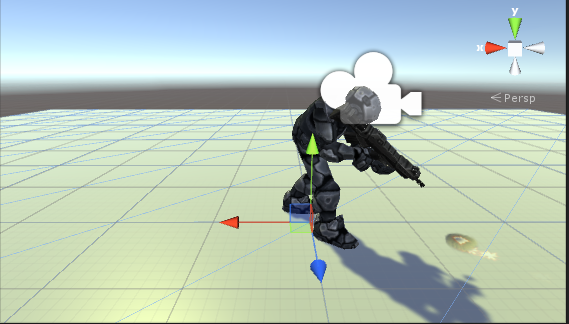
在模型上按如下图为添加摄像机
微调好摄像机位置后
在Bip01 Spine2上添加Mouse Look C#脚本组件
修改其部分代码:
using UnityEngine;
using System.Collections;

/// MouseLook rotates the transform based on the mouse delta.
/// Minimum and Maximum values can be used to constrain the possible rotation

/// To make an FPS style character:
/// - Create a capsule.
/// - Add the MouseLook script to the capsule.
///   -> Set the mouse look to use LookX. (You want to only turn character but not tilt it)
/// - Add FPSInputController script to the capsule
///   -> A CharacterMotor and a CharacterController component will be automatically added.

/// - Create a camera. Make the camera a child of the capsule. Reset it's transform.
/// - Add a MouseLook script to the camera.
///   -> Set the mouse look to use LookY. (You want the camera to tilt up and down like a head. The character already turns.)
[AddComponentMenu("Camera-Control/Mouse Look")]
public class SpineAngles : MonoBehaviour
{

    public enum RotationAxes { MouseXAndY = 0, MouseX = 1, MouseY = 2 }
    public RotationAxes axes = RotationAxes.MouseXAndY;
    public float sensitivityX = 15F;
    public float sensitivityY = 15F;

    public float minimumX = -360F;
    public float maximumX = 360F;

    public float minimumY = -60F;
    public float maximumY = 60F;

    float rotationY = 0F;

    private Vector3 eulerAngle;

    void LateUpdate()
    {
        if (axes == RotationAxes.MouseXAndY)
        {
            float rotationX = transform.localEulerAngles.y + Input.GetAxis("Mouse X") * sensitivityX;

            rotationY += Input.GetAxis("Mouse Y") * sensitivityY;
            rotationY = Mathf.Clamp(rotationY, minimumY, maximumY);

            transform.localEulerAngles = new Vector3(-rotationY, rotationX, 0);
        }
        else if (axes == RotationAxes.MouseX)
        {
            transform.Rotate(0, Input.GetAxis("Mouse X") * sensitivityX, 0);
        }
        else
        {
            rotationY += Input.GetAxis("Mouse Y") * sensitivityY;
            rotationY = Mathf.Clamp(rotationY, minimumY, maximumY);

            transform.localEulerAngles = new Vector3(eulerAngle.x, eulerAngle.y, eulerAngle.z + rotationY);
        }
    }

    void Start()
    {
        // Make the rigid body not change rotation
        if (GetComponent<Rigidbody>())
            GetComponent<Rigidbody>().freezeRotation = true;

        eulerAngle = this.transform.localEulerAngles;
    }
}
【主角的动画控制】
给主角添加一个自定义名为SoldierAnimationController的C#脚本组件:
SoldierAnimationController.cs
using UnityEngine;
using System.Collections;

public class SoldierAnimationController : MonoBehaviour
{
    private CharacterController soldierController;
    private Animation soldierAnima;

	// Use this for initialization
	void Start ()
    {
	    soldierController=this.GetComponent<CharacterController>();
        soldierAnima=this.GetComponent<Animation>();
	}

	// Update is called once per frame
	void Update ()
    {
        //判断主角是否着地
        if (soldierController.isGrounded == false)
        {
            CrossState("soldierFalling");
        }
        else
        {
            float h=Input.GetAxis("Horizontal");
            float v = Input.GetAxis("Vertical");
            if (Mathf.Abs(h) >= 0.1f || Mathf.Abs(v) >= 0.1f)
            {
                CrossState("soldierWalk");
            }
            else
            {
                CrossState("soldierIdle");
            }
        }
	}

    void CrossState(string animaName)
    {
        //缓存0.2秒后,切换动画
        soldierAnima.CrossFade(animaName,0.5f);
        soldierAnima.Play(animaName);
    }
}
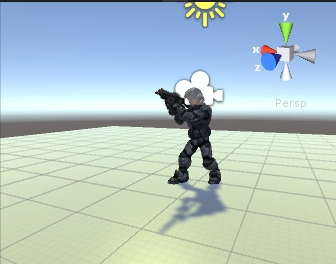
【给主角添加枪支】
将枪支模型拖动到右手关节上,随右手移动而改变位置,如下图:

效果图如下:

【创建子弹模型】】
在hierachy选项卡想点击Create->3D Object->Quad
将子弹贴图拖动到其中后,将自动生成一个材质
接下来在子弹对象上挂载一个控制其运动的脚本组件
代码如下:
using UnityEngine;
using System.Collections;

public class BulletManager : MonoBehaviour
{

    public float bulletSpeed = 800;

    private Vector3 startPos;
    private Vector3 currentPos;


	// Use this for initialization
	void Start ()
    {

	}

	// Update is called once per frame
	void Update ()
    {
        //由于子弹的移动速度很快,如果每一帧进行检测碰撞时,将有可能检测不到碰撞物

        startPos = this.transform.position;
        this.transform.Translate(Vector3.forward*Time.deltaTime*bulletSpeed, Space.Self);
        currentPos = this.transform.position;

    }
}
接下来在枪支口上创建一个空的游戏对象,用于确定子弹实例化时的位置
在其添加一个脚本组件,控制子弹的实例化及接下来的弹痕效果演示
using UnityEngine;
using System.Collections;

public class InstanceBullet : MonoBehaviour
{
    public Camera soldierCamera;

    public GameObject bulletObj;

    //弹痕
    public GameObject[] holes;

	// Use this for initialization
	void Start ()
    {

	}

	// Update is called once per frame
	void Update ()
    {
        if (Input.GetMouseButtonDown(0))
        {
            //GameObject obj = GameObject.Instantiate(bulletObj, this.transform.position, this.transform.rotation) as GameObject;
            //Destroy(obj, 10.0f);

            Vector3 point = soldierCamera.ScreenToWorldPoint(new Vector3(Screen.width*2/5, Screen.height/2, 0));

            //射线碰撞检测
            RaycastHit hit;
            bool isHit = Physics.Raycast(point, soldierCamera.transform.forward, out hit);
            if (isHit)
            {
                Vector3 hitPos = hit.point;

                int index = (int)Random.Range(0.0f, 2.0f);
                GameObject hole = holes[index];

                GameObject instanceHole = GameObject.Instantiate(hole, hitPos, Quaternion.identity) as GameObject;

                //旋转子弹
                //hit.norma取得是一个碰撞点所在碰撞面的垂直向量
                instanceHole.transform.LookAt(hitPos - hit.normal);
                instanceHole.transform.Translate(Vector3.back * 0.01f);
            }
        }
	}
}
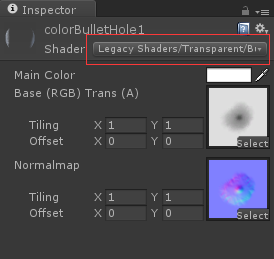
【弹痕效果】
需要设置弹痕有渐淡消失效果
首先将贴图拖到Quad对象上
自动生成材质
在代码上控制其渐淡效果
using UnityEngine;
using System.Collections;

public class BulletHole : MonoBehaviour
{
    private float holeSpeed=150f;

    private MeshRenderer r;

    private float holeTimer=0.0f;

	// Use this for initialization
	void Start ()
    {
        r = this.GetComponent<MeshRenderer>();
	}

	// Update is called once per frame
	void Update ()
    {
        holeTimer += Time.deltaTime;

        if (holeTimer >= 1.0f)
        {
            float lerp = Mathf.PingPong(Time.time, holeSpeed) / holeSpeed;

            //渐变效果,Color.clear便是空白效果
            r.material.color = Color.Lerp(r.material.color, Color.clear, lerp);
        }
        if(holeTimer>=2.5f)
        {
            Destroy(this.gameObject);
        }

	}
}
之后我们要设置一个子弹发射时,在枪口上有个闪光效果
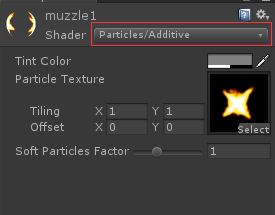
将其Mesh Rederer组件取消勾选
在代码里控制其显示
using UnityEngine;
using System.Collections;

public class MuzzleFlashPlay : MonoBehaviour
{
    private int i=0;

    private MeshRenderer mr;

    public Material[] mat;

    private float flashLifetime = 0.1f;

    private float flashTimer = 0.0f;

	// Use this for initialization
	void Start ()
    {
       mr = this.GetComponent<MeshRenderer>();
	}

	// Update is called once per frame
	void Update ()
    {
        if (Input.GetMouseButtonDown(0))
        {
            PlayFlash();
        }

        if (mr.enabled)
        {
            flashTimer += Time.deltaTime;
            if (flashTimer >= flashLifetime)
            {
                flashTimer = 0;
                mr.enabled = false;
            }
        }

	}

    void PlayFlash()
    {
        mr.enabled = true;

        mr.material = mat[i];
        i++;
        if(i>=4)
        {
            i = 0;
        }
    }
}
本人也在寻找一份游戏开发实习工作,如果大佬们需要开发人员,请把我带走
这是我的简历:resume.liujunliang.com.cn/resume.pdf
作品的话可以私聊我哦!


 1580
1580

 被折叠的 条评论
为什么被折叠?
被折叠的 条评论
为什么被折叠?
 到【灌水乐园】发言


