


Qt 配置Eigen矩阵库 - 并简单测试
引言
Eigen是一个开源的C++模板库,提供了线性代数和矩阵运算的功能。它被设计为一个高性能、可扩展和易用的库,可以用于科学计算、机器学习和计算机图形学等领域。Eigen库的主要特点包括:
- 高性能:Eigen使用了矩阵表达式模板技术,能够在编译时优化矩阵运算,同时还提供了高度优化的数学函数库,可以充分利用硬件的并行计算能力。
- 可扩展:Eigen支持多种矩阵和向量类型,例如动态大小的矩阵、静态大小的矩阵,以及稀疏矩阵等。同时,Eigen还提供了丰富的数学函数和算法,满足不同应用的需求。
- 易用性:Eigen提供了简洁的API接口,使得用户可以轻松地进行矩阵运算和线性代数操作。它还提供了详细的文档和示例代码,方便用户学习和使用。
Eigen库被广泛应用于科学计算、机器学习、计算机图形学等领域。很多开源项目和工具,如OpenCV、PCL等,都使用了Eigen作为其数学库的核心。应用Eigen 的项目:https://blog.csdn.net/weixin_40948750/article/details/136492837
- 整SLAM的时候接触到的数学库,很方便速度也快.
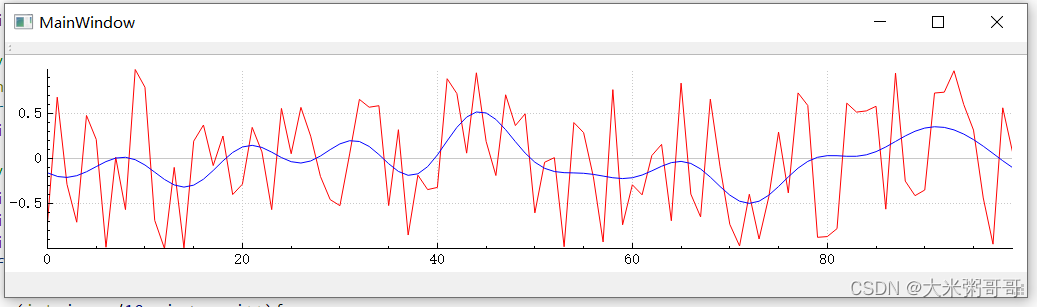
本文主要说明如何在Qt中配置Eigen 以及 写了一个低通滤波器小Demo进行测试 - 如上图所示
一、在Qt中配置Eigen
-
- 先下载源码
官网:http://eigen.tuxfamily.org/index.php?title=Main_Page -经常打不开可选择如下网址直接下载源码:
https://gitlab.com/libeigen/eigen/-/releases
- 先下载源码
-
- 解压到相关路径下 (我放到了项目文件夹中,与.pro同目录),然后配置.pro文件即可 (
INCLUDEPATH += ./eigen-3.4.0)

- 解压到相关路径下 (我放到了项目文件夹中,与.pro同目录),然后配置.pro文件即可 (
-
- 还可以编译为动态库然后调用,不然每次都编译很长时间 (
/todo)
- 还可以编译为动态库然后调用,不然每次都编译很长时间 (
二、低通Demo源码
- 只展示了
mainwindow.cpp的代码,比较简单
#include "mainwindow.h"
#include "ui_mainwindow.h"
#include "Eigen/Dense"
#include <unsupported/Eigen/FFT>
#include "qcustomplot/qcustomplot.h"
#include <iostream>

MainWindow::MainWindow(QWidget *parent) :
    QMainWindow(parent),
    ui(new Ui::MainWindow)
{
    ui->setupUi(this);

    // EigenDemo
    int n = 100;
    srand(static_cast<unsigned>(time(nullptr)));
    Eigen::VectorXd v = Eigen::VectorXd::Random(n);

    // 傅里叶变换,去除高频部分
    Eigen::FFT<double> fft;
    Eigen::VectorXcd tmp(n);
    Eigen::VectorXd v_(n);
    fft.fwd(tmp, v);           // 傅里叶变换

    for(int i = n/10; i < n; i++){
        tmp[i] = 0;
    }
    fft.inv(v_, tmp);           // 逆变换
    //std::cout << v_;

    // 可视化
    QCustomPlot *customPlot =  new QCustomPlot();  // 创建qcustomplot

    // 赋值原始值
    customPlot->addGraph();
    QCPGraph * curGraph1 = customPlot->graph(0);
    curGraph1->setScatterStyle(QCPScatterStyle(QCPScatterStyle::ssCustom, 1));
    QVector<double> x(n), y(n);
    for(int i = 0; i < n; i++){
        x[i] = i;
        y[i] = v[i];
    }
    customPlot->graph(0)->setPen(QPen(QColor(255, 0, 0)));
    customPlot->graph(0)->setData(x, y);

    // 赋值处理后的值
    customPlot->addGraph();
    QCPGraph * curGraph2 = customPlot->graph(1);
    curGraph2->setScatterStyle(QCPScatterStyle(QCPScatterStyle::ssCustom, 1));
    QVector<double> xx(n), yy(n);
    for(int i = 0; i < n; i++){
        xx[i] = i;
        yy[i] = v_[i];
    }
    customPlot->graph(1)->setPen(QPen(QColor(0, 0, 255)));
    customPlot->graph(1)->setData(xx, yy);


    // 设定显示范围
    auto max_x = std::max_element(std::begin(x), std::end(x));
    auto min_x = std::min_element(std::begin(x), std::end(x));
    auto max_y = std::max_element(std::begin(y), std::end(y));
    auto min_y = std::min_element(std::begin(y), std::end(y));
    customPlot->xAxis->setRange(*min_x, *max_x);
    customPlot->yAxis->setRange(*min_y, *max_y);


    this->setCentralWidget(customPlot);
}

MainWindow::~MainWindow()
{
    delete ui;
}
三、参考链接以及其他
Qt 配置Eigen:https://www.cnblogs.com/ybqjymy/p/18110273
大家推荐一个矩阵类?https://www.zhihu.com/question/22655757
Engin库和Armadillo库矩阵计算性能比较?https://www.zhihu.com/question/50586395
Armadillo官网:https://arma.sourceforge.net/
C++线代运算库Armadillo配置(Qt & CLion & VSCode):https://blog.csdn.net/Arry_W/article/details/130725096
- 以及使用
Armadillo实现的低通滤波.
arma::arma_rng::set_seed(0);
arma::vec v1 = randg<vec>(300);
int n = static_cast<int>(v1.size());
cx_vec fft_v1 = fft(v1);
//fft_v1.print("V1:");
for(int i = 100; i < n; i++){
    fft_v1[static_cast<quint64>(i)] = 0;
}
//fft_v1.print("V1_:");
cx_vec ifft_v1 = ifft(fft_v1);
vec v2 = real(ifft_v1);


 1691
1691

 被折叠的 条评论
为什么被折叠?
被折叠的 条评论
为什么被折叠?
 到【灌水乐园】发言


