


工业配电柜是工业生产中不可或缺的设备,用于控制和分配电力供应。配电柜通常包含多个开关,用于打开和关闭不同的电路和设备。为了确保正常的电力供应和安全运行,及时准确地识别配电柜开关的状态非常重要。
传统的配电柜开关状态识别方法通常需要人工观察和判断,这种方法存在识别不准确、效率低下和存在人为误判等问题。而使用YOLOv8实现配电柜开关状态识别可以有效解决这些问题。
YOLOv8是一种基于深度学习的目标检测算法,可以实现实时、准确的目标识别。通过训练一个YOLOv8模型,可以将图像中的配电柜开关准确地识别出来,并判断其状态是开启还是关闭。
利用YOLOv8实现工业配电柜开关状态识别具有以下意义:
提高识别准确率:使用YOLOv8模型可以准确地识别配电柜开关,避免了人工观察和判断带来的误差。
提高工作效率:YOLOv8可以实时处理图像,可以大大提高配电柜开关状态识别的速度,提高工作效率。
减少人工成本:自动化的配电柜开关状态识别可以减少人工操作的需求,降低了人力成本。
提升安全性能:及时准确地识别配电柜开关状态有助于及时处理电力故障和提高安全性能,减少事故发生的可能性。
综上所述,使用YOLOv8实现工业配电柜开关状态识别能够提高识别准确率、工作效率和安全性能,具有重要的背景意义。
目录
🍉🍉1.数据集介绍
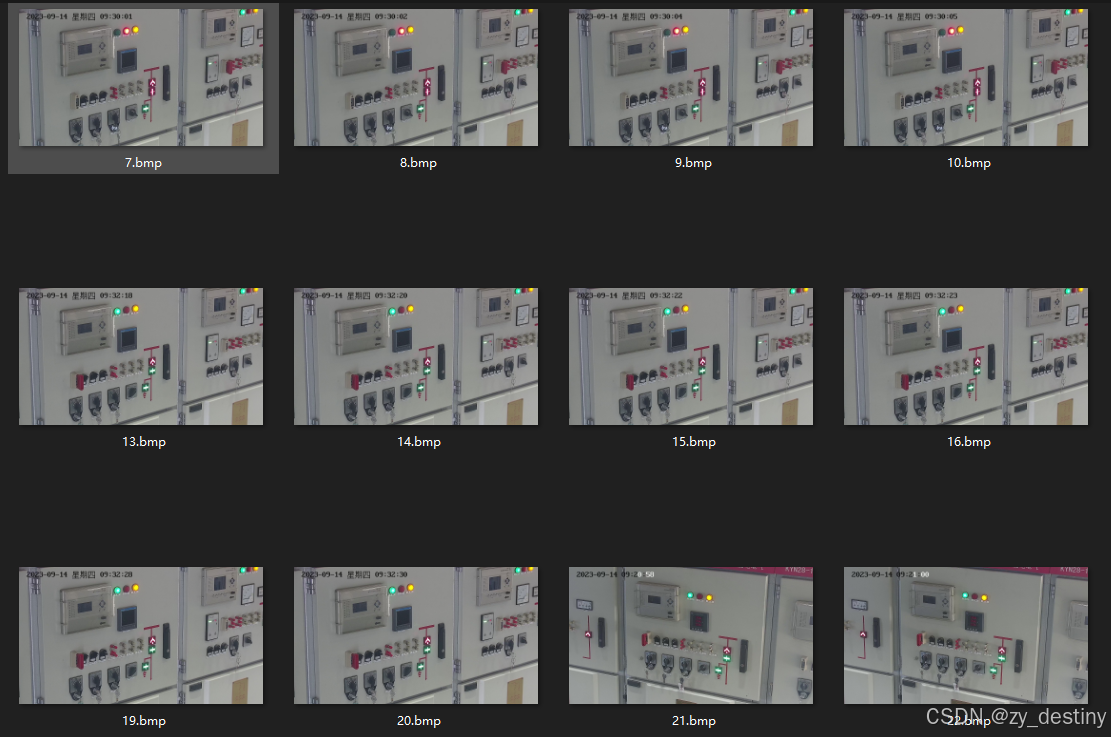
首先介绍使用的数据集,数据集中共包含48张影像,部分影像展示如下:
label包含48个xml格式的label文件和48个txt格式的label文件。
示例xml文件内容为:
<annotation>
<folder>图片</folder>
<filename>1.bmp</filename>
<path>/home/1.bmp</path>
<source>
<database>Unknown</database>
</source>
<size>
<width>1920</width>
<height>1080</height>
<depth>3</depth>
</size>
<segmented>0</segmented>
<object>
<name>lamp_tripoff</name>
<pose>Unspecified</pose>
<truncated>0</truncated>
<difficult>0</difficult>
<bndbox>
<xmin>733</xmin>
<ymin>145</ymin>
<xmax>800</xmax>
<ymax>233</ymax>
</bndbox>
</object>
<object>
<name>lamp_closeon</name>
<pose>Unspecified</pose>
<truncated>0</truncated>
<difficult>0</difficult>
<bndbox>
<xmin>812</xmin>
<ymin>142</ymin>
<xmax>875</xmax>
<ymax>221</ymax>
</bndbox>
</object>
<object>
<name>lamp_storedon</name>
<pose>Unspecified</pose>
<truncated>0</truncated>
<difficult>0</difficult>
<bndbox>
<xmin>884</xmin>
<ymin>129</ymin>
<xmax>952</xmax>
<ymax>205</ymax>
</bndbox>
</object>
<object>
<name>digital_ammeter</name>
<pose>Unspecified</pose>
<truncated>0</truncated>
<difficult>0</difficult>
<bndbox>
<xmin>778</xmin>
<ymin>299</ymin>
<xmax>936</xmax>
<ymax>505</ymax>
</bndbox>
</object>
<object>
<name>knob2trip</name>
<pose>Unspecified</pose>
<truncated>0</truncated>
<difficult>0</difficult>
<bndbox>
<xmin>472</xmin>
<ymin>673</ymin>
<xmax>545</xmax>
<ymax>790</ymax>
</bndbox>
</object>
<object>
<name>knob2trip</name>
<pose>Unspecified</pose>
<truncated>0</truncated>
<difficult>0</difficult>
<bndbox>
<xmin>552</xmin>
<ymin>651</ymin>
<xmax>621</xmax>
<ymax>766</ymax>
</bndbox>
</object>
<object>
<name>knob2close</name>
<pose>Unspecified</pose>
<truncated>0</truncated>
<difficult>0</difficult>
<bndbox>
<xmin>630</xmin>
<ymin>638</ymin>
<xmax>699</xmax>
<ymax>751</ymax>
</bndbox>
</object>
<object>
<name>clamp_close</name>
<pose>Unspecified</pose>
<truncated>0</truncated>
<difficult>0</difficult>
<bndbox>
<xmin>709</xmin>
<ymin>603</ymin>
<xmax>782</xmax>
<ymax>738</ymax>
</bndbox>
</object>
<object>
<name>clamp_trip</name>
<pose>Unspecified</pose>
<truncated>0</truncated>
<difficult>0</difficult>
<bndbox>
<xmin>775</xmin>
<ymin>584</ymin>
<xmax>843</xmax>
<ymax>717</ymax>
</bndbox>
</object>
<object>
<name>clamp_trip</name>
<pose>Unspecified</pose>
<truncated>0</truncated>
<difficult>0</difficult>
<bndbox>
<xmin>842</xmin>
<ymin>575</ymin>
<xmax>912</xmax>
<ymax>703</ymax>
</bndbox>
</object>
<object>
<name>clamp_trip</name>
<pose>Unspecified</pose>
<truncated>0</truncated>
<difficult>0</difficult>
<bndbox>
<xmin>920</xmin>
<ymin>563</ymin>
<xmax>990</xmax>
<ymax>687</ymax>
</bndbox>
</object>
<object>
<name>knob2Mclose</name>
<pose>Unspecified</pose>
<truncated>0</truncated>
<difficult>0</difficult>
<bndbox>
<xmin>829</xmin>
<ymin>744</ymin>
<xmax>942</xmax>
<ymax>884</ymax>
</bndbox>
</object>
</annotation>
示例txt文件内容为:
9 0.399219 0.175 0.034896 0.081481
10 0.439323 0.168056 0.032813 0.073148
2 0.478125 0.15463 0.035417 0.07037
3 0.446354 0.372222 0.082292 0.190741
4 0.264844 0.677315 0.038021 0.108333
4 0.305469 0.656019 0.035937 0.106481
5 0.346094 0.643056 0.035937 0.10463
6 0.388281 0.620833 0.038021 0.125
7 0.421354 0.602315 0.035417 0.123148
7 0.456771 0.591667 0.036458 0.118519
7 0.497396 0.578704 0.036458 0.114815
11 0.461198 0.753704 0.058854 0.12963
其中训练验证比例为9:1,也可自行分数据集。
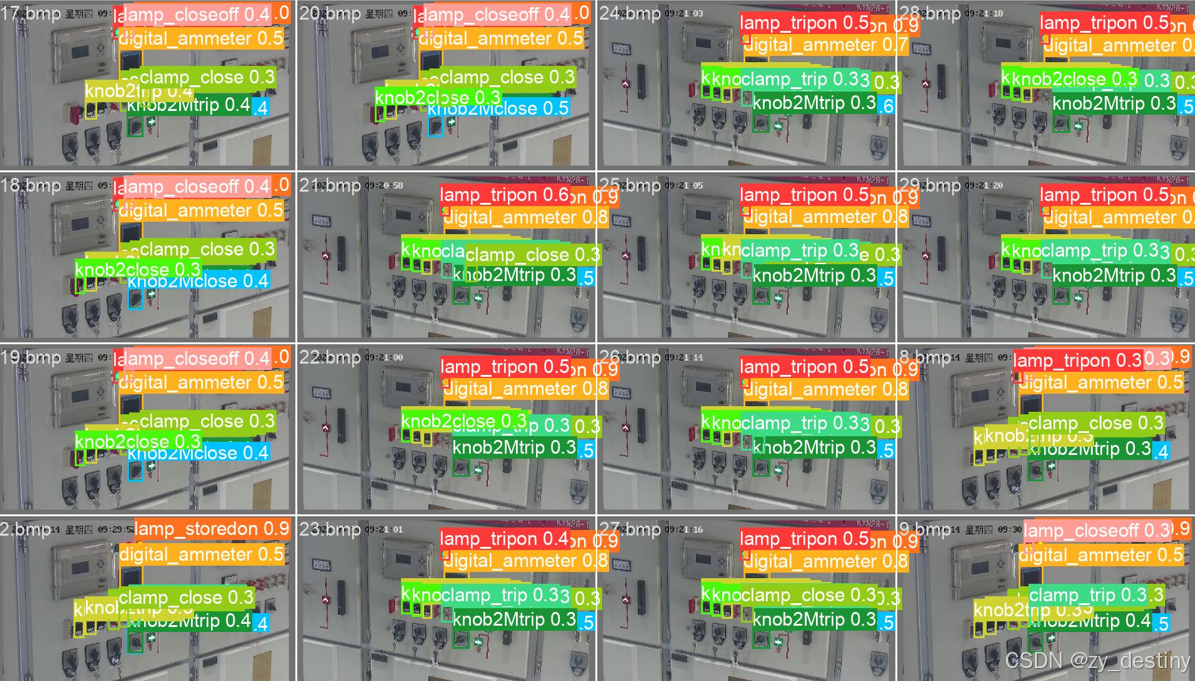
🍇🍇2.实现效果
使用YOLOv8实现的配电柜状态预测效果如下:

🍓🍓3.YOLOv8算法步骤
通过目标检测方法对数字仪表表盘进行目标识别的方法不限,本文仍以YOLOv8为例进行说明。
🍋3.1数据准备
数据集共包含48张影像,其中训练集和验证集9:1划分。主要是指示灯、数字电压表、旋钮、夹钳开关等状态识别。
模型训练label部分采用的是YOLO格式的txt文件,所以如果自己的数据集是xml格式需要进行转换哦。具体txt格式内容如1.数据集介绍中所示。
🍋3.2模型选择
以YOLOv8n为例,模型选择代码如下:
from ultralytics import YOLO

# Load a model
model = YOLO('yolov8n.yaml')  # build a new model from YAML
model = YOLO('yolov8n.pt')  # load a pretrained model (recommended for training)
model = YOLO('yolov8n.yaml').load('yolov8n.pt')  # build from YAML and transfer weights
其中yolov8n.yaml为./ultralytics/cfg/models/v8/yolov8n.yaml,可根据自己的数据进行模型调整,打开yolov8n.yaml显示内容如下:
# Ultralytics YOLO 🚀, AGPL-3.0 license
# YOLOv8 object detection model with P3-P5 outputs. For Usage examples see https://docs.ultralytics.com/tasks/detect

# Parameters
nc: 14 # number of classes
scales: # model compound scaling constants, i.e. 'model=yolov8n.yaml' will call yolov8.yaml with scale 'n'
  # [depth, width, max_channels]
  n: [0.33, 0.25, 1024] # YOLOv8n summary: 225 layers,  3157200 parameters,  3157184 gradients,   8.9 GFLOPs
  s: [0.33, 0.50, 1024] # YOLOv8s summary: 225 layers, 11166560 parameters, 11166544 gradients,  28.8 GFLOPs
  m: [0.67, 0.75, 768] # YOLOv8m summary: 295 layers, 25902640 parameters, 25902624 gradients,  79.3 GFLOPs
  l: [1.00, 1.00, 512] # YOLOv8l summary: 365 layers, 43691520 parameters, 43691504 gradients, 165.7 GFLOPs
  x: [1.00, 1.25, 512] # YOLOv8x summary: 365 layers, 68229648 parameters, 68229632 gradients, 258.5 GFLOPs

# YOLOv8.0n backbone
backbone:
  # [from, repeats, module, args]
  - [-1, 1, Conv, [64, 3, 2]] # 0-P1/2
  - [-1, 1, Conv, [128, 3, 2]] # 1-P2/4
  - [-1, 3, C2f, [128, True]]
  - [-1, 1, Conv, [256, 3, 2]] # 3-P3/8
  - [-1, 6, C2f, [256, True]]
  - [-1, 1, Conv, [512, 3, 2]] # 5-P4/16
  - [-1, 6, C2f, [512, True]]
  - [-1, 1, Conv, [1024, 3, 2]] # 7-P5/32
  - [-1, 3, C2f, [1024, True]]
  - [-1, 1, SPPF, [1024, 5]] # 9

# YOLOv8.0n head
head:
  - [-1, 1, nn.Upsample, [None, 2, "nearest"]]
  - [[-1, 6], 1, Concat, [1]] # cat backbone P4
  - [-1, 3, C2f, [512]] # 12

  - [-1, 1, nn.Upsample, [None, 2, "nearest"]]
  - [[-1, 4], 1, Concat, [1]] # cat backbone P3
  - [-1, 3, C2f, [256]] # 15 (P3/8-small)

  - [-1, 1, Conv, [256, 3, 2]]
  - [[-1, 12], 1, Concat, [1]] # cat head P4
  - [-1, 3, C2f, [512]] # 18 (P4/16-medium)

  - [-1, 1, Conv, [512, 3, 2]]
  - [[-1, 9], 1, Concat, [1]] # cat head P5
  - [-1, 3, C2f, [1024]] # 21 (P5/32-large)

- [[15, 18, 21], 1, Detect, [nc]] # Detect(P3, P4, P5)主要需要修改的地方为nc,也就是num_class,此处数据集类别为14类,所以nc=14。
如果其他的模型参数不变的话,就默认保持原版yolov8,需要改造模型结构的大佬请绕行。
🍋3.3加载预训练模型
加载预训练模型yolov8n.pt,可以在第一次运行时自动下载,如果受到下载速度限制,也可以自行下载好(下载链接),放在对应目录下即可。
🍋3.4数据组织
yolov8还是以yolo格式的数据为例,./ultralytics/cfg/datasets/data.yaml的内容可以修改为自己的数据格式,以我的peidiangui_detect_coco128.yaml文件为例,具体内容如下:
path: /home/zhouyuan/mnt/peidiangui/ # dataset root dir
train: images/train # train images
val: images/test # val images
test: # test images (optional)

# Classes
names:
  0: lamp_tripon
  1: lamp_closeoff
  2: lamp_storedon  #灯具仓库
  3: digital_ammeter #数字安培计
  4: knob2trip  #旋钮跳闸
  5: knob2close #旋钮关闭
  6: clamp_close #夹钳闭合
  7: clamp_trip #夹钳跳闸
  8: knob2Mtrip
  9: lamp_tripoff  #灯跳闸
  10: lamp_closeon  #灯闭合
  11: knob2Mclose
  12: digital_voltmeter #数字电压表
  13: lamp_storedoff  #灯灭
🍭🍭4.目标检测训练代码
准备好数据和模型之后,就可以开始训练了,train.py的内容显示为:
from ultralytics import YOLO

# Load a model
model = YOLO('yolov8n.yaml')  # build a new model from YAML
model = YOLO('yolov8n.pt')  # load a pretrained model (recommended for training)
model = YOLO('yolov8n.yaml').load('yolov8n.pt')  # build from YAML and transfer weights

# Train the model
results = model.train(data='peidiangui_detect_coco128.yaml', epochs=100, imgsz=640)
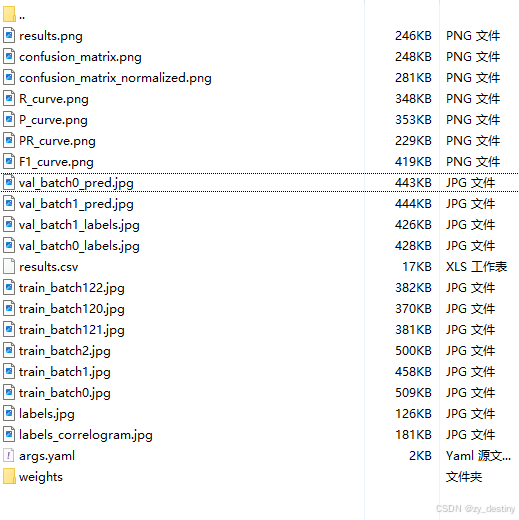
训练完成后的结果如下:
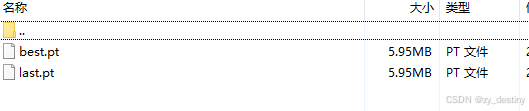
其中weights文件夹内会包含2个模型,一个best.pth,一个last.pth。
至此就可以使用best.pth进行推理配电柜开关状态了。贴上我的训练结果:
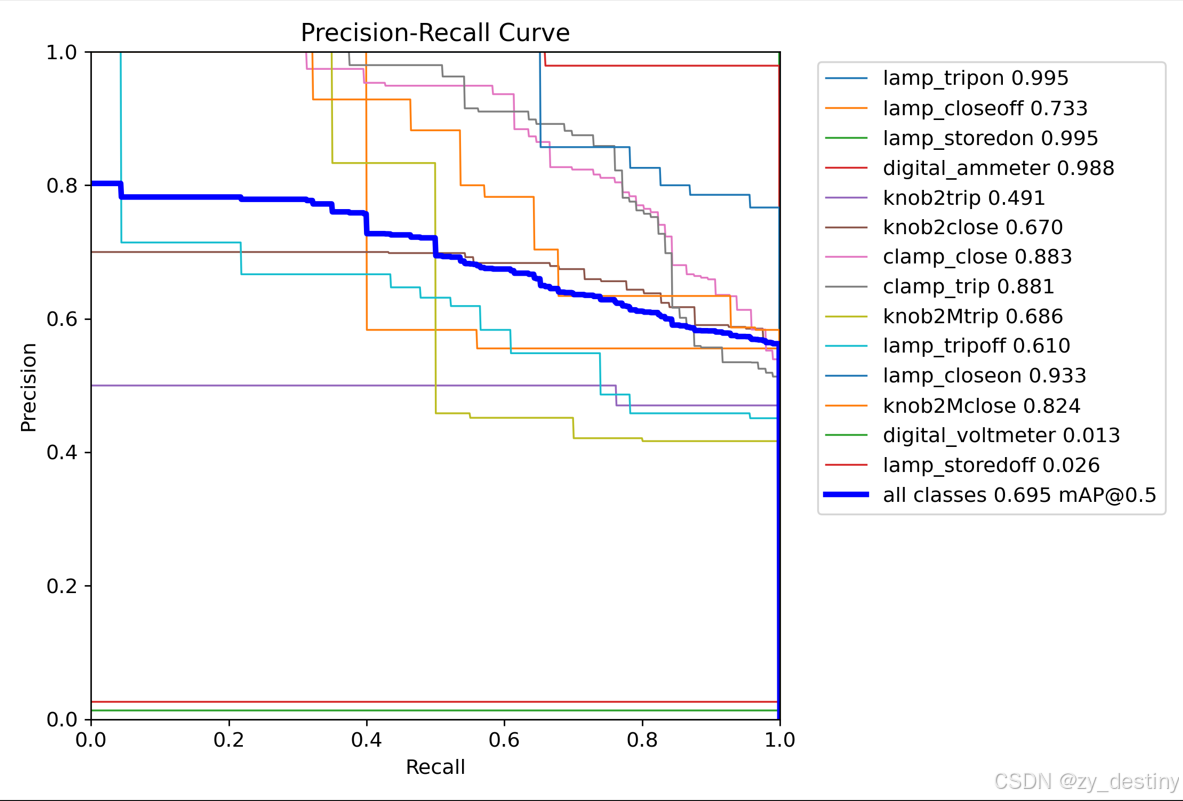
由于数据量太少,个别类别训练样本极少,所以整体训练效果不是很好,我后续根据情况删除了一些类别,训练为完之后精度提升很大,感兴趣的同学可以自行修改数据集。
🐸🐸5.目标检测推理代码
批量推理python代码如下:
from ultralytics import YOLO
from PIL import Image
import cv2
import os


model = YOLO('/yolov8/runs/detect/train5/weights/best.pt')  # load a custom model
path = '/home/dataset/peidiangui/images/'  #test_image_path_dir
img_list = os.listdir(path)
for img_path in img_list:
###  =============detect=====================
    im1 = Image.open(os.path.join(path,img_path))
results = model.predict(source=im1, save=True,save_txt=True)若需要完整数据集和源代码可以私信。
整理不易,欢迎一键三连!!!
送你们一条美丽的--分割线--
🌷🌷🍀🍀🌾🌾🍓🍓🍂🍂🙋🙋🐸🐸🙋🙋💖💖🍌🍌🔔🔔🍉🍉🍭🍭🍋🍋🍇🍇🏆🏆📸📸⛵⛵⭐⭐🍎🍎👍👍🌷🌷


 7896
7896

 被折叠的 条评论
为什么被折叠?
被折叠的 条评论
为什么被折叠?
 到【灌水乐园】发言


