


Yolact模型
在YOLACT++代码分析1——数据增强,我们讲解了数据增强的部分,这一部分主要讲Yolact模型。
首先看到train.py文件
    #image_path训练图片文件夹
    #info_file标签文件夹
    dataset = COCODetection(image_path=cfg.dataset.train_images,
                            info_file=cfg.dataset.train_info,
                            transform=SSDAugmentation(MEANS))
1.继续看看COCODetection的构造函数:
def __init__(self, image_path, info_file, transform=None,
                 target_transform=None,
                 dataset_name='MS COCO', has_gt=True):
        # Do this here because we have too many things named COCO
        from pycocotools.coco import COCO

        if target_transform is None:
            target_transform = COCOAnnotationTransform()

        self.root = image_path
        self.coco = COCO(info_file) #将标签文件导入COCO API

        #self.coco.imgToAnns 里面包含了标签文件中所有的bbox、category_id、image_id、segmentation
        #的信息,很显然这里这里取出所有训练的图片中的信息:len(self.ids)=159
        self.ids = list(self.coco.imgToAnns.keys())
        if len(self.ids) == 0 or not has_gt:
            self.ids = list(self.coco.imgs.keys())

        self.transform = transform
        #transform是SSDAugmentation的实例对象
        #COCOAnnotationTransform这个类作用:将COCO的标签转换成bbox coords and label index
        #的张量
        self.target_transform = COCOAnnotationTransform()

        self.name = dataset_name
        self.has_gt = has_gt
这里要讲下COCOAnnotationTransform(),这个类的__call__方法将coco标签中的bbox和category_id信息存到一个列表中:[xmin, ymin, xmax, ymax, category_id]。这里需要注意coco标签中的bbox信息:[xmin,ymin,w,h].
2.下面回到train.py文件中: yolact_net = Yolact()
class Yolact(nn.Module):
    def __init__(self):
        super().__init__()

        1.首先定义ResNet101的backbone
        self.backbone = construct_backbone(cfg.backbone) #默认resnet101
1).yolact默认以ResNet101作为backbone

2).不让BN层参与梯度传播
       2.让上面定义的backbone里面的除Conv之外的层不参与梯度计算(学习)
        if cfg.freeze_bn:
            self.freeze_bn()
    def freeze_bn(self, enable=False):
        """ Adapted from https://discuss.pytorch.org/t/how-to-train-with-frozen-batchnorm/12106/8 """
        for module in self.modules():
            if isinstance(module, nn.BatchNorm2d):
                module.train() if enable else module.eval()
                module.weight.requires_grad = enable
                module.bias.requires_grad = enable
'''
第一次循环,module为Yolact类 ,那么if肯定不成立
第二次循环,module为ResNetbackbone类,就是上面定义的网络层,if不成立
第三次循环,进入ResNetbackbone中,依次访问里面的层,这次module为Modulelist
第四次循环,module为Modulelist中的第一个Sequential
第五次循环,module为Bottleneck。if不成立
第六次循环,module为conv1,if不成立
第七次循环,module为bn1,if成立:
                    module.weight.requires_grad = enable #enable = False
                    module.bias.requires_grad = enable
'''
上面循环访问顺序参考下面具体模型(backbone:ResNet101的一部分):

3).下面我们直接看到这一行代码:Protonet Architecture
self.proto_net, cfg.mask_dim = make_net(in_channels,
                       cfg.mask_proto_net, include_last_relu=False)
输入参数:

这个make_net函数就不粘贴出来了,直接看到make_net函数中:
#conf就是上图中cfg.mask_proto_net
net = sum([make_layer(x) for x in conf], [])
第一个循环:x为(256, 3, {‘padding’: 1}),进入make_layer函数:直接执行到193行,剩余的循环与上面原理一样,我们看最终的输出net:

我们返回到yolact.py文件中:
self.proto_net, cfg.mask_dim = make_net(in_channels, cfg.mask_proto_net, include_last_relu=False)
查看self.proto_net,这个就是论文中 Protonet Architecture:
Sequential(
  (0): Conv2d(256, 256, kernel_size=(3, 3), stride=(1, 1), padding=(1, 1))
  (1): ReLU(inplace=True)
  (2): Conv2d(256, 256, kernel_size=(3, 3), stride=(1, 1), padding=(1, 1))
  (3): ReLU(inplace=True)
  (4): Conv2d(256, 256, kernel_size=(3, 3), stride=(1, 1), padding=(1, 1))
  (5): ReLU(inplace=True)
  (6): InterpolateModule()
  (7): ReLU(inplace=True)
  (8): Conv2d(256, 256, kernel_size=(3, 3), stride=(1, 1), padding=(1, 1))
  (9): ReLU(inplace=True)
  (10): Conv2d(256, 32, kernel_size=(1, 1), stride=(1, 1))
)

看看论文怎么说: prototype生成分支为一张图片预测k个 prototype masks。我们将FCN网络的最后一层通道数改为k ,每一个prototype对应一个通道。并与backbone连接上,以P3 feature map(Fig 2)作为输入。
论文中也解释了为什么将P3输入到Protonet ?因为从更深层次的主干特征中提取protonet会产生 more robust masks和higher resolution prototypes,就导致在小的对象上得到更高质量的Mask和更好的性能。因此,我们使用了FPN网络,因为它最大的那个特征层(在我们的例子中是p3;见图2) 是最深的。我们将它的尺寸提升到输入图像的四分之一,以提高小对象的性能。
最后,作者以ReLU作激活函数,跟在Protonet 后面。
4).下面我们来到yolact.py的492行:FPN
if cfg.fpn is not None:
   # Some hacky rewiring to accomodate the FPN
   self.fpn = FPN([src_channels[i] for i in self.selected_layers])
   self.selected_layers = list(range(len(self.selected_layers) + cfg.fpn.num_downsample))
   src_channels = [cfg.fpn.num_features] * len(self.selected_layers)
'''
FPN的输入参数:
	src_channels:[256, 512, 1024, 2048]
	self.selected_layers:[1, 2, 3]
'''
我们来到了 FPN:
class FPN(ScriptModuleWrapper):
    """
    Implements a general version of the FPN introduced in
    https://arxiv.org/pdf/1612.03144.pdf

    Parameters (in cfg.fpn):
        - num_features (int): The number of output features in the fpn layers.
        - interpolation_mode (str): The mode to pass to F.interpolate.
        - num_downsample (int): The number of downsampled layers to add onto the selected layers.
                                These extra layers are downsampled from the last selected layer.

    Args:
        - in_channels (list): For each conv layer you supply in the forward pass,
                              how many features will it have?
    """
    __constants__ = ['interpolation_mode', 'num_downsample', 'use_conv_downsample', 'relu_pred_layers',
                     'lat_layers', 'pred_layers', 'downsample_layers', 'relu_downsample_layers']

    def __init__(self, in_channels):
        super().__init__()

        self.lat_layers  = nn.ModuleList([
            nn.Conv2d(x, cfg.fpn.num_features, kernel_size=1)
            for x in reversed(in_channels)
        ])

        # This is here for backwards compatability
        padding = 1 if cfg.fpn.pad else 0
        self.pred_layers = nn.ModuleList([
            nn.Conv2d(cfg.fpn.num_features, cfg.fpn.num_features, kernel_size=3, padding=padding)
            for _ in in_channels
        ])

        if cfg.fpn.use_conv_downsample:
            self.downsample_layers = nn.ModuleList([
                nn.Conv2d(cfg.fpn.num_features, cfg.fpn.num_features, kernel_size=3, padding=1, stride=2)
                for _ in range(cfg.fpn.num_downsample)
            ])

        self.interpolation_mode     = cfg.fpn.interpolation_mode
        self.num_downsample         = cfg.fpn.num_downsample
        self.use_conv_downsample    = cfg.fpn.use_conv_downsample
        self.relu_downsample_layers = cfg.fpn.relu_downsample_layers
        self.relu_pred_layers       = cfg.fpn.relu_pred_layers
相信大家都看过FPN的论文:

当然这里不是一一对应的,yolact的结构:

P7,P6,P5没有特征融合,直接输入Preditction Head中,然后P4、P3均融合了上一层的特征和对应的backbone的特征。
下面就好理解FPN里面的操作,看到yolact.py的341行:注意这里我们仅仅只是执行到FPN的__init__方法,并没有执行forward方法,所下面都是定义FPN要用到网络层的实例属性:
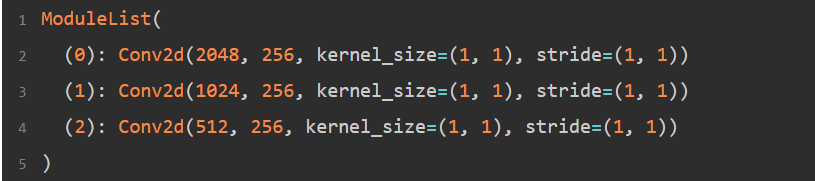
self.lat_layers  = nn.ModuleList([
            nn.Conv2d(x, cfg.fpn.num_features, kernel_size=1)
            for x in reversed(in_channels) #倒序一个列表,并对其生成迭代器
        ])
最终self.lat_layers输出:
继续看到348行,self.pred_layers:

继续看到353行,self.downsample_layers:

self.downsample_layers用于两次下采样,很显然是针对P5使用的,生成P6,再对P6下采样,生成P7.
self.lat_layers、self.pred_layers、self.downsample_layers具体怎么用来搭建FPN网络,大家看这个图片,就能明白:

5).下面我们来到yolact.py的506行:定义PredictionHead,执行完5次循环:
 pred = PredictionModule(src_channels[layer_idx], src_channels[layer_idx],
                            aspect_ratios = cfg.backbone.pred_aspect_ratios[idx],
                            scales        = cfg.backbone.pred_scales[idx],
                            parent        = parent,
                            index         = idx)
具体的PredictionModule类就不讲解了,比较简单,主要是__init__方法中这三行代码:
self.bbox_layer = nn.Conv2d(out_channels, self.num_priors * 4,                **cfg.head_layer_params)
self.conf_layer = nn.Conv2d(out_channels, self.num_priors * self.num_classes, **cfg.head_layer_params)
self.mask_layer = nn.Conv2d(out_channels, self.num_priors * self.mask_dim,    **cfg.head_layer_params)
输出pred:
ModuleList(
  (0): PredictionModule(
    (upfeature): Sequential(
      (0): Conv2d(256, 256, kernel_size=(3, 3), stride=(1, 1), padding=(1, 1))
      (1): ReLU(inplace=True)
    )
    (bbox_layer): Conv2d(256, 12, kernel_size=(3, 3), stride=(1, 1), padding=(1, 1))
    (conf_layer): Conv2d(256, 15, kernel_size=(3, 3), stride=(1, 1), padding=(1, 1))
    (mask_layer): Conv2d(256, 96, kernel_size=(3, 3), stride=(1, 1), padding=(1, 1))
  )
  (1): PredictionModule()
  (2): PredictionModule()
  (3): PredictionModule()
  (4): PredictionModule()
)
bbox_layer :预测anchor的偏移量:gt与匹配到的anchor之间的中心点offset,以及它们宽度和高度比。
in_channels = 256
out_channels =  12 (每个像素点预测3个anchor)

conf_layer :预测anchor的置信度
out_channels= 12 ,因为每个像素点生成3个anchor,而我们总共要检测4类
所以,输出为12

mask_layer:预测mask coefficients
out_channels = 3*32,
每个anchor预测k(32)个mask coefficients,这是因为一张图片生成32个prototype masks。
看看论文怎么说:

注意代码中的:
(bbox_layer): Conv2d(256, 12, kernel_size=(3, 3), stride=(1, 1), padding=(1, 1))
(conf_layer): Conv2d(256, 15, kernel_size=(3, 3), stride=(1, 1), padding=(1, 1))
(mask_layer): Conv2d(256, 96, kernel_size=(3, 3), stride=(1, 1), padding=(1, 1))
是上图Class 、Box、Mask的最后一个卷积层。
继续看到yoloact.py 557行:
self.semantic_seg_conv = nn.Conv2d(src_channels[0], cfg.num_classes-1, kernel_size=1)
到这里应该就看完了train.py文件中:yolact_net = Yolact() 。再次声明这里仅仅是定义了一个对象(即执行__init__方法),并没有真正的输入图片让其训练。可以看到上面的很多class里面都有一个forward函数,模型之间的连接就在哪里,后面真正输入图片至网络中时,即:前向传播时会调用各个类中forward函数,实现前向传播。后面博客会写到:YOLACT++代码分析3——前向传播
Reference
YOLACT++ Better Real-time Instance Segmentation
YOLACT++源码


 2万+
2万+


 被折叠的 条评论
为什么被折叠?
被折叠的 条评论
为什么被折叠?
 到【灌水乐园】发言


