


import torch
import torch
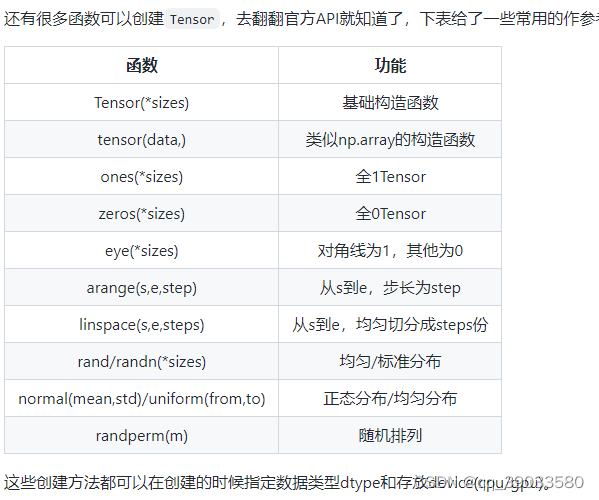
x=torch.empty(5,3)# 创建一个5*3的未初始化的Tensor
print(x)
x=torch.empty(5,3)# 创建一个5*3的未初始化的Tensor
print(x)
tensor([[0., 0., 0.],
[0., 0., 0.],
[0., 0., 0.],
[0., 0., 0.],
[0., 0., 0.]])
#直接根据数据创建
x=torch.tensor([5.5,3])
print(x)
#直接根据数据创建
x=torch.tensor([5.5,3])
print(x)
tensor([5.5000, 3.0000])
x=x.new_ones(5,3,dtype=torch.float64)
print(x)
tensor([[1., 1., 1.],
        [1., 1., 1.],
        [1., 1., 1.],
        [1., 1., 1.],
        [1., 1., 1.]], dtype=torch.float64)
#指定新的数据类型
x=torch.randn_like(x,dtype=torch.float)#指定新的数据类型
print(x)
tensor([[ 0.6709, -0.8583, -0.1520],
        [ 1.0064, -0.7911, -0.5696],
        [ 0.6201,  0.1907,  0.8568],
        [-0.3720,  0.5157, -0.6008],
        [ 0.7198,  0.2041,  0.3857]])
print(x.size())#通过shape或者size()来获取Tensor的形状
torch.Size([5, 3])
x.shape
print(x.shape)
torch.Size([5, 3])
操作
y=torch.rand(5,3)
print(x+y)
tensor([[ 1.1893, -0.1136, -0.0344],
        [ 1.6346, -0.6564, -0.0171],
        [ 1.3278,  1.0924,  1.7310],
        [ 0.5513,  0.8700,  0.1952],
        [ 1.6335,  0.8769,  0.9073]])
print(torch.add(x,y))
tensor([[ 1.1893, -0.1136, -0.0344],
        [ 1.6346, -0.6564, -0.0171],
        [ 1.3278,  1.0924,  1.7310],
        [ 0.5513,  0.8700,  0.1952],
        [ 1.6335,  0.8769,  0.9073]])
result=torch.empty(5,3)
torch.add(x,y,out=result)
print(result)
tensor([[ 1.1893, -0.1136, -0.0344],
        [ 1.6346, -0.6564, -0.0171],
        [ 1.3278,  1.0924,  1.7310],
        [ 0.5513,  0.8700,  0.1952],
        [ 1.6335,  0.8769,  0.9073]])
inplace版本,pytorch操作inplace版本都有后缀,x.copy(y)

y.add_(x)
print(y)
tensor([[ 1.1893, -0.1136, -0.0344],
        [ 1.6346, -0.6564, -0.0171],
        [ 1.3278,  1.0924,  1.7310],
        [ 0.5513,  0.8700,  0.1952],
        [ 1.6335,  0.8769,  0.9073]])
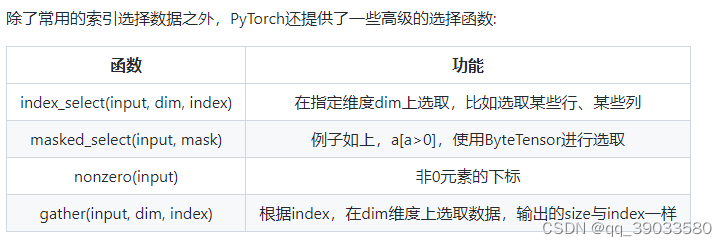
#索引 使用类似Numpy的索引操作来访问Tensor
y=x[0,:]
y+=1
print(y)
print(x[0,:]) #索引出来的结果与原数据共享内存,也即修改一个,另一个会跟着修改。
tensor([1.6709, 0.1417, 0.8480])
tensor([1.6709, 0.1417, 0.8480])
y=x.view(15)#view()来改变Tensor的形状
z=x.view(-1,5)
print(x.size(),y.shape,z.shape)
torch.Size([5, 3]) torch.Size([15]) torch.Size([3, 5])
注意view()返回的新Tensor与源Tensor虽然可能有不同的size,但是是共享data的,view仅仅是改变了对这个张量的观察角度,内部数据并未改变)

x+=1
print(x)
print(y)
tensor([[2.6709, 1.1417, 1.8480],
        [2.0064, 0.2089, 0.4304],
        [1.6201, 1.1907, 1.8568],
        [0.6280, 1.5157, 0.3992],
        [1.7198, 1.2041, 1.3857]])
tensor([2.6709, 1.1417, 1.8480, 2.0064, 0.2089, 0.4304, 1.6201, 1.1907, 1.8568,
        0.6280, 1.5157, 0.3992, 1.7198, 1.2041, 1.3857])
如果我们想返回一个真正新的副本(即不共享data内存)该怎么办呢?Pytorch还提供了一个reshape()可以改变形状,但是此函数并不能保证返回的是其拷贝,所以不推荐使用。推荐先用clone创造一个副本然后再使用view。参考此处

x_copy=x.clone().view(15)
#使用clone还有一个好处是会被记录在计算图中,即梯度回传到副本时也会传到源Tensor
x-=1
print(x)
print(x_copy)
tensor([[ 1.6709,  0.1417,  0.8480],
        [ 1.0064, -0.7911, -0.5696],
        [ 0.6201,  0.1907,  0.8568],
        [-0.3720,  0.5157, -0.6008],
        [ 0.7198,  0.2041,  0.3857]])
tensor([2.6709, 1.1417, 1.8480, 2.0064, 0.2089, 0.4304, 1.6201, 1.1907, 1.8568,
        0.6280, 1.5157, 0.3992, 1.7198, 1.2041, 1.3857])
#
#另外一个常用的函数就是item(), 它可以将一个标量Tensor转换成一个Python number
x=torch.randn(1)
print(x)
print(x.item())
tensor([-0.6633])
-0.6632570624351501
广播机制
x=torch.arange(1,3).view(1,2)
print(x)
y=torch.arange(1,4).view(3,1)
print(y)
print(x+y)
tensor([[1, 2]])
tensor([[1],
        [2],
        [3]])
tensor([[2, 3],
        [3, 4],
        [4, 5]])
如果要计算x + y,那么x中第一行的2个元素被广播(复制)到了第二行和第三行,而y中第一列的3个元素被广播(复制)到了第二列。如此,就可以对2个3行2列的矩阵按元素相加
运算的内存开销
x=torch.tensor([1,2])
#索引操作是不会开辟新内存的,而像y = x + y这样的运算是会新开内存的,然后将y指向新内存
y=torch.tensor([3,4])
id_before=id(y)
y[:]=y+x
print(id(y)==id_before)
True
x=torch.tensor([1,2])
#索引操作是不会开辟新内存的,而像y = x + y这样的运算是会新开内存的,然后将y指向新内存
y=torch.tensor([3,4])
id_before=id(y)
y=y+x
print(id(y)==id_before)
False
x=torch.tensor([1,2])
#索引操作是不会开辟新内存的,而像y = x + y这样的运算是会新开内存的,然后将y指向新内存
y=torch.tensor([3,4])
id_before=id(y)
torch.add(x,y,out=y)#y+=x,y.add_(x)
#还可以使用运算符全名函x=torch.tensor([1,2])
#索引操作是不会开辟新内存的,而像y = x + y这样的运算是会新开内存的,然后将y指向新内存
print(id(y)==id_before)
x=torch.tensor([1,2])
#索引操作是不会开辟新内存的,而像y = x + y这样的运算是会新开内存的,然后将y指向新内存
y=torch.tensor([3,4])
id_before=id(y)
torch.add(x,y,out=y)#y+=x,y.add_(x)
#还可以使用运算符全名函x=torch.tensor([1,2])
#索引操作是不会开辟新内存的,而像y = x + y这样的运算是会新开内存的,然后将y指向新内存
print(id(y)==id_before)
True
**
Tensor和NumPy互换
**
这两个函数所产生的的Tensor和NumPy中的数组共享相同的内存(所以他们之间的转换很快),改变其中一个时另一个也会改变!!!
#Numpy转化为Tensor
import numpy as np
a=np.ones(5)
b=torch.from_numpy(a)
print(a,b)
a+=1
print(a,b)
b+=1
print(a,b)
#所有在CPU上的Tensor(除了CharTensor)都支持与NumPy数组相互转换
[1. 1. 1. 1. 1.] tensor([1., 1., 1., 1., 1.], dtype=torch.float64)
[2. 2. 2. 2. 2.] tensor([2., 2., 2., 2., 2.], dtype=torch.float64)
[3. 3. 3. 3. 3.] tensor([3., 3., 3., 3., 3.], dtype=torch.float64)
=1
print(a,c)
c=torch.tensor(a)
#torch.tensor()将NumPy数组转换成Tensor,需要注意的是该方法总是会进行数据拷贝,返回的Tensor和原来的数据不再共享内存
a+=1
print(a,c)
[4. 4. 4. 4. 4.] tensor([3., 3., 3., 3., 3.], dtype=torch.float64)
Tensor on GPU
if torch.cuda.is_available():
    device=torch.device("cuda")#GPU
    y=torch.ones_like(x,device=device) #直接创建一个在GPU上的Tensor
    x=x.to(device)  #等价于.to("cuda")
    z=x+y
    print(z)
    print(z.to("cpu",torch.double))
tensor([2, 3], device='cuda:0')
tensor([2., 3.], dtype=torch.float64)


 1万+
1万+


 被折叠的 条评论
为什么被折叠?
被折叠的 条评论
为什么被折叠?
 到【灌水乐园】发言


