


三维空间刚体运动
一、向量
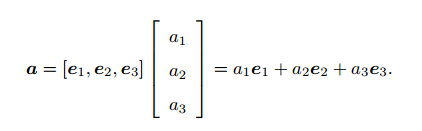
1、在描述旋转矩阵前我们先明确向量这个概念。向量是空间中的一个具体实物且不和任何实数相关联。为了描述向量,应该先确定一个具体的坐标系,明确该坐标系的线性基后才能够确定一个向量在该坐标系下的坐标,一个线性空间的基(e1,e2,e3),向量 a表示为(a1,a2,a3)是这向量在这组基下的坐标:
2、向量内积

3、向量外积

外积的方向垂直与这两个向量,大小为 |a||b|sin<a,b>。
^称之为反对称符号。引入侧概念可以将向量外积变成线性运算。
二、旋转 、变换矩阵
2.1、欧式变换:
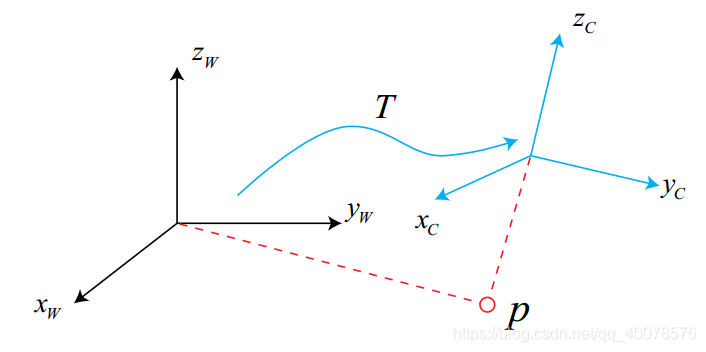
假设存在两个坐标系:一个世界坐标系,定义为某个墙角和它的三条边,并是一个惯性系;一个机器人坐标系,是一个随机器人移动的坐标系。假设机器人观察到了某个向量 [公式] , 它在这两个坐标系中分别有一套坐标。前面说了,向量是一个客观存在的实体,那么必然有一个关系能够将这两套坐标联系起来。
这个关系就是欧式变换。因为机器人的运动是一个刚体运动,所以同一个向量在不同坐标系下的模长和方向都不会发生变化。这样一个欧式变换就是由一个旋转和一个平移两部分组成。先说旋转。
2.1、旋转矩阵
我们先考虑旋转。对于向量P ,他并不会随着坐标系的旋转而发生运动,它在两个坐标系下的表示是相等的:

(e1,e2,e3)和 (e1,e2,e3`) 是连个坐标系的正交基。
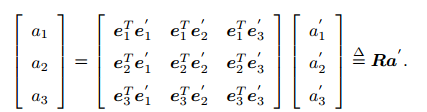
R表示为旋转矩阵,旋转矩阵的约束为必须为正交矩阵,||R||=1
2.2、旋转加平移:
** a’ = R-1*a + t= R_t * a + t**
2.3 变换矩阵与齐次坐标
若下式的左边坐标最后一项不为1,强制为1,则a也要跟着变化转化为非齐次坐标(一个点一个唯一表示)
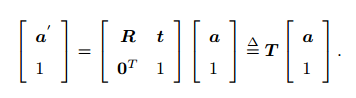
这样子很容易用符号表示出旋转和平移的变换了。
三、旋转向量和欧拉角
3.1、旋转向量
因为旋转矩阵R有九个元素,只表达了3个自由度(三个轴方向的旋转),看起来冗余了,所以人们找到一种更精简的方式来描述旋转。
接下来介绍旋转向量,任意旋转都可以用一个旋转轴和一个旋转角来描述。那么,我们可以用一个向量,其方向为旋转轴n的方向,大小则为旋转角θ ,这种向量就是旋转向量,表示为θn . 前面说到,外积可以用来表示旋转就是因为外积可以用来表示旋转向量:考虑两个不平行的向量a和 b,在右手法则下,用右手的4个指头从a 转向 b ,大拇指的朝向就是旋转向量的方向,即 a x b的方向,而它的大小则由 a 和 b的夹角决定。
旋转向量和旋转矩阵的转换可以用罗德里格斯公式表示:

反之则有
上边的公式推导,不难。

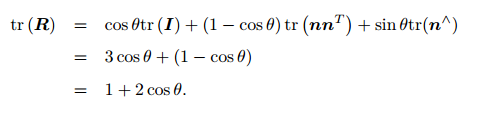
而旋转轴上的向量在旋转后不发生改变,所以:

所以n是R的特征值为1时的特征向量。
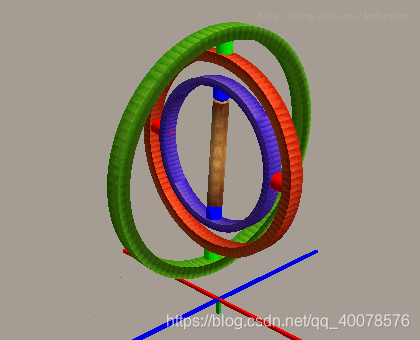
四、欧拉角万向死锁问题
 四元数的引用是为了减少计算量和计算时存储占用的空间。
具体看博文:
https://www.zhihu.com/question/47736315
本部分代码演练:
//
// Created by wdb on 2021/7/30.
//
/* 在右手系中绕X轴旋转p° 对应的矩阵Rx
      | 1    0        0 |
Rx=   | 0   cosp   -sinp|
      | 0   sinp    cosp|
//在右手系中绕Y轴旋转h° 对应的矩阵Ry
        | cosh   0   sinh|
Ry=     |  0     1     0 |
        |-sinh   0   cosh|
//在右手系中绕Z轴旋转b° 对应的矩阵Rz
      |cosb  -sinb   0 |
Rz=   |sinb   cosb   0 |
      |  0     0     1 |

      //欧拉角(p,h,b)在右手系中对应的旋转矩阵(Z-X-Y顺规)
               |cosbcosh-sinbsinpsinh  -sinbcosp  cosbsinh+sinbsinpcosh|
R = Rz*Rx*Ry = |sinbcosh+cosbsinpsinh   cosbcosp  sinbsinh-cosbsinpcosh|
               |     -cospsinh            sinp           cospcosh      |
  | m11  m12  m13 |
M=| m21  m22  m23 |
  | m31  m32  m33 |

    | m11  m12  m13 |     |cosbcosh-sinbsinpsinh  -sinbcosp  cosbsinh+sinbsinpcosh|
M=| m21  m22  m23 |  =  |sinbcosh+cosbsinpsinh   cosbcosp  sinbsinh-cosbsinpcosh| = R=Rz*Rx*Ry
  | m31  m32  m33 |     |     -cospsinh            sinp           cospcosh      |

*/
#include <pangolin/pangolin.h>   //可视化工具
#include <Eigen/Eigen>
#include <Eigen/Core>
#include <iostream>
#include <unistd.h>

#include <Eigen/Geometry>

#define PI (3.1415926535897932346f)


#include <iostream>
#include <iomanip>
using namespace std;
using namespace Eigen;
using namespace pangolin;


struct RotationMatrix {
    Matrix3d matrix = Matrix3d::Identity();
};

ostream &operator<<(ostream &out, const RotationMatrix &r) //你想通过<< 这个操作符直接输出你所创建的类的实例(对象),
// 而<< 操作符属于iostream库,这个库无法识别你自己定义的类,因而需要对操作符<< 载重。
//重载<< 函数返回类型是一个流的引用, 第一个参数是流,第二个参数是以引用传递的方式的一个类的实例(并且只能对这个参数读操作)
{
    out.setf(ios::fixed);
    Matrix3d matrix = r.matrix;
    out << '=';
    out << "[" << setprecision(2) << matrix(0, 0) << "," << matrix(0, 1) << "," << matrix(0, 2) << "],"
        << "[" << matrix(1, 0) << "," << matrix(1, 1) << "," << matrix(1, 2) << "],"
        << "[" << matrix(2, 0) << "," << matrix(2, 1) << "," << matrix(2, 2) << "]";
    return out;
}


void DrawTrajectory(vector<Isometry3d, Eigen::aligned_allocator<Isometry3d>> poses);
vector<Isometry3d, Eigen::aligned_allocator<Isometry3d>> poses;
namespace learning_eigen
{
    /****************
     *
     * @param point_before_trans
     * @param transform_anglexyz
     * @param transform_translationxyz
     * @return
     */
    Eigen::Vector3d use_rotationMatrix(Vector3d point_before_trans,
                            Vector3d transform_anglexyz,Vector3d transform_translationxyz)
   {

        Vector3d euler_angles;
        Quaterniond q_anglexyz;
        Eigen::Matrix3d rotation_matrix3;   // rotation  Matrix3d
        Vector3d translationxyz;

        euler_angles<<transform_anglexyz[2]/180*PI,transform_anglexyz[1]/180*PI,transform_anglexyz[0]/180*PI;

       rotation_matrix3 = Eigen::AngleAxisd(euler_angles[0], Eigen::Vector3d::UnitZ()) *
                          Eigen::AngleAxisd(euler_angles[1], Eigen::Vector3d::UnitY()) *
                          Eigen::AngleAxisd(euler_angles[2], Eigen::Vector3d::UnitX());
       //cout << "rotation euler =\n" << rotation_matrix3.eulerAngles(0,1,2) << endl;   //xyz
       q_anglexyz = Eigen::AngleAxisd(euler_angles[0], Eigen::Vector3d::UnitZ()) *
                    Eigen::AngleAxisd(euler_angles[1], Eigen::Vector3d::UnitY()) *
                    Eigen::AngleAxisd(euler_angles[2], Eigen::Vector3d::UnitX());

       Isometry3d Twr = Eigen::Isometry3d ::Identity();
       poses.push_back(Twr);
       Twr.rotate(q_anglexyz);
       poses.push_back(Twr);
       Twr.pretranslate(Vector3d(1,-2,-2));
       poses.push_back(Twr);
       Twr.pretranslate(transform_translationxyz);
       poses.push_back(Twr);
       DrawTrajectory(poses);

       cout<<"rotation_matrix3\n"<<rotation_matrix3<<endl;

       Eigen::AngleAxisd rotation_vector4(q_anglexyz);

       Vector3d update_point = rotation_matrix3*point_before_trans +transform_translationxyz;

       return update_point;

   }
}

int main()
{

    Vector3d point(0,0,0);
    Vector3d euler_angles(1,20,90);
    Vector3d transplate(1,2,2);
    learning_eigen::use_rotationMatrix(point,euler_angles,transplate);
    return 0;

}

void pangolin_example()
{
    //Vector3d updatePoint1 = learning_eigen::use_rotationMatrix(point,euler_angles,transplate);
    // 创建名称为“Main”的GUI窗口,尺寸为640×640
    pangolin::CreateWindowAndBind("Main",640,480);
    // 启动深度测试我们启动了深度测试功能,
    // 该功能会使得pangolin只会绘制朝向镜头的那一面像素点,避免容易混淆的透视关系出现,
    // 因此在任何3D可视化中都应该开启该功能。
    glEnable(GL_DEPTH_TEST);

    // 创建一个观察相机视图
    // ProjectMatrix(int h, int w, int fu, int fv, int cu, int cv, int znear, int zfar)
    //参数依次为观察相机的图像高度、宽度、4个内参以及最近和最远视距  Pangolin会自动根据内参矩阵完成对应的透视变换
    // ModelViewLookAt(double x, double y, double z,double lx, double ly, double lz, AxisDirection Up)

    pangolin::OpenGlRenderState s_cam(
            pangolin::ProjectionMatrix(640,480,420,420,320,320,0.2,100),
            pangolin::ModelViewLookAt(2,0,2, 0,0,0, pangolin::AxisY)
    );

    // 创建交互视图
    pangolin::Handler3D handler(s_cam); //交互相机视图句柄
    pangolin::View& d_cam = pangolin::CreateDisplay()
            .SetBounds(0.0, 1.0, 0.0, 1.0, -640.0f/480.0f)
            .SetHandler(&handler);

    while( !pangolin::ShouldQuit() )
    {
        // 清空颜色和深度缓存
        glClear(GL_COLOR_BUFFER_BIT | GL_DEPTH_BUFFER_BIT);
        d_cam.Activate(s_cam);

        // 在原点绘制一个立方体
        pangolin::glDrawColouredCube();

        // 绘制坐标系
        glLineWidth(3);
        glBegin ( GL_LINES );
        glColor3f ( 0.8f,0.f,0.f );
        glVertex3f( -1,-1,-1 );
        glVertex3f( 0,-1,-1 );
        glColor3f( 0.f,0.8f,0.f);
        glVertex3f( -1,-1,-1 );
        glVertex3f( -1,0,-1 );
        glColor3f( 0.2f,0.2f,1.f);
        glVertex3f( -1,-1,-1 );
        glVertex3f( -1,-1,0 );
        glEnd();

        // 运行帧循环以推进窗口事件
        pangolin::FinishFrame();
    }


}

/*******************************************************************************************/
void DrawTrajectory(vector<Isometry3d, Eigen::aligned_allocator<Isometry3d>> poses)
{
    // create pangolin window and plot the trajectory
    pangolin::CreateWindowAndBind("Trajectory Viewer", 1024, 768);
    glEnable(GL_DEPTH_TEST);
    glEnable(GL_BLEND);
    glBlendFunc(GL_SRC_ALPHA, GL_ONE_MINUS_SRC_ALPHA);

    pangolin::OpenGlRenderState s_cam(
            pangolin::ProjectionMatrix(1024, 768, 500, 500, 512, 389, 0.1, 1000),
            pangolin::ModelViewLookAt(0, -0.1, -1.8, 0, 0, 0, 0.0, -1.0, 0.0)
    );

    pangolin::View &d_cam = pangolin::CreateDisplay()
            .SetBounds(0.0, 1.0, 0.0, 1.0, -1024.0f / 768.0f)
            .SetHandler(new pangolin::Handler3D(s_cam));

    while (pangolin::ShouldQuit() == false) {
        glClear(GL_COLOR_BUFFER_BIT | GL_DEPTH_BUFFER_BIT);
        d_cam.Activate(s_cam);
        glClearColor(1.0f, 1.0f, 1.0f, 1.0f);
        glLineWidth(2);
        for (size_t i = 0; i < poses.size(); i++) {
            // 画每个位姿的三个坐标轴
            if (i == 0)
            {
                Vector3d Ow = poses[i].translation();
                Vector3d Xw = poses[i] * (0.1 * Vector3d(1, 0, 0));
                Vector3d Yw = poses[i] * (0.1 * Vector3d(0, 1, 0));
                Vector3d Zw = poses[i] * (0.1 * Vector3d(0, 0, 1));
                glBegin(GL_LINES);
                glColor3f(1.0, 0.0, 0.0);
                glVertex3d(Ow[0], Ow[1], Ow[2]);
                glVertex3d(Xw[0], Xw[1], Xw[2]);
                glColor3f(0.0, 1.0, 0.0);
                glVertex3d(Ow[0], Ow[1], Ow[2]);
                glVertex3d(Yw[0], Yw[1], Yw[2]);
                glColor3f(0.0, 0.0, 1.0);
                glVertex3d(Ow[0], Ow[1], Ow[2]);
                glVertex3d(Zw[0], Zw[1], Zw[2]);
                glEnd();

            }
            else
            {
                Vector3d Ow = poses[i].translation();
                Vector3d Xw = poses[i] * (0.1 * Vector3d(1, 0, 0));
                Vector3d Yw = poses[i] * (0.1 * Vector3d(0, 1, 0));
                Vector3d Zw = poses[i] * (0.1 * Vector3d(0, 0, 1));
                glBegin(GL_LINES);
                glColor3f(1.0, 0.0, 0.0);
                glVertex3d(Ow[0], Ow[1], Ow[2]);
                glVertex3d(Xw[0], Xw[1], Xw[2]);
                glColor3f(0.0, 1.0, 0.0);
                glVertex3d(Ow[0], Ow[1], Ow[2]);
                glVertex3d(Yw[0], Yw[1], Yw[2]);
                glColor3f(0.0, 0.0, 1.0);
                glVertex3d(Ow[0], Ow[1], Ow[2]);
                glVertex3d(Zw[0], Zw[1], Zw[2]);
                glEnd();
            }

        }
        // 画出连线
        for (size_t i = 0; i < poses.size(); i++) {
            glColor3f(0.0, 0.0, 0.0);
            glBegin(GL_LINES);
            auto p1 = poses[i], p2 = poses[i + 1];
            glVertex3d(p1.translation()[0], p1.translation()[1], p1.translation()[2]);
            glVertex3d(p2.translation()[0], p2.translation()[1], p2.translation()[2]);
            glEnd();
        }
        pangolin::FinishFrame();
        usleep(5000);   // sleep 5 ms
    }
}


 340
340


 被折叠的 条评论
为什么被折叠?
被折叠的 条评论
为什么被折叠?
 到【灌水乐园】发言


