


DaSiamRPN主要是在SiamRPN的基础上做了改进。SiamRPN引入RPN使得跟踪能得到相当精确的包围框,但并没有提高分类器的鉴别能力,而DaSiamRPN在前者的基础上,对训练方式做出了改进,提高了网络的鉴别能力。
由于电脑没有GPU,只能修改成CPU版本进行运行。
代码地址:https://github.com/foolwood/DaSiamRPN
一、环境配置
打开Anaconda Prompt,创建虚拟环境conda create -n DaSiamRPN python=3.5
激活虚拟环境conda activate DaSiamRPN
安装torch[下载地址][官网],作者github上给的是python2.7,torch0.3.1但是由于window没有这个版本的torch,所以我这里用的是torch0.4.0 pip install torch-0.4.0-cp35-cp35m-win_amd64.whl
安装pip install numpy
安装opencv pip install opencv-python
测试,输入python
>>> import torch
>>> import cv2
>>> import numpy
>>> exit()

说明库安装成功
二、代码运行
具体流程可以参考视频:https://www.bilibili.com/video/BV1kx411o7Nv/
将下载SiamRPNBIG放在’./code’
修改代码
2.1. demo.py

2.2 run_SiamRPN.py


之后运行Demo.py,即可运行

但是可能是因为troch的版本问题,效果不理想,很简单的视频都会莫名跟丢
三、代码解读
虽然下的是DaSiamRPN的代码,但感觉就是SiamRPN,没看到DaSiamRPN的更新策略、重检测。
3.1 SiamRPN_init
def SiamRPN_init(im, target_pos, target_sz, net):
    state = dict()
    p = TrackerConfig()
    p.update(net.cfg)
    state['im_h'] = im.shape[0]
    state['im_w'] = im.shape[1]

    if p.adaptive:
        if ((target_sz[0] * target_sz[1]) / float(state['im_h'] * state['im_w'])) < 0.004:
            p.instance_size = 287  # small object big search region
        else:
            p.instance_size = 271

        #响应图尺寸19*19
        p.score_size = (p.instance_size - p.exemplar_size) / p.total_stride + 1
    #生成响应图每个位置(19*19)节点,每个节点5个anchors
    p.anchor = generate_anchor(p.total_stride, p.scales, p.ratios, int(p.score_size))

    avg_chans = np.mean(im, axis=(0, 1))

    wc_z = target_sz[0] + p.context_amount * sum(target_sz)
    hc_z = target_sz[1] + p.context_amount * sum(target_sz)
    s_z = round(np.sqrt(wc_z * hc_z))
    # initialize the exemplar
    z_crop = get_subwindow_tracking(im, target_pos, p.exemplar_size, s_z, avg_chans)

    z = Variable(z_crop.unsqueeze(0))
    net.temple(z)
    #net.temple(z.cuda())

    if p.windowing == 'cosine':
        window = np.outer(np.hanning(p.score_size), np.hanning(p.score_size))
    elif p.windowing == 'uniform':
        window = np.ones((p.score_size, p.score_size))
    window = np.tile(window.flatten(), p.anchor_num)

    state['p'] = p
    state['net'] = net
    state['avg_chans'] = avg_chans
    state['window'] = window
    state['target_pos'] = target_pos
    state['target_sz'] = target_sz
    return state
3.2 tracker_eval
def tracker_eval(net, x_crop, target_pos, target_sz, window, scale_z, p):
    delta, score = net(x_crop)

    delta = delta.permute(1, 2, 3, 0).contiguous().view(4, -1).data.cpu().numpy()
    score = F.softmax(score.permute(1, 2, 3, 0).contiguous().view(2, -1), dim=0).data[1, :].cpu().numpy()

    delta[0, :] = delta[0, :] * p.anchor[:, 2] + p.anchor[:, 0]   # x,尺寸为5*19*19
    delta[1, :] = delta[1, :] * p.anchor[:, 3] + p.anchor[:, 1]   # y
    delta[2, :] = np.exp(delta[2, :]) * p.anchor[:, 2]            # w
    delta[3, :] = np.exp(delta[3, :]) * p.anchor[:, 3]            # h
总共K个anchors(K=5)
delta用于存储x,y,w,h(尺寸为4K);score用于保存分值(foreground and background,尺寸为2K)
K个anchors对应的论文(SiamRPN)计算公式
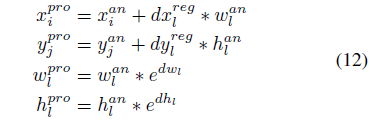
    # size penalty
    s_c = change(sz(delta[2, :], delta[3, :]) / (sz_wh(target_sz)))  # scale penalty 对角线尺寸
    r_c = change((target_sz[0] / target_sz[1]) / (delta[2, :] / delta[3, :]))  # ratio penalty  w/h

    penalty = np.exp(-(r_c * s_c - 1.) * p.penalty_k)
    pscore = penalty * score
对应论文(SiamRPN)

    # window float
    pscore = pscore * (1 - p.window_influence) + window * p.window_influence # window是余弦窗;p.window_influence=0.42
    best_pscore_id = np.argmax(pscore)
    target = delta[:, best_pscore_id] / scale_z #得到x_pro,y_pro,w_pro,h_pro四个变量在图片上的变化量(单位是像素)
    target_sz = target_sz / scale_z
    lr = penalty[best_pscore_id] * score[best_pscore_id] * p.lr

    #目标的xy位置是直接加上x_pro和y_pro,而wh是有一个学习率来增量学习的(目标相邻两帧之间的纵横比不会突变的很厉害)
    res_x = target[0] + target_pos[0]
    res_y = target[1] + target_pos[1]

    res_w = target_sz[0] * (1 - lr) + target[2] * lr
    res_h = target_sz[1] * (1 - lr) + target[3] * lr

    target_pos = np.array([res_x, res_y])
    target_sz = np.array([res_w, res_h])
    return target_pos, target_sz, score[best_pscore_id]
四、Linux16.04+python2.7环境配置
由于作者github上给的是python2.7+torch0.3.1,所以想尝试一下Linux底下的torch0.3.1的跟踪效果:
由于oython版本低,opencv不好装,只好装了3.1.0版本的
安装Opencv:pip2 install --target='Your Opencv Insatll Path' opencv-python==3.1.0.0
添加环境变量:export PYTHONPATH=$PYTHONPATH:Your Opencv Insatll Path

由于Linux不好显示图像,我就将跟踪结果保存成视频,demo.py修改成如下:
# tracking and visualization
fps = 30
fourcc = cv2.VideoWriter_fourcc(*'MJPG')
videoWriter = cv2.VideoWriter('saveVideo.avi',fourcc,fps,(480,360))#480,360对应图像的尺寸,这里是bag视频的尺寸,如果尺寸不确定,在保存视频前+resize
toc = 0
for f, image_file in enumerate(image_files):
    im = cv2.imread(image_file)
    tic = cv2.getTickCount()
    state = SiamRPN_track(state, im)  # track
    toc += cv2.getTickCount()-tic
    res = cxy_wh_2_rect(state['target_pos'], state['target_sz'])
    res = [int(l) for l in res]
    cv2.rectangle(im, (res[0], res[1]), (res[0] + res[2], res[1] + res[3]), (0, 255, 255), 3)
    videoWriter.write(im)
    # cv2.imshow('SiamRPN', im)
    # cv2.waitKey(1)
跟踪效果如下:


 2880
2880


 被折叠的 条评论
为什么被折叠?
被折叠的 条评论
为什么被折叠?
 到【灌水乐园】发言


