


 本文详细介绍了如何从源代码编译MMDeploy,包括安装onnxruntime后端,构建并安装mmdeploy,以及使用modelconverter进行模型转换的过程,提供了部署示例和参数说明。
文章目录
1 从源码编译
git clone -b main https://github.com/open-mmlab/mmdeploy.git --recursive
cd mmdeploy
1.1 安装onnxruntime后端
python 的onnx后端安装.
pip install onnxruntime==1.8.1
注: 在另外的机器上python3.11.5版本的环境下没有onnxruntime==1.8.1,安装了onnxruntime1.15.1,可以正常转换模型。
c++ 的onnx库,在你喜欢的目录下下载解压,设置环境变量即可。
wget https://github.com/microsoft/onnxruntime/releases/download/v1.8.1/onnxruntime-linux-x64-1.8.1.tgz
tar -zxvf onnxruntime-linux-x64-1.8.1.tgz
export ONNXRUNTIME_DIR=$(pwd)/onnxruntime-linux-x64-1.8.1
export LD_LIBRARY_PATH=$ONNXRUNTIME_DIR/lib:$LD_LIBRARY_PATH
可以用下面的方式把环境变量设为永久
echo '# set env for onnxruntime' >> ~/.bashrc
echo "export ONNXRUNTIME_DIR=${ONNXRUNTIME_DIR}" >> ~/.bashrc
echo "export LD_LIBRARY_PATH=$ONNXRUNTIME_DIR/lib:$LD_LIBRARY_PATH" >> ~/.bashrc
source ~/.bashrc
1.2 build mmdeploy
cd /the/root/path/of/MMDeploy
export MMDEPLOY_DIR=$(pwd)
mkdir -p build && cd build
cmake -DCMAKE_CXX_COMPILER=g++ -DMMDEPLOY_TARGET_BACKENDS=ort -DONNXRUNTIME_DIR=${ONNXRUNTIME_DIR} ..
make -j$(nproc) && make install
输出
(py3) xp@hello:/media/xp/data/pydoc/mmlab/mmdeploy/build$ cmake -DCMAKE_CXX_COMPILER=g++ -DMMDEPLOY_TARGET_BACKENDS=ort -DONNXRUNTIME_DIR=${ONNXRUNTIME_DIR} ..
-- CMAKE_INSTALL_PREFIX: /media/xp/data/pydoc/mmlab/mmdeploy/build/install
-- Build ONNXRUNTIME custom ops.
-- Configuring done
-- Generating done
-- Build files have been written to: /media/xp/data/pydoc/mmlab/mmdeploy/build
(py3) xp@hello:/media/xp/data/pydoc/mmlab/mmdeploy/build$ make -j$(nproc) && make install
[ 12%] Building CXX object csrc/mmdeploy/backend_ops/onnxruntime/CMakeFiles/mmdeploy_onnxruntime_ops_obj.dir/common/ort_utils.cpp.o
[ 25%] Building CXX object csrc/mmdeploy/backend_ops/onnxruntime/CMakeFiles/mmdeploy_onnxruntime_ops_obj.dir/grid_sample/grid_sample.cpp.o
[ 37%] Building CXX object csrc/mmdeploy/backend_ops/onnxruntime/CMakeFiles/mmdeploy_onnxruntime_ops_obj.dir/modulated_deform_conv/modulated_deform_conv.cpp.o
[ 50%] Building CXX object csrc/mmdeploy/backend_ops/onnxruntime/CMakeFiles/mmdeploy_onnxruntime_ops_obj.dir/nms_match/nms_match.cpp.o
[ 62%] Building CXX object csrc/mmdeploy/backend_ops/onnxruntime/CMakeFiles/mmdeploy_onnxruntime_ops_obj.dir/nms_rotated/nms_rotated.cpp.o
[ 75%] Building CXX object csrc/mmdeploy/backend_ops/onnxruntime/CMakeFiles/mmdeploy_onnxruntime_ops_obj.dir/onnxruntime_register.cpp.o
[ 87%] Building CXX object csrc/mmdeploy/backend_ops/onnxruntime/CMakeFiles/mmdeploy_onnxruntime_ops_obj.dir/roi_align_rotated/roi_align_rotated.cpp.o
[ 87%] Built target mmdeploy_onnxruntime_ops_obj
[100%] Linking CXX shared library ../../../../lib/libmmdeploy_onnxruntime_ops.so
[100%] Built target mmdeploy_onnxruntime_ops
Consolidate compiler generated dependencies of target mmdeploy_onnxruntime_ops_obj
[ 87%] Built target mmdeploy_onnxruntime_ops_obj
[100%] Built target mmdeploy_onnxruntime_ops
Install the project...
-- Install configuration: "Release"
-- Installing: /media/xp/data/pydoc/mmlab/mmdeploy/mmdeploy/lib/libmmdeploy_onnxruntime_ops.so
-- Set runtime path of "/media/xp/data/pydoc/mmlab/mmdeploy/mmdeploy/lib/libmmdeploy_onnxruntime_ops.so" to "$ORIGIN"
1.3 install model converter
到mmdeploy的根目录下执行
mim install -e .
输出
Downloading grpcio-1.62.2-cp38-cp38-manylinux_2_17_x86_64.manylinux2014_x86_64.whl (5.6 MB)
   ━━━━━━━━━━━━━━━━━━━━━━━━━━━━━━━━━━━━━━━━ 5.6/5.6 MB 599.6 kB/s eta 0:00:00
Downloading multiprocess-0.70.16-py38-none-any.whl (132 kB)
   ━━━━━━━━━━━━━━━━━━━━━━━━━━━━━━━━━━━━━━━ 132.6/132.6 kB 673.0 kB/s eta 0:00:00
Downloading prettytable-3.10.0-py3-none-any.whl (28 kB)
Downloading terminaltables-3.1.10-py2.py3-none-any.whl (15 kB)
Downloading dill-0.3.8-py3-none-any.whl (116 kB)
   ━━━━━━━━━━━━━━━━━━━━━━━━━━━━━━━━━━━━━━━ 116.3/116.3 kB 799.7 kB/s eta 0:00:00
Downloading wcwidth-0.2.13-py2.py3-none-any.whl (34 kB)
Installing collected packages: wcwidth, aenum, terminaltables, protobuf, prettytable, grpcio, dill, multiprocess, mmdeploy
  Attempting uninstall: protobuf
    Found existing installation: protobuf 3.20.3
    Uninstalling protobuf-3.20.3:
      Successfully uninstalled protobuf-3.20.3
  Running setup.py develop for mmdeploy
Successfully installed aenum-3.1.15 dill-0.3.8 grpcio-1.62.2 mmdeploy-1.3.1 multiprocess-0.70.16 prettytable-3.10.0 protobuf-3.20.2 terminaltables-3.1.10 wcwidth-0.2.13
2 模型转换
2.1 deploy用法
python ./tools/deploy.py \
    ${DEPLOY_CFG_PATH} \
    ${MODEL_CFG_PATH} \
    ${MODEL_CHECKPOINT_PATH} \
    ${INPUT_IMG} \
    --test-img ${TEST_IMG} \
    --work-dir ${WORK_DIR} \
    --calib-dataset-cfg ${CALIB_DATA_CFG} \
    --device ${DEVICE} \
    --log-level INFO \
    --show \
    --dump-info
参数描述
deploy_cfg : mmdeploy 针对此模型的部署配置,包含推理框架类型、是否量化、输入 shape 是否动态等。配置文件之间可能有引用关系,configs/mmpretrain/classification_ncnn_static.py 是一个示例。
model_cfg : mm 算法库的模型配置,例如 mmpretrain/configs/vision_transformer/vit-base-p32_ft-64xb64_in1k-384.py,与 mmdeploy 的路径无关。
checkpoint : torch 模型路径。可以 http/https 开头,详见 mmcv.FileClient 的实现。
img : 模型转换时,用做测试的图像或点云文件路径。
–test-img : 用于测试模型的图像文件路径。默认设置成None。
–work-dir : 工作目录,用来保存日志和模型文件。
–calib-dataset-cfg : 此参数只有int8模式下生效,用于校准数据集配置文件。若在int8模式下未传入参数,则会自动使用模型配置文件中的’val’数据集进行校准。
–device : 用于模型转换的设备。 默认是cpu,对于 trt 可使用 cuda:0 这种形式。
–log-level : 设置日记的等级,选项包括’CRITICAL’, ‘FATAL’, ‘ERROR’, ‘WARN’, ‘WARNING’, ‘INFO’, ‘DEBUG’, ‘NOTSET’。 默认是INFO。
–show : 是否显示检测的结果。
–dump-info : 是否输出 SDK 信息。
2.2 示例
python tools/deploy.py \
configs/mmpretrain/classification_onnxruntime_static.py \
../mmpretrain/z_my_config/my_mobilenetv3.py \
../mmpretrain/work_dirs/my_mobilenetv3/epoch_150.pth \
/media/xp/data/image/deep_image/mini_cat_and_dog/val/cat/9835.jpg
(py3) xp@hello:/media/xp/data/pydoc/mmlab/mmdeploy$ python tools/deploy.py configs/mmpretrain/classification_onnxruntime_static.py ../mmpretrain/z_my_config/my_mobilenetv3.py ../mmpretrain/work_dirs/my_mobilenetv3/epoch_150.pth /media/xp/data/image/deep_image/mini_cat_and_dog/val/cat/9835.jpg
04/23 15:08:13 - mmengine - INFO - Start pipeline mmdeploy.apis.pytorch2onnx.torch2onnx in subprocess
04/23 15:08:13 - mmengine - WARNING - Failed to search registry with scope "mmpretrain" in the "Codebases" registry tree. As a workaround, the current "Codebases" registry in "mmdeploy" is used to build instance. This may cause unexpected failure when running the built modules. Please check whether "mmpretrain" is a correct scope, or whether the registry is initialized.
04/23 15:08:13 - mmengine - WARNING - Failed to search registry with scope "mmpretrain" in the "mmpretrain_tasks" registry tree. As a workaround, the current "mmpretrain_tasks" registry in "mmdeploy" is used to build instance. This may cause unexpected failure when running the built modules. Please check whether "mmpretrain" is a correct scope, or whether the registry is initialized.
/home/xp/anaconda3/envs/py3/lib/python3.8/site-packages/mmcv/cnn/bricks/hsigmoid.py:35: UserWarning: In MMCV v1.4.4, we modified the default value of args to align with PyTorch official. Previous Implementation: Hsigmoid(x) = min(max((x + 1) / 2, 0), 1). Current Implementation: Hsigmoid(x) = min(max((x + 3) / 6, 0), 1).
  warnings.warn(
Loads checkpoint by local backend from path: ../mmpretrain/work_dirs/my_mobilenetv3/epoch_150.pth
04/23 15:08:13 - mmengine - WARNING - DeprecationWarning: get_onnx_config will be deprecated in the future.
04/23 15:08:13 - mmengine - INFO - Export PyTorch model to ONNX: /media/xp/data/pydoc/mmlab/mmdeploy/end2end.onnx.
04/23 15:08:13 - mmengine - INFO - Execute onnx optimize passes.
04/23 15:08:13 - mmengine - INFO - Finish pipeline mmdeploy.apis.pytorch2onnx.torch2onnx
04/23 15:08:13 - mmengine - INFO - Start pipeline mmdeploy.apis.utils.utils.to_backend in main process
04/23 15:08:13 - mmengine - INFO - Finish pipeline mmdeploy.apis.utils.utils.to_backend
04/23 15:08:13 - mmengine - INFO - visualize onnxruntime model start.
04/23 15:08:15 - mmengine - WARNING - Failed to search registry with scope "mmpretrain" in the "Codebases" registry tree. As a workaround, the current "Codebases" registry in "mmdeploy" is used to build instance. This may cause unexpected failure when running the built modules. Please check whether "mmpretrain" is a correct scope, or whether the registry is initialized.
04/23 15:08:15 - mmengine - WARNING - Failed to search registry with scope "mmpretrain" in the "mmpretrain_tasks" registry tree. As a workaround, the current "mmpretrain_tasks" registry in "mmdeploy" is used to build instance. This may cause unexpected failure when running the built modules. Please check whether "mmpretrain" is a correct scope, or whether the registry is initialized.
04/23 15:08:15 - mmengine - WARNING - Failed to search registry with scope "mmpretrain" in the "backend_classifiers" registry tree. As a workaround, the current "backend_classifiers" registry in "mmdeploy" is used to build instance. This may cause unexpected failure when running the built modules. Please check whether "mmpretrain" is a correct scope, or whether the registry is initialized.
04/23 15:08:15 - mmengine - INFO - Successfully loaded onnxruntime custom ops from /media/xp/data/pydoc/mmlab/mmdeploy/mmdeploy/lib/libmmdeploy_onnxruntime_ops.so
04/23 15:08:15 - mmengine - INFO - visualize onnxruntime model success.
04/23 15:08:15 - mmengine - INFO - visualize pytorch model start.
04/23 15:08:16 - mmengine - WARNING - Failed to search registry with scope "mmpretrain" in the "Codebases" registry tree. As a workaround, the current "Codebases" registry in "mmdeploy" is used to build instance. This may cause unexpected failure when running the built modules. Please check whether "mmpretrain" is a correct scope, or whether the registry is initialized.
04/23 15:08:16 - mmengine - WARNING - Failed to search registry with scope "mmpretrain" in the "mmpretrain_tasks" registry tree. As a workaround, the current "mmpretrain_tasks" registry in "mmdeploy" is used to build instance. This may cause unexpected failure when running the built modules. Please check whether "mmpretrain" is a correct scope, or whether the registry is initialized.
/home/xp/anaconda3/envs/py3/lib/python3.8/site-packages/mmcv/cnn/bricks/hsigmoid.py:35: UserWarning: In MMCV v1.4.4, we modified the default value of args to align with PyTorch official. Previous Implementation: Hsigmoid(x) = min(max((x + 1) / 2, 0), 1). Current Implementation: Hsigmoid(x) = min(max((x + 3) / 6, 0), 1).
  warnings.warn(
Loads checkpoint by local backend from path: ../mmpretrain/work_dirs/my_mobilenetv3/epoch_150.pth
04/23 15:08:17 - mmengine - INFO - visualize pytorch model success.
04/23 15:08:17 - mmengine - INFO - All process success.
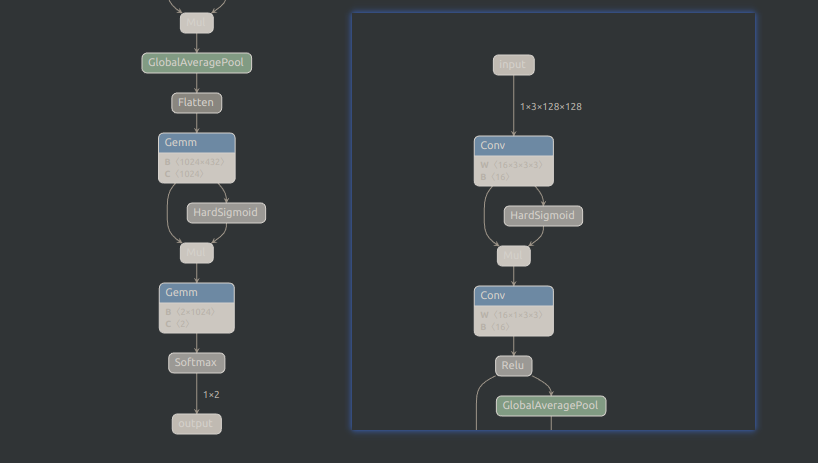
输出一个end2end.onnx
用netron打开来看一切正常


 403
403

 被折叠的 条评论
为什么被折叠?
被折叠的 条评论
为什么被折叠?
 到【灌水乐园】发言


