使用platformio平台Arduino开发ESP32-C2

使用platformio平台Arduino开发ESP32-C2

有两种方法,推荐方法二。

方法一:

  1. 安装vscode后安装platformio插件

(参考:Your Gateway to Embedded Software Development Excellence · PlatformIO

安装时,需要可靠的网络链接。

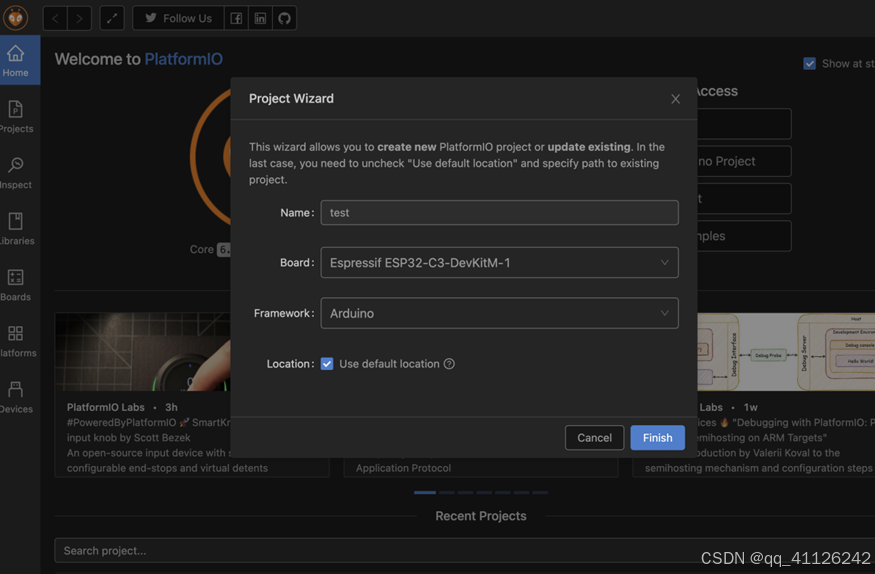
  1. 使用platformio创建一个esp32-c3项目(platform io平台默认没有esp32-c2 board)

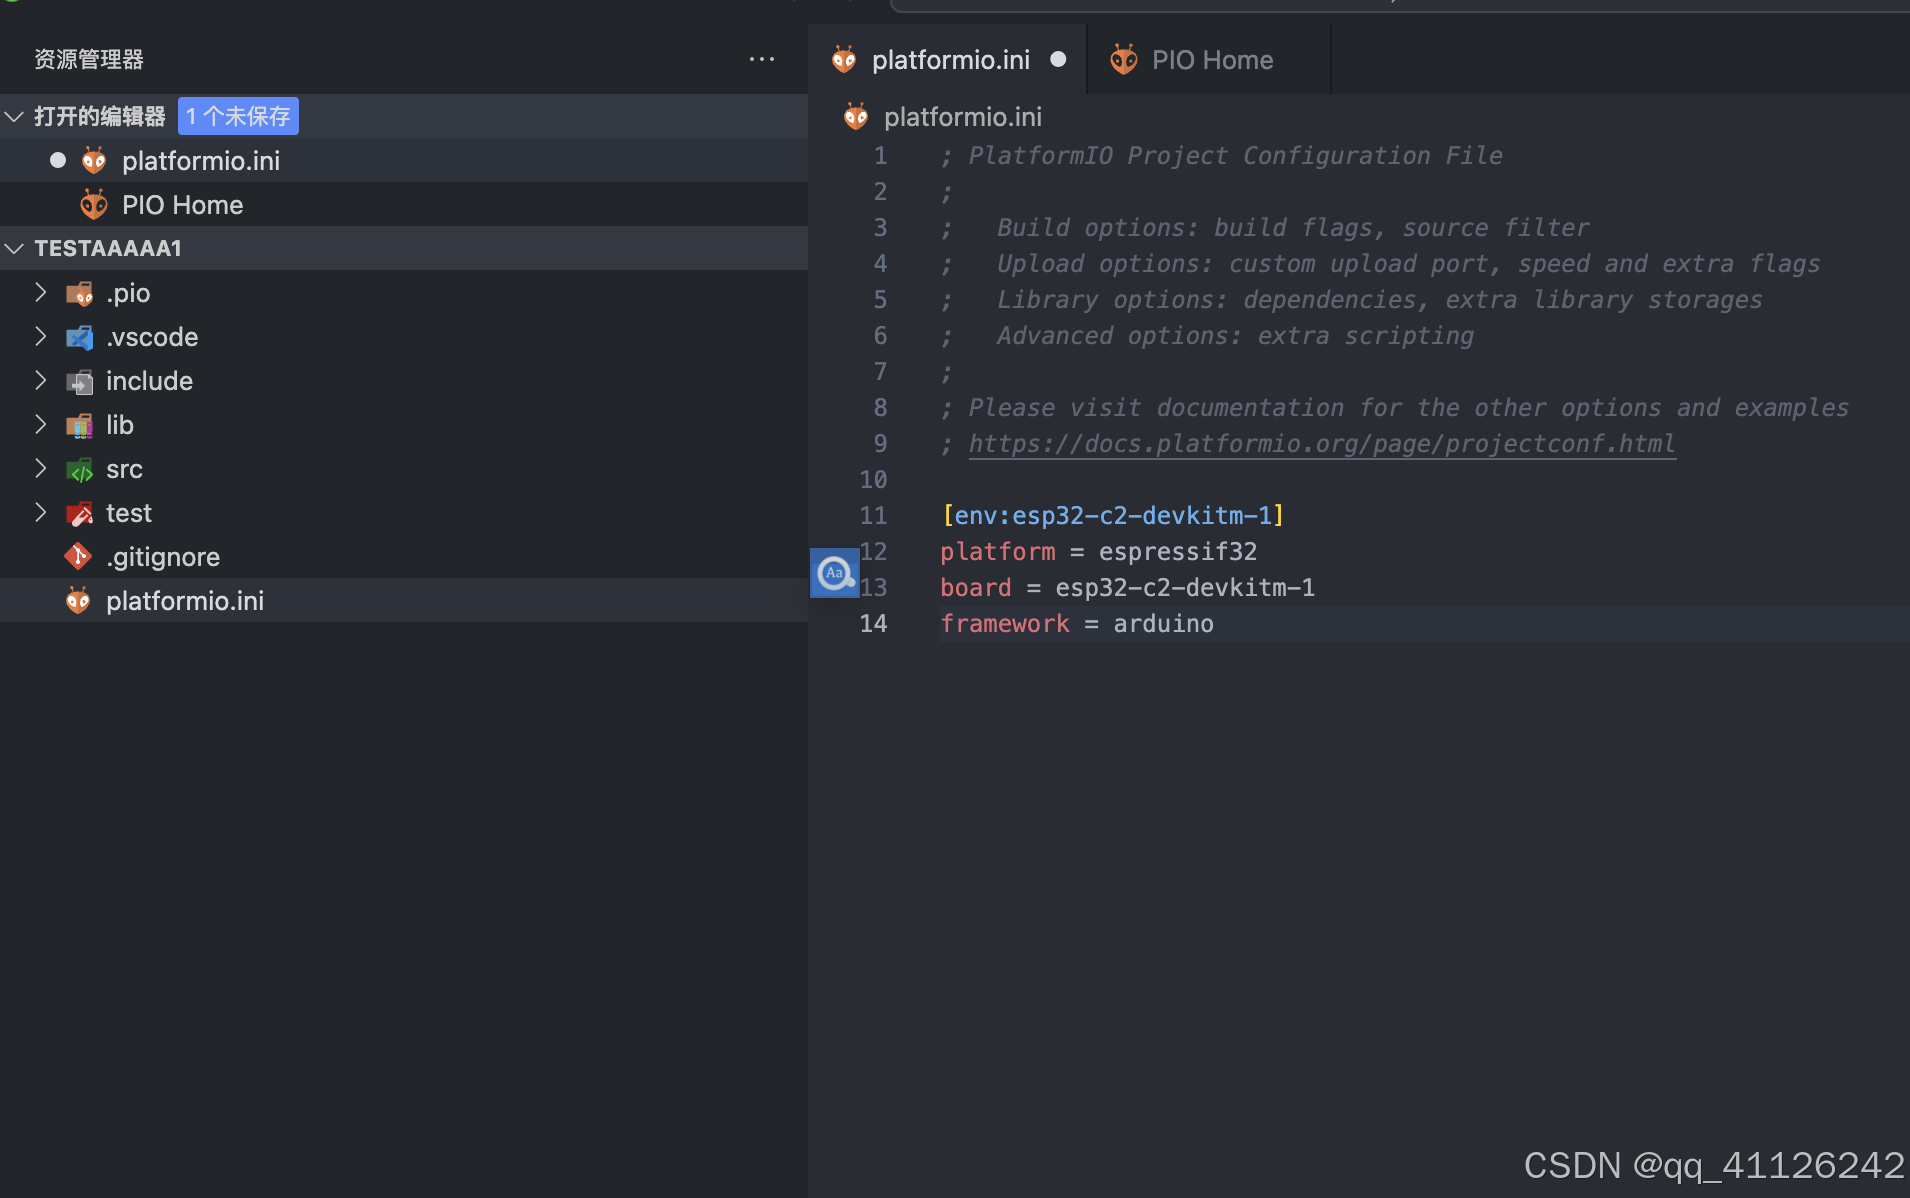
  1. 进入项目目录打开platformio.ini文件将其中配置配件中的platform 改为:
  1. = https://github.com/Jason2866/-espressif32.git#Arduino/IDF5

  1. 保存,平台会自动下载依赖,等待下载完成可将platform.ini文件改成以下配置

[env:esp32-c2-devkitm-1]
platform = espressif32
board = esp32-c2-devkitm-1
framework = arduino

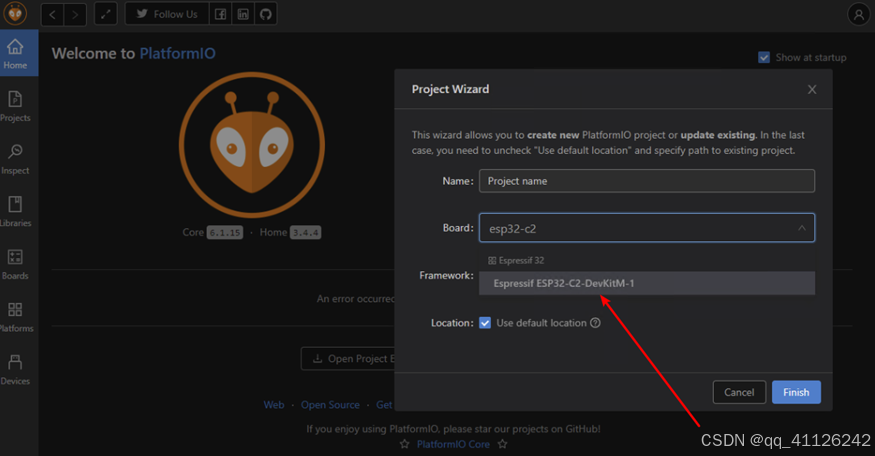
  1. 编译测试,上述步骤只需设置一次,以后创建项目可以直接选择esp32-c2

方法二

  1. 直接克隆github仓库或者使用百度网盘下载

github仓库:https://github.com/Jason2866/platform-espressif32.git

链接: https://pan.baidu.com/s/1cdzgmmKW_PgrOlMPDIOVKA 提取码: doit

  1. 将文件解压至platformio根目录platforms文件夹中C:/用户/你的用户/.platformio/platforms/,如果只安装了插件,目录中可能没有platforms文件夹,需要自己创建
  2. 用vscode打开下载文件夹中的examples/arduino-blink目录将platform.ini文件改为以下,保存,等待安装依赖工具。

[env:esp32-c2-devkitm-1]

platform = espressif32

board = esp32-c2-devkitm-1

framework = arduino

  1. 重新打开vscode,使用platformio创建项目搜索esp32-c2选择c2开发板

问题记录

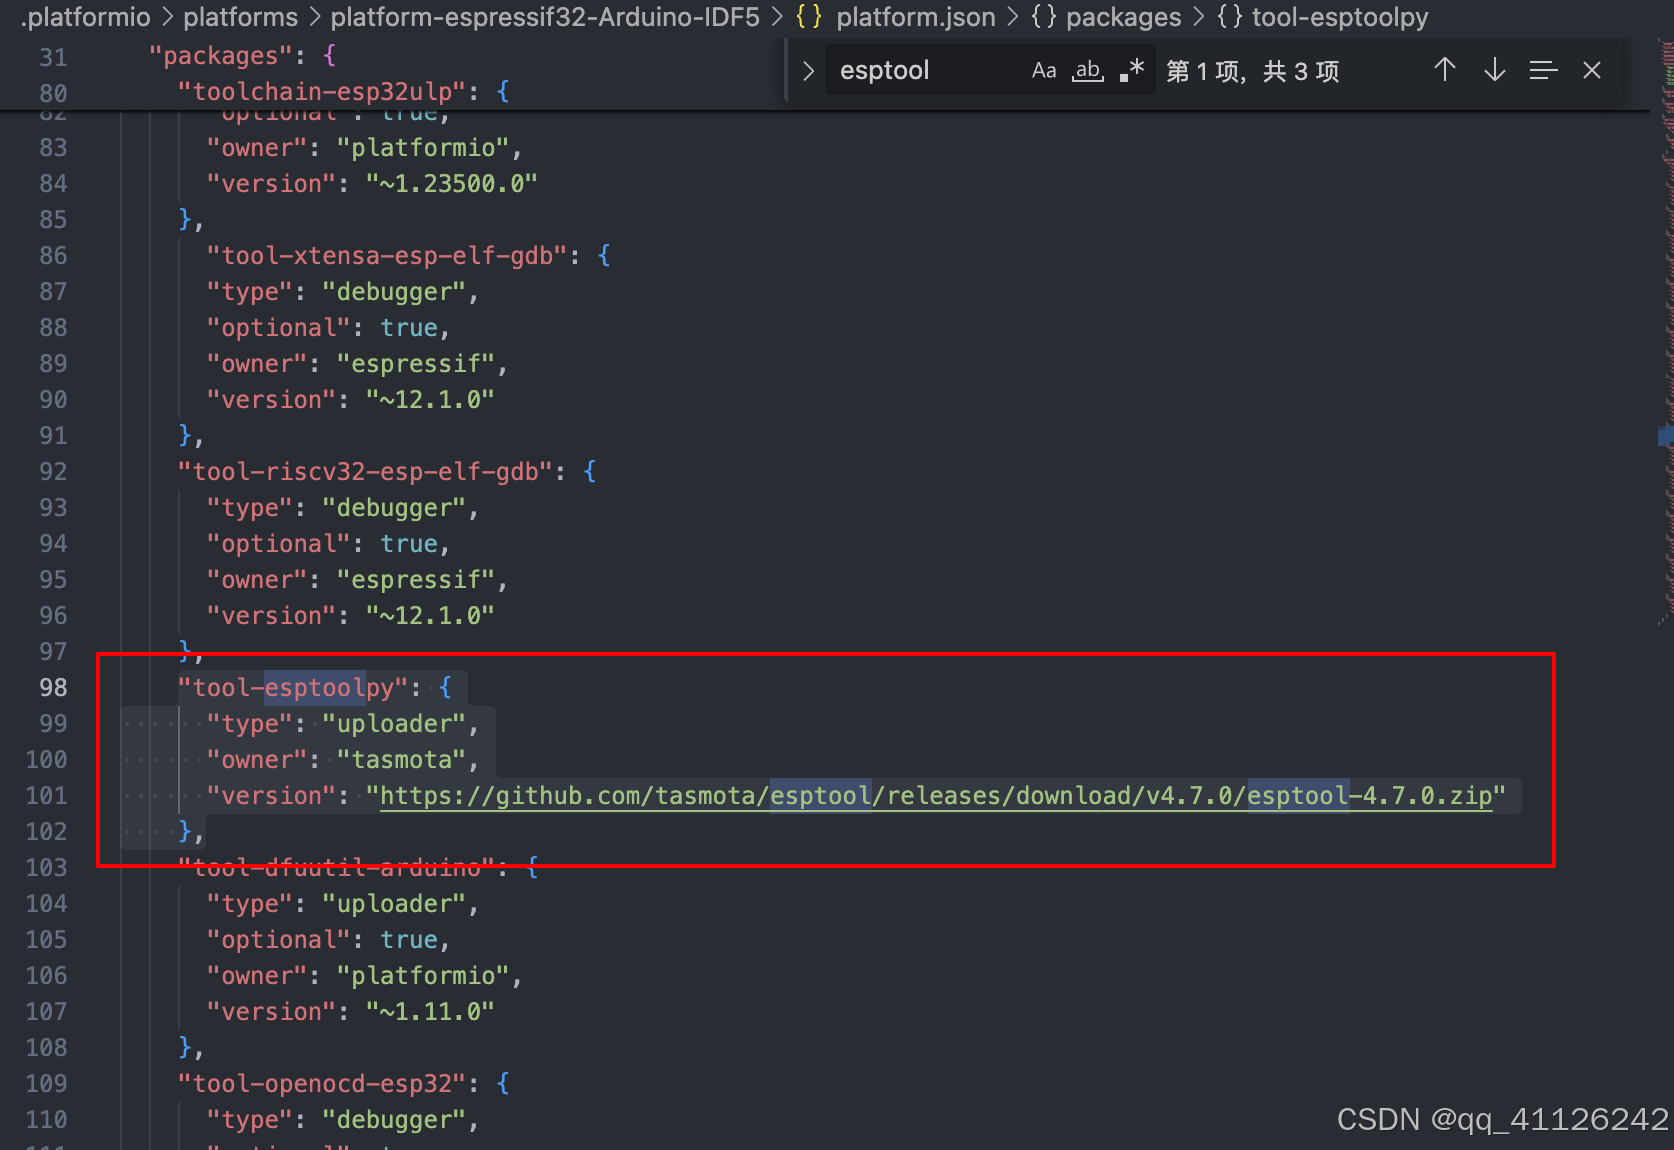
测试过程发现烧录完后程序不执行,将esptool版本降到4.7.0后正常

解决过程:

  1. 打开目录/Users/shangxin/.platformio/platforms/platform-espressif32-Arduino-IDF5中的platform.json文件(使用第一种方法是espressif32目录)
  2. Ctrl+F搜索esptool,修改如下

  • "tool-esptoolpy": {
          "type": "uploader",
          "owner": "tasmota",
          "version": "https://github.com/tasmota/esptool/releases/download/v4.7.3/esptool.zip"
        },

    修改为:
    "tool-esptoolpy": {
          "type": "uploader",
          "owner": "tasmota",
          "version": "https://github.com/tasmota/esptool/releases/download/v4.7.0/esptool-4.7.0.zip"
        },
      
  1. 重新编译、烧录
### ESP32-C2 Arduino 开发教程 #### 环境搭建 对于ESP32-C2Arduino开发环境搭建,推荐使用PlatformIO作为集成开发环境(IDE),这能极大简化配置过程并提供良好的跨平台支持[^1]。 - **安装PlatformIO** 如果尚未安装PlatformIO,则可以通过Visual Studio Code (VSCode)插件市场来获取。安装完毕后,在VSCode内打开命令面板(`Ctrl+Shift+P`)输入`PIO: New Project`创建新项目。按照提示选择框架为`Arduino`, 平台为`Espressif 32`以及具体的板子型号如`ESP32-C2`. - **初始化工程结构** 创建的新工程项目会自动生成必要的文件夹和配置文件,其中包括用于编写源码的`.ino`文件。此时可以开始着手准备自己的应用程序逻辑了。 ```cpp // main.cpp or your .ino file content here. void setup() { Serial.begin(115200); } void loop() { delay(1000); // Wait for a second } ``` #### 示例代码:基础LED闪烁程序 下面给出一段简单的示例代码用来验证开发环境是否正常工作。这段代码会让连接到GPIO Pin上的LED每隔一秒亮灭一次。 ```cpp const int ledPin = LED_BUILTIN; // Define the pin number where LED is connected. void setup() { pinMode(ledPin, OUTPUT); // Set up digital pin as output mode. digitalWrite(ledPin, LOW); // Initially turn off the LED. } void loop() { digitalWrite(ledPin, HIGH); // Turn on the LED by setting voltage high. delay(1000); // Keep it lit for one second. digitalWrite(ledPin, LOW); // Then set low to switch off again. delay(1000); // And wait another second before repeating cycle. } ``` 上述操作完成后上传代码至设备即可观察效果。如果一切顺利的话应该能看到外接或者内置的LED灯随着设定的时间间隔规律性的点亮熄灭。 #### 进一步学习资源链接 除了官方文档之外还有许多社区贡献的内容可以帮助加深理解如何利用ESP32-C2进行更复杂的应用开发- [ESP-IDF Programming Guide](https://docs.espressif.com/projects/esp-idf/en/latest/) 提供了深入的技术细节说明。 - GitHub上也有很多开源项目可供参考实践案例研究。
评论 1
添加红包

请填写红包祝福语或标题

红包个数最小为10个

红包金额最低5元

当前余额3.43前往充值 >
需支付:10.00
成就一亿技术人!
领取后你会自动成为博主和红包主的粉丝 规则
hope_wisdom
发出的红包
实付
使用余额支付
点击重新获取
扫码支付
钱包余额 0

抵扣说明:

1.余额是钱包充值的虚拟货币,按照1:1的比例进行支付金额的抵扣。
2.余额无法直接购买下载,可以购买VIP、付费专栏及课程。

余额充值