


 本文详细介绍了如何利用nginx搭建rtmp和http-flv流媒体服务器,包括项目需求、基础概念、服务器搭建、拉流推流、http-flv推流等步骤。在配置过程中,通过ffmpeg将rtsp流转化为rtmp流推送到nginx服务器,解决了可能出现的花屏问题,最后探讨了画面延迟的优化方案。
*免责声明:
1\此方法仅提供参考
2\搬了其他博主的操作方法,以贴上路径.
3*
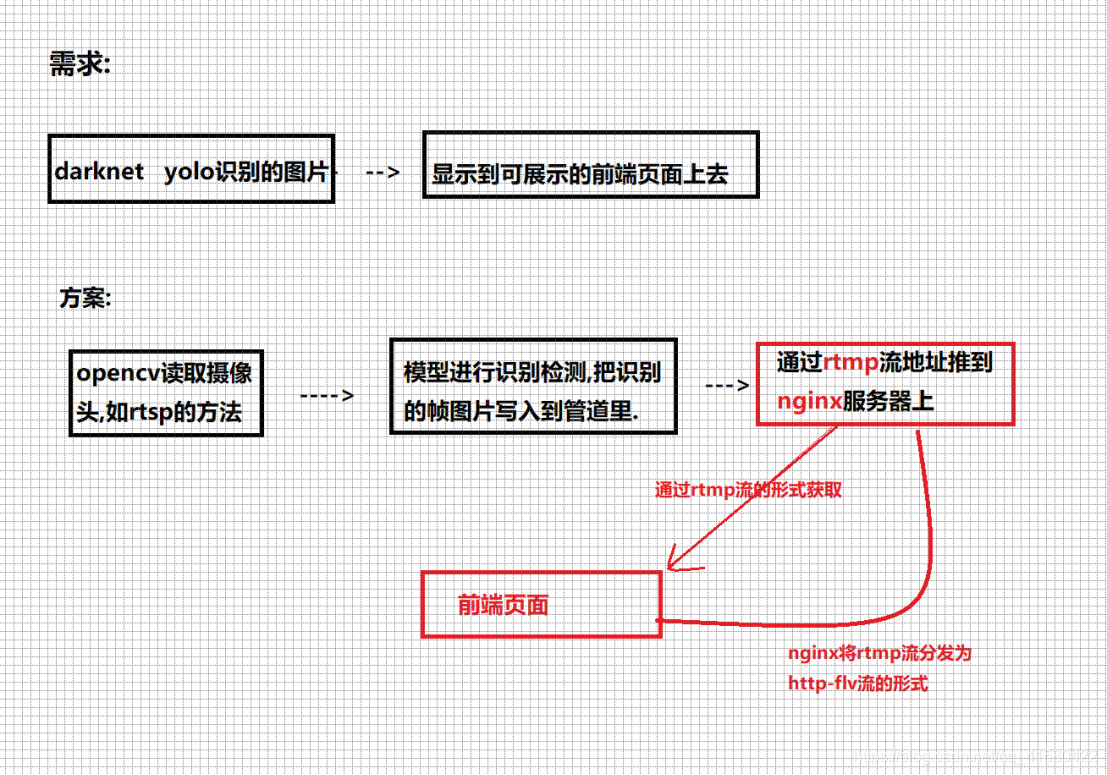
场景一:项目需求介绍
场景二:基础知识点介绍
场景三:nginx+rtmp流媒体服务器搭建
场景四:拉流和推流
场景五:nginx+http-flv的推流
.
.
.
场景一:项目需求介绍
rtmp在线测试地址:http://cloud.liveqing.com:10080/#/liveplayer(需要加载flash插件)
http-flv在线测试地址:http://bilibili.github.io/flv.js/demo/(不需要flash插件)
场景二:基础知识点介绍
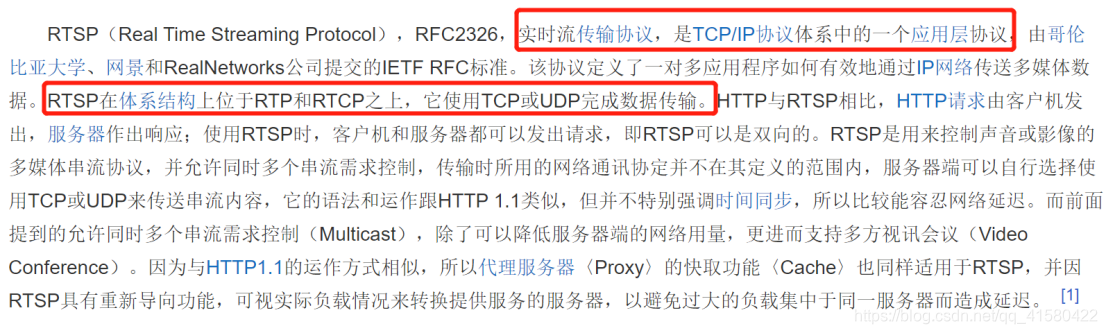
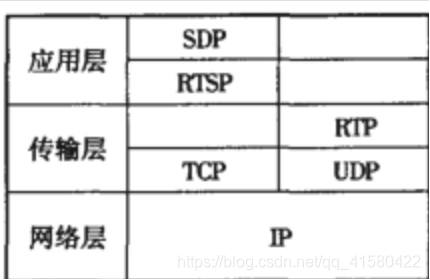
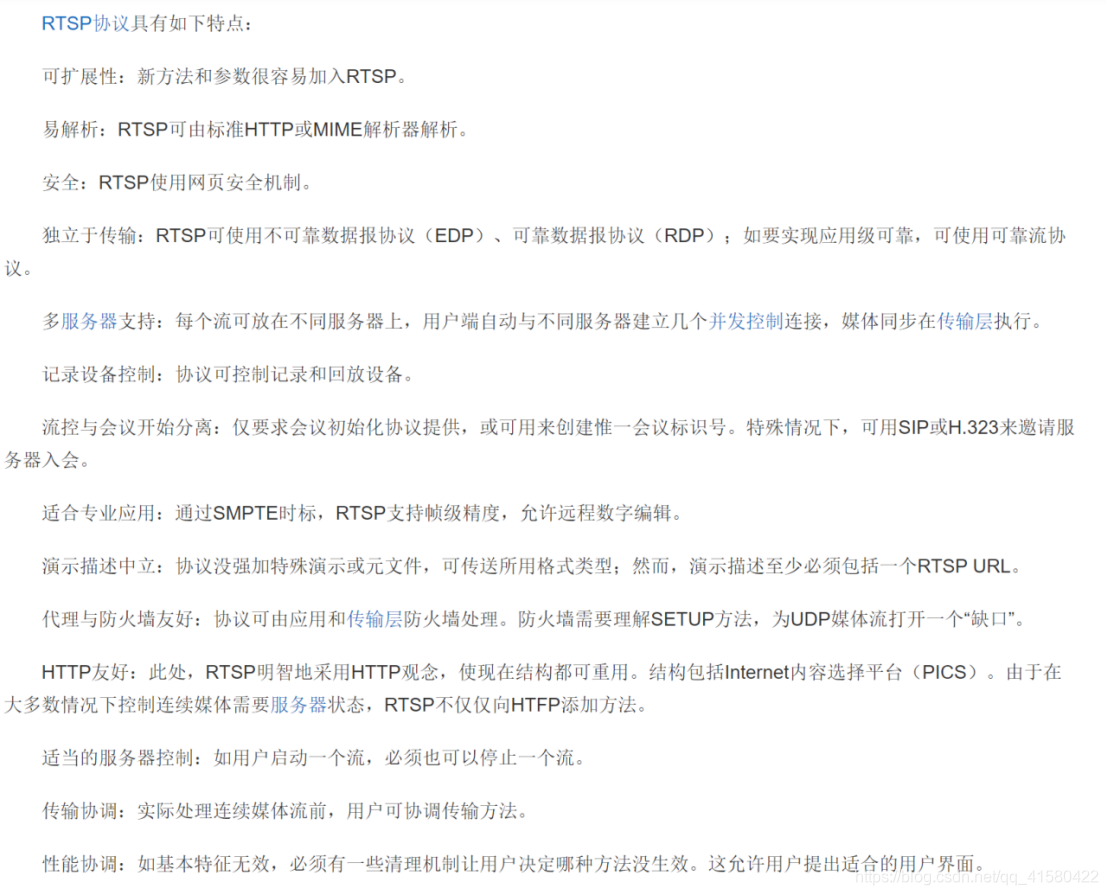
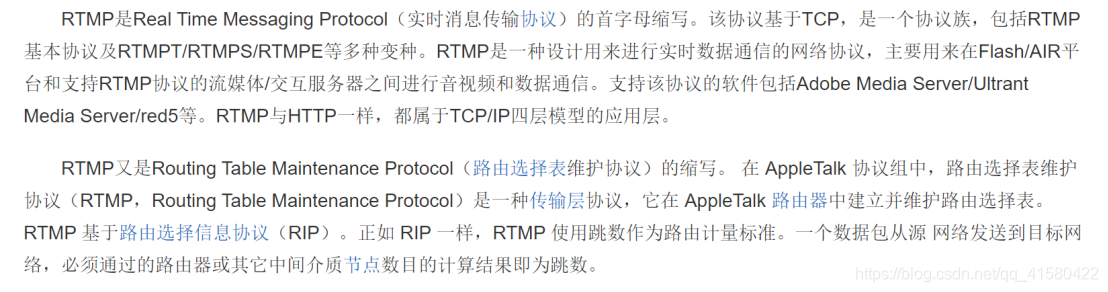
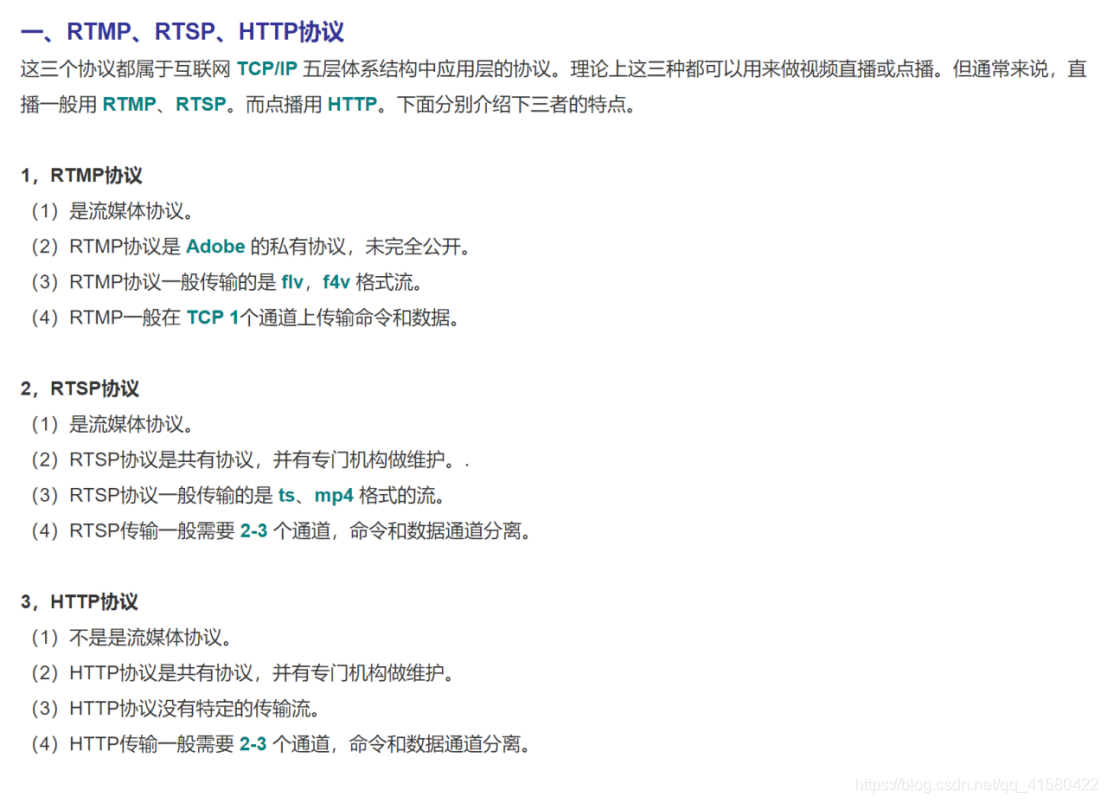
1.1 RTSP
1.2 RTMP
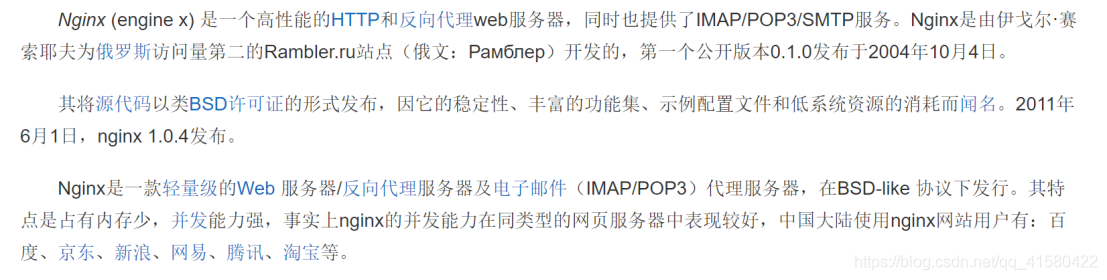
1.3 nginx
场景三:nginx+rtmp流媒体服务器搭建
1.1 简介
Nginx本身是一个非常出色的HTTP服务器,FFMPEG是非常好的音视频解决方案。这两个东西通过一个nginx的模块nginx-rtmp-module,组合在一起即可以搭建一个功能相对比较完善的流媒体服务器.。这个流媒体服务器可以支持RTMP和HLS(Live
Http Stream)。
1.2 下载源码
步骤一: 创建nginx文件夹,切换到该文件夹下
下载 nginx-rtmp-module
命令: git clone https://github.com/arut/nginx-rtmp-module.git
步骤二: 下载nginx并解压,建议下载高版本的,编译无误。低版本的编译时候可能出现各种各样的错误。
  命令:  wget http://nginx.org/download/nginx-1.14.2.tar.gz
         tar -zxvf nginx-1.14.2.tar.gz
1.3 安装依赖
sudo apt-get update
sudo apt-get install libpcre3 libpcre3-dev
sudo apt-get install openssl libssl-dev
1.4 编译
cd nginx-1.14.2/ # 进入nginx的目录下
./configure --add-module=../nginx-rtmp-module
make
make install
1.5 运行
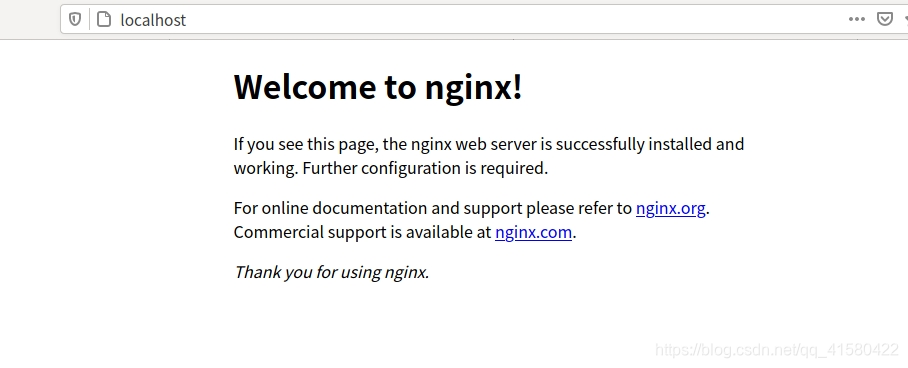
进入安装目录/usr/local/nginx,运行命令
sudo ./sbin/nginx,
nginx重启命令为sudo ./sbin/nginx -s reload查看部署是否成功!
cd  /usr/local/nginx
sudo ./sbin/nginx
如果出现下面情况说明80端口被占用,
释放端口命令:sudo fuser -k 80/tcp
然后重新运行sudo ./sbin/nginx

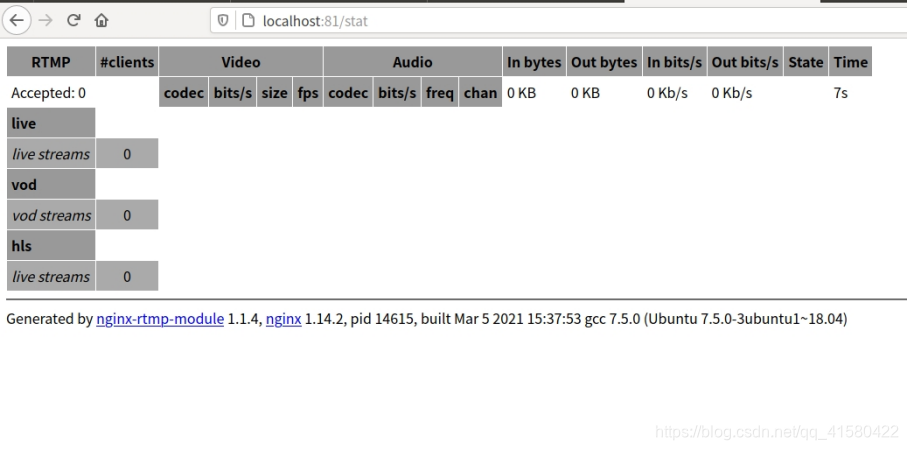
运行以后打开浏览器输入localhost:80
1.6 配置rtmp(直播)
配置文件说明:
这时候你会发现其实可能有多个nginx.conf文件
.
1:你自己创建的nginx/nginx-1.14.2/conf/nginx.conf 这是nginx自身的;
.
2: nginx/nginx-rtmp-module/test/nginx.conf 这是使用rtmp的话官方提供修改好以后的配置文件.
.
3: /usr/local/nginx/conf/nginx.conf 这是你make出来的好像,我们要修改是这个配置文件,修改前面2个是没有用的。
这里其实也不需要自己修改,就用第二个配置文件,把配置文件复制到第三个里面,修改配置完以后,重新启动
sudo /usr/local/nginx/sbin/nginx -s reload如果重启不了就杀死端口号再重新运行。还是在下面挂一下配置文件吧。
worker_processes 1;
error_log logs/error.log debug;
events {
worker_connections 1024;
}
rtmp {
server {
listen 1935;
application myapp {
live on;
#record keyframes;
#record_path /tmp;
#record_max_size 128K;
#record_interval 30s;
#record_suffix .this.is.flv;
#on_publish http://localhost:8080/publish;
#on_play http://localhost:8080/play;
#on_record_done http://localhost:8080/record_done;
}
}
}
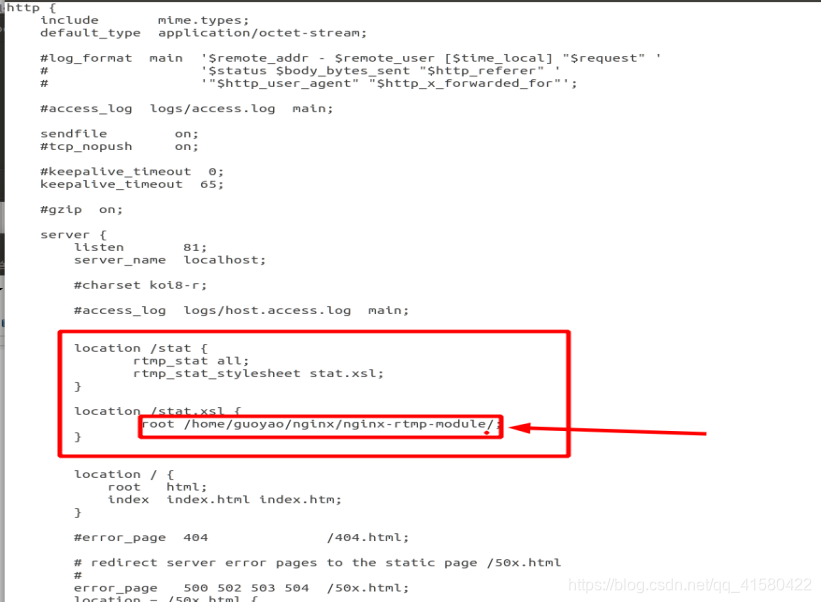
http {
server {
listen 81;
location /stat {
rtmp_stat all;
rtmp_stat_stylesheet stat.xsl;
}
location /stat.xsl {
root /path/to/nginx-rtmp-module/;
}
location /control {
rtmp_control all;
}
#location /publish {
# return 201;
#}
#location /play {
# return 202;
#}
#location /record_done {
# return 203;
#}
location /rtmp-publisher {
root /path/to/nginx-rtmp-module/test;
}
location / {
root /path/to/nginx-rtmp-module/test/www;
}
}
}
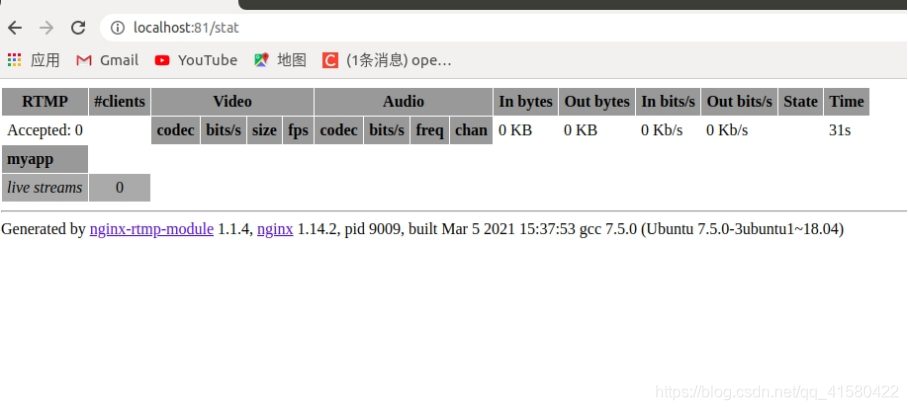
端口我修改以后是81,在浏览器中输入 localhost:81/stat 就会出来结果,其中stat是location中定义的
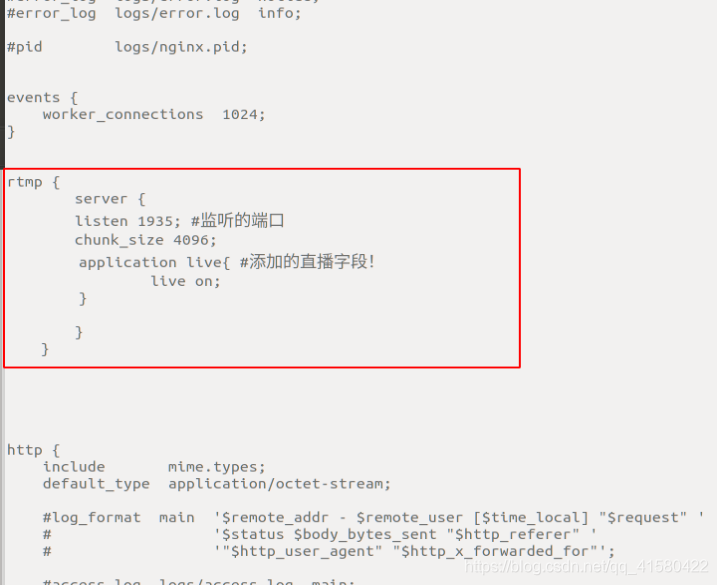
1.7 可选配置视频与直播回看的支持
视频
#rtmp配置
rtmp {
     server {
        listen 1935; #监听服务端口
        chunk_size 4096; # 数据传输块的大小

        application vod {
                play /darknet4/data/vod;#视频文件的存放位置
        }
        }
}
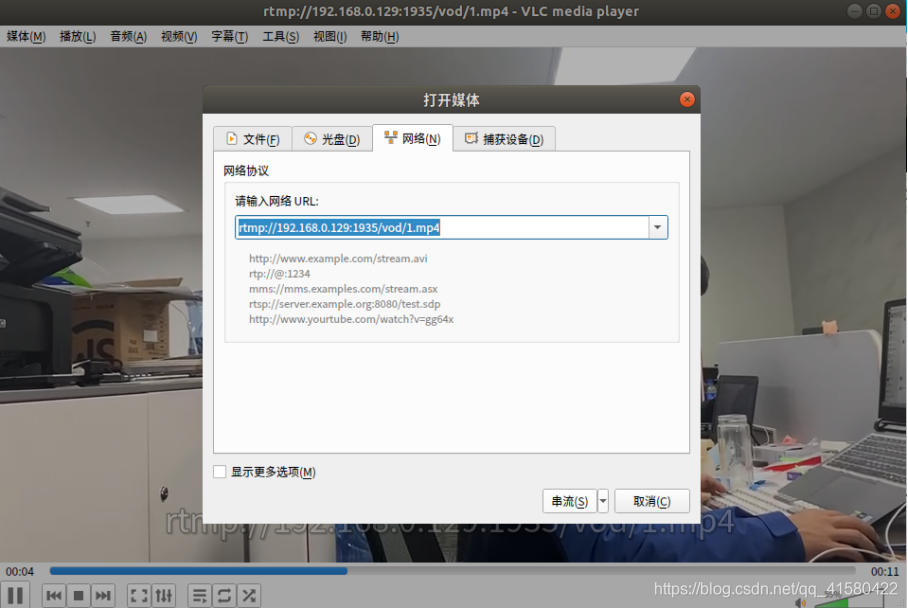
在配置目录 /darknet4/data/vod;放一个视频文件,放好之后重启Nginx服务器!
使用vlc播放器,输入rtmp://192.168.0.129:1935/vod/1.mp4 (这里的ip换为你的)
支持回看的视频直播
# rtmp配置
application hls{ #添加的直播字段!
                live on;
                hls on; # 这个参数把直播服务器改造为实时回放服务器。
                wait_key on; #对视频切片服务器进行保护,这样就不会产生马赛克了!
                hls_path  /darknet4/data/hls;#切片视频文件存放位置
                hls_fragment 600s; #设置HLS片段长度
                hls_playlist_length 10m; #设置HLS播放列表长度,这里设置的是10分钟
                hls_continuous on; #连续模式。
                hls_cleanup on; #对多余的切片进行删除。
                hls_nested on; #嵌套模式:
        }

        #在 http 配置中增加一个location
         location /hls {
                types {
                        application/vnd.apple.mpegurl m3u8;
                        video/mp2t ts;
                }
                alias  /darknet4/data/hls;
                expires -1;
                add_header Cache-Control no-cache;
                add_header Access-Control-Allow-Origin *;
        }
配置完以后,重启命令sudo /usr/local/nginx/sbin/nginx -s reload
浏览器输入: localhost:81/stat
场景四:拉流和推流
1.1 基础拉推
我们采用rtsp拉取网络摄像头,然后通过rtmp把流推到nginx服务器上,然后可以用vlc去看一下我们拉的流的情况。
# 需先自行安装FFmpeg,并添加环境变量
import cv2
import subprocess

#rtsp ="rtsp://192.168.0.116:8554/live"
#rtsp ="rtsp://admin:weeks123456@198.190.0.164:554"  #这是海康摄像头
rtmp = 'rtmp://localhost:1935/live/test'
cap = cv2.VideoCapture(0)

size = (int(cap.get(cv2.CAP_PROP_FRAME_WIDTH)), int(cap.get(cv2.CAP_PROP_FRAME_HEIGHT)))
sizeStr = str(size[0]) + 'x' + str(size[1])
command = ['ffmpeg',
    '-y', '-an',
    '-f', 'rawvideo',
    '-vcodec','rawvideo',
    '-pix_fmt', 'bgr24',
    '-s', sizeStr,
    '-r', '25',
    '-i', '-',
    '-c:v', 'libx264',
    '-pix_fmt', 'yuv420p',
    '-preset', 'ultrafast',
    '-f', 'flv',
    rtmp]
pipe = subprocess.Popen(command, shell=False, stdin=subprocess.PIPE
)
while cap.isOpened():
    success, frame = cap.read()
    if success:
        if cv2.waitKey(1) & 0xFF == ord('q'):
            break
        pipe.stdin.write(frame.tostring())
cap.release()
pipe.terminate()
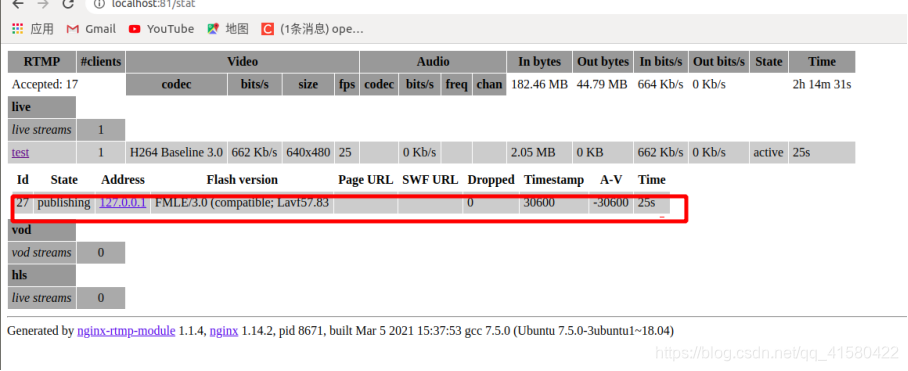
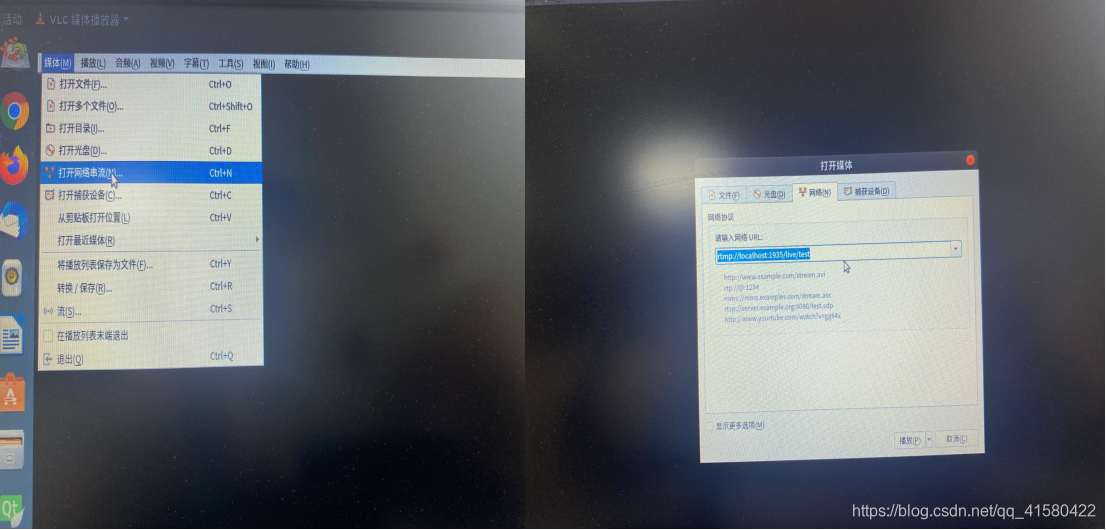
这个时候我们看到已经推到nginx服务器上了。我们使用vlc去看一下我们推的流。

这时候再看localhost。
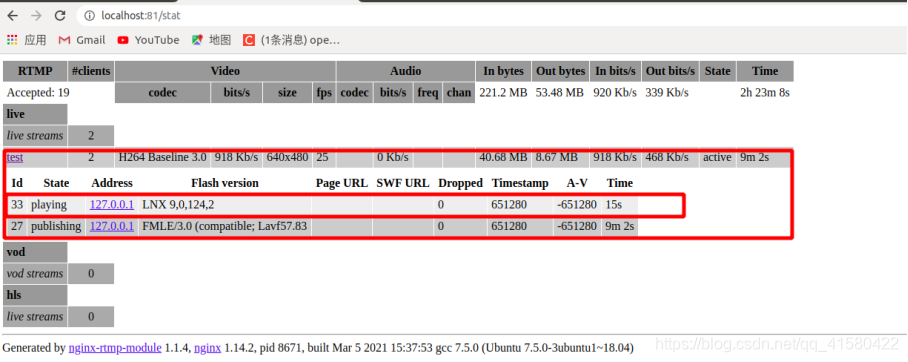
基础拉推成功。
1.2 opencv+yolov4的拉推
把上面的代码加入到相应的位置,其中yolov4提供了darknet_video.py和darknet.py。我们只要将上面的代码加入到相应的位置即可。
运行,拉推正常。不过可能出现的问题在下面讲述。问题之vlc获取rtmp流出现花屏现象。
在这里,先贴2个代码,防止某些小朋友找不到,不会改。记得修改某些位置的路径哦。
Darknet.py
#!python3
"""
Python 3 wrapper for identifying objects in images

Requires DLL compilation

Both the GPU and no-GPU version should be compiled; the no-GPU version should be renamed "yolo_cpp_dll_nogpu.dll".

On a GPU system, you can force CPU evaluation by any of:

- Set global variable DARKNET_FORCE_CPU to True
- Set environment variable CUDA_VISIBLE_DEVICES to -1
- Set environment variable "FORCE_CPU" to "true"
- Set environment variable "DARKNET_PATH" to path darknet lib .so (for Linux)

Directly viewing or returning bounding-boxed images requires scikit-image to be installed (`pip install scikit-image`)

@author:weeks
@date: 20210303
"""
from ctypes import *
import math
import random
import os


class BOX(Structure):
    _fields_ = [("x", c_float),
                ("y", c_float),
                ("w", c_float),
                ("h", c_float)]


class DETECTION(Structure):
    _fields_ = [("bbox", BOX),
                ("classes", c_int),
                ("prob", POINTER(c_float)),
                ("mask", POINTER(c_float)),
                ("objectness", c_float),
                ("sort_class", c_int),
                ("uc", POINTER(c_float)),
                ("points", c_int),
                ("embeddings", POINTER(c_float)),
                ("embedding_size", c_int),
                ("sim", c_float),
                ("track_id", c_int)]

class DETNUMPAIR(Structure):
    _fields_ = [("num", c_int),
                ("dets", POINTER(DETECTION))]


class IMAGE(Structure):
    _fields_ = [("w", c_int),
                ("h", c_int),
                ("c", c_int),
                ("data", POINTER(c_float))]


class METADATA(Structure):
    _fields_ = [("classes", c_int),
                ("names", POINTER(c_char_p))]


def network_width(net):
    return lib.network_width(net)


def network_height(net):
    return lib.network_height(net)


def bbox2points(bbox):
    """
    From bounding box yolo format
    to corner points cv2 rectangle
    """
    x, y, w, h = bbox
    xmin = int(round(x - (w / 2)))
    xmax = int(round(x + (w / 2)))
    ymin = int(round(y - (h / 2)))
    ymax = int(round(y + (h / 2)))
    return xmin, ymin, xmax, ymax


def class_colors(names):
    """
    Create a dict with one random BGR color for each
    class name
    """
    return {name: (
        random.randint(0, 255),
        random.randint(0, 255),
        random.randint(0, 255)) for name in names}


def load_network(config_file, data_file, weights, batch_size=1):
    """
    load model description and weights from config files
    args:
        config_file (str): path to .cfg model file
        data_file (str): path to .data model file
        weights (str): path to weights
    returns:
        network: trained model
        class_names
        class_colors
    """
    network = load_net_custom(
        config_file.encode("ascii"),
        weights.encode("ascii"), 0, batch_size)
    metadata = load_meta(data_file.encode("ascii"))
    class_names = [metadata.names[i].decode("ascii") for i in range(metadata.classes)]
    colors = class_colors(class_names)
    return network, class_names, colors

##########################################################################################
def print_detections(detections, coordinates=False):
    print("\nObjects:")
    for label, confidence, bbox in detections:
        x, y, w, h = bbox
        if coordinates:
            print("{}: {}%    (left_x: {:.0f}   top_y:  {:.0f}   width:   {:.0f}   height:  {:.0f})".format(label, confidence, x, y, w, h))
        else:
            print("{}: {}%".format(label, confidence))
#################################################################################
            if  label=="dog":
                savingtxtmsg = open('/darknet4/data/yujin/yujing.txt','w')
                savingtxtmsg.write(label)
                savingtxtmsg.write('\n')
                savingtxtmsg.close()

                savingtxtmsg1 = open('/darknet4/data/yujin/yujinglishi.txt','a')
                savingtxtmsg1.write(label)
                savingtxtmsg1.write('\n')
                savingtxtmsg1.close()
######################################################


def draw_boxes(detections, image, colors):
    import cv2
    for label, confidence, bbox in detections:
        left, top, right, bottom = bbox2points(bbox)
        cv2.rectangle(image, (left, top), (right, bottom), colors[label], 1)
        cv2.putText(image, "{} [{:.2f}]".format(label, float(confidence)),
                    (left, top - 5), cv2.FONT_HERSHEY_SIMPLEX, 0.5,
                    colors[label], 2)
    return image


def decode_detection(detections):
    decoded = []
    for label, confidence, bbox in detections:
        confidence = str(round(confidence * 100, 2))
        decoded.append((str(label), confidence, bbox))
    return decoded


def remove_negatives(detections, class_names, num):
    """
    Remove all classes with 0% confidence within the detection
    """
    predictions = []
    for j in range(num):
        for idx, name in enumerate(class_names):
            if detections[j].prob[idx] > 0:
                bbox = detections[j].bbox
                bbox = (bbox.x, bbox.y, bbox.w, bbox.h)
                predictions.append((name, detections[j].prob[idx], (bbox)))
    return predictions


def array_to_image(arr):
    """
    opencv获得的frame是array格式,需要将其转换为image供yolo检测
    """
    arr = arr.transpose(2, 0, 1)
    c, h, w = arr.shape[0:3]
    arr = np.ascontiguousarray(arr.flat, dtype=np.float32) / 255.0
    data = arr.ctypes.data_as(POINTER(c_float))
    im = IMAGE(w, h, c, data)
    return im

#########################################


def detect_image(network, class_names, image, thresh=.5, hier_thresh=.5, nms=.45):
    """
        Returns a list with highest confidence class and their bbox
    """
    pnum = pointer(c_int(0))
    predict_image(network, image)
    detections = get_network_boxes(network, image.w, image.h,
                                   thresh, hier_thresh, None, 0, pnum, 0)
    num = pnum[0]
    if nms:
        do_nms_sort(detections, num, len(class_names), nms)
    predictions = remove_negatives(detections, class_names, num)
    predictions = decode_detection(predictions)
    free_detections(detections, num)
    return sorted(predictions, key=lambda x: x[1])


#  lib = CDLL("/home/pjreddie/documents/darknet/libdarknet.so", RTLD_GLOBAL)
#lib = CDLL("libdarknet.so", RTLD_GLOBAL)
hasGPU = True
if os.name == "nt":
    cwd = os.path.dirname(__file__)
    os.environ['PATH'] = cwd + ';' + os.environ['PATH']
    winGPUdll = os.path.join(cwd, "yolo_cpp_dll.dll")
    winNoGPUdll = os.path.join(cwd, "yolo_cpp_dll_nogpu.dll")
    envKeys = list()
    for k, v in os.environ.items():
        envKeys.append(k)
    try:
        try:
            tmp = os.environ["FORCE_CPU"].lower()
            if tmp in ["1", "true", "yes", "on"]:
                raise ValueError("ForceCPU")
            else:
                print("Flag value {} not forcing CPU mode".format(tmp))
        except KeyError:
            # We never set the flag
            if 'CUDA_VISIBLE_DEVICES' in envKeys:
                if int(os.environ['CUDA_VISIBLE_DEVICES']) < 0:
                    raise ValueError("ForceCPU")
            try:
                global DARKNET_FORCE_CPU
                if DARKNET_FORCE_CPU:
                    raise ValueError("ForceCPU")
            except NameError as cpu_error:
                print(cpu_error)
        if not os.path.exists(winGPUdll):
            raise ValueError("NoDLL")
        lib = CDLL(winGPUdll, RTLD_GLOBAL)
    except (KeyError, ValueError):
        hasGPU = False
        if os.path.exists(winNoGPUdll):
            lib = CDLL(winNoGPUdll, RTLD_GLOBAL)
            print("Notice: CPU-only mode")
        else:
            # Try the other way, in case no_gpu was compile but not renamed
            lib = CDLL(winGPUdll, RTLD_GLOBAL)
            print("Environment variables indicated a CPU run, but we didn't find {}. Trying a GPU run anyway.".format(winNoGPUdll))
else:
    lib = CDLL(os.path.join(
        os.environ.get('DARKNET_PATH', './'),
        "libdarknet.so"), RTLD_GLOBAL)
lib.network_width.argtypes = [c_void_p]
lib.network_width.restype = c_int
lib.network_height.argtypes = [c_void_p]
lib.network_height.restype = c_int

copy_image_from_bytes = lib.copy_image_from_bytes
copy_image_from_bytes.argtypes = [IMAGE,c_char_p]

predict = lib.network_predict_ptr
predict.argtypes = [c_void_p, POINTER(c_float)]
predict.restype = POINTER(c_float)

if hasGPU:
    set_gpu = lib.cuda_set_device
    set_gpu.argtypes = [c_int]

init_cpu = lib.init_cpu

make_image = lib.make_image
make_image.argtypes = [c_int, c_int, c_int]
make_image.restype = IMAGE

get_network_boxes = lib.get_network_boxes
get_network_boxes.argtypes = [c_void_p, c_int, c_int, c_float, c_float, POINTER(c_int), c_int, POINTER(c_int), c_int]
get_network_boxes.restype = POINTER(DETECTION)

make_network_boxes = lib.make_network_boxes
make_network_boxes.argtypes = [c_void_p]
make_network_boxes.restype = POINTER(DETECTION)

free_detections = lib.free_detections
free_detections.argtypes = [POINTER(DETECTION), c_int]

free_batch_detections = lib.free_batch_detections
free_batch_detections.argtypes = [POINTER(DETNUMPAIR), c_int]

free_ptrs = lib.free_ptrs
free_ptrs.argtypes = [POINTER(c_void_p), c_int]

network_predict = lib.network_predict_ptr
network_predict.argtypes = [c_void_p, POINTER(c_float)]

reset_rnn = lib.reset_rnn
reset_rnn.argtypes = [c_void_p]

load_net = lib.load_network
load_net.argtypes = [c_char_p, c_char_p, c_int]
load_net.restype = c_void_p

load_net_custom = lib.load_network_custom
load_net_custom.argtypes = [c_char_p, c_char_p, c_int, c_int]
load_net_custom.restype = c_void_p

free_network_ptr = lib.free_network_ptr
free_network_ptr.argtypes = [c_void_p]
free_network_ptr.restype = c_void_p

do_nms_obj = lib.do_nms_obj
do_nms_obj.argtypes = [POINTER(DETECTION), c_int, c_int, c_float]

do_nms_sort = lib.do_nms_sort
do_nms_sort.argtypes = [POINTER(DETECTION), c_int, c_int, c_float]

free_image = lib.free_image
free_image.argtypes = [IMAGE]

letterbox_image = lib.letterbox_image
letterbox_image.argtypes = [IMAGE, c_int, c_int]
letterbox_image.restype = IMAGE

load_meta = lib.get_metadata
lib.get_metadata.argtypes = [c_char_p]
lib.get_metadata.restype = METADATA

load_image = lib.load_image_color
load_image.argtypes = [c_char_p, c_int, c_int]
load_image.restype = IMAGE

rgbgr_image = lib.rgbgr_image
rgbgr_image.argtypes = [IMAGE]

predict_image = lib.network_predict_image
predict_image.argtypes = [c_void_p, IMAGE]
predict_image.restype = POINTER(c_float)

predict_image_letterbox = lib.network_predict_image_letterbox
predict_image_letterbox.argtypes = [c_void_p, IMAGE]
predict_image_letterbox.restype = POINTER(c_float)

network_predict_batch = lib.network_predict_batch
network_predict_batch.argtypes = [c_void_p, IMAGE, c_int, c_int, c_int,
                                   c_float, c_float, POINTER(c_int), c_int, c_int]
network_predict_batch.restype = POINTER(DETNUMPAIR)
Darknet_video.py
from ctypes import *
import random
import os
import cv2
import time
import darknet
import argparse
from threading import Thread, enumerate
from queue import Queue
import subprocess
def parser():
parser = argparse.ArgumentParser(description="YOLO Object Detection")
parser.add_argument("--input", type=str, default=0,
help="video source. If empty, uses webcam 0 stream")
parser.add_argument("--out_filename", type=str, default="",
help="inference video name. Not saved if empty")
parser.add_argument("--weights", default="yolov4.weights",
help="yolo weights path")
parser.add_argument("--dont_show", action='store_true',
help="windown inference display. For headless systems")
parser.add_argument("--ext_output", action='store_true',
help="display bbox coordinates of detected objects")
parser.add_argument("--config_file", default="/darknet4/cfg/yolov4.cfg",
help="path to config file")
parser.add_argument("--data_file", default="/darknet4/cfg/coco.data",
help="path to data file")
parser.add_argument("--thresh", type=float, default=.25,
help="remove detections with confidence below this value")
return parser.parse_args()
def str2int(video_path):
"""
argparse returns and string althout webcam uses int (0, 1 ...)
Cast to int if needed
"""
try:
return int(video_path)
except ValueError:
return video_path
def check_arguments_errors(args):
assert 0 < args.thresh < 1, "Threshold should be a float between zero and one (non-inclusive)"
if not os.path.exists(args.config_file):
raise (ValueError("Invalid config path {}".format(os.path.abspath(args.config_file))))
if not os.path.exists(args.weights):
raise (ValueError("Invalid weight path {}".format(os.path.abspath(args.weights))))
if not os.path.exists(args.data_file):
raise (ValueError("Invalid data file path {}".format(os.path.abspath(args.data_file))))
if str2int(args.input) == str and not os.path.exists(args.input):
raise (ValueError("Invalid video path {}".format(os.path.abspath(args.input))))
# 这个是保存视频
def set_saved_video(input_video, output_video, size):
fourcc = cv2.VideoWriter_fourcc('m', 'p', '4', 'v')
fps = int(input_video.get(cv2.CAP_PROP_FPS))
video = cv2.VideoWriter("/darknet4/out.mp4", fourcc, fps, size) # 这里面路径被修改了,保存地址
return video
#一帧一帧队列
def video_capture(frame_queue, darknet_image_queue):
while cap.isOpened():
ret, frame = cap.read()
if not ret:
break
frame_rgb = cv2.cvtColor(frame, cv2.COLOR_BGR2RGB)
frame_resized = cv2.resize(frame_rgb, (width, height),
interpolation=cv2.INTER_LINEAR)
frame_queue.put(frame_resized)
img_for_detect = darknet.make_image(width, height, 3)
darknet.copy_image_from_bytes(img_for_detect, frame_resized.tobytes())
darknet_image_queue.put(img_for_detect)
cap.release()
def inference(darknet_image_queue, detections_queue, fps_queue):
while cap.isOpened():
darknet_image = darknet_image_queue.get()
prev_time = time.time()
detections = darknet.detect_image(network, class_names, darknet_image, thresh=args.thresh)
detections_queue.put(detections)
fps = int(1 / (time.time() - prev_time))
fps_queue.put(fps)
print("FPS: {}".format(fps))
darknet.print_detections(detections, args.ext_output)
darknet.free_image(darknet_image)
cap.release()
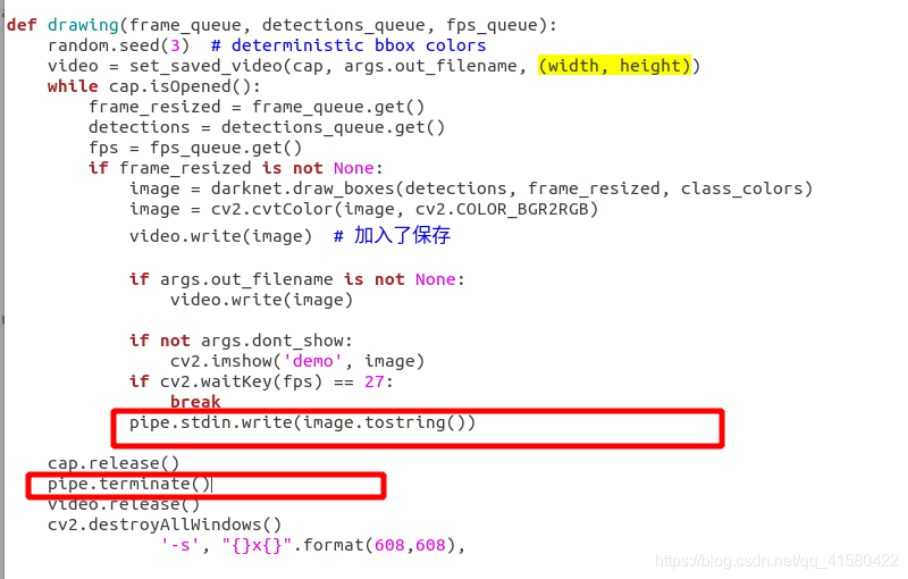
def drawing(frame_queue, detections_queue, fps_queue):
random.seed(3) # deterministic bbox colors
video = set_saved_video(cap, args.out_filename, (width, height))
while cap.isOpened():
frame_resized = frame_queue.get()
detections = detections_queue.get()
fps = fps_queue.get()
if frame_resized is not None:
image = darknet.draw_boxes(detections, frame_resized, class_colors)
image = cv2.cvtColor(image, cv2.COLOR_BGR2RGB)
video.write(image) # 加入了保存
if args.out_filename is not None:
video.write(image)
if not args.dont_show:
cv2.imshow('demo', image)
if cv2.waitKey(fps) == 27:
break
pipe.stdin.write(image.tostring())
cap.release()
pipe.terminate()
video.release()
cv2.destroyAllWindows()
if __name__ == '__main__':
frame_queue = Queue()
darknet_image_queue = Queue(maxsize=1)
detections_queue = Queue(maxsize=1)
fps_queue = Queue(maxsize=1)
args = parser()
check_arguments_errors(args)
network, class_names, class_colors = darknet.load_network(
args.config_file,
args.data_file,
args.weights,
batch_size=1
)
width = darknet.network_width(network)
height = darknet.network_height(network)
input_path = str2int(args.input)
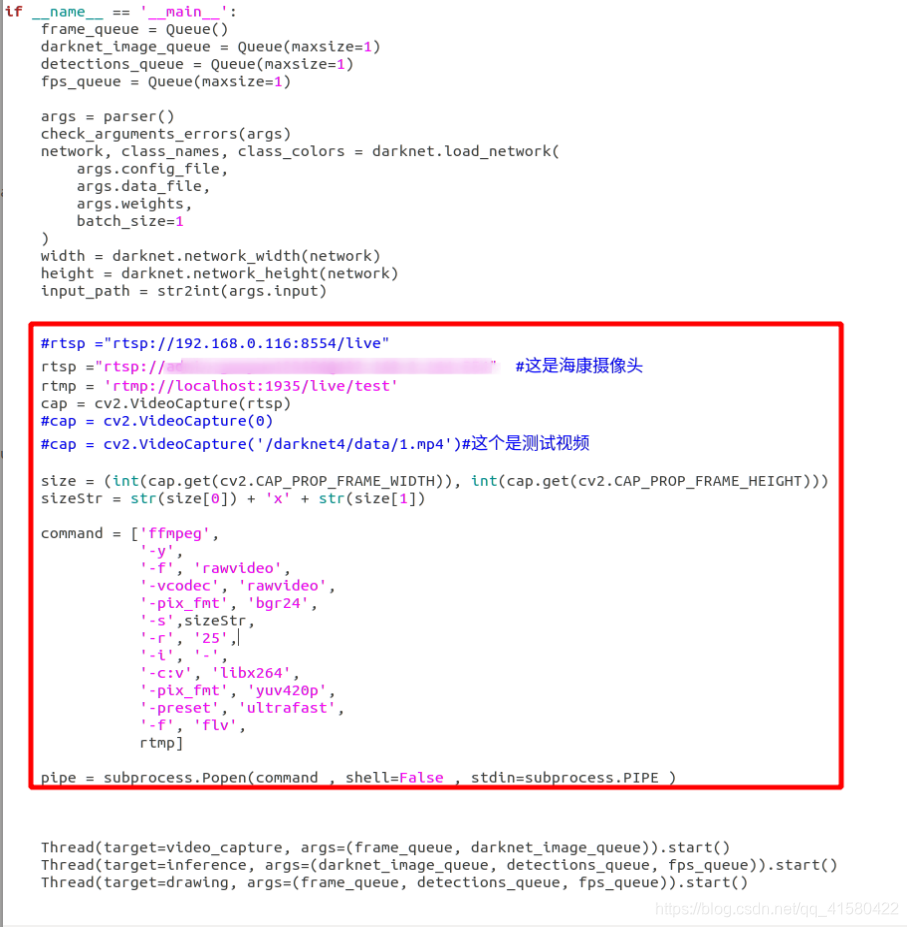
#rtsp ="rtsp://192.168.0.116:8554/live"
rtsp ="rtsp://admin:weeks123456@192.168.0.164:554" #这是海康摄像头
rtmp = 'rtmp://localhost:1935/live/test'
cap = cv2.VideoCapture(rtsp)
#cap = cv2.VideoCapture(0)
#cap = cv2.VideoCapture('/darknet4/data/1.mp4')#这个是测试视频
size = (int(cap.get(cv2.CAP_PROP_FRAME_WIDTH)), int(cap.get(cv2.CAP_PROP_FRAME_HEIGHT)))
sizeStr = str(size[0]) + 'x' + str(size[1])
command = ['ffmpeg',
'-y',
'-f', 'rawvideo',
'-vcodec', 'rawvideo',
'-pix_fmt', 'bgr24',
'-s',sizeStr,
'-r', '25',
'-i', '-',
'-c:v', 'libx264',
'-pix_fmt', 'yuv420p',
'-preset', 'ultrafast',
'-f', 'flv',
rtmp]
pipe = subprocess.Popen(command , shell=False , stdin=subprocess.PIPE )
Thread(target=video_capture, args=(frame_queue, darknet_image_queue)).start()
Thread(target=inference, args=(darknet_image_queue, detections_queue, fps_queue)).start()
Thread(target=drawing, args=(frame_queue, detections_queue, fps_queue)).start()
1.3 opencv推流出现花屏
上面通过rtsp拉取网络摄像头,opencv进行处理以后,然后将rtmp流通过管道推到nginx服务器上。通过vlc从nginx服务器上拉取rtmp,进行查看,但是出现花屏的现象。


其实,由上面的流程可以看出,导致花屏的原因其实可能存在着很多。我大致列取下面三种情况。
.
情况一:利用vlc发布视频的rtsp服务,经测试,同一种视频封装格式,分辨率越小,花屏现象越少,即涉及到的图片的尺寸的大小。
由上面的流程可知,我们拉取摄像头有一个尺寸,opencv处理以后,图片尺寸可能改变,进行推到nginx服务器上再到vlc可能存在这尺寸的改变。我的就是这个问题。
.
情况二:分辨率越小,服务器发送给客户端(vlc)的数据越小,当发送的数据量过大时候,客户端的缓冲区不足,导致数据丢失的严重,从而引起数据的丢包。解决方案是扩充客户端的缓冲区大小。
.
情况三:fps帧率不对
对于情况二,我发现我使用基础推流,不会造成花屏,就知道不是情况二的问题,然后我试图从尺寸大小或fps方面上去解决问题。
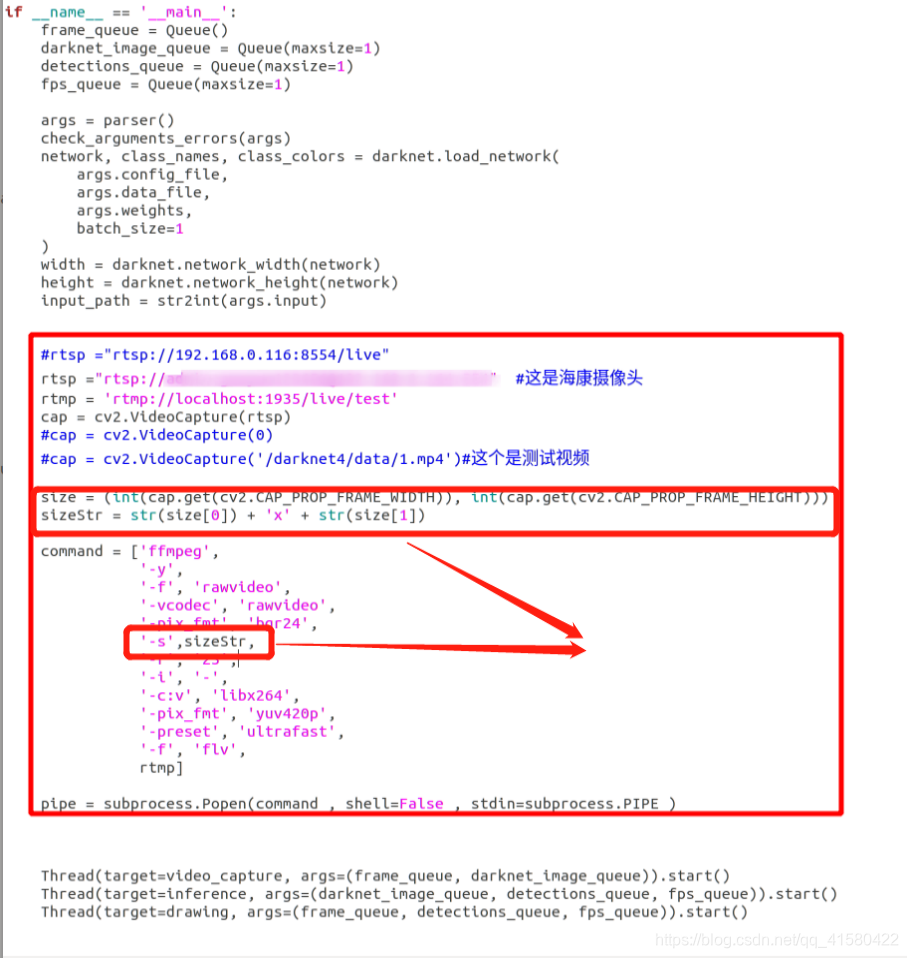
opencv其实已经处理过图片的大小了,但是我在这里的管道重新定义了推流的尺寸,这就是问题的所在,这也是为什么基础推流成功,而处理后推流出现花屏的原因。
解决: 首先我们要知道官方提供的代码中处理图片以后的大小。
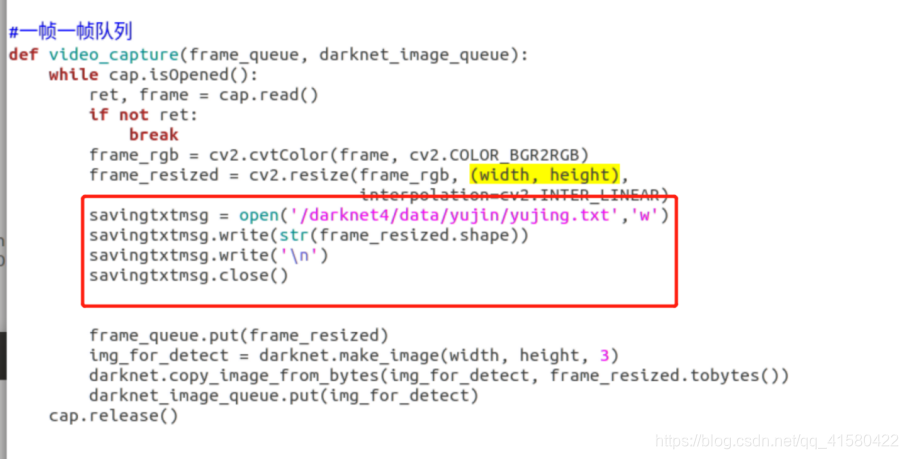
找到这个函数进行修改,将opencv处理后图片的大小写入到darknet/data/yujin文件夹下的yujing.txt文件中,这里记得修改为自己的输出路径,运行程序。在文件中发现我的是(608*608,3)

修改以后在进行推流,发现花屏问题成功解决。
其实我只要使用修改以后的608*608来告诉你们就可以了,为什么多走一步,因为我自己在实际开发中获得的是基础的拉推,我进行应用到我的程序中才发现拉推出现花屏,一来记录自己的实践过程和解决方案。二来当我后续再遇到这个问题,或者是其他处理的尺寸,还是fps的问题,我能有参考的分析问题的思路。
.
在这里,我们基本完成了属于我们的工作任务,后面就是前端组的同事从nginx上调取我们推的流了。如果后续前端组同事做完,将会跟进。不过也遗留了一个最为重要的问题,就是画面延迟比较严重。
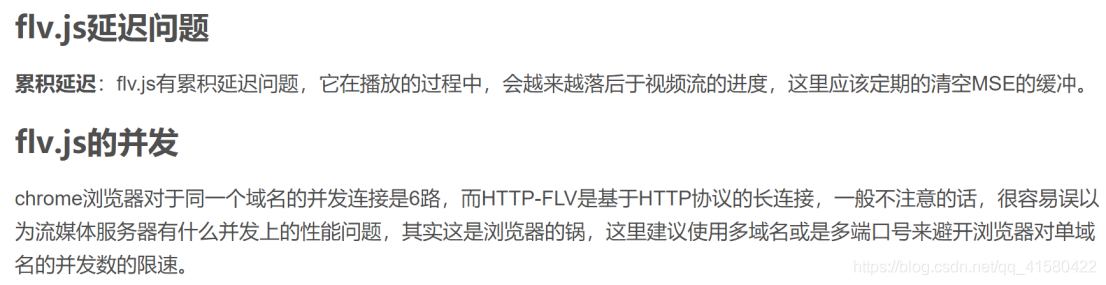
1.4 画面延迟优化方案
期待你的留言
场景五:nginx+http-flv的推流
参考博文
1.1 背景
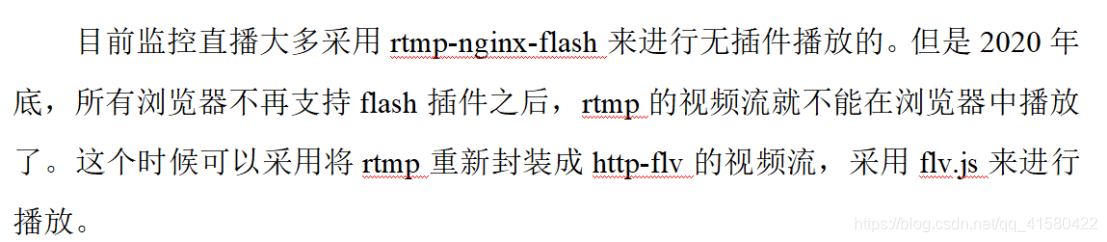
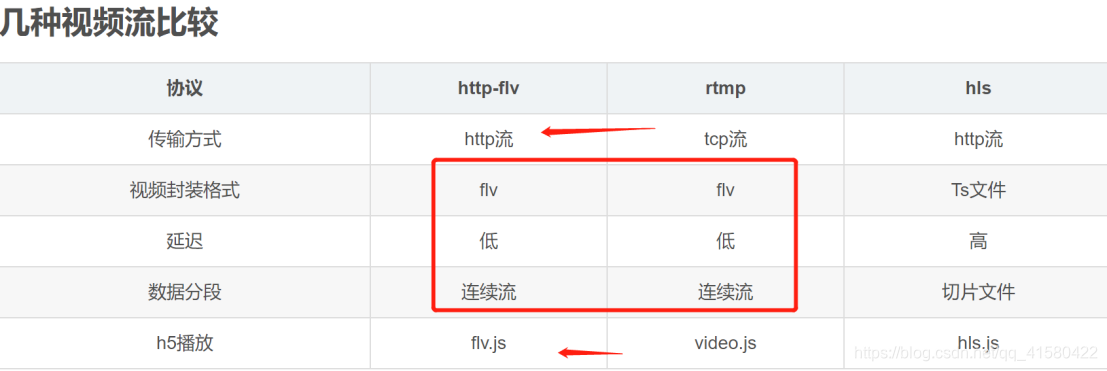
rtmp和http-flv的视频格式都是flv格式的,只是传输协议而不同。rtmp是tcp的传输协议,而http-flv是http长链接的传输协议。
可以采用搭载http-flv模块的nginx服务对rtmp流重新封装为http-flv的流进行分发。
1.2 下载nginx-http-flv-module模块的源码
在上面的nginx文件夹下,下载nginx-http-flv-module模快
git clone https://github.com/winshining/nginx-http-flv-module.git
1.3 重新编译
cd nginx-1.14.2/ # 进入nginx的目录下<如果已经编译,记得make clean一下>
./configure --add-module=../nginx-rtmp-module
./configure --add-module=../nginx-http-flv-module
make
make install
1.4 配置http-flv
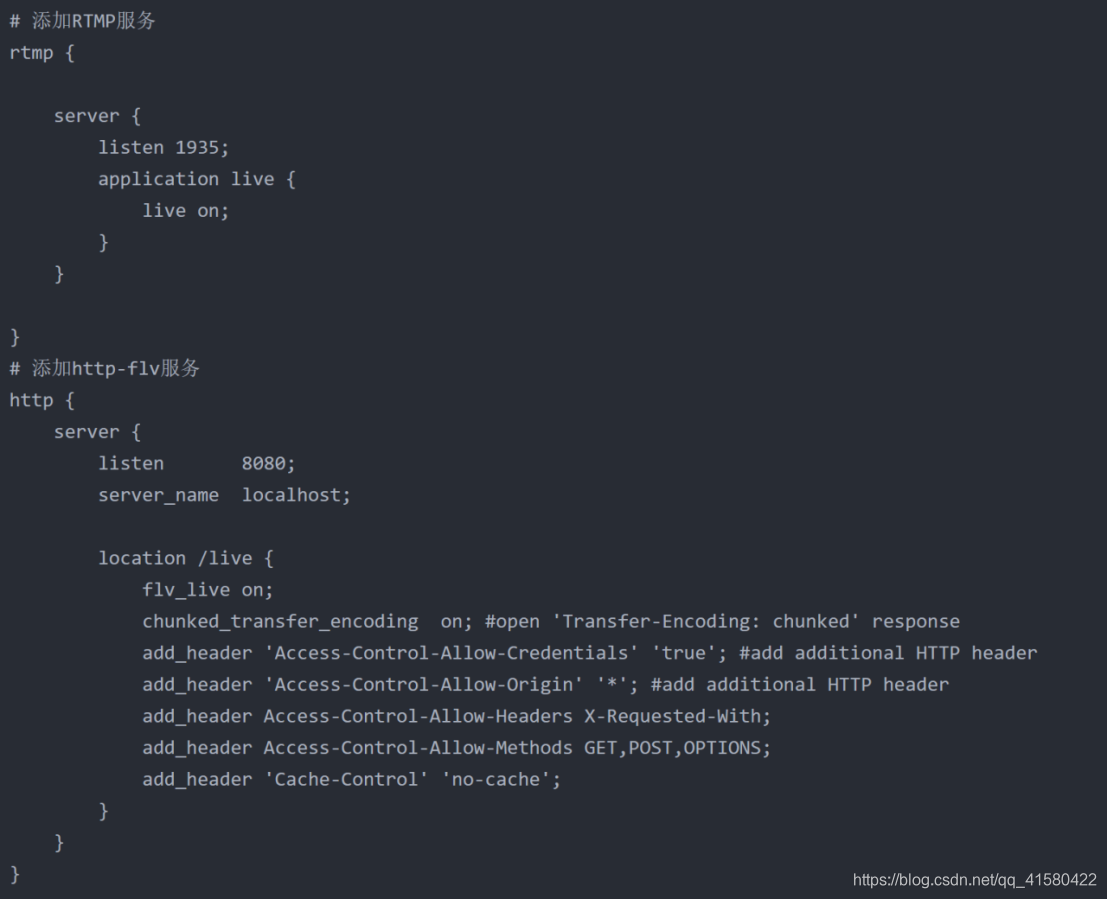
location /live {
   flv_live on;
          chunked_transfer_encoding  on; #open 'Transfer-Encoding: chunked' response
   add_header 'Access-Control-Allow-Credentials' 'true'; #add additional HTTP header
   add_header 'Access-Control-Allow-Origin' '*'; #add additional HTTP header
   add_header Access-Control-Allow-Headers X-Requested-With;
   add_header Access-Control-Allow-Methods GET,POST,OPTIONS;
   add_header 'Cache-Control' 'no-cache';
      }

1.5 其他问题
1.6 成功以后前端测试地址
rtmp在线测试地址:http://cloud.liveqing.com:10080/#/liveplayer(需要加载flash插件)
http-flv在线测试地址:http://bilibili.github.io/flv.js/demo/(不需要flash插件)
you did it


 1万+
1万+

 被折叠的 条评论
为什么被折叠?
被折叠的 条评论
为什么被折叠?
 到【灌水乐园】发言


