


【 ros by example 笔记】
1、安装ROS问题
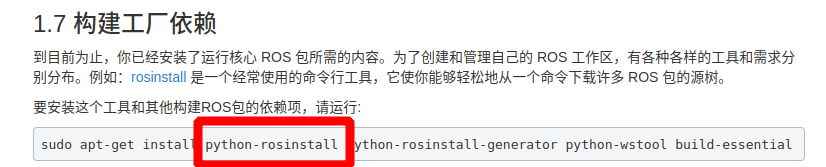
 这本rbx1中说这个不是教程里面的东西,要额外安装,注意,其实在melodic的教程里面已经安装了python-rosinstall
2、creating a catkin workspace顺序问题
- 在ros wiki 中说的是直接在catkin_ws中运行catkin_make就会出现src下面的CMakeLists.txt
- 在rbx1中增加了catkin_init_workspace命令,在src文件夹下运行命令,来初始化工作空间生成CMakeLists.txt文件

3、新创建一个包
- 每当新创建一个包,在ros wiki 中只需要source一下devel/setup.bash文件即可
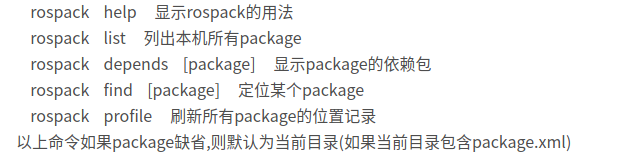
- 在rbx1中每当新创建一个包,不仅需要source,还需要执行
rospack profile命令,不过这样做也有道理,下面是rospack的命令作用
4、Doing a “make clean” with catkin
The only way to start with a clean slate, is to remove all build objects from all your catkin packages using the following commands:

5、Rebuilding a Single catkin Package
当只更新了一个package,只需要re-build一个package,可以使用如下命令:

6、参数服务器动态改变参数问题
- 在ros wiki 中提到用rosparam来设定参数,但是这有一个缺点,就是修改的参数,是不能被正在运行的节点所读取的,如果想要让参数作用于节点,则需要重启节点才能使节点读取参数服务器中的数据
- 在rbx1中提到,用
rosrun rqt_reconfigure rqt_reconfigure这个命令可以打开参数服务器的图形化用户界面,并且可以动态改变参数,而不用重启节点
区别:rbx1中提到rqt_reconfigure的图形化用户界面虽然允许动态修改参数,但是他的节点显示不全,只有那些调用了req_reconfigure的API的节点才会被这个图形化用户界面所显示,当一个项目中包含了那些不用rqt_reconfigure API的第三方的节点,那么这些节点是不可见的,只有通过rosparam命令才能修改它们在参数服务器上的参数。
dynamic_reconfigure 与 rqt_reconfigure的区别:
dynamic_reconfigure可以实现动态的刷新节点,如果启动图形化用户界面后再启动节点,dynamic_reconfigure是可以刷新节点序列的,但是rqt_configure就不可以,它只能通过重启来刷新节点序列。
7、安装时间同步
保持你的电脑时间同步的一个简单方法是在你的电脑和机器人上同时安装chrony软件包,这个软件包可以保持你的电脑时间与网络服务器同步,进而达到与所有机器之间的时间同步。
An easy way to keep your computers synchronized is to install the Ubuntu chrony package on both your desktop and your robot. This package will keep your computer clocks synchronized with Internet servers and thus with each other.
安装chrony使用以下命令
To install chrony , run the command:
$ sudo apt-get install chrony
安装完成后,chrony的守护进程会自启动,自动的将你的电脑与一系列的网络服务器进行同步。
After installation, the chrony daemon will automatically start and begin synchronizing your computer’s clock with a number of Internet servers.
8、Zeroconf
Zeroconf,是一项允许同一局域网(子网)下的机器,不使用IP地址 而 采用本地hostname来互相访问的技术。所以,当你的电脑和机器人连接在同一家庭网络路由器或者官方路由器的时候,你可以采用Zeroconf这种方法来使他们之间互相通信。使用Zeroconf技术,在兴趣或者研发机器人中十分常用。
Zeroconf, a technique that allows machines on the same subnet to reference each other using local hostnames instead of IP addresses. So you can use this method if your desktop computer and robot are connected to the same router on a home or office network—a common scenario for both hobby and research robots.
举个例子:
比如你的电脑名称hostname是my_desktop。那么它所对应的Zeroconf hostname就是简单的在后面加一个.local后缀。所以这台电脑的Zeroconf hostname就是my_desktop.local
查看hostname,使用命令:
hostname
可以使用ping命令来ping hostname 和 ping Zeroconf hostname 两个都可以ping通
9、设置ROS_MASTER的URI,设置ROS_HOSTNAME环境变量
在任何的ROS网络中,会有一个单独的机器被指派运行ros master,并且这个及其仅仅只运行这一个roscore进程,其他的机器必须设置ROS_MASTER_URI这个环境变量来指出ros master所在机器的hostname。每台计算机还必须正确设置其ROS主机名,一般来说,你选择哪个机器作为ros master都无关紧要,但是,对于一个全自动的机器人,你可能想要将机器人上的电脑作为ros master,这样的话这个机器人就与其他的电脑没有任何依赖关系了。
In any ROS network, one machine is designated as the ROS master and it alone runs the roscore process. Other machines must then set the ROS_MASTER_URI environment variable to point to the master host. Each computer must also set its ROS hostname appropriately . In general, it does not matter which machine you choose to be the master. However, for a completely autonomous robot, you’ll probably want to make the robot computer the master so that it does not depend in any way on the desktop.
设置方法如下:

10、ROS知识回顾
因为你距离上一次学习初级教程和tf教程已经有很长一段时间了,这里有一个对ROS的核心概念的简单回顾。ROS中的核心实体叫做节点。一个节点一般来说是用python或者c++所写的程序,这段程序可以执行一些简单的任务或者进程。节点可以被独立的运行或者终止。它们之间是靠传递信息来交流。一个节点可以在一些话题上发布消息,或者为其他节点提供一些服务。
Since it might have been awhile since you did the Beginner and tf Tutorials, here is a
brief recap of the primary ROS concepts. The core entity in ROS is called a node. A
node is generally a small program written in Python or C++ that executes some
relatively simple task or process. Nodes can be started and stopped independently of
one another and they communicate by passing messages. A node can publish messages
on certain topics or provide services to other nodes.
举个例子,一个发布节点,可能从你机器人上的微控制器上的传感器获得一些数据。在/head_sonar话题中的一条消息,内容是0.5,这个值可能代表着这个传感器目前检查到了0.5米外有一个物体(记住:ROS中使用米作为距离单位,弧度用作角度单位)。任何节点如果想要获取传感器上的消息,只需要订阅/head_sonar话题即可。为了利用这些消息内容,订阅节点会定义回调函数,在一个新的消息发布在订阅话题上时,回调函数就会开始执行。回调函数执行的次数取决于发布节点更新信息的频率。
For example, a publisher node might report data from sensors attached to your robot’s
microcontroller. A message on the /head_sonar topic with a value of 0.5 would mean
that the sensor is currently detecting an object 0.5 meters away. (Remember that ROS
uses meters for distance and radians for angular measurements.) Any node that wants to
know the reading from this sensor need only subscribe to the /head_sonar topic. To
make use of these values, the subscriber node defines a callback function that gets
executed whenever a new message arrives on the subscribed topic. How often this
happens depends on the rate at which the publisher node updates its messages.
一个节点也可以定义一个或者多个服务。当一个其他节点请求当前节点时,当前节点的ROS服务会产生一些行为或者返回一个回复。举一个简单的例子,例如LED的开关问题。举一个复杂的例子,比如当服务的请求中给出了目标地点、机器人的起始地点,服务就会返回一个针对于移动机器人的导航计划
A node can also define one or more services. A ROS service produces some behavior or
sends back a reply when sent a request from another node. A simple example would be
a service that turns an LED on or off. A more complex example would be a service that
returns a navigation plan for a mobile robot when given a goal location and the starting
pose of the robot.
级别高一点的ROS节点会订阅一系列的话题和服务,它会将这些结果以一种有用的方式结合起来,并且它们还有可能还会发布一些消息或者提供一些服务。举个例子,在本书后半部分我们会开发一个跟踪节点,它订阅了相机所发布的一系列视频话题,并且它会在其他话题上发布移动命令,这些移动命令会被机器人的移动控制器所读取,用来控制机器人在正确的方向移动。
Higher level ROS nodes will subscribe to a number of topics and services, combine the
results in a useful way, and perhaps publish messages or provide services of their own.
For example, the object tracker node we will develop later in the book subscribes to
camera messages on a set of video topics and publishes movement commands on
another topic that are read by the robot’s base controller to move the robot in the
appropriate direction.
11、使用 SVN, Git, Mercurial 安装 package
https://blog.csdn.net/qq_42127861/article/details/107940755
12、从catkin目录中移除package
为了移除你在你个人的catkin目录中已经安装的package,第一部需要移除整个package的源文件或者将其移动到一个不在ROS_PACKAGE_PATH的地方。举个例子,为了从你的 ~/catkin_ws/src 目录下移除一个叫做my_catkin_package的package,执行以下命令:
To remove a package installed in your personal catkin directory, first remove the entire
package source directory or move it to a different location outside of your
ROS_PACKAGE_PATH . For example, to remove a package called my_catkin_package
from your ~/catkin_ws/src directory, run the commands:
cd ~/catkin_ws/src
rm -rf my_catkin_package
你同样需要移除所对应的package在catkin的build目录中的build项目。不幸的是,目前没有任何一个比较好的方法可以移除指定的package所对应的build文件,你需要一次性的移除整个build文件(里面包含了所有的package),然后重新运行catkin_make:
You also have to remove all catkin build objects. Unfortunately, there is no (easy) way
to do this for just the package you removed—you have to remove all build objects for all
packages and then rerun catkin_make :
注意!不要将src目录包含在rm命令下,否则你会失去所有个人的catkin 源文件
CAUTION! Do not include the src directory in the rm command below or you will
lose all your personal catkin source files!
cd ~/catkin_ws
rm -rf devel build install
catkin_make
source devel/setup.bash
你可以使用roscd命令来检验这个package是否已经被真正的移除:
You can test that the package has been removed using the roscd command:
roscd my_ros_package
你将会看到如下结果:
roscd: No such package ‘my_ros_package’
which should produce the output:
roscd: No such package ‘my_ros_package’
【 日常笔记 】
1、 创建.msg和.srv文件的时候,需要在功能包的目录下的CMakeLists.txt中修改,修改之后,就可以使用rosmsg和rossrv 查找到相应的参数类型,而不需要catkin_make的参与.

2、rospy.log**()
rospy.loginfo(str), which performs triple-duty: the messages get printed to screen, it gets written to the Node’s log file, and it gets written to rosout.
3、rospy.Subscriber(“chatter”, String, callback) 话题
This declares that your node subscribes to the chatter topic which is of type std_msgs.msgs.String. When new messages are received, callback is invoked with the message as the first argument.
这声明您的节点订阅了类型为std_msgs.msgs.String的chatter主题。 收到新消息时,将以消息作为第一个参数调用回调。
def callback(data):#data就是消息,消息作为第一个参数调用回调函数
    rospy.loginfo(rospy.get_caller_id() + "I heard %s", data.data)
4、rospy.Service(‘add_two_ints’, AddTwoInts, handle_add_two_ints) 服务
This declares a new service named add_two_ints with the AddTwoInts service type. All requests are passed to handle_add_two_ints function. handle_add_two_ints is called with instances of AddTwoIntsRequest and returns instances of AddTwoIntsResponse.
这将声明一个名为Add_two_ints的新服务,其服务类型为AddTwoInts。 所有请求requests都传递给handle_add_two_ints函数。 系统调用回调函数时,是携带着AddTwoIntsRequest实例调用handle_add_two_ints函数,即AddTwoIntsRequest请求实例是回调函数的参数,回调函数返回AddTwoIntsResponse的实例,即AddTwoIntsResponse实例为回调函数的返回值。
5、 如果名字冲突,后面的名字顶替前面的名字
If a node with the same name comes up, it bumps the previous one
6、rosbag record -o/-O 问题

-o 后接一个时间后缀
-O 重命名
7、launch文件
launch文件,只要被创建了,就可以使用roslaunch来启动,不需要source一下。
8、listener.lookupTransform(to,from, )

9、创建话题,服务,动作前提准备
- 创建话题前,要创建消息类型,即话题所传递的消息的属性变量
- 创建服务前,要创建服务类型,即服务接受参数,返回参数的定义
- 创建动作前,要创建goal, result, and feedback messages.
创建这些之后均需要修改CMakeLists.txt,修改add部分,generate_messages部分,catkin_package这三个部分
修改完成后要进行catkin_make来生成这些类型定义的头文件,供真正的代码(可执行文件)使用
10、动作的交互靠话题来实现
The action client and server communicate over a set of topics, described in the actionlib protocol. The action name describes the namespace containing these topics, and the action specification message describes what messages should be passed along these topics.
feedback 话题,会实时发布话题详情,包括时间戳,status,seq,id等信息,并不仅仅是feedback这个数组

result 话题,会发布最后一次的feedback话题内容,作为结果显示。

在python写的客户端中,返回的result就是result数组,内容相当于result话题中的result这个数组内容

动作客户端client发布goal,cancel话题消息,订阅feedback,result,status话题消息
动作服务端server订阅goal,cancel话题消息,发布feedback,result,status话题消息

11、创建动作客户端
actionlib::SimpleActionClient<actionlib_tutorials::AveragingAction> ac("averaging",false);
这里的这个构造对象的时候,需要传入两个参数,第一个参数是动作服务端的name,第二个是是否自动设置线程,第二个参数默认为false,如果第二个采用默认值(false),则需要手动创建一个线程。
The action client is template on the action definition, specifying what message types to communicate to the action server with. The action client constructor also takes two arguments, the server name to connect to and a boolean option to automatically spin a thread. Here the action client is constructed with the server name and the auto spin option set to false, which means a thread must be created.
void spinThread()
{
  ros::spin();
}
boost::thread spin_thread(&spinThread);
Here the thread is created and the ros node is started spinning in the background. By using this method you can create multiple threads for your action client if needed.
12、base_link坐标系与base_laser坐标系
为了更加具体,请考虑一个简单的机器人示例,该机器人具有一个可移动的基座,并在其上方安装了一个激光器。 关于机器人,我们定义两个坐标系:一个对应于机器人基座的中心点,另一个对应于安装在基座顶部的激光器的中心点。 让我们也给他们起个名字以便于参考。 我们将附着在移动基座上的坐标系称为“ base_link”(对于导航,很重要的一点是将其作为机器人的旋转中心),我们将附着在激光器上的坐标框架称为“ base_laser”。 有关框架命名约定,请参阅 REP 105
To make this more concrete, consider the example of a simple robot that has a mobile base with a single laser mounted on top of it. In referring to the robot let’s define two coordinate frames: one corresponding to the center point of the base of the robot and one for the center point of the laser that is mounted on top of the base. Let’s also give them names for easy reference. We’ll call the coordinate frame attached to the mobile base “base_link” (for navigation, its important that this be placed at the rotational center of the robot) and we’ll call the coordinate frame attached to the laser “base_laser.” For frame naming conventions, see REP 105
13、父子坐标系之间的转换

为了给我们的简单示例创建一个转换树,我们将创建两个节点,一个节点用于“ base_link”坐标系,一个节点用于“ base_laser”坐标系。为了两个节点之间创建边,我们首先需要确定哪个节点是父节点,哪个节点是子节点。请记住,这种区别很重要,因为tf假定所有转换都从父级移动到子级。让我们选择“ base_link”坐标系作为父坐标系,因为随着其他零件/传感器被添加到机器人中,通过遍历“ base_link”框架将它们与“ base_laser”框架联系起来是最有意义的。这意味着与连接“ base_link”和“ base_laser”的边上的相关的变换应为(x:0.1m,y:0.0m,z:0.2m)。设置此转换树后,将在“ base_laser”坐标系中接收的激光扫描数据转换为“ base_link”坐标系中的数据就像调用tf库一样简单。我们的机器人可以使用这些数据信息来推断在“ base_link”坐标系中所对应的激光扫描数据,并安全地规划周围环境中的障碍物。
To create a transform tree for our simple example, we’ll create two nodes, one for the “base_link” coordinate frame and one for the “base_laser” coordinate frame. To create the edge between them, we first need to decide which node will be the parent and which will be the child. Remember, this distinction is important because tf assumes that all transforms move from parent to child. Let’s choose the “base_link” coordinate frame as the parent because as other pieces/sensors are added to the robot, it will make the most sense for them to relate to the “base_laser” frame by traversing through the “base_link” frame. This means the transform associated with the edge connecting “base_link” and “base_laser” should be (x: 0.1m, y: 0.0m, z: 0.2m). With this transform tree set up, converting the laser scan received in the “base_laser” frame to the “base_link” frame is as simple as making a call to the tf library. Our robot can use this information to reason about laser scans in the “base_link” frame and safely plan around obstacles in its environment.
- 父子节点之间的转换是父指向子,两个节点之间的边代表转换,对于将坐标原点从base_link转换到base_laser是将base_link的原点加上转换边(或者说子坐标系的坐标原点在父坐标系的坐标),将坐标原点从base_laser转换到base_link,则需要在base_laser坐标原点的基础上减去转换边(或者说加上父坐标系在子坐标系下的坐标)
- 对于将父节点下的点的坐标转换为子坐标系下的坐标,则需要将父坐标下的点的坐标减去转换。对于将子坐标系下的坐标点,转换为父坐标系下的坐标点,则需要子坐标系的坐标点加上转换
具体转换的定义是这样: the laser’s x offset of 10cm and z offset of 20cm from the robot base. 是子坐标系原点在父坐标系下的偏移量
14、俯仰角(pitch) 、偏摆角 (yaw) 、翻滚角 (roll)
上面是角之间的意思,但是具体那个角对应了那个坐标轴的旋转,看具体的坐标系规定,两者之间的映射无强制性要求。ros_by_example上是x轴旋转对应roll,y轴旋转对应pitch,z轴旋转对应yaw
15、tf转换坐标点
网址:Setting up your robot using tf
- 定义原来的坐标点:
  geometry_msgs::PointStamped laser_point;//定义坐标点
  laser_point.header.frame_id = "base_laser";//定义点所处的坐标系

  //允许我们要求listener使用最新的转换
  laser_point.header.stamp = ros::Time();

  //随意定义一个点位置
  laser_point.point.x = 1.0;
  laser_point.point.y = 0.2;
  laser_point.point.z = 0.0;
- 进行转换:
geometry_msgs::PointStamped base_point;//定义转换后的点
listener.transformPoint("base_link", laser_point, base_point);
//transformPoint自动填充base_point坐标点,即此时得到的base_point点已经是转换后的点了
transformPoint() with three arguments:
- the name of the frame we want to transform the point to (“base_link” in our case),
- the point we’re transforming,
- and storage for the transformed point.
So, after the call to transformPoint(), base_point holds the same information as laser_point did before only now in the “base_link” frame.
关于listener的定义:
tf::TransformListener listener(ros::Duration(10));
16、Header格式
Header类型中的三个字段如下所示。 seq字段对应于一个标识符,该标识符随着给定发布者发送消息而自动增加。 stamp字段存储与消息中的数据相关联的时间信息。 例如,在进行激光扫描的情况下,stamp可能对应于进行扫描的时间。 frame_id字段存储与消息中的数据相关联的tf坐标系信息。 如果是激光扫描,则将其设置为进行扫描的坐标系。
The three fields in the Header type are shown below. The seq field corresponds to an identifier that automatically increases as Messages are sent from a given publisher. The stamp field stores time information that should be associated with data in a Message. In the case of a laser scan, for example, the stamp might correspond to the time at which the scan was taken. The frame_id field stores tf frame information that should be associated with data in a message. In the case of a laser scan, this would be set to the frame in which the scan was taken.

17、sensor_msgs/LaserScan 激光扫描消息格式

18、sensor_msgs/PointCloud 点云消息格式
如下所示,此消息支持三维点的数组以及存储格式为channel的任何关联数据。 例如,可以通过“强度”channel发送PointCloud,该channel保存有关云中每个点的强度值的信息。
This message, as shown below, is meant to support arrays of points in three dimensions along with any associated data stored as a channel. For example, a PointCloud could be sent over the wire with an “intensity” channel that holds information about the intensity value of each point in the cloud.

从上图可以看出,点云数据有points和channels,points存储三维点坐标,channels存储每个点所对应的关联数据,如强度(intensity),channels[0]代表强度,则channels[0]的长度size为点的个数,其中的每一个value都代表每个对应的点的强度值,即channels实质上来说是一个二维数组。
19、nav_msgs/Odometry 里程计消息格式
nav_msgs / Odometry消息存储对机器人在自由空间中的位置和速度的估计值:
The nav_msgs/Odometry message stores an estimate of the position and velocity of a robot in free space:
 该消息中的pose对应于机器人在里程表坐标系中的估计位置,以及用于确定该姿势估计值的可选协方差。 此消息中的twist对应于机器人在子坐标系(通常是移动基座的坐标系)中的速度,以及用于确定该速度估计值的可选协方差。
The pose in this message corresponds to the estimated position of the robot in the odometric frame along with an optional covariance for the certainty of that pose estimate. The twist in this message corresponds to the robot’s velocity in the child frame, normally the coordinate frame of the mobile base, along with an optional covariance for the certainty of that velocity estimate.


 379
379


 被折叠的 条评论
为什么被折叠?
被折叠的 条评论
为什么被折叠?
 到【灌水乐园】发言


