


1、将PyTorch分类模型转换为ONNX格式
使用pytorch的torch.onnx.export()接口将模型转换为onnx格式。
下例以resnet50为例进行演示。
import os
import torch
import torch.onnx
from torch.autograd import Variable
from torchvision.models import resnet50, ResNet50_Weights

def get_pytorch_onnx_model(original_model):
    # define the directory for further converted model save
    onnx_model_path = "models"
    # define the name of further converted model
    onnx_model_name = "resnet50.onnx"

    # create directory for further converted model
    os.makedirs(onnx_model_path, exist_ok=True)

    # get full path to the converted model
    full_model_path = os.path.join(onnx_model_path, onnx_model_name)

    # generate model input
    generated_input = Variable(
        torch.randn(1, 3, 224, 224)
    )

    # model export into ONNX format
    torch.onnx.export(
        original_model,  # 需转换的原始模型
        generated_input,  # 模型的输入维度尺寸
        full_model_path,  # onnx模型文件生成路径
        verbose=True,  # 是否打印相关转换日志
        input_names=["input"],  # 按顺序分配给onnx图的输入节点的名称列表。
        output_names=["output"],  # 按顺序分配给onnx图的输出节点的名称列表。
        opset_version=11
    )

    return full_model_path


def main():
    # initialize PyTorch ResNet-50 model
    Weight = ResNet50_Weights.DEFAULT
    original_model = resnet50(weights=Weight)
    # get the path to the converted into ONNX PyTorch model
    full_model_path = get_pytorch_onnx_model(original_model)
    print("PyTorch ResNet-50 model was successfully converted: ", full_model_path)

if __name__ == "__main__":
    main()
2、使用OpenCV C/C++API运行转换后的PyTorch模型
使用opencv提供的cv::dnn::readNet(),cv::dnn::readNetFromONNX()函数接口读取加载onnx模型,并设置模型计算的后端与目标计算设备。
std::string onnx_file_path = "./models/resnet50.onnx";
Net net = readNetFromONNX(onnx_file_path); // 加载onnx模型
net.setPreferableBackend(0); // 选择计算后端,此处选择的默认0:automatically
net.setPreferableTarget(0);  // 选择目标计算设备,此处选择的模型0:CPU target
3、模型推理
首先对图片数据进行预处理,使其符合网络的输入标准,然后cv::dnn::Net::setInput()与cv::dnn::Net::forward()实现模型的前向推理运算。
int init_width = 256;
int init_height = 256;
cv::Mat mat = cv::imread(image_path, -1);
// cv::cvtColor(mat, mat, cv::COLOR_BGR2RGB);
cv::Mat blod;
cv::resize(mat, mat, cv::Size(init_width, init_height)); // resize图片大小;
double scale = 1.0; // 图片缩放因子
cv::Scalar mean = (123.675, 116.28, 103.53); // 均值
// blobFromImage()函数可将图片对象转换成网络模型的输入张量(tensor)
blobFromImage(mat, // image-原始image,
blod, // blob-输出张量
scale, // scale-缩放因子
cv::Size(224, 224), // size-图片张量大小
mean, // mean-所减均值, 如果图像具有BGR排序并且swapRB为真,则mean值应按(均值-R、均值-G、均值-B)顺序排列。
true, // swapRB-是否交换R与B通道
false, // crop-是否从中心裁剪调整图像
CV_32F // ddepth-输出blob的深度。选择CV_32F或CV_8U。
);
cv::TickMeter timeRecorder; // 计时器
timeRecorder.reset(); // 重置计时器
net.setInput(blod); // 将图片张量输入到网络模型
timeRecorder.start(); // 开始计时
cv::Mat pred = net.forward(); // 执行模型前向计算(模型推理)
timeRecorder.stop(); // 结束及时
double t = timeRecorder.getAvgTimeMilli(); // 返回平均时间(以毫秒为单位)
cv::Mat softmaxPred;
softmax(pred, softmaxPred); // 执行softmax()归一化操作,函数实现在下面的完整代码中给出
cv::Point classIdPoint;
double confidence;
// Mat cv::Mat::reshape(int cn, int rows=0) const; 函数不仅可以改变通道数,还可以改变数组序列形状。
cv::minMaxLoc(softmaxPred.reshape(1, 1), 0, &confidence, 0, &classIdPoint); // 获取最高的置信度及其索引
int classId = classIdPoint.x; //获取类别ID
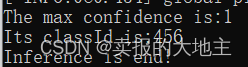
std::cout << "The max confidence is:" << confidence << '\n' << "Its classId is:" << classId << std::endl;
// std::cout << "Inference is end!" << std::endl;
//在图片上打印推理时间、置信度与列别ID
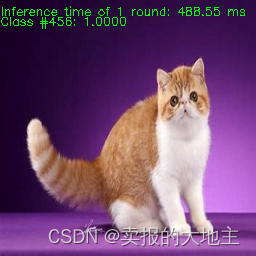
std::string label_ms = cv::format("Inference time of 1 round: %.2f ms", t);
cv::putText(mat, label_ms, cv::Point(0, 15), cv::FONT_HERSHEY_SIMPLEX, 0.4, cv::Scalar(0, 255, 0));
std::string label_infer = cv::format("%s: %.4f", cv::format("Class #%d", classId).c_str(), confidence);
cv::putText(mat, label_infer, cv::Point(0, 25), cv::FONT_HERSHEY_SIMPLEX, 0.4, cv::Scalar(0, 255, 0));
std::string WinName = "Deep learning image classification in OpenCV!";
cv::namedWindow(WinName, cv::WINDOW_FULLSCREEN);
cv::imshow(WinName, mat);
cv::waitKey();
使用opencv C++ API运行onnx模型以及推理运算的完整代码如下:
#include <opencv2/opencv.hpp>
#include <opencv2/dnn.hpp>

using namespace cv::dnn;

void softmax(cv::Mat& prob, cv::Mat& softmaxProb) {
	float maxProb = 0.0;
	float sum = 0.0;

	maxProb = *std::max_element(prob.begin<float>(), prob.end<float>());
	cv::exp(prob - maxProb, softmaxProb);
	sum = (float)cv::sum(softmaxProb)[0];
	softmaxProb /= sum;
}

int main(int argc, char argv[]) {
	std::string onnx_file_path = "E:/CS/opencv/Opencv_DNN_accelerate_optimization/pytorch2opencv/models/resnet50.onnx";
	std::string image_path = "E:/CS/opencv/Opencv_DNN_accelerate_optimization/pytorch2opencv/imgs/cat.jpg";
	Net net = readNetFromONNX(onnx_file_path);
	net.setPreferableBackend(0);
	net.setPreferableTarget(0);

	int init_width = 256;
	int init_height = 256;

	cv::Mat mat = cv::imread(image_path, -1);
	// cv::cvtColor(mat, mat, cv::COLOR_BGR2RGB);
	cv::Mat blod;
	cv::resize(mat, mat, cv::Size(init_width, init_height));
	double scale = 1.0;
	cv::Scalar mean = (123.675, 116.28, 103.53);
	blobFromImage(mat, blod, scale, cv::Size(224, 224), mean, true, false);

	cv::TickMeter timeRecorder;
	timeRecorder.reset();

	net.setInput(blod);

	timeRecorder.start();
	cv::Mat pred = net.forward();
	timeRecorder.stop();

	double t = timeRecorder.getAvgTimeMilli();
	cv::Mat softmaxPred;
	softmax(pred, softmaxPred);

	cv::Point classIdPoint;
	double confidence;
	cv::minMaxLoc(softmaxPred.reshape(1, 1), 0, &confidence, 0, &classIdPoint);
	int classId = classIdPoint.x;

	std::cout << "The max confidence is:" << confidence << '\n' << "Its classId is:" << classId << std::endl;
	std::cout << "Inference is end!" << std::endl;

	std::string label_ms = cv::format("Inference time of 1 round: %.2f ms", t);
	cv::putText(mat, label_ms, cv::Point(0, 15), cv::FONT_HERSHEY_SIMPLEX, 0.4, cv::Scalar(0, 255, 0));

	std::string label = cv::format("%s: %.4f", cv::format("Class #%d", classId).c_str(), confidence);
	cv::putText(mat, label, cv::Point(0, 25), cv::FONT_HERSHEY_SIMPLEX, 0.4, cv::Scalar(0, 255, 0));

	std::string WinName = "Deep learning image classification in OpenCV!";
	cv::namedWindow(WinName, cv::WINDOW_FULLSCREEN);
	cv::imshow(WinName, mat);
	cv::waitKey();
	return 0;
}
运行输出:
参考链接:OpenCV: Conversion of PyTorch Classification Models and Launch with OpenCV C++


 6684
6684


 被折叠的 条评论
为什么被折叠?
被折叠的 条评论
为什么被折叠?
 到【灌水乐园】发言


