


文章目录
前言(注:由于每个人的环境不同,所述方法不一定适用所有人,此笔记仅当作者自己的问题记录)
parrot ardrone2.0 + ros_indigo 问题记录
1.gazebo中插入自己的模型
gazebo版本:gazebo7.12.0
1.1 利用gazebo自带的编辑器制作模型
步骤:1.运行gazebo
	 2.点击左上角edit/building editor或model editor
	 3.绘图
	 4.保存(保存时,新建文件夹 如my_war)
保存之后 会在my_war中形成两个文件:model.config和model.sdf,将my_war文件夹整体放在./gazebo/models下。(在主文件夹下按Ctrl H 会显示./gazebo文件夹)
此时,可以打开gazebo 点击insert找见自己的模型。
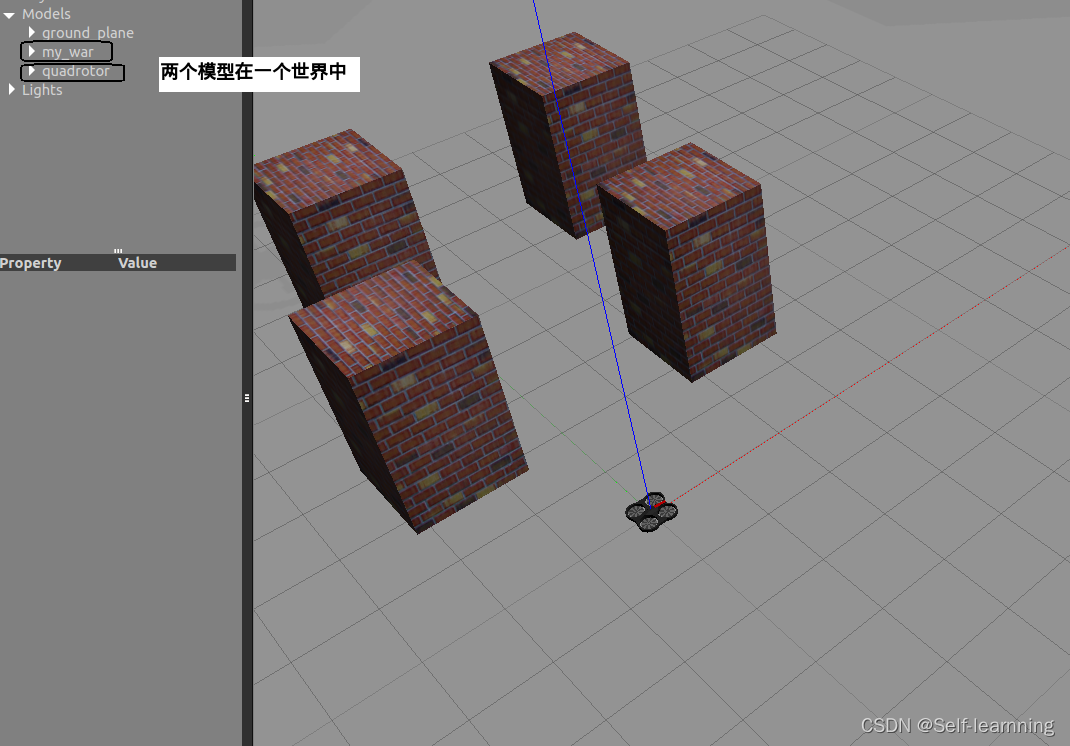
1.2 调用新建的模型和其他模型在一个world中(利用launch)
1.在自己的功能包下新建world文件夹,在该文件夹下新建.world文件。
2.在该文件内填入以下代码


<sdf version='1.6'>
  <world name='default'>
    <light name='sun' type='directional'>
      <cast_shadows>1</cast_shadows>
      <pose frame=''>0 0 10 0 -0 0</pose>
      <diffuse>0.8 0.8 0.8 1</diffuse>
      <specular>0.1 0.1 0.1 1</specular>
      <attenuation>
        <range>1000</range>
        <constant>0.9</constant>
        <linear>0.01</linear>
        <quadratic>0.001</quadratic>
      </attenuation>
      <direction>-0.5 0.5 -1</direction>
    </light>
    <model name='ground_plane'>
      <static>1</static>
      <link name='link'>
        <collision name='collision'>
          <geometry>
            <plane>
              <normal>0 0 1</normal>
              <size>100 100</size>
            </plane>
          </geometry>
          <surface>
            <friction>
              <ode>
                <mu>100</mu>
                <mu2>50</mu2>
              </ode>
              <torsional>
                <ode/>
              </torsional>
            </friction>
            <contact>
              <ode/>
            </contact>
            <bounce/>
          </surface>
          <max_contacts>10</max_contacts>
        </collision>
        <visual name='visual'>
          <cast_shadows>0</cast_shadows>
          <geometry>
            <plane>
              <normal>0 0 1</normal>
              <size>100 100</size>
            </plane>
          </geometry>
          <material>
            <script>
              <uri>file://media/materials/scripts/gazebo.material</uri>
              <name>Gazebo/Grey</name>
            </script>
          </material>
        </visual>
        <self_collide>0</self_collide>
        <kinematic>0</kinematic>
        <gravity>1</gravity>
      </link>
    </model>
    <!-- 此处加自己的模型 以下 -->
    <model name='my_war'>
      <include>
        <uri>model://my_war</uri>
      </include>
    </model>
    <!-- 此处加自己的模型 以上 -->
    <gravity>0 0 -9.8</gravity>
    <magnetic_field>6e-06 2.3e-05 -4.2e-05</magnetic_field>
    <atmosphere type='adiabatic'/>
    <physics name='default_physics' default='0' type='ode'>
      <max_step_size>0.001</max_step_size>
      <real_time_factor>1</real_time_factor>
      <real_time_update_rate>1000</real_time_update_rate>
    </physics>
    <scene>
      <ambient>0.4 0.4 0.4 1</ambient>
      <background>0.7 0.7 0.7 1</background>
      <shadows>1</shadows>
    </scene>
    <spherical_coordinates>
      <surface_model>EARTH_WGS84</surface_model>
      <latitude_deg>0</latitude_deg>
      <longitude_deg>0</longitude_deg>
      <elevation>0</elevation>
      <heading_deg>0</heading_deg>
    </spherical_coordinates>
    <state world_name='default'>
      <sim_time>581 925000000</sim_time>
      <real_time>38 808833466</real_time>
      <wall_time>1618890393 270034891</wall_time>
      <iterations>36891</iterations>
      <model name='ground_plane'>
        <pose frame=''>0 0 0 0 -0 0</pose>
        <scale>1 1 1</scale>
        <link name='link'>
          <pose frame=''>0 0 0 0 -0 0</pose>
          <velocity>0 0 0 0 -0 0</velocity>
          <acceleration>0 0 0 0 -0 0</acceleration>
          <wrench>0 0 0 0 -0 0</wrench>
        </link>
      </model>
      <light name='sun'>
        <pose frame=''>0 0 10 0 -0 0</pose>
      </light>
    </state>
    <gui fullscreen='0'>
      <camera name='user_camera'>
        <pose frame=''>-5.57259 -2.71913 2.87031 0 0.265358 0.347715</pose>
        <view_controller>orbit</view_controller>
        <projection_type>perspective</projection_type>
      </camera>
    </gui>
  </world>
</sdf>

3.新建.launch文件
在launch文件中填入以下代码:
<?xml version="1.0"?>
<launch>
	<!-- We resume the logic in empty_world.launch, changing only the name of the world to be launched -->
	<include file="$(find gazebo_ros)/launch/empty_world.launch">
	<arg name="world_name" value="$(find cvg_sim_gazebo)/worlds/war.world"/>
	</include>

	<!-- Spawn simulated quadrotor uav -->
	<include file="$(find cvg_sim_gazebo)/launch/spawn_quadrotor.launch" >
	<arg name="model" value="$(find cvg_sim_gazebo)/urdf/quadrotor_sensors.urdf.xacro"/>
	</include>

  	<arg name="pid_namespace" default="pandora_ardrone2_pid" />

  	<node
    	name="pandora_ardrone2_pid_node"
    	type="pandora_ardrone2_pid_node"
    	pkg="pandora_ardrone2_pid"
    	respawn="False"
    	output="screen"
    	ns="$(arg pid_namespace)" >
  	</node>


</launch>

4.运行 roslaunch roslaunch cvg_sim_gazebo ar_tag_test_new.launch
1.3修改parrot模型在gazebo中的初始位置
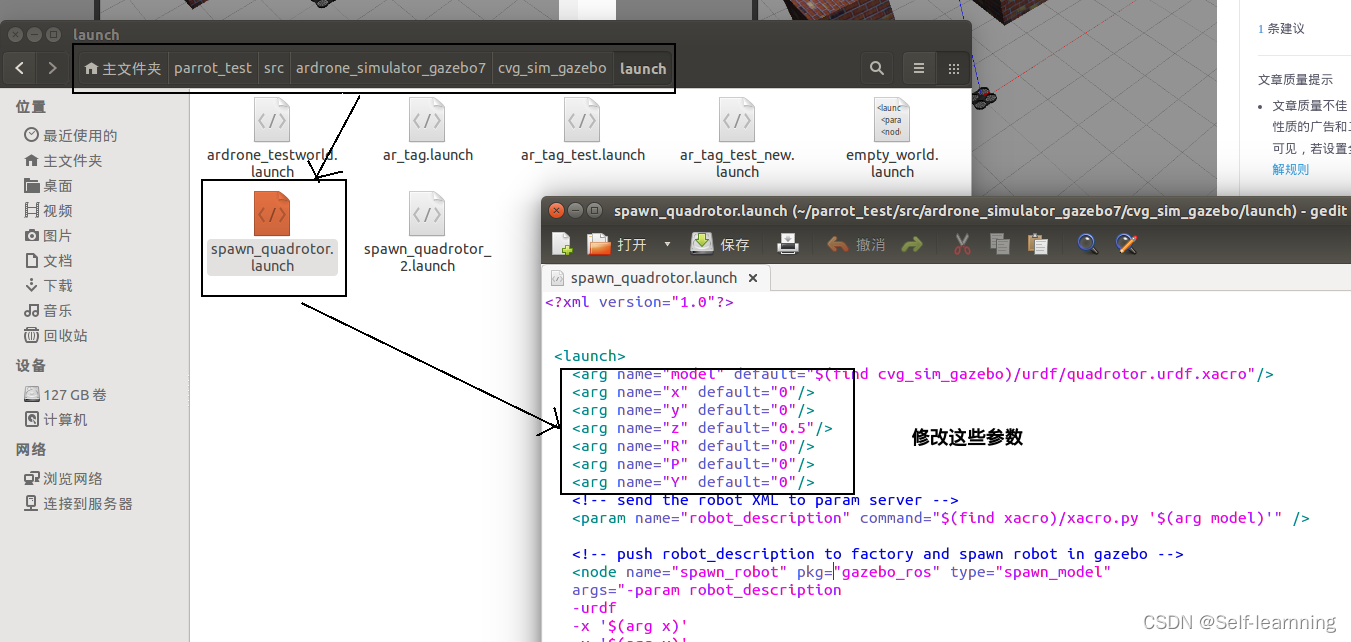
各个标签的含义:http://sdformat.org/spec?ver=1.9&elem=model#include_pose
1.4 仿真复位:rosservice call /gazebo/reset_simulation "{}"
2 rospkg.common.ResourceNotFound: rosgraph
2.1 问题描述
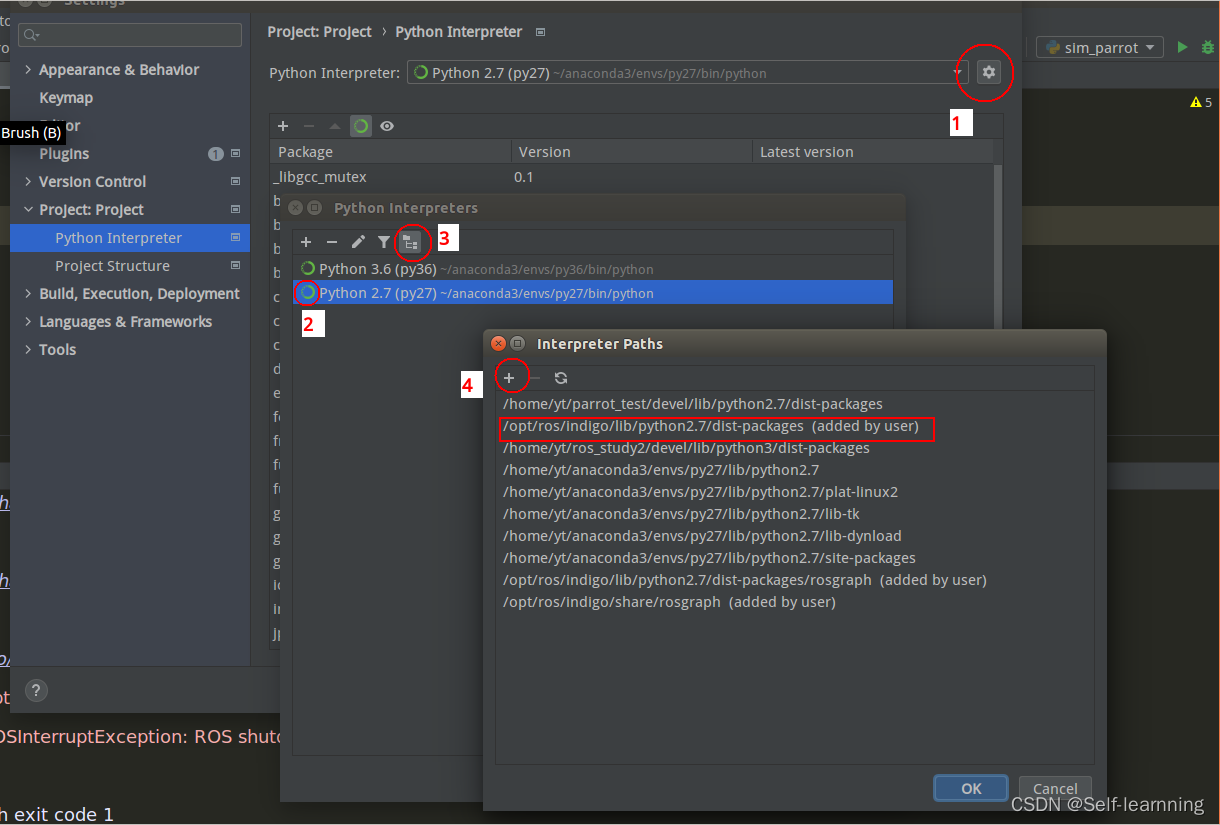
在pycharm中运行ros程序是,提示rospkg.common.ResourceNotFound: rosgraph,但是在终端运行无问题。并且运行rospack find rosgraph”也能找到rosgraph。
2.2 解决方法:
1.配置路径:File->Settings->Project Interpreter->右边小齿轮Show All->选中正在使用的python
点击右边最下面的图标,打开Interpreter Path
添加/opt/ros/indigo/lib/python2.7/dist-packages
2.修改PYCHARM启动文件(UBUNTU):
gedit ~/.local/share/applications/jetbrains-pycharm.desktop(有的人可能gedit /usr/share/applications)

找到exec语句:Exec="/usr/lib/pycharm-community/bin/pycharm.sh" %f(修改前)
Exec=bash -i -c "/usr/lib/pycharm-community/bin/pycharm.sh" %f(修改后)

将该文件复制到桌面,右键属性,选择权限,改为可执行文件

至此 桌面会生成一个快捷键。
warning:在使用pycharm2020.1的时候,按以上步骤,发现rosgraph仍然报错,然后卸载 重新安装pycharm2021.1.3版本,问题解决。


 4250
4250


 被折叠的 条评论
为什么被折叠?
被折叠的 条评论
为什么被折叠?
 到【灌水乐园】发言


