


本文只记录如何实现两个核之间简单的软中断,之后如果更深入在做详细更新
目录
1、创建FSBL
首先需要创建一个FSBL(First Stage Boot Loader 负责PS的初始化核PL的加载)用于加载核0和核1,修改main.c,在main函数前加入下面的代码,参考ug585-Zynq-7000-TRM
#define sev() __asm__("sev")
#define CPU1STARTADR 0xFFFFFFF0
#define CPU1STARTMEM 0x2000000
void StartCpu1(void)
{
    #if 1
    fsbl_printf(DEBUG_GENERAL,"FSBL: Write the address of the application for CPU 1 to 0xFFFFFFF0\n\r");
    Xil_Out32(CPU1STARTADR, CPU1STARTMEM);
    dmb(); //waits until write has finished
    fsbl_printf(DEBUG_GENERAL,"FSBL: Execute the SEV instruction to cause CPU 1 to wake up and jump to the application\n\r");
    sev();
    #endif
}
在mian.c中load boot image之后执行StartCpu1()函数;

2、创建第一个核 APP_CORE0
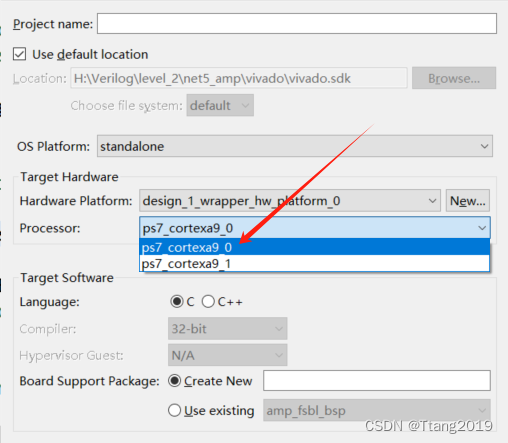
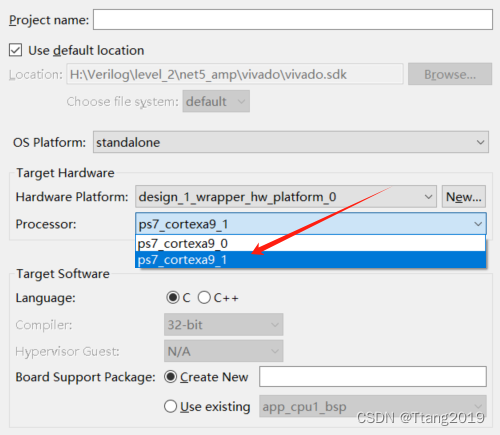
注意processor选择后缀为0的核,之后选择helloworld模板
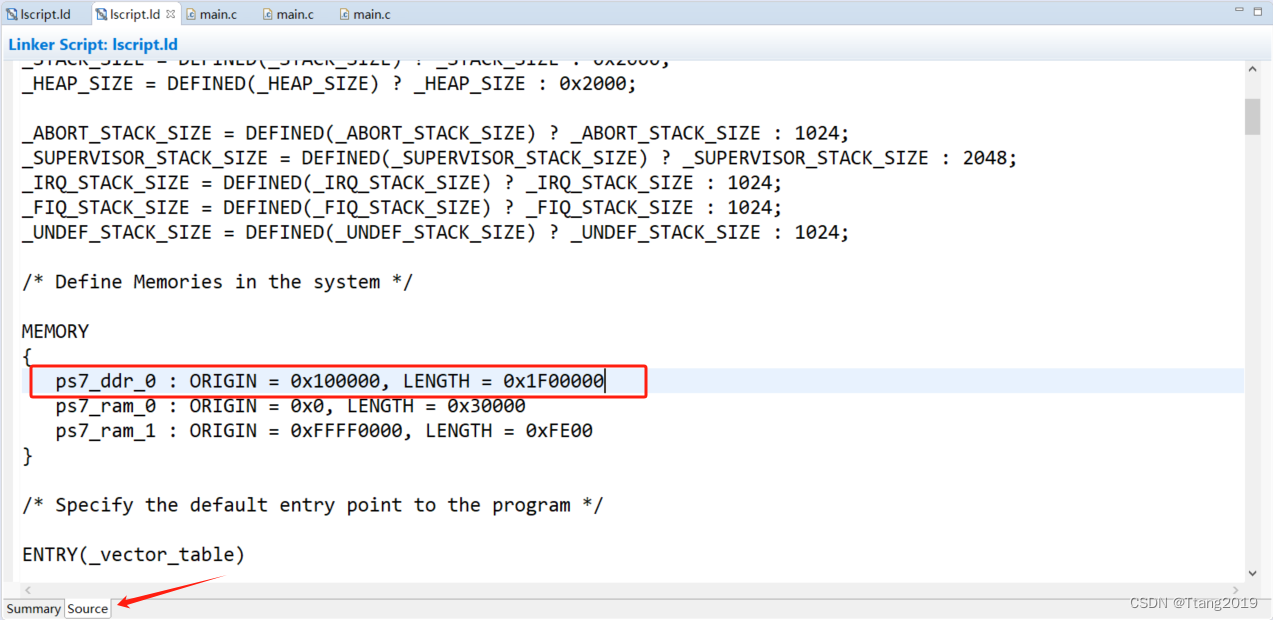
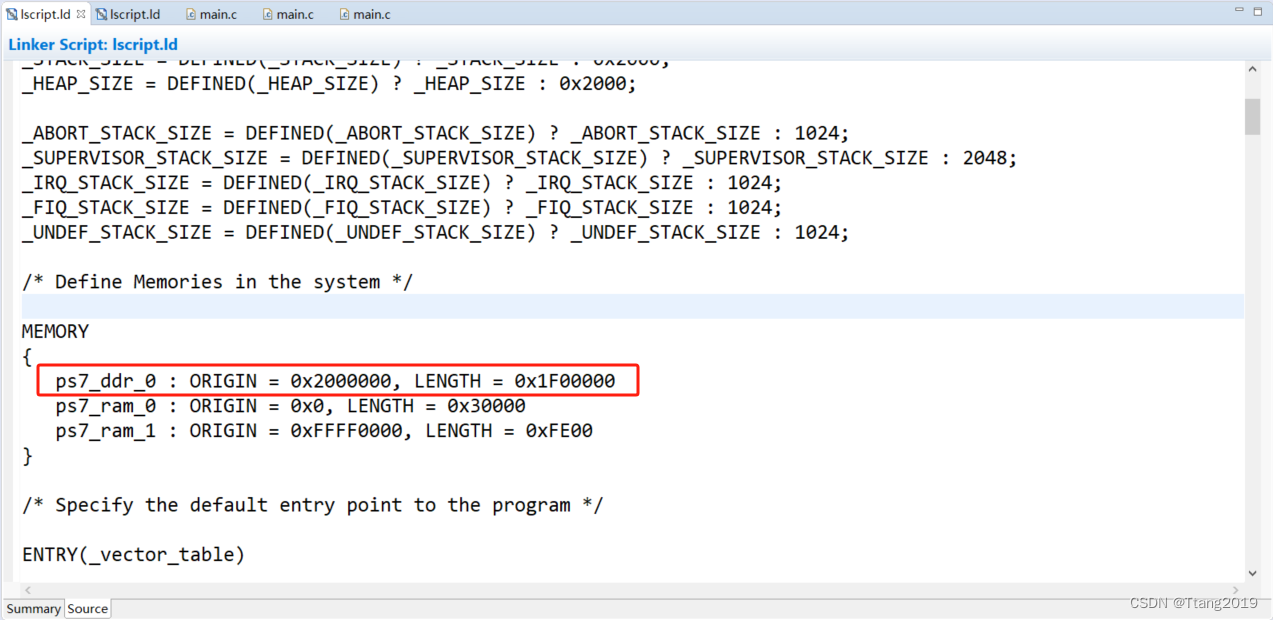
修改core0的代码空间,在Iscript.Id中,点source到修改界面
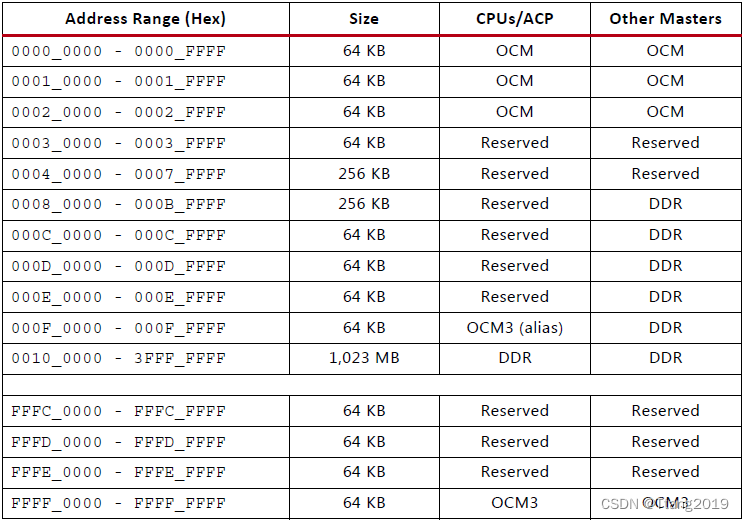
将helloworld.c改为main.c,在main.c中有一个宏定义变量COMM_VAL,程序通过此变量访问OCM(on chip memory)完成共享内存的访问,下图是具体的地址范围,下方使用的OCM3
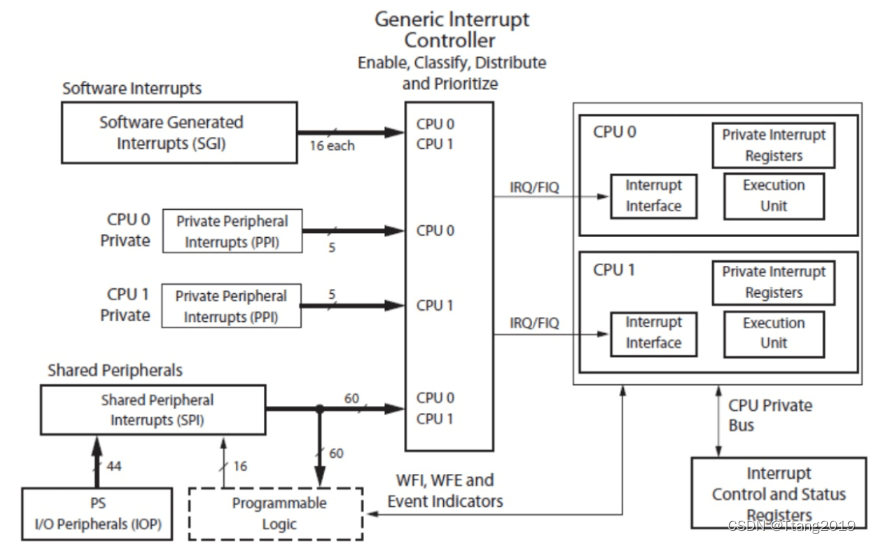
将main.c中的代码替换以下代码,其中 GIC_ID 是中断id在xparameters.h中可以找到,CPU0_SW_INTR 和 CPU1_SW_INTR 是核0的软中断id,具体id是可选的在下方图片中,Xil_SetTlbAttributes函数小弟还不是很明白,求大佬解答后面两个参数是什么意思
#include <stdio.h>
//#include "platform.h"
#include "xil_printf.h"
#include "xparameters.h"
#include "xscugic.h"
// will data point share ram ocm3
#define COMM_VAL (*(volatile unsigned long*)(0xFFFF0000))
#define GIC_ID XPAR_PS7_SCUGIC_0_DEVICE_ID
#define CPU0_SW_INTR 0x0d
#define CPU1_SW_INTR 0x0e

static XScuGic ScuGic;
static XScuGic_Config *ScuGicCfgPtr;

int InitSWIntr();
void cup0intrHandler(void *CallBackRef);

int main()
{
	COMM_VAL = 0;
    // cup0 -> cache -> ram <- cup1
	// disable onchip memory cache
	Xil_SetTlbAttributes(0xFFFF0000,0x14de2);
	int status;
	status = InitSWIntr();
	if(status != XST_SUCCESS){
		return status;
	}
	while(1){
		printf("Hello world cpu0!\n\r");
		XScuGic_SoftwareIntr(&ScuGic,CPU1_SW_INTR,XSCUGIC_SPI_CPU1_MASK);
		COMM_VAL = 1;
		while(COMM_VAL == 1){

		}
	}
    return 0;
}
之后就是中断的配置,在connect连接的时候因为软中断是直接到控制器的,不像gpio需要先到共享中断在调用自己写的函数,所有在connect直接写自己的中断触发函数就可以了
int InitSWIntr(){
	int status;
    // 初始化异常
	Xil_ExceptionInit();
    // 寻找中断
	ScuGicCfgPtr = XScuGic_LookupConfig(GIC_ID);
    // 初始化中断
	status = XScuGic_CfgInitialize(&ScuGic,ScuGicCfgPtr,ScuGicCfgPtr->CpuBaseAddress);
	if(status != XST_SUCCESS){
		return status;
	}
    // 注册异常处理然后回调到cpu
	Xil_ExceptionRegisterHandler(XIL_EXCEPTION_ID_INT,(Xil_ExceptionHandler)XScuGic_InterruptHandler,&ScuGic);
    // 连接软中断并注册软中断函数
	status = XScuGic_Connect(&ScuGic,CPU0_SW_INTR,(Xil_InterruptHandler)cup0intrHandler,&ScuGic);
    // 使能中断控制器
	XScuGic_Enable(&ScuGic,CPU0_SW_INTR);
	if(status != XST_SUCCESS){
		return status;
	}
    // 使能异常
	Xil_ExceptionEnable();
	return XST_SUCCESS;
}
3、创建第二个核 APP_CORE2
第二个核和一个核操作基本一样只需修改少许就可以让程序跑起来了,在创建的时候选择核1
首先需要修改的是地址空间
然后将mian.c替换为下方代码,其实修改的不多,自己看吧,之后就可以debug了
include <stdio.h>
//#include "platform.h"
#include "xil_printf.h"
#include "xparameters.h"
#include "xscugic.h"
// will data point share ram ocm3
#define COMM_VAL (*(volatile unsigned long*)(0xFFFF0000))
#define GIC_ID XPAR_PS7_SCUGIC_0_DEVICE_ID
#define CPU0_SW_INTR 0x0d
#define CPU1_SW_INTR 0x0e

static XScuGic ScuGic;
static XScuGic_Config *ScuGicCfgPtr;

int InitSWIntr();
void cup1intrHandler(void *CallBackRef);

int main()
{
	COMM_VAL = 0;
    // cup0 -> cache -> ram <- cup1
	// disable onchip memory cache
	Xil_SetTlbAttributes(0xFFFF0000,0x14de2);
	int status;
	status = InitSWIntr();
	if(status != XST_SUCCESS){
		return status;
	}
	while(1){
		printf("Hello world cpu1!\n\r");
		XScuGic_SoftwareIntr(&ScuGic,CPU0_SW_INTR,XSCUGIC_SPI_CPU0_MASK);
		COMM_VAL = 0;
		while(COMM_VAL == 0){

		}
	}
    return 0;
}

int InitSWIntr(){
	int status;
	Xil_ExceptionInit();
	ScuGicCfgPtr = XScuGic_LookupConfig(GIC_ID);
	status = XScuGic_CfgInitialize(&ScuGic,ScuGicCfgPtr,ScuGicCfgPtr->CpuBaseAddress);
	if(status != XST_SUCCESS){
		return status;
	}
	Xil_ExceptionRegisterHandler(XIL_EXCEPTION_ID_INT,(Xil_ExceptionHandler)XScuGic_InterruptHandler,&ScuGic);
	status = XScuGic_Connect(&ScuGic,CPU1_SW_INTR,(Xil_InterruptHandler)cup1intrHandler,&ScuGic);
	XScuGic_Enable(&ScuGic,CPU1_SW_INTR);
	if(status != XST_SUCCESS){
		return status;
	}
	Xil_ExceptionEnable();
	return XST_SUCCESS;
}

void cup1intrHandler(void *CallBackRef){
	printf("cpu0 interrupt cpu1!!\n\r");
}


 1475
1475

 被折叠的 条评论
为什么被折叠?
被折叠的 条评论
为什么被折叠?
 到【灌水乐园】发言


