


1.三角形颜色插值
顶点着色器:
const char *vertexShaderSource ="#version 330 core\n"
                                "layout (location = 0) in vec3 aPos;\n"
                                "layout (location = 1) in vec3 aColor;\n"
                                "out vec3 ourColor;\n"
                                "void main()\n"
                                "{\n"
                                "   gl_Position = vec4(aPos, 1.0);\n"
                                    "   ourColor = aColor;\n"
                                "}\0";
片段着色器
const char *fragmentShaderSource = "#version 330 core\n"
                                    "out vec4 FragColor;\n"
                                    "in vec3 ourColor;\n"
                                    "void main()\n"
                                    "{\n"
                                    "   FragColor = vec4(ourColor, 1.0f);\n"
                                    "}\n\0";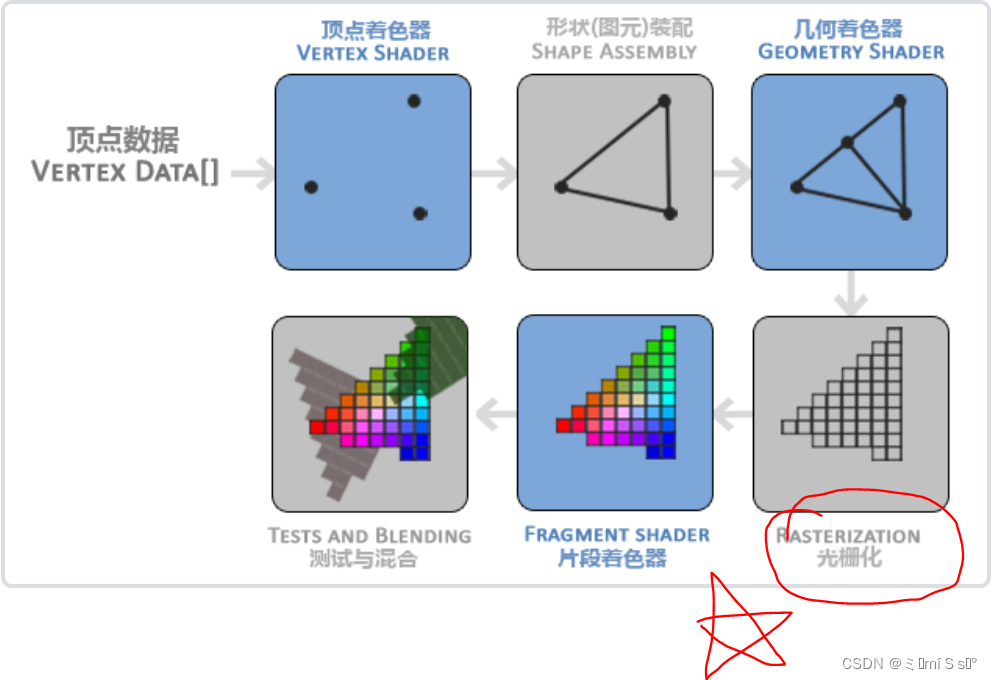
当渲染一个三角形时,光栅化(Rasterization)阶段通常会造成比原指定顶点更多的片段。光栅会根据每个片段在三角形形状上所处相对位置决定这些片段的位置。
基于这些位置,它会插值(Interpolate)所有片段着色器的输入变量。(颜色、法线、光照等)在顶点着色器中提供顶点颜色,在光栅化过程中(应该是这样)会对每个片段的颜色进行插值计算。
插值结果:
2.冯氏光照模型(Phong Lighting Model)
2.1Gouraud着色(Gouraud Shading)
早期:在顶点着色器中实现冯氏光照模型。
优势:相比片段来说,顶点要少得多,因此会更高效,所以(开销大的)光照计算频率会更低。
缺点:然而,顶点着色器中的最终颜色值是仅仅只是那个顶点的颜色值,片段的颜色值是由插值光照颜色所得来的。结果就是这种光照看起来不会非常真实,除非使用了大量顶点。
在顶点着色器中实现的冯氏光照模型叫做Gouraud着色(Gouraud Shading),而不是冯氏着色(Phong Shading)。由于插值,这种光照看起来有点逊色。冯氏着色能产生更平滑的光照效果。
So what do we see? You can see (for yourself or in the provided image) the clear distinction of the two triangles at the front of the cube. This 'stripe' is visible because of fragment interpolation. From the example image we can see that the top-right vertex of the cube's front face is lit with specular highlights. Since the top-right vertex of the bottom-right triangle is lit and the other 2 vertices of the triangle are not, the bright values interpolates to the other 2 vertices. The same happens for the upper-left triangle. Since the intermediate fragment colors are not directly from the light source but are the result of interpolation, the lighting is incorrect at the intermediate fragments and the top-left and bottom-right triangle collide in their brightness resulting in a visible stripe between both triangles. This effect will become more apparent when using more complicated shapes.
在顶点着色器中计算出每个顶点的光照颜色,光栅化的过程根据片段的位置,对每个三角形的光照颜色进行插值,导致两个三角形之间出现了一条高亮的条纹。

// Vertex shader:
// ================
#version 330 core
layout (location = 0) in vec3 aPos;
layout (location = 1) in vec3 aNormal;

out vec3 LightingColor; // resulting color from lighting calculations

uniform vec3 lightPos;
uniform vec3 viewPos;
uniform vec3 lightColor;

uniform mat4 model;
uniform mat4 view;
uniform mat4 projection;

void main()
{
    gl_Position = projection * view * model * vec4(aPos, 1.0);

    // gouraud shading
    // ------------------------
    vec3 Position = vec3(model * vec4(aPos, 1.0));
    vec3 Normal = mat3(transpose(inverse(model))) * aNormal;

    // ambient
    float ambientStrength = 0.1;
    vec3 ambient = ambientStrength * lightColor;

    // diffuse
    vec3 norm = normalize(Normal);
    vec3 lightDir = normalize(lightPos - Position);
    float diff = max(dot(norm, lightDir), 0.0);
    vec3 diffuse = diff * lightColor;

    // specular
    float specularStrength = 1.0; // this is set higher to better show the effect of Gouraud shading
    vec3 viewDir = normalize(viewPos - Position);
    vec3 reflectDir = reflect(-lightDir, norm);
    float spec = pow(max(dot(viewDir, reflectDir), 0.0), 32);
    vec3 specular = specularStrength * spec * lightColor;

    LightingColor = ambient + diffuse + specular;
}


// Fragment shader:
// ================
#version 330 core
out vec4 FragColor;

in vec3 LightingColor;

uniform vec3 objectColor;

void main()
{
   FragColor = vec4(LightingColor * objectColor, 1.0);
}
2.2冯氏着色(Phong Shading)
在片段着色器中进行每个片段的光照的计算,每个片段都要计算,计算量大,但效果较好(gouraud着色只要计算每个顶点的光照,光栅化会产生很多片段,这些片段的光照通过插值计算,计算量较小);
再通过 光的颜色*物体颜色 得到物体最终的颜色。
//vs
#version 330 core
layout (location = 0) in vec3 aPos;
layout (location = 1) in vec3 aNormal;

out vec3 FragPos;	//顶点在世界空间中的坐标
out vec3 Normal;	//世界空间中的法向量

uniform mat4 model;
uniform mat4 view;
uniform mat4 projection;

void main(){
	FragPos = vec3(model * vec4(aPos,1.0));
	//把法向量转换成世界空间坐标
	//由于不等比缩放会破坏法线,所以要使用专门的法线矩阵:model左上角3*3的逆矩阵的转置矩阵
	Normal = mat3(transpose(inverse(model))) * aNormal;

	//默认是归一化的裁剪空间坐标,xyz各个维度的范围为-1到1,仅能在顶点着色器中使用,既是输入也是输出
	gl_Position = projection * view * vec4(aPos,1.0);
}
一些要点:
(1)环境光——可以设置为 光照*一个很小的系数
(2)所有光照计算都是在世界空间中进行的,所以初始坐标和法向量要转化成世界空间中的坐标。 使用模型矩阵(model)
//顶点转化成世界空间的坐标
FragPos = vec3(model * vec4(aPos,1.0));//把法向量转换成世界空间坐标
//由于不等比缩放会破坏法线,所以要使用专门的法线矩阵:model(原变换矩阵)左上角3*3的逆矩阵的转置矩阵
Normal = mat3(transpose(inverse(model))) * aNormal;(3)float diff = max(dot(norm,lightDir), 0.0);
如果法向量和光线的夹角超过90度,dot()点乘结果为负值,取0,相当于没有漫反射光的影响
//fs
#version 330 core
out vec4 Fragcolor;

in vec3 Normal;		//世界空间中的法向量
in vec3 FragPos;	//世界空间中的坐标

uniform vec3 lightPos;	//光源位置
uniform vec3 viewPos;	//观察点位置,在世界空间中就是摄像机的位置
uniform vec3 lightColor;
uniform vec3 objectColor;

void main(){
	//ambient环境光
	float ambientStrength = 0.1;
	vec3 ambient = ambientStrength * lightColor;	//环境光,可以设置为 光照*一个很小的系数

	//diffuse漫反射光
	vec3 norm = normalize(Normal);					//法向量
	vec3 lightDir = normalize(lightPos - FragPos);	//光源方向,指向光源
	float diff = max(dot(norm,lightDir), 0.0);		//漫反射系数:由法向量和光源方向的夹角决定
	vec3 diffuse = diff * lightColor;				//漫反射光

	//specular镜面反射
	float specularStrength = 0.5;							//镜面反射强度
	vec3 viewDir = normalize(viewPos - FragPos);			//视线方向,指向观察点
	vec3 refelectDir = reflect(-lightDir,norm);				//光线反射方向,要求第一个参数指向物体片段
	float spec = pow(max(dot(viewDir,refelectDir), 0), 32);	//反射系数 ; 32是高光的反光度(Shininess)。一个物体的反光度越高,反射光的能力越强,散射得越少,高光点就会越小
	vec3 specular = specularStrength * spec *lightColor;	//镜面反射光

	vec3 result = (ambient + diffuse + specular) * objectColor;
	Fragcolor = vec4(result,1.0);

}


 492
492


 被折叠的 条评论
为什么被折叠?
被折叠的 条评论
为什么被折叠?
 到【灌水乐园】发言


