


使用
NuGet包下载 -- > Prism.Unity

框架中的数据与行为
BindableBase
在ViewModel中需要继承此类
通知属性的三种方式:
public class MainViewModel : BindableBase
{
    // 基本的通知属性
    private string _value;

    public string Value
    {
        get { return _value; }
        set
        {
            // 通知属性 第一种方式
            SetProperty<string>(ref _value, value);
            // 第二种方式
            //_value = value;
            //this.RaisePropertyChanged("Value");
            // 第三种方式
            //_value = value;
            //this.OnPropertyChanged(new System.ComponentModel.PropertyChangedEventArgs("Value"));
        }
    }
}
DelegateCommand/DelegateCommand<T>
 // 命令属性定义
 public DelegateCommand<object> BtnCommand { get; set; }

 public MainViewModel()
 {
     // 初始化
     BtnCommand = new DelegateCommand<object>((arg) =>
     {

     });
 }
基本逻辑处理
IOC:项目初始化,Unity
安装Prism.Unity -- NuGet包
在APP.xaml中需要改为:需要StartupUri 去掉
<p:PrismApplication x:Class="XH.PrismInitialize.App"
                    xmlns="http://schemas.microsoft.com/winfx/2006/xaml/presentation"
                    xmlns:x="http://schemas.microsoft.com/winfx/2006/xaml"
                    xmlns:local="clr-namespace:XH.PrismInitialize"
                    xmlns:p="http://prismlibrary.com/">
  <Application.Resources>

  </Application.Resources>
</p:PrismApplication>
并且APP.xaml.cs文件中,APP也要继承PrismApplication类,并且完成以下两个抽象方法:
在CreateShell()方法中,写初始化哪个窗口
public partial class App : PrismApplication
 {
    public App()
    {

    }
    // 初始化第一种方式
    // 提供主窗口的对象
    protected override Window CreateShell()
    {
        return new MainWindow() { Title = "Prism Start"};
    }

    // 业务中所需要的注入对象,在这个方法里注册
    protected override void RegisterTypes(IContainerRegistry containerRegistry)
    {

    }
}
初始化也可以用第二种方法:PrismBootstrapper
需要写个信的类,继承PrismBootstrapper
这里面重写的两个方法,和刚才的两个抽象方法是一样的作用
 // 启动项
 public class StartUp : PrismBootstrapper
 {

     // 提供主窗口的对象
     protected override DependencyObject CreateShell()
     {
         return new MainWindow() { Title = "Prism Start" };
     }

     // 业务中所需要的注入对象,在这个方法里注册
     protected override void RegisterTypes(IContainerRegistry containerRegistry)
     {

     }
 }
在APP.xaml.cs的构造函数中写入: 即可
 public App()
 {
     new StartUp().Run();
 }
注入IEventAggregator
注入使用
第一步:在需要使用的ViewModel中构造函数注入即可:
public MainWindow(IEventAggregator eventAggregator)
{
    InitializeComponent();
}
第二步:需要在APP的CreateShell方法中进行写注入:
以下两种写法都可以
protected override Window CreateShell()
{
    // 第一种
    //var ea = Container.Resolve<IEventAggregator>();
    //return new MainWindow(ea) { Title = "Prism Start" };

    // 第二种
    return Container.Resolve<MainWindow>();
}
静态使用
单独创建一个类,进行初始化IEventAggregator类,进行静态调用即可:
public class Messenger
{
    private Messenger() { }
    public static IEventAggregator Defualt { get; set; }
}
在APP中进行初始化
Messenger.Defualt = Container.Resolve<IEventAggregator>();属性注入、参数多实现注入
以下代码中,静态和注入都是一样的,都是同一个消息总线对象
GetEvents<T> where T : EventBase, new();
订阅无参
public MainWindow(IEventAggregator eventAggregator)
{
    InitializeComponent();
    // 订阅无参
    eventAggregator.GetEvent<EventMessage>().Subscribe(Receive);
    // 发布
    eventAggregator.GetEvent<EventMessage>().Publish();
}

// 无参数触发
private void Receive()
{

}
订阅有参:
public MainWindow(IEventAggregator eventAggregator)
{
    InitializeComponent();

    // 订阅带参
    // 全局静态处理 和 eventAggregator 是同一个对象
    Messenger.Defualt.GetEvent<EventMessageArgs>().Subscribe(Receive);
    // 静态发布
    Messenger.Defualt.GetEvent<EventMessageArgs>().Publish("Hello");
}

// 有参数触发
private void Receive(object obj)
{

}
订阅List:
public MainWindow(IEventAggregator eventAggregator)
{
    InitializeComponent();
    // 类订阅
    Messenger.Defualt.GetEvent<EventMessageArgsList<EventMessageList>>().Subscribe(Receive);

    // 类触发
    Messenger.Defualt.GetEvent<EventMessageArgsList<EventMessageList>>().Publish(new EventMessageList()
    {
        Name = "张三",
        Age = 18
    });
}
// list 触发
private void Receive(EventMessageList list)
{

}
利用委托传值:
事件类:
// 无参数触发
public class EventMessage : PubSubEvent { }

// 参数触发
public class EventMessageArgs : PubSubEvent<object> { }

// 类型参数触发
public class EventMessageArgsList<T> : PubSubEvent<T> { }

public class EventAction
{
    public Action<bool> ResultAction { get; set; }
}
在SubWin中订阅:
public SubWindow()
{
    InitializeComponent();

    // 订阅
    Messenger.Defualt.GetEvent<EventMessageArgs>().Subscribe(Receive);
}

private void Receive(object obj)
{
    var ea = (EventAction)obj;
    ea.ResultAction?.Invoke(true);
}
在MainWin中发布:
// 发布
Messenger.Defualt.GetEvent<EventMessageArgs>().Publish(new EventAction()
{
    ResultAction = new Action<bool>(state =>
    {

    })
});
触发顺序:SubWin订阅--> MainWin发布-->SubWin 的 Receive方法 --> MainWin 的 ResultAction方法
订阅参数
无参数订阅
Messenger.Defualt.GetEvent<EventMessageArgs>().Subscribe(Receive);
 private void Receive() { }
过滤参数订阅
第一个参数:执行方法
第二个参数:过滤器,可以根据什么条件进行过滤,满足条件之后才会执行第一个参数方法
订阅:
Messenger.Defualt.GetEvent<EventMessageArgs>().Subscribe(Receive, obj => obj.Id == 1);

private void Receive(DataModel obj) { }
发布:
Messenger.Defualt.GetEvent<EventMessageArgs>().
Publish(new DataModel { Id = 2, Text = "Hello" });以上的两个方法中,不会触发Receive,因为只过滤了 id == 1 的数据
消息委托的引用方式
第二个参数默认设置为false,指定委托的强引用和弱引用:
true:强引用,不关闭一直打开,在对象销毁的时候做注销操作;
false:弱引用,自动释放
Messenger.Defualt.GetEvent<EventMessageArgs>().Subscribe(Receive,true);
private void Receive(DataModel obj) { }
多线程控制
PublisherThread:
发布者在什么线程发布的,注册的逻辑就在哪个线程执行 默认此方法
UIThread:
不管发布者在什么线程发布的,注册的逻辑总是在非UI线程(主线程)执行
如果在执行逻辑里有页面的操作,可以使用这个
BackgroundThread:
不管发布者在哪个线程发布,注册的逻辑总是在后台线程执行
例如写日志,不在UI线程和当前线程执行,就在后台线程执行
新建一个线程,把当前逻辑包起来 跟发布方无关
Messenger.Defualt.GetEvent<EventMessageArgs>().
    Subscribe(Receive1, Prism.Events.ThreadOption.BackgroundThread);

// 在这个里面可以获取线程ID
private void Receive1(DataModel obj)
{
    var id = Thread.CurrentThread.ManagedThreadId;
}
弹窗对象
使用
创建一个弹出窗口的内容:一般是UserControl(不是Window)
传递一个名称:窗口内容对象的名称
窗口内容:UCDetail UserControl
名称:UCDetail,应该是内容注册的时候给定的名称
前提是IOC容器中,创建一个UCDetail类型的对象
每次打开的页面都是新实例
window 会报错:

注入:IDialogService:用来执行弹窗动作,一般注入到某个VM中调用 一般是调用方
 public MainViewModel( IDialogService dialogService)
 {
     _dialogService = dialogService;
     OpenCommand = new DelegateCommand(OnOpen);
 }
注册弹窗内容(内容需要注册到IoC容器),对应ViewModel实现IDialogAware接口
在APP.xaml.cs中注册:
public partial class App : PrismApplication
{
    protected override Window CreateShell()
    {
        return Container.Resolve<MainWindow>();
    }

    protected override void RegisterTypes(IContainerRegistry containerRegistry)
    {
        // 注册弹窗内容
        containerRegistry.RegisterDialog<UCDetail>("Detail");

        // 注册弹窗窗口,这句代码会将框架内的默认弹窗窗口替换掉
        containerRegistry.RegisterDialogWindow<DialogParent>();
    }
}
弹窗的xaml.cs文件:
 public UCDetail(IContainerProvider containerProvider)
 {
     InitializeComponent();

     // 1.明确需要获取某个对象 并且这个对象里需要自动注入一些内容
     // 2.在IOC创建的过程,需要注入的对象,都需要注册
     this.DataContext = containerProvider.Resolve<DetailViewModel>();
 }
弹窗的ViewModel:
public class DetailViewModel : IDialogAware
{
    // 弹出窗口的标题
    public string Title => "Hello Dialog";

    // 执行关闭返回的结果
    public event Action<IDialogResult> RequestClose;

    // 当前打开的窗口是否允许关闭
    public bool CanCloseDialog()
    {
        return true;
    }

    // 弹出窗口关闭时执行逻辑
    public void OnDialogClosed()
    {

    }

    // 弹出窗口打开时执行逻辑
    public void OnDialogOpened(IDialogParameters parameters)
    {

    }
}
窗口配置:在内容UserControl对象中,进行样式设置 p:Dialog.WindowStyle
可以根据设置window一样设置窗口
<p:Dialog.WindowStyle>
  <Style TargetType="Window">
    <Setter Property="Height" Value="300" />
    <Setter Property="Width" Value="300" />
    <Setter Property="WindowChrome.WindowChrome">
      <Setter.Value>
        <WindowChrome GlassFrameThickness="-1" />
      </Setter.Value>
    </Setter>
  </Style>
</p:Dialog.WindowStyle>
注册弹窗窗口,对应窗口实现IDialogWindow接口
1、新建一个window窗口,然后注册
// 注册弹窗窗口,这句代码会将框架内的默认弹窗窗口替换掉
containerRegistry.RegisterDialogWindow<DialogParent>();
窗口关闭状态
同过IDialogResult传值,然后穿给打开窗口方
窗口ViewModel:
public DelegateCommand CloseCommand { get; set; }

public DetailViewModel()
{
    CloseCommand = new DelegateCommand(OnClose);
}

private void OnClose()
{
    IDialogResult dialogResult = new DialogResult();
    dialogResult.Parameters.Add("A", true);
    dialogResult.Parameters.Add("value", Value);
    RequestClose?.Invoke(dialogResult);
}
调用方ViewModel:
 private void OnOpen()
 {
     // 获取弹窗关闭时的返回结果
     // ShowDialog(string name, Action<IDialogResult> callback)
     _dialogService.ShowDialog("Detail", OnDialogClosed);

 }

 private void OnDialogClosed(IDialogResult result)
 {
     // 根据键值对获取返回的值 做对应的处理
     Value = result.Parameters.GetValue<string>("value");
 }
总结
创建一个弹出窗口的内容:一般是UserControl(不是Window)
注入:IDialogService 用来执行弹窗动作,一般注入到某个VM中调用
注册弹窗内容(内容需要注册到IoC容器),对应ViewModel实现 IDialogAware接口
窗口配置:在内容UserControl对象中,进行样式设置 p:Dialog.WindowStyle
注册弹窗窗口,对应窗口实现 IDialogWindow接口
ViewModel的自动匹配
xaml中使用的属性:
p:ViewModelLocator.AutoWireViewModel="True":是否自动匹配
默认为True符合Prism的匹配规则
<Window x:Class="XH.PrismViewModelLocator.Views.LoginView"
  xmlns="http://schemas.microsoft.com/winfx/2006/xaml/presentation"
  xmlns:x="http://schemas.microsoft.com/winfx/2006/xaml"
  xmlns:d="http://schemas.microsoft.com/expression/blend/2008"
  xmlns:mc="http://schemas.openxmlformats.org/markup-compatibility/2006"
  xmlns:local="clr-namespace:XH.PrismViewModelLocator.Views"
  xmlns:p="http://prismlibrary.com/"
  p:ViewModelLocator.AutoWireViewModel="True"
  mc:Ignorable="d"
  Title="LoginView" Height="450" Width="800">
  <StackPanel>
    <TextBlock Text="{Binding UserName}"  />
  </StackPanel>
</Window>
标准状态:
ViewModel与视图类型位于同一个程序集中
ViewModel位于.ViewModels(ViewModel)子命名空间中
View位于.Views(View)子命名空间中
ViewModel名称与视图名称对应,以“ViewModel”结尾
个性化配置:
在启动位置(PrismApplication/PrismBootstrapper)重写ConfigureViewModelLocator方法
ViewModelLocationProvider:
更改命名约定
默认的匹配规则:
protected override void ConfigureViewModelLocator()
{
    base.ConfigureViewModelLocator();

    // 1、配置默认的匹配规则
    ViewModelLocationProvider.SetDefaultViewTypeToViewModelTypeResolver(TypeResolver);
}

private Type TypeResolver(Type viewType)
{
    //XH.PrismViewModelLocator.Views.MainWindow
    //XH.PrismViewModelLocator.ViewModels.MainWindowViewModel
    //XH.PrismViewModelLocator.Views.LoginView
    //XH.PrismViewModelLocator.ViewModels.LoginViewModel

    var vmName = viewType.FullName.Replace(".Views", ".ViewModels");

    if (vmName.EndsWith("View"))
        vmName += "Model";
    else
        vmName += "ViewModel";

    return Type.GetType(vmName);
}
可以在TypeResolver方法中写自己想要的自定义匹配规则
独立注册-4种方式
强制将View和ViewModel 关联起来
 protected override void ConfigureViewModelLocator()
 {
     base.ConfigureViewModelLocator();

     //ViewModelLocationProvider.Register<MainWindow, MainWindowViewModel>();
     //
     //ViewModelLocationProvider.Register("MainWindow", typeof(MainWindowViewModel));
     //
     //ViewModelLocationProvider.Register("MainWindow", CreateMainViewModel);
     //
     //ViewModelLocationProvider.Register<MainWindow>(CreateMainViewModel);
 }
private object CreateMainViewModel() => Container.Resolve<MainWindowViewModel>();
Prism框架特色功能
区域化
区域注册
项目初始化
页面初始化:窗口(Shell)里进行区域划分,区域需要注册到RegionManager里的,才能进行内容接收
属性:
p:RegionManager.RegionName:注册的区域的名字
在Prism中四种容器类型可以注册区域导航:
- ContentControlRegionAdapter
ContentControl只能显示一个页面,单页面呈现
<ContentControl p:RegionManager.RegionName="ViewRegion"/>- ItemsControlRegionAdapter
<ItemsControl p:RegionManager.RegionName="ViewRegion"/>- SelectorRegionAdapter
<ListBox p:RegionManager.RegionName="ViewRegion"/>
<ListView p:RegionManager.RegionName="ViewRegion"/>- TabControlRegionAdapter
<TabControl p:RegionManager.RegionName="ViewRegion"/>注册的地方代码:
protected override DependencyObject CreateShell()
{
    return Container.Resolve<MainWindow>();
}

protected override void RegisterTypes(IContainerRegistry containerRegistry)
{
    // 注册需要导航的子页面,只有注册了才能处理
    containerRegistry.RegisterForNavigation<ViewA>();
    containerRegistry.RegisterForNavigation<ViewB>();
}
MainWindow划分的代码:
<Window x:Class="XH.PrismRegion.Base.Views.MainWindow"
  xmlns="http://schemas.microsoft.com/winfx/2006/xaml/presentation"
  xmlns:x="http://schemas.microsoft.com/winfx/2006/xaml"
  xmlns:d="http://schemas.microsoft.com/expression/blend/2008"
  xmlns:mc="http://schemas.openxmlformats.org/markup-compatibility/2006"
  xmlns:local="clr-namespace:XH.PrismRegion.Base.Views"
  xmlns:p="http://prismlibrary.com/"
  mc:Ignorable="d" FontSize="20"
  Title="MainWindow" Height="450" Width="800">
  <DockPanel>
    <Grid Height="50" DockPanel.Dock="Top" Background="Red">
      <TextBlock Text="Prism 框架" VerticalAlignment="Center" HorizontalAlignment="Left" Margin="20 0 0 0"/>
    </Grid>
    <Grid Width="220" DockPanel.Dock="Left" Background="LemonChiffon">
      <StackPanel>
        <Button Content="ViewA" Margin="0 3"/>
        <Button Content="ViewB" Margin="0 3"/>
        <Button Content="ViewB" Margin="0 3"/>
      </StackPanel>
    </Grid>
    <Grid Background="White">
      <TabControl p:RegionManager.RegionName="ViewRegion"/>
    </Grid>
  </DockPanel>
</Window>
MainWindow.xaml.cs注册区域代码:
public MainWindow(IRegionManager regionManager)
{
    InitializeComponent();

    regionManager.RegisterViewWithRegion("ViewRegion", "ViewA");
    regionManager.RegisterViewWithRegion("ViewRegion", "ViewB");


    this.Loaded += (se, ev) =>
    {
        // 激活这个注册的哪个View界面
        var region = regionManager.Regions["ViewRegion"];
        var view = region.Views.FirstOrDefault(v => v.GetType().Name == "ViewB");
        region.Activate(view);
    };
}
自定义Region
需要继承:RegionAdapterBase
public class CustomRegion : RegionAdapterBase<UniformGrid>
{
    public CustomRegion(IRegionBehaviorFactory regionBehaviorFactory)
        : base(regionBehaviorFactory)
        {

        }

    // 每次增加或者减少触发此方法
    protected override void Adapt(IRegion region, UniformGrid regionTarget)
    {
        region.Views.CollectionChanged += (o, e) =>
        {
            if (e.Action == System.Collections.Specialized.NotifyCollectionChangedAction.Add)
            {
                foreach (UIElement view in region.Views)
                {
                    regionTarget.Children.Add(view);
                }
            }
            else if (e.Action == System.Collections.Specialized.NotifyCollectionChangedAction.Remove)
            {
                foreach (UIElement view in region.Views)
                {
                    regionTarget.Children.Remove(view);
                }
            }
        };
    }

    protected override IRegion CreateRegion()
    {
        // 返回激活的Region区域
        return new AllActiveRegion();
    }
}
注入:IRegionManager:管理项目中所有的Region区域的,处理区域中内容显示逻辑
注册导航页面:regionManager.RegisterViewWithRegion("ViewRegion", "ViewA");
执行导航动作,传参
观察导航过程:接收参数,页面对应的ViewModel实现INavigationAware接口
观察导航页面生命周期:控制页面是否自动销毁,页面对应ViewModel实现IRegionMemberLifetime接口
确认是否允许从当前页面导航出去:页面对应ViewModel实现IConfirmNavigationRequest接口
传参:NavigationParameters 同过Key Value 方式传参
调用方代码:
if (viewName == "ViewA")
{
    NavigationParameters parmaters = new NavigationParameters();
    parmaters.Add("A", "Hello");
    _regionManager.RequestNavigate("ViewRegion", viewName, parmaters);
}
else if (viewName == "ViewB")
{
    _regionManager.RequestNavigate("ViewRegion", viewName);
}
被打开方代码:
 // 打开当前View的时候触发
 public void OnNavigatedTo(NavigationContext navigationContext)
 {
     string arg = navigationContext.Parameters.GetValue<string>("A");
}注意:被打开方需要继承接口:INavigationAware
生命周期代码:需要继承IRegionMemberLifetime接口
用来控制当前页面非激活状态,是否在Region中保留
KeepAlive:
true:不会销毁
false:会销毁
public bool KeepAlive => true;导航确认:是否允许能从当前页面导航去其他页面:需要继承IConfirmNavigationRequest
OnNavigatedFrom 调用前执行
public void ConfirmNavigationRequest(NavigationContext navigationContext, Action<bool> continuationCallback)
{
    // 从当前页面导航出去的时候 判断是不是需要导航出去
    // 打开某个页面
    //
    if (MessageBox.Show("是否打开", "导航提示", MessageBoxButton.YesNo) == MessageBoxResult.Yes)
    {
        // 继续打开
        continuationCallback?.Invoke(true);
    }
    else
        // 不被打开
        continuationCallback?.Invoke(false);
}
整体ViewModel的执行顺序:
OnNavigatedTo --> ConfirmNavigationRequest --> OnNavigatedFrom
两个导航区域导航需要之间传参:
 // 从当前View导航出去的时候触发
 public void OnNavigatedFrom(NavigationContext navigationContext)
 {
     // 从当前页面到另外一个页面的时候 可以把这个信息带过去
     navigationContext.Parameters.Add("B", "Hello");
}也就是会所:A页面的OnNavigatedFrom触发之后,进入B界面之后,B界面的OnNavigatedTo会把A界面的参数带过来。
页面表头
主页面的XAML代码:
<TabControl p:RegionManager.RegionName="ViewRegion" Name="tb">
  <TabControl.ItemContainerStyle>
    <Style TargetType="TabItem">
      <!--TabItem这里的绑定数据源是页面对象
      如果需要页面对象的ViewModel 需要写:DataContext
      TabItem.DataContext = View 对象
      View 对象DataContext = 对应的ViewModel-->
      <Setter Property="Header" Value="{Binding DataContext.Title}"/>
    </Style>
  </TabControl.ItemContainerStyle>
</TabControl>
单独页面的ViewModel:
public string Title { get; set; } = "View A";关闭TabItem(关闭注册的页面)
 private void DoCloseTab()
 {
     var region = _regionManager.Regions["ViewRegion"];
     // 需要关闭的页面
     var view = region.Views.FirstOrDefault(v => v.GetType().Name == "ViewA");
     region.Remove(view);

     // 关闭所有
     //region.RemoveAll();
 }
导航历史记录:需要注入接口:IRegionNavigationJournal
可以前一个后一个进行跳转
public ViewAViewModel(
    IRegionNavigationService regionNavigationService,
    IRegionNavigationJournal regionNavigationJournal,
    IRegionManager regionManager)
{
    _regionManager = regionManager;
    // 导航历史记录 操作
    regionNavigationJournal.GoBack();

    CloseTabCommand = new DelegateCommand(DoCloseTab);
}
导航日志的使用
IRegionNavigationJournal(接收对象)、IJournalAware(实现)
在页面中使用:
public class ViewAViewModel : INavigationAware
{
    // 接受导航日志
    public IRegionNavigationJournal Journal { get; set; }
    public ICommand GoBackCommand { get; set; }
    public ICommand ForwordCommand { get; set; }

    public ViewAViewModel(IRegionManager regionManager)
    {
        GoBackCommand = new DelegateCommand(() =>
        {
            // 跳转
            if (Journal.CanGoBack)
                Journal.GoBack();
        });

        ForwordCommand = new DelegateCommand(() =>
        {
            // 跳转
            if (Journal.CanGoForward)
                Journal.GoForward();
            else
            {
                // 下一步打开ViewB
                regionManager.RequestNavigate("MainRegion", "ViewB");
            }
        });
    }

    public void OnNavigatedTo(NavigationContext navigationContext)
    {
        // 跳转进来的时候 获取日志
        Journal = navigationContext.NavigationService.Journal;
    }

    public bool IsNavigationTarget(NavigationContext navigationContext)
    {
        return true;
    }

    public void OnNavigatedFrom(NavigationContext navigationContext)
    {

    }
}
弹窗页面区域的注册 View中的区域注册(不是Shell)
背景:因为Prism中的注册Region 是在初始化CreateShell的时候,打开窗体时候,自动扫描此窗体中的所有的Region 注册的,弹窗是在初始化之后触发出来的,所以,需要在弹窗的地方重新注册Region 并且每次退出弹窗的时候,移除此窗体的Region
核心代码如下:
窗口的xaml.cs代码:
 public DialogView(IRegionManager regionManager)
 {
     InitializeComponent();
     // region 有个扫描时机,在Shell中会扫描一次,其他的需要手动加入并重新更新
     // 把当前的所有 region 都放入到regionManager中,重新扫描
     RegionManager.SetRegionManager(this, regionManager);
     // 更新下regionManager集合
     RegionManager.UpdateRegions();

     this.Unloaded += (o, e) =>
     {
         var rm = RegionManager.GetRegionManager(this);
         //rm.Regions.Remove("DialogRegion");
         // 释放所有的Name 等同于上面
         rm.Regions.FirstOrDefault(x => rm.Regions.Remove(x.Name));
     };
 }
复合命令 -- 保存全部 -- CompositeCommand
在主窗口赋值,然后同过注入CompositeCommand,在每个子页面中加入到CompositeCommand中,然后在主窗口可以命令所有加入的方法
主窗口ViewModel代码:
 // 多个命令整合一起
 public CompositeCommand AllSaveCommand { get; set; }

 public MainViewModel(IRegionManager regionManager, CompositeCommand compositeCommand)
 {
     AllSaveCommand = compositeCommand;
 }
子页面ViewModel代码:
 public ViewAViewModel(CompositeCommand compositeCommand)
 {
     SaveCommand = new DelegateCommand(() =>
     {

     });

     // 这里的前后关系很重要
     compositeCommand.RegisterCommand(SaveCommand);
 }
注意:必须先实例化Command 再注册Command
每次当前ViewModel 销毁的时候,或者子页面关闭的时候,退出注册。UnregisterCommand
public void OnNavigatedFrom(NavigationContext navigationContext)
{
_compositeCommand.UnregisterCommand(SaveCommand);
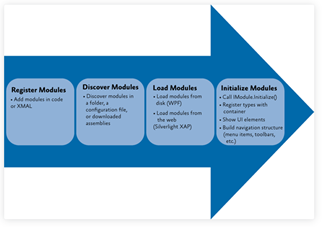
}模块化项目基本结构
模块化例子:

项目的分模块管理
模块定义,创建WPF类库,添加类对象,实现IModule接口
模块注册
项目初始化类中添加(配置文件、类型添加、自动扫描)
步骤:
- 创建WPF项目:
需要在住项目中,重写ConfigureModuleCatalog方法:
// 模块注册
protected override void ConfigureModuleCatalog(IModuleCatalog moduleCatalog)
{
    moduleCatalog.AddModule<AModule>();
}- 其他模块创建WPF类库
在A模块中写一个AModule :需要继承IModule接口
public class AModule : IModule
{
    // 初始化
    public void OnInitialized(IContainerProvider containerProvider)
    {

    }

    // 注入
    public void RegisterTypes(IContainerRegistry containerRegistry)
    {
        containerRegistry.RegisterForNavigation<ViewA>();
    }
}
这个时候,两个项目就关联起来了,
这个时候两个项目的注入是同一个注入,Prism会自动合并为一个。
- 在主窗口使用
 public DelegateCommand OpenCommand { get; set; }
 public MainWindowViewModel(IRegionManager regionManager)
 {
     OpenCommand = new DelegateCommand(() =>
     {
         regionManager.RequestNavigate("MainRegion","ViewA");
     });
 }
效果:

模块注册
ConfigureModuleCatalog
- 通过 ConfigureModuleCatalog ,添加模块注册
 protected override void ConfigureModuleCatalog(IModuleCatalog moduleCatalog)
 {
     moduleCatalog.AddModule<AModule>();
}- 通过 ConfigureModuleCatalog ,添加 ModuleInfo 进行注册
protected override void ConfigureModuleCatalog(IModuleCatalog moduleCatalog)
{
     Type type = typeof(AModule);
     moduleCatalog.AddModule(new ModuleInfo
     {
         ModuleName = type.Name,
         ModuleType = type.AssemblyQualifiedName,
         // 标记Module按需加载 懒加载
         InitializationMode = InitializationMode.OnDemand,
     });
}
完全解耦
如果要实现完全解耦,两个模块没有任何关系,也不引用,那么需要使用生成命令操作:
需要module类库执行以下操作:
属性-->生成-->事件-->生成后事件

xcopy $(TargetPath) $(SolutionDir)20240727_WPFMvvm\XH.PrismLesson\XH.PrismModule\bin\Debug\net7.0-windows\ModulePath /y解释:
- xcopy:是Windows命令行中的一个命令,用于复制文件和目录树。
- $(TargetPath):是一个宏,代表当前项目生成的输出文件的完整路径(包括文件名)。这通常是项目的主输出文件,比如一个DLL或EXE文件。
- $(SolutionDir):是另一个宏,代表解决方案目录的完整路径。但是,注意你的命令中$(SolutionDir)后面紧跟的是20240727_WPFMvvm,这看起来像是你想将$(SolutionDir)的值直接与这个文件夹名拼接起来,但通常$(SolutionDir)已经包含了解决方案的根目录,所以你可能不需要再显式地添加年份和项目名(除非它们实际上是解决方案目录下的一个子目录)。这里我假设20240727_WPFMvvm是解决方案目录下的一个子目录。
- XH.PrismLesson\XH.PrismModule\bin\Debug\net7.0-windows\:这是你希望将文件复制到的具体文件夹路径。它看起来像是你的解决方案中的一个项目(XH.PrismLesson)的子项目(XH.PrismModule)的特定构建配置(Debug)和目标框架(net7.0-windows)的输出目录。
- $(TargetFileName):是另一个宏,它只包含输出文件的文件名(不包括路径)。在你的场景中,这可能不是完全必要的,因为$(TargetPath)已经包含了完整的路径和文件名。但是,如果你的意图是确保文件名被正确复制(而不是覆盖整个路径),那么这个宏是有用的。然而,由于你的目标路径已经指定了详细的目录结构,通常你会想要直接使用$(TargetPath)而不是仅文件名。
- /y:是一个xcopy命令的参数,表示覆盖现有文件而不提示。
- ModulePath:是在文件扫描的时候,扫描此文件的所有dll进行注册
- 通过 Config 进行注册
APP.Config:
<?xml version="1.0" encoding="utf-8" ?>
<configuration>
  <configSections>
    <!--name:modules
    type:引入wpf-->
    <section name="modules" type="Prism.Modularity.ModulesConfigurationSection, Prism.Wpf"/>
  </configSections>
  <modules>
    <!--assemblyFile:模块的程序集
    moduleName:模块的名称
    moduleType:typeof(AModule).AssemblyQualifiedName,就是模块的全名称-->
    <module assemblyFile = "XH.PrismModule.ModuleA.dll"
      moduleName = "AModule"
      moduleType = "XH.PrismModule.ModuleA.AModule, XH.PrismModule.ModuleA, Version=1.0.0.0, Culture=neutral, PublicKeyToken=null" />
  </modules>
</configuration>
IModuleCatalog类:
protected override IModuleCatalog CreateModuleCatalog()
{
    return new ConfigurationModuleCatalog();
}- XML文件配置
XML代码:
<?xml version="1.0" encoding="utf-8" ?>
<p:ModuleCatalog xmlns="http://schemas.microsoft.com/winfx/2006/xaml/presentation"
                 xmlns:x="http://schemas.microsoft.com/winfx/2006/xaml"
                 xmlns:p="clr-namespace:Prism.Modularity;assembly=Prism.Wpf">
  <p:ModuleInfo ModuleName = "AModule"
                ModuleType = "XH.PrismModule.ModuleA.AModule, XH.PrismModule.ModuleA, Version=1.0.0.0, Culture=neutral, PublicKeyToken=null"/>
</p:ModuleCatalog>
IModuleCatalog类:
protected override IModuleCatalog CreateModuleCatalog()
{
    //return new XamlModuleCatalog(".\\ModuleConfig.xml");
    // 两个都可以
    return new XamlModuleCatalog("pack://application:,,,/XH.PrismModule;component/ModuleConfig.xml");
}- 文件扫描方式注册(推荐)
IModuleCatalog类:
 protected override IModuleCatalog CreateModuleCatalog()
 {
     // 需要在bin/Debug 下有 ModulePath 目录,进行扫描
     return new DirectoryModuleCatalog()
     {
         // 配置将要扫描的目录
         ModulePath = ".\\ModulePath"
     };
 }
不过需要在当前文件夹下创建 ModulePath 文件夹,然后让其他Model 类库生成dll 放入到ModulePath 文件夹中。

模块懒加载
OnDemand:是否懒加载 默认是false
[Module(ModuleName ="AAA",OnDemand =true)]
public class AModule : IModule
{
    // 初始化
    public void OnInitialized(IContainerProvider containerProvider)
    {

    }

    // 注入
    public void RegisterTypes(IContainerRegistry containerRegistry)
    {
        containerRegistry.RegisterForNavigation<ViewA>();
    }
}
调用代码:
如果开启懒加载的话 需要手动加载
 public MainWindowViewModel(IRegionManager regionManager,IModuleManager moduleManager)
 {
     OpenCommand = new DelegateCommand(() =>
     {
         // 加载模块 OnDemand =true 如果开启懒加载的话 需要手动加载
         //moduleManager.LoadModule("AAA");
         regionManager.RequestNavigate("MainRegion","ViewA");
     });
 }
也可以在配置的时候,按需加载:
 // 配置模块注册
 protected override void ConfigureModuleCatalog(IModuleCatalog moduleCatalog)
 {
     Type type = typeof(AModule);
     moduleCatalog.AddModule(new ModuleInfo
     {
         ModuleName = type.Name,
         ModuleType = type.AssemblyQualifiedName,
         // 标记Module按需加载 懒加载
         InitializationMode = InitializationMode.OnDemand,
     });
 }
模块动态加载
动态加载的意思是,程序启动的时候 ModulePath 文件中增加模块dll 也能加载成功。 热加载
动态加载类:
 public class DynamicLoadModule : ModuleCatalog
 {
     SynchronizationContext _context;

     /// <summary>
     /// Directory containing modules to search for.
     /// </summary>
     public string ModulePath { get; set; }

     public DynamicLoadModule(string modulePath)
     {
         _context = SynchronizationContext.Current;

         ModulePath = modulePath;

         // we need to watch our folder for newly added modules
         FileSystemWatcher fileWatcher = new FileSystemWatcher(ModulePath, "*.dll");
         fileWatcher.Created += FileWatcher_Created;
         fileWatcher.EnableRaisingEvents = true;
     }

     /// <summary>
     /// Rasied when a new file is added to the ModulePath directory
     /// </summary>
     void FileWatcher_Created(object sender, FileSystemEventArgs e)
     {
         if (e.ChangeType == WatcherChangeTypes.Created)
         {
             LoadModuleCatalog(e.FullPath, true);
         }
     }

     /// <summary>
     /// Drives the main logic of building the child domain and searching for the assemblies.
     /// </summary>
     protected override void InnerLoad()
     {
         LoadModuleCatalog(ModulePath);
     }

     void LoadModuleCatalog(string path, bool isFile = false)
     {
         if (string.IsNullOrEmpty(path))
             throw new InvalidOperationException("Path cannot be null.");

         if (isFile)
         {
             if (!File.Exists(path))
                 throw new InvalidOperationException(string.Format("File {0} could not be found.", path));
         }
         else
         {
             if (!Directory.Exists(path))
                 throw new InvalidOperationException(string.Format("Directory {0} could not be found.", path));
         }

         AppDomain childDomain = this.BuildChildDomain(AppDomain.CurrentDomain);

         try
         {
             List<string> loadedAssemblies = new List<string>();

             var assemblies = (
                                  from Assembly assembly in AppDomain.CurrentDomain.GetAssemblies()
                                  where !(assembly is System.Reflection.Emit.AssemblyBuilder)
                                     && assembly.GetType().FullName != "System.Reflection.Emit.InternalAssemblyBuilder"
                                     && !String.IsNullOrEmpty(assembly.Location)
                                  select assembly.Location
                              );

             loadedAssemblies.AddRange(assemblies);

             Type loaderType = typeof(InnerModuleInfoLoader);
             if (loaderType.Assembly != null)
             {
                 var loader = (InnerModuleInfoLoader)childDomain.CreateInstanceFrom(loaderType.Assembly.Location, loaderType.FullName).Unwrap();
                 loader.LoadAssemblies(loadedAssemblies);

                 //get all the ModuleInfos
                 ModuleInfo[] modules = loader.GetModuleInfos(path, isFile);

                 //add modules to catalog
                 this.Items.AddRange(modules);

                 //we are dealing with a file from our file watcher, so let's notify that it needs to be loaded
                 if (isFile)
                 {
                     LoadModules(modules);
                 }
             }
         }
         finally
         {
             AppDomain.Unload(childDomain);
         }
     }

     /// <summary>
     /// Uses the IModuleManager to load the modules into memory
     /// </summary>
     /// <param name="modules"></param>
     private void LoadModules(ModuleInfo[] modules)
     {
         if (_context == null)
             return;

         IModuleManager manager = ServiceLocator.Current.GetInstance<IModuleManager>();

         _context.Send(new SendOrPostCallback(delegate (object state)
         {
             foreach (var module in modules)
             {
                 manager.LoadModule(module.ModuleName);
             }
         }), null);
     }

     /// <summary>
     /// Creates a new child domain and copies the evidence from a parent domain.
     /// </summary>
     /// <param name="parentDomain">The parent domain.</param>
     /// <returns>The new child domain.</returns>
     /// <remarks>
     /// Grabs the <paramref name="parentDomain"/> evidence and uses it to construct the new
     /// <see cref="AppDomain"/> because in a ClickOnce execution environment, creating an
     /// <see cref="AppDomain"/> will by default pick up the partial trust environment of
     /// the AppLaunch.exe, which was the root executable. The AppLaunch.exe does a
     /// create domain and applies the evidence from the ClickOnce manifests to
     /// create the domain that the application is actually executing in. This will
     /// need to be Full Trust for Composite Application Library applications.
     /// </remarks>
     /// <exception cref="ArgumentNullException">An <see cref="ArgumentNullException"/> is thrown if <paramref name="parentDomain"/> is null.</exception>
     protected virtual AppDomain BuildChildDomain(AppDomain parentDomain)
     {
         if (parentDomain == null) throw new System.ArgumentNullException("parentDomain");

         Evidence evidence = new Evidence(parentDomain.Evidence);
         AppDomainSetup setup = parentDomain.SetupInformation;
         return AppDomain.CreateDomain("DiscoveryRegion", evidence, setup);
     }


     private class InnerModuleInfoLoader : MarshalByRefObject
     {
         [System.Diagnostics.CodeAnalysis.SuppressMessage("Microsoft.Performance", "CA1822:MarkMembersAsStatic")]
         internal ModuleInfo[] GetModuleInfos(string path, bool isFile = false)
         {
             Assembly moduleReflectionOnlyAssembly =
                 AppDomain.CurrentDomain.ReflectionOnlyGetAssemblies().First(
                     asm => asm.FullName == typeof(IModule).Assembly.FullName);

             Type IModuleType = moduleReflectionOnlyAssembly.GetType(typeof(IModule).FullName);

             FileSystemInfo info = null;
             if (isFile)
                 info = new FileInfo(path);
             else
                 info = new DirectoryInfo(path);

             ResolveEventHandler resolveEventHandler = delegate (object sender, ResolveEventArgs args) { return OnReflectionOnlyResolve(args, info); };
             AppDomain.CurrentDomain.ReflectionOnlyAssemblyResolve += resolveEventHandler;
             IEnumerable<ModuleInfo> modules = GetNotAllreadyLoadedModuleInfos(info, IModuleType);
             AppDomain.CurrentDomain.ReflectionOnlyAssemblyResolve -= resolveEventHandler;

             return modules.ToArray();
         }

         private static IEnumerable<ModuleInfo> GetNotAllreadyLoadedModuleInfos(FileSystemInfo info, Type IModuleType)
         {
             List<FileInfo> validAssemblies = new List<FileInfo>();
             Assembly[] alreadyLoadedAssemblies = AppDomain.CurrentDomain.ReflectionOnlyGetAssemblies();

             FileInfo fileInfo = info as FileInfo;
             if (fileInfo != null)
             {
                 if (alreadyLoadedAssemblies.FirstOrDefault(assembly => String.Compare(Path.GetFileName(assembly.Location), fileInfo.Name, StringComparison.OrdinalIgnoreCase) == 0) == null)
                 {
                     var moduleInfos = Assembly.ReflectionOnlyLoadFrom(fileInfo.FullName).GetExportedTypes()
                     .Where(IModuleType.IsAssignableFrom)
                     .Where(t => t != IModuleType)
                     .Where(t => !t.IsAbstract).Select(t => CreateModuleInfo(t));

                     return moduleInfos;
                 }
             }

             DirectoryInfo directory = info as DirectoryInfo;

             var files = directory.GetFiles("*.dll").Where(file => alreadyLoadedAssemblies.
                 FirstOrDefault(assembly => String.Compare(Path.GetFileName(assembly.Location), file.Name, StringComparison.OrdinalIgnoreCase) == 0) == null);

             foreach (FileInfo file in files)
             {
                 try
                 {
                     Assembly.ReflectionOnlyLoadFrom(file.FullName);
                     validAssemblies.Add(file);
                 }
                 catch (BadImageFormatException)
                 {
                     // skip non-.NET Dlls
                 }
             }

             return validAssemblies.SelectMany(file => Assembly.ReflectionOnlyLoadFrom(file.FullName)
                                         .GetExportedTypes()
                                         .Where(IModuleType.IsAssignableFrom)
                                         .Where(t => t != IModuleType)
                                         .Where(t => !t.IsAbstract)
                                         .Select(type => CreateModuleInfo(type)));
         }


         private static Assembly OnReflectionOnlyResolve(ResolveEventArgs args, FileSystemInfo info)
         {
             Assembly loadedAssembly = AppDomain.CurrentDomain.ReflectionOnlyGetAssemblies().FirstOrDefault(
                 asm => string.Equals(asm.FullName, args.Name, StringComparison.OrdinalIgnoreCase));
             if (loadedAssembly != null)
             {
                 return loadedAssembly;
             }

             DirectoryInfo directory = info as DirectoryInfo;
             if (directory != null)
             {
                 AssemblyName assemblyName = new AssemblyName(args.Name);
                 string dependentAssemblyFilename = Path.Combine(directory.FullName, assemblyName.Name + ".dll");
                 if (File.Exists(dependentAssemblyFilename))
                 {
                     return Assembly.ReflectionOnlyLoadFrom(dependentAssemblyFilename);
                 }
             }

             return Assembly.ReflectionOnlyLoad(args.Name);
         }

         [System.Diagnostics.CodeAnalysis.SuppressMessage("Microsoft.Performance", "CA1822:MarkMembersAsStatic")]
         internal void LoadAssemblies(IEnumerable<string> assemblies)
         {
             foreach (string assemblyPath in assemblies)
             {
                 try
                 {
                     Assembly.ReflectionOnlyLoadFrom(assemblyPath);
                 }
                 catch (FileNotFoundException)
                 {
                     // Continue loading assemblies even if an assembly can not be loaded in the new AppDomain
                 }
             }
         }

         private static ModuleInfo CreateModuleInfo(Type type)
         {
             string moduleName = type.Name;
             List<string> dependsOn = new List<string>();
             bool onDemand = false;
             var moduleAttribute = CustomAttributeData.GetCustomAttributes(type).FirstOrDefault(cad => cad.Constructor.DeclaringType.FullName == typeof(ModuleAttribute).FullName);

             if (moduleAttribute != null)
             {
                 foreach (CustomAttributeNamedArgument argument in moduleAttribute.NamedArguments)
                 {
                     string argumentName = argument.MemberInfo.Name;
                     switch (argumentName)
                     {
                         case "ModuleName":
                             moduleName = (string)argument.TypedValue.Value;
                             break;

                         case "OnDemand":
                             onDemand = (bool)argument.TypedValue.Value;
                             break;

                         case "StartupLoaded":
                             onDemand = !((bool)argument.TypedValue.Value);
                             break;
                     }
                 }
             }

             var moduleDependencyAttributes = CustomAttributeData.GetCustomAttributes(type).Where(cad => cad.Constructor.DeclaringType.FullName == typeof(ModuleDependencyAttribute).FullName);
             foreach (CustomAttributeData cad in moduleDependencyAttributes)
             {
                 dependsOn.Add((string)cad.ConstructorArguments[0].Value);
             }

             ModuleInfo moduleInfo = new ModuleInfo(moduleName, type.AssemblyQualifiedName)
             {
                 InitializationMode =
                     onDemand
                         ? InitializationMode.OnDemand
                         : InitializationMode.WhenAvailable,
                 Ref = type.Assembly.CodeBase,
             };
             moduleInfo.DependsOn.AddRange(dependsOn);
             return moduleInfo;
         }
     }
 }

 /// <summary>
 /// Class that provides extension methods to Collection
 /// </summary>
 public static class CollectionExtensions
 {
     /// <summary>
     /// Add a range of items to a collection.
     /// </summary>
     /// <typeparam name="T">Type of objects within the collection.</typeparam>
     /// <param name="collection">The collection to add items to.</param>
     /// <param name="items">The items to add to the collection.</param>
     /// <returns>The collection.</returns>
     /// <exception cref="System.ArgumentNullException">An <see cref="System.ArgumentNullException"/> is thrown if <paramref name="collection"/> or <paramref name="items"/> is <see langword="null"/>.</exception>
     public static Collection<T> AddRange<T>(this Collection<T> collection, IEnumerable<T> items)
     {
         if (collection == null) throw new System.ArgumentNullException("collection");
         if (items == null) throw new System.ArgumentNullException("items");

         foreach (var each in items)
         {
             collection.Add(each);
         }

         return collection;
     }
 }
在注册Module的时候,创建动态加载:
 protected override IModuleCatalog CreateModuleCatalog()
 {
     // 动态加载
     return new DynamicLoadModule(".\\ModulePath");
 }
总结
- 已实现,直接注入使用
IUnityContainer、IContainerExtension、IContainerProvider、IContainerRegistry、IModuleCatalog、IDialogService
IModuleManager、IRegionManager、IEventAggregator、IRegionBehaviorFactory、IRegionNavigationJournalEntry
IRegionNavigationJournal
- 继承实现
IDialogWindow、IDialogAware、IActiveAware、INavigationAware、IConfirmNavigationRequest、IRegionMemberLifetime
IJournalAware、IModule


 985
985

 被折叠的 条评论
为什么被折叠?
被折叠的 条评论
为什么被折叠?
 到【灌水乐园】发言


