


我们要将一个脚本进行开机自启,本文主要介绍配置服务器 service 的方法。
目录
制作.service文件
基本结构
Systemd 服务的内容主要分为三个部分,控制单元(unit)的定义、服务(service)的定义、以及安装部分。
Systemd
Systemd 是系统启动和服务器守护进程管理器,负责在系统启动或运行时,激活系统资源,服务器进程和其它进程。
systemd 被设计用来改进sysvinit的缺点,它和 ubuntu 的 upstart 是竞争对手,预计会取代它们。systemd 的很多概念来源于苹果的 launchd 。创始人 Lennart 是 redhat 员工,但 systemd 不是 redhat 项目。
systemd 的目标是:尽可能启动更少进程;尽可能将更多进程并行启动。 systemd 尽可能减少对 shell 脚本的依赖。传统 sysvinit 使用 inittab 来决定运行哪些 shell 脚本,大量使用 shell 脚本被认为是效率低下无法并行的原因。 systemd 使用了 Linux 专属技术,不再顾及 POSIX 兼容,一度谣传 Debian 为了它的 BSD 项目将不会使用 systemd 。
控制单元Unit
- Description:当前服务的简单描述
- Documentation:指定 man 文档位置
- After:如果 a.target 或 b.service 需要启动,那么 user.service 应该在它们之后启动
- Before:定义 user.service 应该在哪些服务之前启动
- Wants:表示 a.service 与 user.service 之间存在”弱依赖”关系,即如果 “a.service” 启动失败或停止运行,不影响 user.service 继续执行
- Requires:表示”强依赖”关系,即如果该服务启动失败或异常退出,那么user.service 也必须退出
注意:Wants 字段与 Requires 字段只涉及依赖关系,与启动顺序无关,默认情况下是同时启动。
注意:After 和 Before 字段只涉及启动顺序,不涉及依赖关系。
服务本体service
- EnvironmentFile:许多软件都有自己的环境参数文件,该字段指定文件路径
- Type:定义启动类型。可设置:simple,exec,forking,oneshot,dbus,notify,idle
A. simple(设置了 ExecStart= 但未设置 BusName= 时的默认值):ExecStart 字段启动的进程为该服务的主进程
B. forking:ExecStart 字段的命令将以 fork() 方式启动,此时父进程将会退出,子进程将成为主进程 - ExecStart:定义启动进程时执行的命令
- ExecReload:重启服务时执行的命令
- ExecStop:停止服务时执行的命令
- ExecStartPre:启动服务之前执行的命令
- ExecStartPost:启动服务之后执行的命令
- ExecStopPost:停止服务之后执行的命令
- RemainAfterExit:设为yes,表示进程退出以后,服务仍然保持执行
- KillMode:定义 Systemd 如何停止服务,可以设置的值如下:
A. control-group(默认值):当前控制组里面的所有子进程,都会被杀掉
B. process:只杀主进程
C. mixed:主进程将收到 SIGTERM 信号,子进程收到 SIGKILL 信号
D. none:没有进程会被杀掉,只是执行服务的 stop 命令 - Restart:定义了退出后,Systemd 的重启方式。可以设置的值如下:
A. no(默认值):退出后不会重启
B. on-success:只有正常退出时(退出状态码为0),才会重启
C. on-failure:非正常退出时(退出状态码非0),包括被信号终止和超时,才会重启
D. on-abnormal:只有被信号终止和超时,才会重启
E. on-abort:只有在收到没有捕捉到的信号终止时,才会重启
F. on-watchdog:超时退出,才会重启
G. always:不管是什么退出原因,总是重启 - RestartSec:表示 Systemd 重启服务之前,需要等待的秒数
若Type不为oneshot,配置中ExecStart只能执行一条命令
配置中多个相同配置会选择最后一个,下面结果是 execstart2
[Service]
ExecStart = /bin/echo execstart1
ExecStart = /bin/echo execstart2
所有的启动设置之前,都可以加上一个连词号(-),表示”抑制错误”,即发生错误的时候,不影响其他命令的执行
EnvironmentFile = -/etc/sysconfig/aaaaaa
表示即使 /etc/sysconfig/aaaaaa 文件不存在,也不会抛出错误。
安装服务Install
WantedBy:表示该服务所在的 Target(服务组)
在树莓派中创建自定义服务
首先,进入/usr/lib/systemd/system/目录,新建服务脚本。
若没有该目录可自行建立。
cd /usr/lib/systemd/system/
sudo vim my_t265.service
然后按照上述规则写入脚本
[Unit]
...
[Service]
...

[Install]
...
设置自启动,实质就是在 /etc/systemd/system/multi-user.target.wants/ 添加服务文件的链接。
systemctl enable my_265.service
若代码无错误,会输出如下结果:
Created symlink /etc/systemd/system/multi-user.target.wants/my_t265.service → /lib/systemd/system/my_t265.service.
表示在执行$ sudo systemctl enable my_t265.service 命令以后,在/lib/systemd/system/ 目录新建了一个名为 my_t265.service 的配置文件文件,并建立了一个链接文件 /etc/systemd/system/multi-user.target.wants/my_t265.service 链接到 /lib/systemd/system/my_t265.service 文件。
当系统启动时,会去寻找 /etc/systemd/system/multi-user.target.wants/ 目录下面的 XXX.service 配置文件去启动相应的进程。
启动service
执行以下命令
sudo systemctl start xxxx.service
输出结果示例
my_program.service - /home/pi/program fan_ctrl.py
     Loaded: loaded (/lib/systemd/system/my_program.service; enabled; vendor preset: enabled)
     Active: active (running) since Mon 2021-11-29 15:33:18 CST; 3s ago
    Process: 4157 ExecStartPost=/bin/echo 123456 (code=exited, status=0/SUCCESS)
   Main PID: 4156 (sudo)
      Tasks: 2 (limit: 4599)
     Memory: 3.5M
     CGroup: /system.slice/my_program.service
             ├─4156 /usr/bin/sudo python3 /home/pi/program/fan_ctrl.py
             └─4158 python3 /home/pi/program/fan_ctrl.py

11月 29 15:33:18 pi-virtual-machine systemd[1]: Starting /home/pi/program fan_ctrl.py...
11月 29 15:33:18 pi-virtual-machine echo[4157]: 123456
11月 29 15:33:18 pi-virtual-machine systemd[1]: Started /home/pi/program fan_ctrl.py.
11月 29 15:33:18 pi-virtual-machine sudo[4156]:     root : TTY=unknown ; PWD=/ ; USER=root ; COMMAND=/usr/bin/python3 >
11月 29 15:33:18 pi-virtual-machine sudo[4156]: pam_unix(sudo:session): session opened for user root by (uid=0)
Loaded:配置文件的位置,是否设为开机启动
Active:running 表示正在运行
Main PID:主进程ID
Status:由应用本身提供的软件当前状态
CGroup:应用的所有子进程
日志块:应用的日志
查看service状态
运行以下代码
sudo systemctl status xxxx.service
输出结果示例
(Opencv4.5.3) ubuntu@ubuntu:~$ sudo systemctl status my_t265.service
● my_t265.service - My_T265 Service
     Loaded: loaded (/lib/systemd/system/my_t265.service; enabled; vendor preset: enabled)
     Active: active (running) since Sat 2022-05-14 21:52:44 CST; 1min 23s ago
   Main PID: 861 (python3)
      Tasks: 10 (limit: 9251)
     CGroup: /system.slice/my_t265.service
             └─861 /usr/bin/python3 /home/ubuntu/Desktop/code_coordinate/T265.py

May 14 21:54:10 ubuntu python3[861]: X: 0, Y: 0, Z: 0
May 14 21:54:10 ubuntu python3[861]: X: 0, Y: 0, Z: 0
May 14 21:54:10 ubuntu python3[861]: X: 0, Y: 0, Z: 0
May 14 21:54:10 ubuntu python3[861]: X: 0, Y: 0, Z: 0
May 14 21:54:10 ubuntu python3[861]: X: 0, Y: 0, Z: 0
May 14 21:54:10 ubuntu python3[861]: X: 0, Y: 0, Z: 0
May 14 21:54:10 ubuntu python3[861]: X: 0, Y: 0, Z: 0
May 14 21:54:10 ubuntu python3[861]: X: 0, Y: 0, Z: 0
May 14 21:54:10 ubuntu python3[861]: X: 0, Y: 0, Z: 0
May 14 21:54:10 ubuntu python3[861]: X: 0, Y: 0, Z: 0
实例
[Unit]
Description = My_T265 Service
After = my_usb.service

[Service]
#Environment=SYSTEMD_LOG_LEVEL=debug
Type = simple
WorkingDirectory = /home/ubuntu/Desktop/code_coordinate
ExecStart = python3 /home/ubuntu/Desktop/code_coordinate/T265.py
Restart = always

[Install]
WantedBy = multi-user.target
service 执行多条语句
想要在单个 Service 下执行多个ExecStart命令,必须将 Type 设置为 oneshot。
oneshot 顾名思义,打一枪换一个地方。所以这种服务类型就是启动,完成,没进程了。oneshot 与 simple 类似,不同之处在于, 只有在该服务的主服务进程退出之后,systemd 才会认为该服务启动完成,才会开始启动后继单元。 此种类型的服务通常需要设置 RemainAfterExit= 选项。 当 Type= 与 ExecStart= 都没有设置时, Type=oneshot 就是默认值。oneshot常用于如文件系统的检查与挂载等,只需在开机的时候执行一次。
实例
树莓派开机重刷USB口
(Opencv4.5.3) ubuntu@ubuntu:/usr/lib/systemd/system$ cat my_usb.service
[Unity]
Description = restart USB

[Service]
Type = oneshot
ExecStart = sudo uhubctl -l 2 -a cycle -p 1-4

[Install]
WantedBy=multi-user.target
服务常用命令
systemctl is-enabled servicename.service #查询服务是否开机启动

systemctl enable *.service #开机运行服务

systemctl disable *.service #取消开机运行

systemctl start *.service #启动服务

systemctl stop *.service #停止服务

systemctl restart *.service #重启服务

systemctl reload *.service #重新加载服务配置文件

systemctl status *.service #查询服务运行状态
修改 *.service文件后重启
# 重新加载配置文件
$ sudo systemctl daemon-reload

# 重启相关服务
$ sudo systemctl restart my_program.service
systemd-analyze
这里列举几个常用的方法,详细可看最后推荐资料。
- systemd-analyze [OPTIONS…] [time]
启动时间:内核态时间+用户态时间. - systemd-analyze blame
显示上次开机时的所有服务,并显示服务耗时. - systemd-analyze [OPTIONS…] critical-chain [UNIT…]
为指定的单元(省略参数表示默认启动目标单元)以树状形式显示时间关键链(time-critical chain)。
"@"后面的时刻表示该单元的启动时刻; "+"后面的时长表示该单元总计花了多长时间才完成启动。
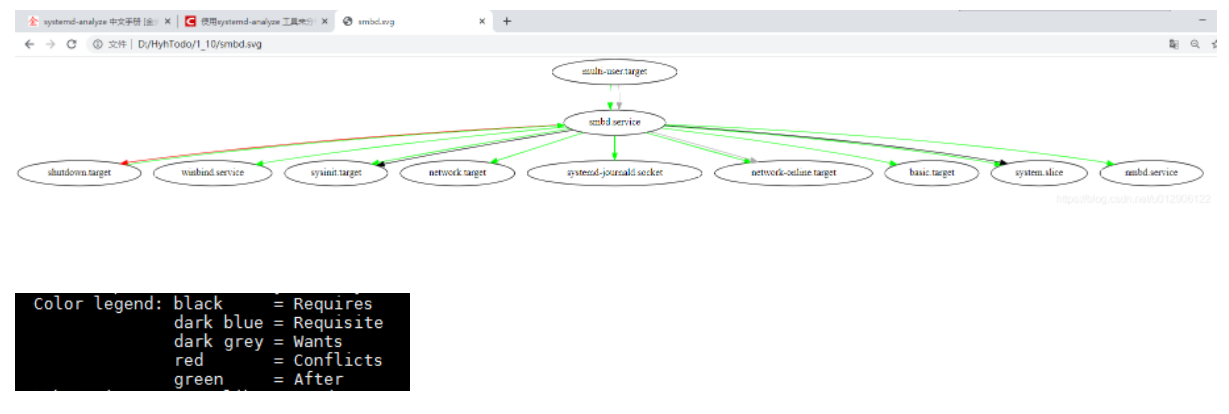
不过需要注意的是, 这些信息也可能具有误导性, 因为花费较长时间启动的单元, 有可能只是在等待另一个依赖单元完成启动。 - systemd-analyze [OPTIONS…] plot [> file.svg]
输出一个 SVG 图像,详细显示每个单元的启动时刻, 并高亮显示每个单元总计花了多长时间才完成启动。 - systemd-analyze dot smbd.service | dot -Tsvg > systemd.svg
用浏览器打开查看
对服务启动问题进行debug
Systemd被诟病的很多的点之一就是出现问题之后很难确认原因,其实在很早的时候systemd就提供了debug的方法,这里介绍常用的一种方式,并结合一个常见的很容易忽视的问题来进行说明。
Step 1:设定system.conf
#对象文件:
/etc/systemd/system.conf
#修改内容
LogLevel=debug
设定例
(Opencv4.5.3) ubuntu@ubuntu:~$ cat /etc/systemd/system.conf
#  This file is part of systemd.
#
#  systemd is free software; you can redistribute it and/or modify it
#  under the terms of the GNU Lesser General Public License as published by
#  the Free Software Foundation; either version 2.1 of the License, or
#  (at your option) any later version.
#
# Entries in this file show the compile time defaults.
# You can change settings by editing this file.
# Defaults can be restored by simply deleting this file.
#
# See systemd-system.conf(5) for details.

[Manager]
LogLevel=debug
#LogLevel=info
#LogTarget=journal-or-kmsg
#LogColor=yes
#LogLocation=no
#DumpCore=yes
#ShowStatus=yes
#CrashChangeVT=no
#CrashShell=no
#CrashReboot=no
#CtrlAltDelBurstAction=reboot-force
#CPUAffinity=1 2
#NUMAPolicy=default
#NUMAMask=
#RuntimeWatchdogSec=0
#RebootWatchdogSec=10min
#ShutdownWatchdogSec=10min
#KExecWatchdogSec=0
#WatchdogDevice=
#CapabilityBoundingSet=
#NoNewPrivileges=no
#SystemCallArchitectures=
#TimerSlackNSec=
#StatusUnitFormat=description
#DefaultTimerAccuracySec=1min
#DefaultStandardOutput=journal
#DefaultStandardError=inherit
#DefaultTimeoutStartSec=90s
#DefaultTimeoutStopSec=90s
#DefaultTimeoutAbortSec=
#DefaultRestartSec=100ms
#DefaultStartLimitIntervalSec=10s
#DefaultStartLimitBurst=5
#DefaultEnvironment=
#DefaultCPUAccounting=no
#DefaultIOAccounting=no
#DefaultIPAccounting=no
#DefaultBlockIOAccounting=no
#DefaultMemoryAccounting=yes
#DefaultTasksAccounting=yes
#DefaultTasksMax=
#DefaultLimitCPU=
#DefaultLimitFSIZE=
#DefaultLimitDATA=
#DefaultLimitSTACK=
#DefaultLimitCORE=
#DefaultLimitRSS=
#DefaultLimitNOFILE=1024:524288
#DefaultLimitAS=
#DefaultLimitNPROC=
#DefaultLimitMEMLOCK=
#DefaultLimitLOCKS=
#DefaultLimitSIGPENDING=
#DefaultLimitMSGQUEUE=
#DefaultLimitNICE=
#DefaultLimitRTPRIO=
#DefaultLimitRTTIME=
Step2:reboot
重启操作系统
Step3:添加 Environment
(Opencv4.5.3) ubuntu@ubuntu:/usr/lib/systemd/system$ cat my_t265.service
[Unit]
Description = My_T265 Service
After = my_usb.service

[Service]
Environment=SYSTEMD_LOG_LEVEL=debug
Type = simple
WorkingDirectory = /home/ubuntu/Desktop/code_coordinate
ExecStart = python3 /home/ubuntu/Desktop/code_coordinate/T265.py
Restart = always

[Install]
WantedBy = multi-user.target
确认结果
在此启动测试用的服务
sudo systemctl daemon-reload
sudo systemctl restart my_t265.service
使用 status 或者 journalctl 均可看到更加详细的输出结果。
- status 输出
(Opencv4.5.3) ubuntu@ubuntu:/usr/lib/systemd/system$ systemctl status my_t265
Warning: The unit file, source configuration file or drop-ins of my_t265.service changed on disk. Run 'systemctl daemon-reload' to reload units.
● my_t265.service - My_T265 Service
     Loaded: loaded (/lib/systemd/system/my_t265.service; enabled; vendor preset: enabled)
     Active: active (running) since Sat 2022-05-14 20:57:17 CST; 8s ago
   Main PID: 2519 (python3)
      Tasks: 4 (limit: 9251)
     CGroup: /system.slice/my_t265.service
             └─2519 /usr/bin/python3 /home/ubuntu/Desktop/code_coordinate/T265.py

May 14 20:57:17 ubuntu systemd[1]: Stopped My_T265 Service.
May 14 20:57:17 ubuntu systemd[1]: my_t265.service: Converting job my_t265.service/restart -> my_t265.service/start
May 14 20:57:17 ubuntu systemd[1]: my_t265.service: Failed to set 'blkio.weight' attribute on '/system.slice/my_t265.service' to '500': No such file or directory
May 14 20:57:17 ubuntu systemd[1]: my_t265.service: Passing 0 fds to service
May 14 20:57:17 ubuntu systemd[1]: my_t265.service: About to execute: /usr/bin/python3 /home/ubuntu/Desktop/code_coordinate/T265.py
May 14 20:57:17 ubuntu systemd[1]: my_t265.service: Forked /usr/bin/python3 as 2519
May 14 20:57:17 ubuntu systemd[1]: my_t265.service: Changed dead -> running
May 14 20:57:17 ubuntu systemd[1]: my_t265.service: Job 3488 my_t265.service/start finished, result=done
May 14 20:57:17 ubuntu systemd[1]: Started My_T265 Service.
May 14 20:57:17 ubuntu systemd[2519]: my_t265.service: Executing: /usr/bin/python3 /home/ubuntu/Desktop/code_coordinate/T265.py
- journalctl 输出
(Opencv4.5.3) ubuntu@ubuntu:/usr/lib/systemd/system$ journalctl -u my_t265
-- Logs begin at Thu 2022-04-14 20:00:41 CST, end at Sat 2022-05-14 20:58:14 CST. --
May 14 18:23:40 ubuntu systemd[1]: Started My_T265 Service.
May 14 18:24:51 ubuntu python3[766]: Traceback (most recent call last):
May 14 18:24:51 ubuntu python3[766]:   File "/home/ubuntu/Desktop/code_coordinate/T265.py", line 11, in <module>
May 14 18:24:51 ubuntu python3[766]:     pipe.start(cfg)
May 14 18:24:51 ubuntu python3[766]: RuntimeError: No device connected
May 14 18:24:52 ubuntu systemd[1]: my_t265.service: Main process exited, code=exited, status=1/FAILURE
May 14 18:24:52 ubuntu systemd[1]: my_t265.service: Failed with result 'exit-code'.
May 14 18:24:52 ubuntu systemd[1]: my_t265.service: Scheduled restart job, restart counter is at 1.
May 14 18:24:52 ubuntu systemd[1]: Stopped My_T265 Service.
May 14 18:24:52 ubuntu systemd[1]: Started My_T265 Service.
May 14 18:25:33 ubuntu python3[1052]: Traceback (most recent call last):
May 14 18:25:33 ubuntu python3[1052]:   File "/home/ubuntu/Desktop/code_coordinate/T265.py", line 11, in <module>
May 14 18:25:33 ubuntu python3[1052]:     pipe.start(cfg)
May 14 18:25:33 ubuntu python3[1052]: RuntimeError: No device connected
May 14 18:25:33 ubuntu systemd[1]: my_t265.service: Main process exited, code=exited, status=1/FAILURE
May 14 18:25:33 ubuntu systemd[1]: my_t265.service: Failed with result 'exit-code'.
May 14 18:25:34 ubuntu systemd[1]: my_t265.service: Scheduled restart job, restart counter is at 2.
May 14 18:25:34 ubuntu systemd[1]: Stopped My_T265 Service.
May 14 18:25:34 ubuntu systemd[1]: Started My_T265 Service.
May 14 18:26:15 ubuntu python3[1092]: Traceback (most recent call last):
May 14 18:26:15 ubuntu python3[1092]:   File "/home/ubuntu/Desktop/code_coordinate/T265.py", line 11, in <module>
May 14 18:26:15 ubuntu python3[1092]:     pipe.start(cfg)
May 14 18:26:15 ubuntu python3[1092]: RuntimeError: No device connected
May 14 18:26:15 ubuntu systemd[1]: my_t265.service: Main process exited, code=exited, status=1/FAILURE
May 14 18:26:15 ubuntu systemd[1]: my_t265.service: Failed with result 'exit-code'.
May 14 18:26:15 ubuntu systemd[1]: my_t265.service: Scheduled restart job, restart counter is at 3.
May 14 18:26:15 ubuntu systemd[1]: Stopped My_T265 Service.
May 14 18:26:15 ubuntu systemd[1]: Started My_T265 Service.
May 14 18:26:25 ubuntu python3[1344]: X: 0, Y: 0, Z: 0
May 14 18:26:25 ubuntu python3[1344]: X: 0, Y: 0, Z: 0
May 14 18:26:25 ubuntu python3[1344]: X: 0, Y: 0, Z: 0
May 14 18:26:25 ubuntu python3[1344]: X: 0, Y: 0, Z: 0
May 14 18:26:25 ubuntu python3[1344]: X: 0, Y: 0, Z: 0
关于Target(启动模式)
查看默认Target
systemctl get-default
multi-user.target 为命令行模式
graphical.target 为图形模式
查看multi-user.target 包含的所有服务
systemctl list-dependencies multi-user.target
切换到另一个target
systemctl isolate shutdown.target
shutdown.target 就是关机状态
常用的 Target 有两个:一个是 multi-user.target,表示多用户命令行状态;另一个是 graphical.target,表示图形用户状态,它依赖于 multi-user.target。
修改默认启动模式
>>> systemctl set-default graphical.target #图形模式

>>> systemctl set-default multi-user.target #命令行模式
推荐资料
17.3 systemctl 针对 service 类型的配置文件 | 鸟哥的 Linux 私房菜:基础学习篇 第四版
参考链接
树莓派(Debian)配置自定义 Service 实现开机自启
树莓派4B Ubuntu 21.04 开机自动运行 python 脚本


 259
259


 被折叠的 条评论
为什么被折叠?
被折叠的 条评论
为什么被折叠?
 到【灌水乐园】发言


