


目录
摘要
本周主要学习了YOLO-v2、YOLO-v3两个目标检测模型,同时也是YOLO系列的巅峰之作,在后期作者依然对YOLO进行不断地优化,使其仍然是目前最优秀的目标检测网络之一。本篇博客主要介绍YOLO-v2和YOLO-v3做了哪些改进使该模型拥有更好的效果。最后,复现了YOLO-v3的PyTorch代码,实现了对图片的目标检测任务。
Abstract
This week, I mainly studied two object detection models, YOLO-v2 and YOLO-v3, which are also the pinnacle of the YOLO series. In the later stage, the author continued to optimize YOLO, making it still one of the best object detection networks currently available. This blog mainly introduces the improvements made by YOLO-v2 and YOLO-v3 to improve the performance of the model. Finally, the PyTorch code of YOLO-v3 was replicated to achieve object detection tasks on images.
一、YOLO-v2
上一篇博客中写到的YOLO-v1,作者也说了因为是通过全连接层直接预测真实框坐标的方式,所以在预测框的精度上存在不少问题。于是,今天我们来看看YOLO-v2对v1做了哪些改进,得到了多大的提升吧。
1.1 总体结构

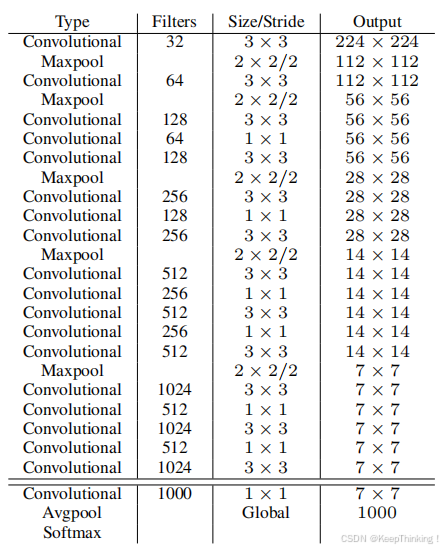
YOLO-v2模型采用 448x448 大小的图像作为输入,在输入模型时将大小缩放为 416x416 。因为在19次卷积之后,正好为 13x13 大小的特征图,因为这样为奇数,在特征图像上会有唯一一个中心点。后面会解释为什么奇数更好。
然后,通过一个全新的分类网络DarkNet-19进行特征提取,最后得到 13x13x1024 的特征图,在经过一次全连接之后,将特征图转化为 13x13x125 。就可以进行框预测和类别预测。
1.2 改进
- 为什么要改为 416x416 的输入

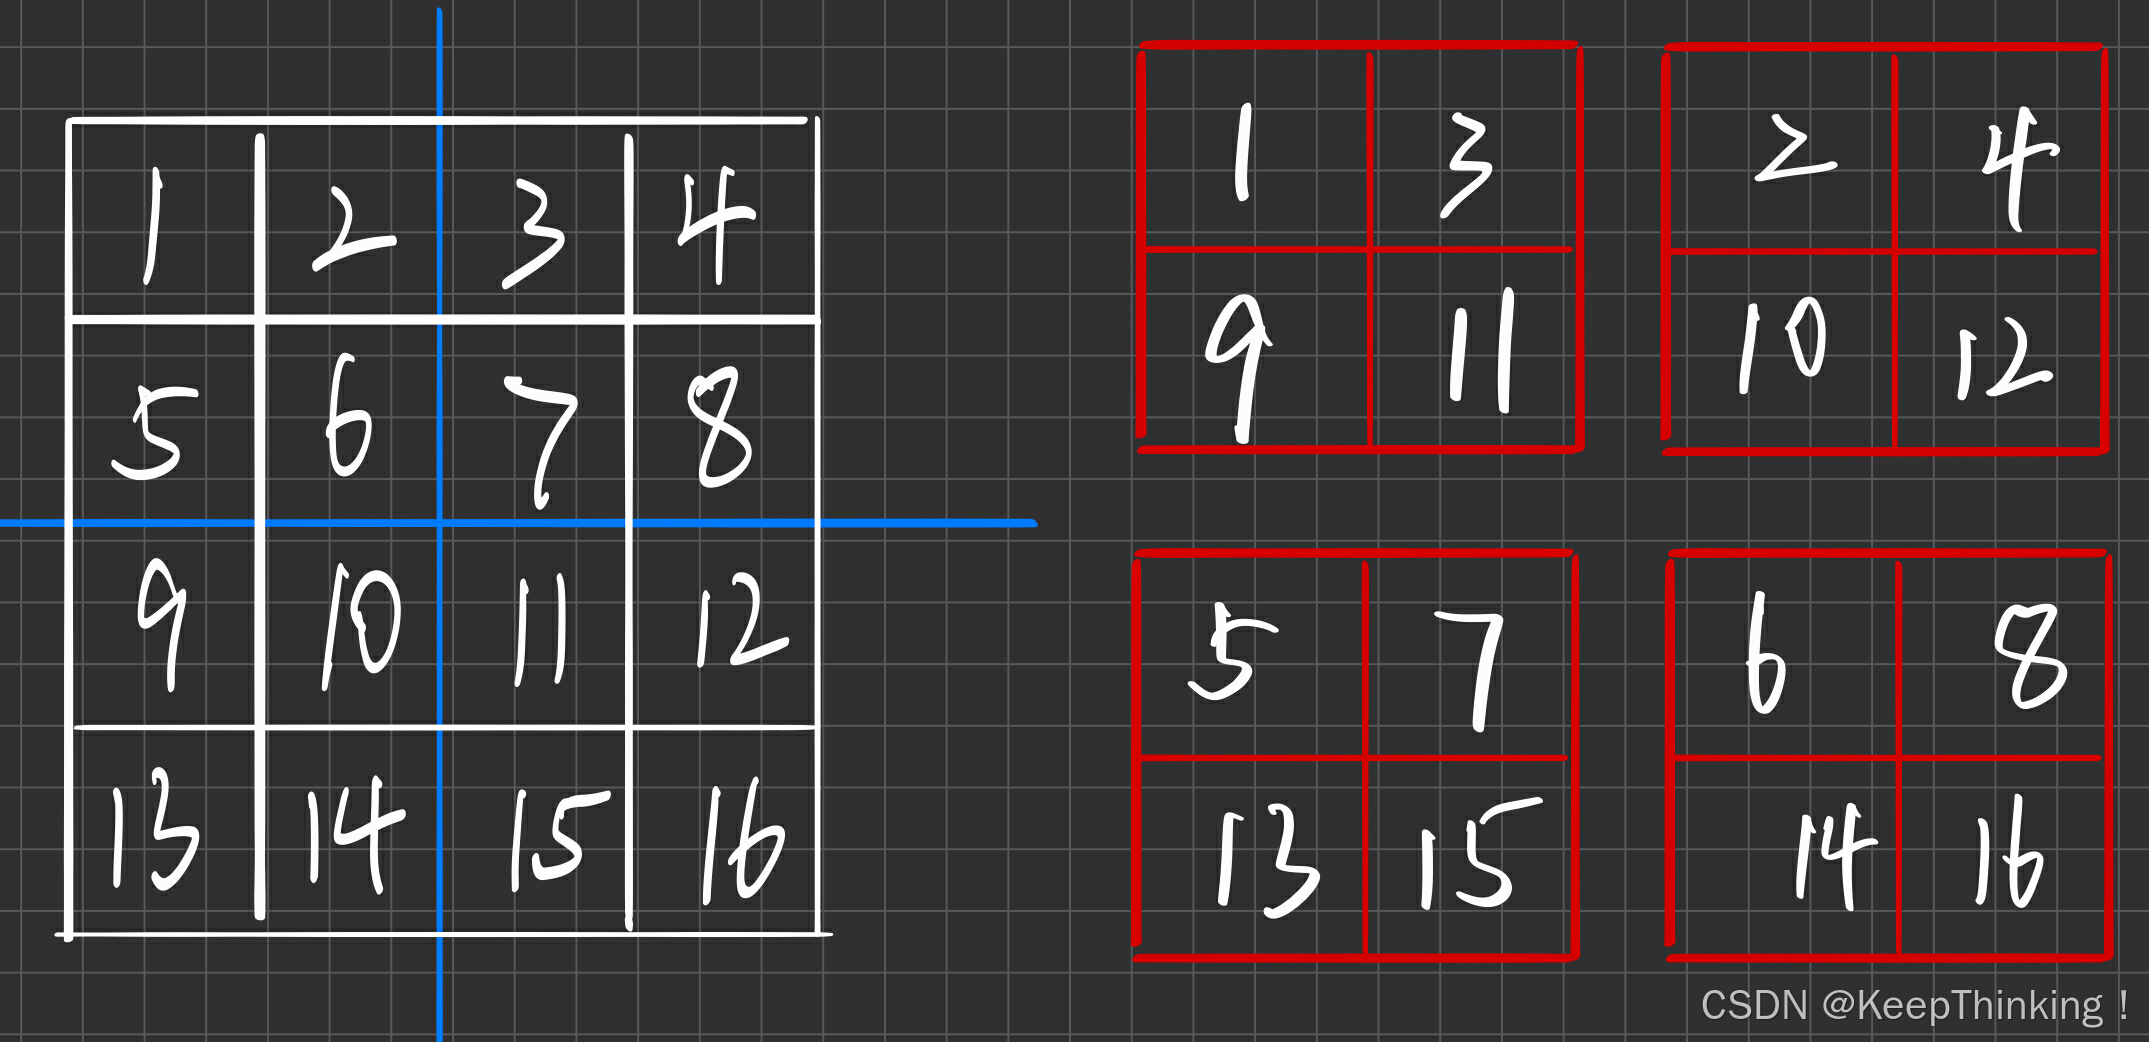
改为 416 之后,下采样32倍会产生 13x13 的特征图像,中心会有唯一一个通道去预测边框和类别,因为YOLO-v2还是会让真实框中心点所在的grid box去预测真实框的位置,这样如果有目标在图像中间就不会像右图一样同时有4个grid box去预测。
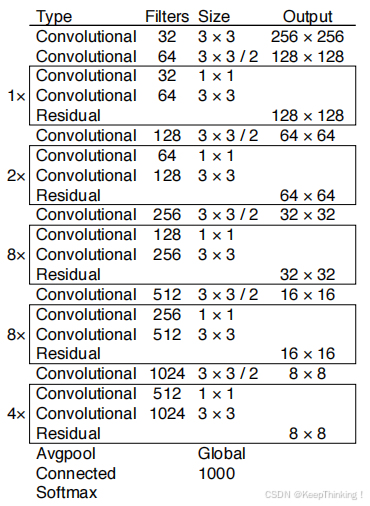
- DarkNet-19
DarkNet-19网络结构图如上所示,相较于YOLO-v1使用的VGG-16而言,在精度上提升不大,但是处DarkNet-19理一张图片仅需要55.8亿次运算,相比于VGG306.9亿次,速度提高了近6倍。同样YOLO-v2中使用的该模型预先在ImageNet上进行预训练后,在进行联合训练。
- 联合训练
YOLO9000,即YOLO-v2。为什么该模型能够识别9000种类别呢?因为该模型使用 WorldTree 来混合来自不同资源的训练数据,并使用联合优化技术同时在ImageNet和COCO数据集上进行训练,能够实时地检测超过9000种物体。也就是在ImageNet上训练的分类网络,依然能够检测在COCO数据集上没有的类别。
- Batch Normalization
BN 对数据进行预处理(统一格式、均衡化、去噪等)能够大大提高训练速度,提升训练效果。基于此,YOLO-v2 对每一层输入的数据都进行批量标准化,这样网络就不需要每层都去学数据的分布,收敛会变得更快。
- Anchor
本节开篇提到YOLO-v1直接通过全连接层预测目标框的位置,导致了准确率低和召回率不高的问题。在加上YOLO-v1没有类似R-CNN系列的推荐区域(RPN),所以网络在前期训练时非常困难,很难收敛。于是,自YOLOv2开始,重新引入了 Anchors box 机制,希望通过提前筛选得到的具有代表性先验框Anchors,使得网络在训练时更容易收敛。
但是YOLO的Anchors box机制有别于Faster R-CNN中的RPN。在Faster R-CNN中,是通过预测预测框和真实框直接的偏移,再去拟合预测框。但是这样的预测框是不受位置限制的,它可能会停在图像中的任何一个位置,导致了模型的不稳定。
于是,YOLO-v2将其改进为预测边界框中心点相对于该网格左上角坐标( Cx , Cy )的相对偏移量,同时为了将预测框的中心点约束在当前网格中,使用 sigmoid 函数将归一化处理,将值约束在0-1,这使得模型训练更稳定,如下图所示:
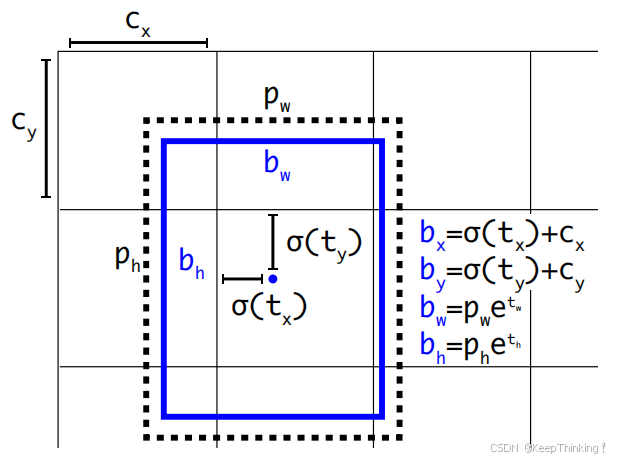
如上约束就能满足每个网格预测目标中心在自身网格中心的物体。
在本节开篇提到经过DarkNet提取特征之后,会产生大小为 13x13x125 的特征图像。由此可见,图像被分为了 13x13 个网格,每个网格会有5个anchor去预测。每个网格对应了125维度的特征,即125=5*(4+1+20),其中4为(x,y,w,h),1为置信度(类似于YOLO-v1中的confidence),20为类别数。
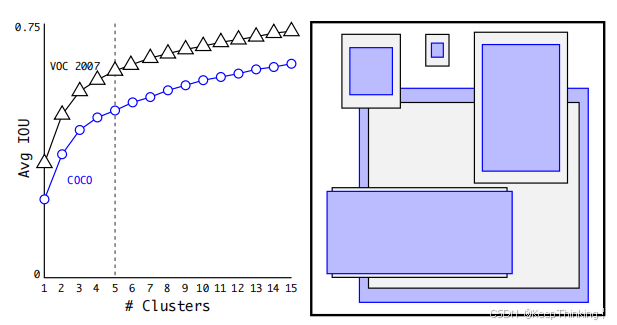
为什么每个网格的anchor数量为5呢?
在Faster R-CNN 中 Anchor Box 的大小和比例是按经验设定的,不具有很好的代表性。若一开始就选择了更好的、更有代表性的先验框Anchor Boxes,那么网络就更容易学到准确的预测位置了。
YOLO-v2 使用 K-means 聚类方法得到 Anchor Box 的大小,选择具有代表性的尺寸的Anchor Box进行一开始的初始化。传统的K-means聚类方法使用标准的欧氏距离作为距离度量,这意味着大的box会比小的box产生更多的错误。因此这里使用其他的距离度量公式。到聚类中心的距离越小越好,但IOU值是越大越好,所以使用 1 - IOU。这样就保证距离越小,IOU值越大。
经过准确度和花销的权衡之下,选择了anchor为5,如下图所示:
- 细粒度特征
YOLO-v2是通过一个直通层实现将高分辨率的特征与低分辨率的特征串联起来的。将DarkNet-19最后一个max pooling层的输入,即 26x26x512 的特征图分为两路:
一路,做正常卷积走完DarkNet-19剩下的路,得到 13x13x1024 的特征图;
另一路,将 26x26x512 的特征图拆分为4块,即 4x13x13x512 的特征图,如下图所示:
然后将上述特征图进行通道维度上的拼接,得到 13x13x3072 的特征图像。这样就拥有了高维度和低维度的特征,以便于后续预测各种尺寸的目标。
二、YOLO-v3
2.1 总体结构
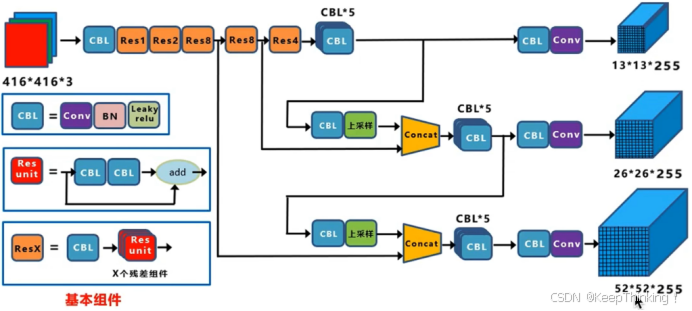
YOLO-v3仍然采用 416x416x3 的输入,通过DarkNet-53提取特征,但是在对于不同尺度下的预测方式与YOLO-v2有所不同,具体请看下文。
图片引用于这篇博客。
2.2 改进
- DarkNet-53
相比于 YOLO-v2 的骨干网络DarkNet-19,YOLO-v3 进行了较大的改进。DarkNet-53由 1×1 和 3×3 的卷积层组成,每个卷积层之后包含一个批量归一化层和一个ReLU,加入这两个部分的目的是为了防止过拟合,以及采用残差连接。卷积层、批量归一化层,以及ReLU共同组成DarkNet-53中的基本卷积单元DBL。
- 多尺寸预测
YOLO-v3中共有3个尺度特征输出,和YOLO-v2中的跨尺度连接输出一个尺度特征有所不同。在每一种尺度输出之前还有一个分支就是和下一路进行拼接(残差连接),在拼接之前该层先进行上采样到下一路相同维度。这样加入残差思想,保留各种维度特征(底层像素+高层语义),三个尺度就可以预测各种不同大小的物体了。详细可见 2.1 的总体结构图。
通过上述方式,模型分别输出了 13x13x255、26x26x255、52x52x255 三个尺度的特征图像。YOLO-v3为每个尺度都分配了3种比例的anchor,即共有9种比例的anchor分别预测不同尺度的目标。在每个尺度下的每一个anchor都需要进行边框预测和类别预测,即每个尺度的特征图都有 种结果。其中 NxN 为该尺度下网格的数量,3为每个网格分配的anchor数量,4为(x,y,w,h)坐标值,1为置信度,80为类别数量。这样每一个尺度下的anchor就可以预测不同大小的目标,同时也增加了anchor的数量,使模型的预测框召回率更高。
- 多标签分类
将YOLO-v2中用于分类的softmax层修改为逻辑分类器。在YOLOv2中,算法认定一个目标只从属于一个类别,根据网络输出类别的得分最大值,将其归为某一类。然而在一些复杂的场景中,单一目标可能从属于多个类别。
为实现多标签分类就需要用逻辑分类器来对每个类别都进行二分类。逻辑分类器主要用到了sigmoid函数,它可以把输出约束在 0 到 1 ,如果某一特征图的输出经过该函数处理后的值大于设定阈值,那么就认定该目标框所对应的目标属于该类。
二分类、多分类与多标签问题的区别请看这篇博客。
2.3 代码
采用VOC2012数据集微调YOLO-v3模型,DarkNet-53在ImageNet上预训练。
import datetime
import argparse
import yaml
import torch.optim as optim
import torch.optim.lr_scheduler as lr_scheduler
from torch.utils.tensorboard import SummaryWriter
from models import *
from build_utils.datasets import *
from build_utils.utils import *
from train_utils import train_eval_utils as train_util
from train_utils import get_coco_api_from_dataset
def train(hyp):
device = torch.device(opt.device if torch.cuda.is_available() else "cpu")
print("Using {} device training.".format(device.type))
wdir = "weights" + os.sep # weights dir
best = wdir + "best.pt"
results_file = "results{}.txt".format(datetime.datetime.now().strftime("%Y%m%d-%H%M%S"))
cfg = opt.cfg
data = opt.data
epochs = opt.epochs
batch_size = opt.batch_size
accumulate = max(round(64 / batch_size), 1) # accumulate n times before optimizer update (bs 64)
weights = opt.weights # initial training weights
imgsz_train = opt.img_size
imgsz_test = opt.img_size # test image sizes
multi_scale = opt.multi_scale
# Image sizes
# 图像要设置成32的倍数
gs = 32 # (pixels) grid size
assert math.fmod(imgsz_test, gs) == 0, "--img-size %g must be a %g-multiple" % (imgsz_test, gs)
grid_min, grid_max = imgsz_test // gs, imgsz_test // gs
if multi_scale:
imgsz_min = opt.img_size // 1.5
imgsz_max = opt.img_size // 0.667
# 将给定的最大,最小输入尺寸向下调整到32的整数倍
grid_min, grid_max = imgsz_min // gs, imgsz_max // gs
imgsz_min, imgsz_max = int(grid_min * gs), int(grid_max * gs)
imgsz_train = imgsz_max # initialize with max size
print("Using multi_scale training, image range[{}, {}]".format(imgsz_min, imgsz_max))
# configure run
# init_seeds() # 初始化随机种子,保证结果可复现
data_dict = parse_data_cfg(data)
train_path = data_dict["train"]
test_path = data_dict["valid"]
nc = 1 if opt.single_cls else int(data_dict["classes"]) # number of classes
hyp["cls"] *= nc / 80 # update coco-tuned hyp['cls'] to current dataset
hyp["obj"] *= imgsz_test / 320
# Remove previous results
for f in glob.glob(results_file):
os.remove(f)
# Initialize model
model = Darknet(cfg).to(device)
# 是否冻结权重,只训练predictor的权重
if opt.freeze_layers:
# 索引减一对应的是predictor的索引,YOLOLayer并不是predictor
output_layer_indices = [idx - 1 for idx, module in enumerate(model.module_list) if
isinstance(module, YOLOLayer)]
# 冻结除predictor和YOLOLayer外的所有层
freeze_layer_indeces = [x for x in range(len(model.module_list)) if
(x not in output_layer_indices) and
(x - 1 not in output_layer_indices)]
# Freeze non-output layers
# 总共训练3x2=6个parameters
for idx in freeze_layer_indeces:
for parameter in model.module_list[idx].parameters():
parameter.requires_grad_(False)
else:
# 如果freeze_layer为False,默认仅训练除darknet53之后的部分
# 若要训练全部权重,删除以下代码
darknet_end_layer = 74 # only yolov3spp cfg
# Freeze darknet53 layers
# 总共训练21x3+3x2=69个parameters
for idx in range(darknet_end_layer + 1): # [0, 74]
for parameter in model.module_list[idx].parameters():
parameter.requires_grad_(False)
# optimizer
pg = [p for p in model.parameters() if p.requires_grad]
optimizer = optim.SGD(pg, lr=hyp["lr0"], momentum=hyp["momentum"],
weight_decay=hyp["weight_decay"], nesterov=True)
scaler = torch.cuda.amp.GradScaler() if opt.amp else None
start_epoch = 0
best_map = 0.0
if weights.endswith(".pt") or weights.endswith(".pth"):
ckpt = torch.load(weights, map_location=device)
# load model
try:
ckpt["model"] = {k: v for k, v in ckpt["model"].items() if model.state_dict()[k].numel() == v.numel()}
model.load_state_dict(ckpt["model"], strict=False)
except KeyError as e:
s = "%s is not compatible with %s. Specify --weights '' or specify a --cfg compatible with %s. " \
"See https://github.com/ultralytics/yolov3/issues/657" % (opt.weights, opt.cfg, opt.weights)
raise KeyError(s) from e
# load optimizer
if ckpt["optimizer"] is not None:
optimizer.load_state_dict(ckpt["optimizer"])
if "best_map" in ckpt.keys():
best_map = ckpt["best_map"]
# load results
if ckpt.get("training_results") is not None:
with open(results_file, "w") as file:
file.write(ckpt["training_results"]) # write results.txt
# epochs
start_epoch = ckpt["epoch"] + 1
if epochs < start_epoch:
print('%s has been trained for %g epochs. Fine-tuning for %g additional epochs.' %
(opt.weights, ckpt['epoch'], epochs))
epochs += ckpt['epoch'] # finetune additional epochs
if opt.amp and "scaler" in ckpt:
scaler.load_state_dict(ckpt["scaler"])
del ckpt
# Scheduler https://arxiv.org/pdf/1812.01187.pdf
lf = lambda x: ((1 + math.cos(x * math.pi / epochs)) / 2) * (1 - hyp["lrf"]) + hyp["lrf"] # cosine
scheduler = lr_scheduler.LambdaLR(optimizer, lr_lambda=lf)
scheduler.last_epoch = start_epoch # 指定从哪个epoch开始
# Plot lr schedule
# y = []
# for _ in range(epochs):
# scheduler.step()
# y.append(optimizer.param_groups[0]['lr'])
# plt.plot(y, '.-', label='LambdaLR')
# plt.xlabel('epoch')
# plt.ylabel('LR')
# plt.tight_layout()
# plt.savefig('LR.png', dpi=300)
# model.yolo_layers = model.module.yolo_layers
# dataset
# 训练集的图像尺寸指定为multi_scale_range中最大的尺寸
train_dataset = LoadImagesAndLabels(train_path, imgsz_train, batch_size,
augment=True,
hyp=hyp, # augmentation hyperparameters
rect=opt.rect, # rectangular training
cache_images=opt.cache_images,
single_cls=opt.single_cls)
# 验证集的图像尺寸指定为img_size(512)
val_dataset = LoadImagesAndLabels(test_path, imgsz_test, batch_size,
hyp=hyp,
rect=True, # 将每个batch的图像调整到合适大小,可减少运算量(并不是512x512标准尺寸)
cache_images=opt.cache_images,
single_cls=opt.single_cls)
# dataloader
nw = min([os.cpu_count(), batch_size if batch_size > 1 else 0, 8]) # number of workers
train_dataloader = torch.utils.data.DataLoader(train_dataset,
batch_size=batch_size,
num_workers=nw,
# Shuffle=True unless rectangular training is used
shuffle=not opt.rect,
pin_memory=True,
collate_fn=train_dataset.collate_fn)
val_datasetloader = torch.utils.data.DataLoader(val_dataset,
batch_size=batch_size,
num_workers=nw,
pin_memory=True,
collate_fn=val_dataset.collate_fn)
# Model parameters
model.nc = nc # attach number of classes to model
model.hyp = hyp # attach hyperparameters to model
model.gr = 1.0 # giou loss ratio (obj_loss = 1.0 or giou)
# 计算每个类别的目标个数,并计算每个类别的比重
# model.class_weights = labels_to_class_weights(train_dataset.labels, nc).to(device) # attach class weights
# start training
# caching val_data when you have plenty of memory(RAM)
# coco = None
coco = get_coco_api_from_dataset(val_dataset)
print("starting traning for %g epochs..." % epochs)
print('Using %g dataloader workers' % nw)
for epoch in range(start_epoch, epochs):
mloss, lr = train_util.train_one_epoch(model, optimizer, train_dataloader,
device, epoch,
accumulate=accumulate, # 迭代多少batch才训练完64张图片
img_size=imgsz_train, # 输入图像的大小
multi_scale=multi_scale,
grid_min=grid_min, # grid的最小尺寸
grid_max=grid_max, # grid的最大尺寸
gs=gs, # grid step: 32
print_freq=100, # 每训练多少个step打印一次信息
warmup=True,
scaler=scaler)
# update scheduler
scheduler.step()
if opt.notest is False or epoch == epochs - 1:
# evaluate on the test dataset
result_info = train_util.evaluate(model, val_datasetloader,
coco=coco, device=device)
coco_mAP = result_info[0]
voc_mAP = result_info[1]
coco_mAR = result_info[8]
# write into tensorboard
if tb_writer:
tags = ['train/giou_loss', 'train/obj_loss', 'train/cls_loss', 'train/loss', "learning_rate",
"mAP@[IoU=0.50:0.95]", "mAP@[IoU=0.5]", "mAR@[IoU=0.50:0.95]"]
for x, tag in zip(mloss.tolist() + [lr, coco_mAP, voc_mAP, coco_mAR], tags):
tb_writer.add_scalar(tag, x, epoch)
# write into txt
with open(results_file, "a") as f:
# 记录coco的12个指标加上训练总损失和lr
result_info = [str(round(i, 4)) for i in result_info + [mloss.tolist()[-1]]] + [str(round(lr, 6))]
txt = "epoch:{} {}".format(epoch, ' '.join(result_info))
f.write(txt + "\n")
# update best mAP(IoU=0.50:0.95)
if coco_mAP > best_map:
best_map = coco_mAP
if opt.savebest is False:
# save weights every epoch
with open(results_file, 'r') as f:
save_files = {
'model': model.state_dict(),
'optimizer': optimizer.state_dict(),
'training_results': f.read(),
'epoch': epoch,
'best_map': best_map}
if opt.amp:
save_files["scaler"] = scaler.state_dict()
torch.save(save_files, "./weights/yolov3spp-{}.pt".format(epoch))
else:
# only save best weights
if best_map == coco_mAP:
with open(results_file, 'r') as f:
save_files = {
'model': model.state_dict(),
'optimizer': optimizer.state_dict(),
'training_results': f.read(),
'epoch': epoch,
'best_map': best_map}
if opt.amp:
save_files["scaler"] = scaler.state_dict()
torch.save(save_files, best.format(epoch))
if __name__ == '__main__':
parser = argparse.ArgumentParser()
parser.add_argument('--epochs', type=int, default=10)
parser.add_argument('--batch-size', type=int, default=4)
parser.add_argument('--cfg', type=str, default='./cfg/my_yolov3.cfg', help="*.cfg path")
parser.add_argument('--data', type=str, default='./data/my_data.data', help='*.data path')
parser.add_argument('--hyp', type=str, default='./cfg/hyp.yaml', help='hyperparameters path')
parser.add_argument('--multi-scale', type=bool, default=True, help='adjust (67%% - 150%%) img_size every 10 batches')
parser.add_argument('--img-size', type=int, default=512, help='test size')
parser.add_argument('--rect', action='store_true', help='rectangular training')
parser.add_argument('--savebest', type=bool, default=False, help='only save best checkpoint')
parser.add_argument('--notest', action='store_true', help='only test final epoch')
parser.add_argument('--cache-images', action='store_true', help='cache images for faster training')
parser.add_argument('--weights', type=str, default='./weights/yolov3-spp-ultralytics-512.pt',
help='initial weights path')
parser.add_argument('--name', default='', help='renames results.txt to results_name.txt if supplied')
parser.add_argument('--device', default='cuda:0', help='device id (i.e. 0 or 0,1 or cpu)')
parser.add_argument('--single-cls', action='store_true', help='train as single-class dataset')
parser.add_argument('--freeze-layers', type=bool, default=False, help='Freeze non-output layers')
# 是否使用混合精度训练(需要GPU支持混合精度)
parser.add_argument("--amp", default=False, help="Use torch.cuda.amp for mixed precision training")
opt = parser.parse_args()
# 检查文件是否存在
opt.cfg = check_file(opt.cfg)
opt.data = check_file(opt.data)
opt.hyp = check_file(opt.hyp)
print(opt)
with open(opt.hyp) as f:
hyp = yaml.load(f, Loader=yaml.FullLoader)
print('Start Tensorboard with "tensorboard --logdir=runs", view at http://localhost:6006/')
tb_writer = SummaryWriter(comment=opt.name)
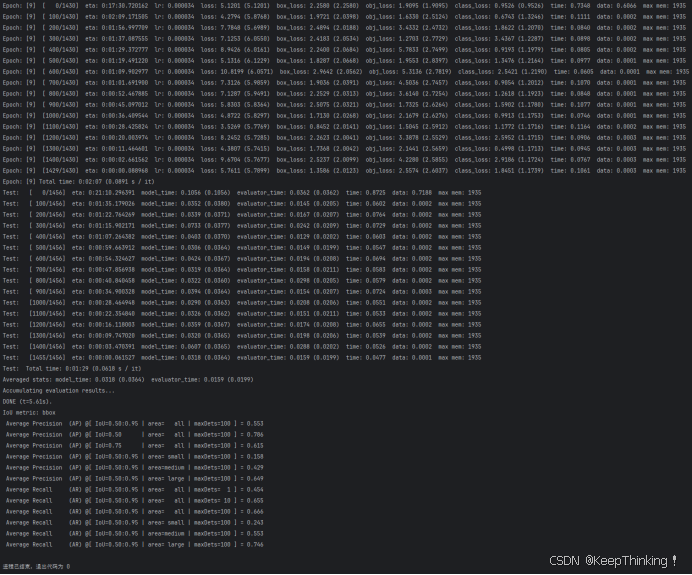
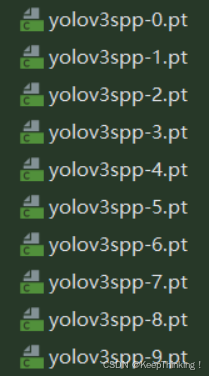
train(hyp)共训练10个epoch,如下图所示:
需要注意的是需要将VOC2012数据集格式转为YOLO格式,脚本如下:
import os
from tqdm import tqdm
from lxml import etree
import json
import shutil
# voc数据集根目录以及版本
voc_root = "./data/VOCdevkit"
voc_version = "VOC2012"
# 转换的训练集以及验证集对应txt文件
train_txt = "train.txt"
val_txt = "val.txt"
# 转换后的文件保存目录
save_file_root = "./data/my_yolo_dataset"
# label标签对应json文件
label_json_path = './data/pascal_voc_classes.json'
# 拼接出voc的images目录,xml目录,txt目录
voc_images_path = os.path.join(voc_root, voc_version, "JPEGImages")
voc_xml_path = os.path.join(voc_root, voc_version, "Annotations")
train_txt_path = os.path.join(voc_root, voc_version, "ImageSets", "Main", train_txt)
val_txt_path = os.path.join(voc_root, voc_version, "ImageSets", "Main", val_txt)
# 检查文件/文件夹都是否存在
assert os.path.exists(voc_images_path), "VOC images path not exist..."
assert os.path.exists(voc_xml_path), "VOC xml path not exist..."
assert os.path.exists(train_txt_path), "VOC train txt file not exist..."
assert os.path.exists(val_txt_path), "VOC val txt file not exist..."
assert os.path.exists(label_json_path), "label_json_path does not exist..."
if os.path.exists(save_file_root) is False:
os.makedirs(save_file_root)
def parse_xml_to_dict(xml):
"""
将xml文件解析成字典形式,参考tensorflow的recursive_parse_xml_to_dict
Args:
xml: xml tree obtained by parsing XML file contents using lxml.etree
Returns:
Python dictionary holding XML contents.
"""
if len(xml) == 0: # 遍历到底层,直接返回tag对应的信息
return {xml.tag: xml.text}
result = {}
for child in xml:
child_result = parse_xml_to_dict(child) # 递归遍历标签信息
if child.tag != 'object':
result[child.tag] = child_result[child.tag]
else:
if child.tag not in result: # 因为object可能有多个,所以需要放入列表里
result[child.tag] = []
result[child.tag].append(child_result[child.tag])
return {xml.tag: result}
def translate_info(file_names: list, save_root: str, class_dict: dict, train_val='train'):
"""
将对应xml文件信息转为yolo中使用的txt文件信息
:param file_names:
:param save_root:
:param class_dict:
:param train_val:
:return:
"""
save_txt_path = os.path.join(save_root, train_val, "labels")
if os.path.exists(save_txt_path) is False:
os.makedirs(save_txt_path)
save_images_path = os.path.join(save_root, train_val, "images")
if os.path.exists(save_images_path) is False:
os.makedirs(save_images_path)
for file in tqdm(file_names, desc="translate {} file...".format(train_val)):
# 检查下图像文件是否存在
img_path = os.path.join(voc_images_path, file + ".jpg")
assert os.path.exists(img_path), "file:{} not exist...".format(img_path)
# 检查xml文件是否存在
xml_path = os.path.join(voc_xml_path, file + ".xml")
assert os.path.exists(xml_path), "file:{} not exist...".format(xml_path)
# read xml
with open(xml_path) as fid:
xml_str = fid.read()
xml = etree.fromstring(xml_str)
data = parse_xml_to_dict(xml)["annotation"]
img_height = int(data["size"]["height"])
img_width = int(data["size"]["width"])
# write object info into txt
assert "object" in data.keys(), "file: '{}' lack of object key.".format(xml_path)
if len(data["object"]) == 0:
# 如果xml文件中没有目标就直接忽略该样本
print("Warning: in '{}' xml, there are no objects.".format(xml_path))
continue
with open(os.path.join(save_txt_path, file + ".txt"), "w") as f:
for index, obj in enumerate(data["object"]):
# 获取每个object的box信息
xmin = float(obj["bndbox"]["xmin"])
xmax = float(obj["bndbox"]["xmax"])
ymin = float(obj["bndbox"]["ymin"])
ymax = float(obj["bndbox"]["ymax"])
class_name = obj["name"]
class_index = class_dict[class_name] - 1 # 目标id从0开始
# 进一步检查数据,有的标注信息中可能有w或h为0的情况,这样的数据会导致计算回归loss为nan
if xmax <= xmin or ymax <= ymin:
print("Warning: in '{}' xml, there are some bbox w/h <=0".format(xml_path))
continue
# 将box信息转换到yolo格式
xcenter = xmin + (xmax - xmin) / 2
ycenter = ymin + (ymax - ymin) / 2
w = xmax - xmin
h = ymax - ymin
# 绝对坐标转相对坐标,保存6位小数
xcenter = round(xcenter / img_width, 6)
ycenter = round(ycenter / img_height, 6)
w = round(w / img_width, 6)
h = round(h / img_height, 6)
info = [str(i) for i in [class_index, xcenter, ycenter, w, h]]
if index == 0:
f.write(" ".join(info))
else:
f.write("\n" + " ".join(info))
# copy image into save_images_path
path_copy_to = os.path.join(save_images_path, img_path.split(os.sep)[-1])
if os.path.exists(path_copy_to) is False:
shutil.copyfile(img_path, path_copy_to)
def create_class_names(class_dict: dict):
keys = class_dict.keys()
with open("./data/my_data_label.names", "w") as w:
for index, k in enumerate(keys):
if index + 1 == len(keys):
w.write(k)
else:
w.write(k + "\n")
def main():
# read class_indict
json_file = open(label_json_path, 'r')
class_dict = json.load(json_file)
# 读取train.txt中的所有行信息,删除空行
with open(train_txt_path, "r") as r:
train_file_names = [i for i in r.read().splitlines() if len(i.strip()) > 0]
# voc信息转yolo,并将图像文件复制到相应文件夹
translate_info(train_file_names, save_file_root, class_dict, "train")
# 读取val.txt中的所有行信息,删除空行
with open(val_txt_path, "r") as r:
val_file_names = [i for i in r.read().splitlines() if len(i.strip()) > 0]
# voc信息转yolo,并将图像文件复制到相应文件夹
translate_info(val_file_names, save_file_root, class_dict, "val")
# 创建my_data_label.names文件
create_class_names(class_dict)
if __name__ == "__main__":
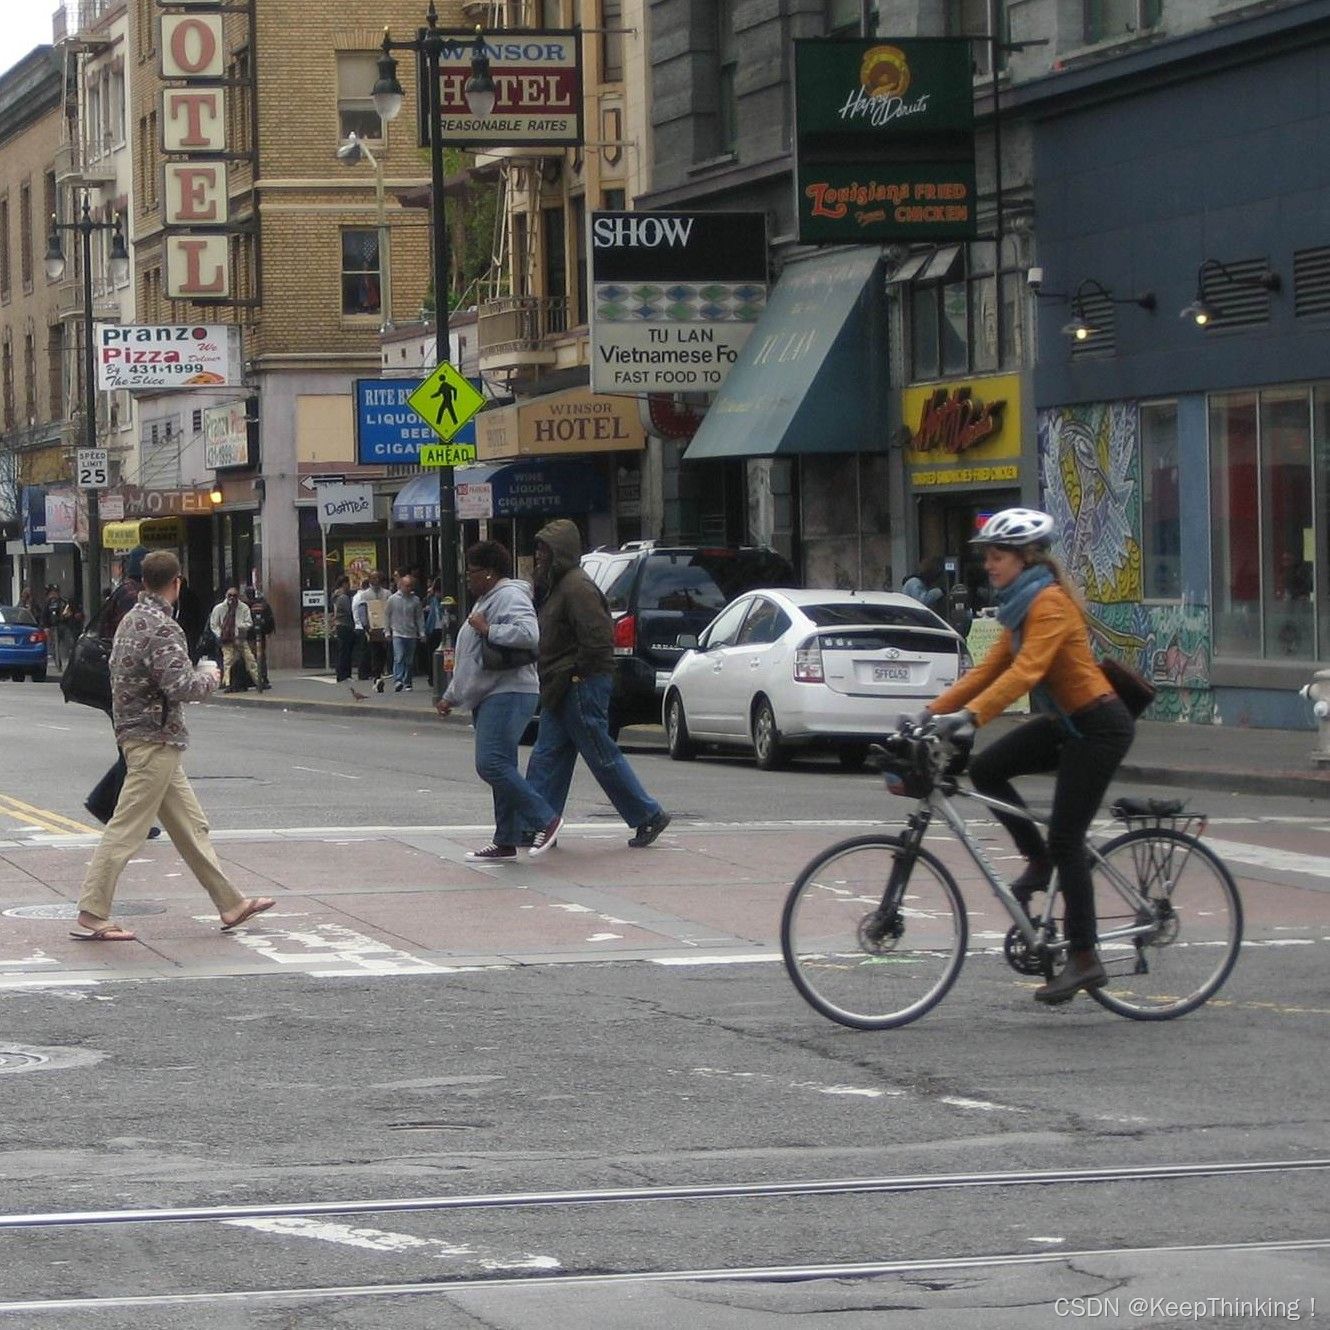
main()将上述训练好的yolov3spp-9.pt模型权重引入YOLO-v3预测代码中进行图像目标检测,代码如下所示:
import os
import json
import time

import torch
import cv2
import numpy as np
from matplotlib import pyplot as plt
from PIL import Image

from build_utils import img_utils, torch_utils, utils
from models import Darknet
from draw_box_utils import draw_objs


def main():
    img_size = 512  # 必须是32的整数倍 [416, 512, 608]
    cfg = "cfg/my_yolov3.cfg"  # 改成生成的.cfg文件
    weights_path = "./weights/yolov3spp-9.pt"  # 改成自己训练好的权重文件
    json_path = "./data/pascal_voc_classes.json"  # json标签文件
    img_path = "./data/street.jpg"

    assert os.path.exists(cfg), "cfg file {} dose not exist.".format(cfg)
    assert os.path.exists(weights_path), "weights file {} dose not exist.".format(weights_path)
    assert os.path.exists(json_path), "json file {} dose not exist.".format(json_path)
    assert os.path.exists(img_path), "image file {} dose not exist.".format(img_path)

    with open(json_path, 'r') as f:
        class_dict = json.load(f)

    category_index = {str(v): str(k) for k, v in class_dict.items()}

    input_size = (img_size, img_size)

    device = torch.device("cuda:0" if torch.cuda.is_available() else "cpu")

    model = Darknet(cfg, img_size)
    weights_dict = torch.load(weights_path, map_location='cpu')
    weights_dict = weights_dict["model"] if "model" in weights_dict else weights_dict
    model.load_state_dict(weights_dict)
    model.to(device)

    model.eval()
    with torch.no_grad():
        # init
        img = torch.zeros((1, 3, img_size, img_size), device=device)
        model(img)

        img_o = cv2.imread(img_path)  # BGR
        assert img_o is not None, "Image Not Found " + img_path

        img = img_utils.letterbox(img_o, new_shape=input_size, auto=True, color=(0, 0, 0))[0]
        # Convert
        img = img[:, :, ::-1].transpose(2, 0, 1)  # BGR to RGB, to 3x416x416
        img = np.ascontiguousarray(img)

        img = torch.from_numpy(img).to(device).float()
        img /= 255.0  # scale (0, 255) to (0, 1)
        img = img.unsqueeze(0)  # add batch dimension

        t1 = torch_utils.time_synchronized()
        pred = model(img)[0]  # only get inference result
        t2 = torch_utils.time_synchronized()
        print(t2 - t1)

        pred = utils.non_max_suppression(pred, conf_thres=0.1, iou_thres=0.6, multi_label=True)[0]
        t3 = time.time()
        print(t3 - t2)

        if pred is None:
            print("No target detected.")
            exit(0)

        # process detections
        pred[:, :4] = utils.scale_coords(img.shape[2:], pred[:, :4], img_o.shape).round()
        print(pred.shape)

        bboxes = pred[:, :4].detach().cpu().numpy()
        scores = pred[:, 4].detach().cpu().numpy()
        classes = pred[:, 5].detach().cpu().numpy().astype(np.int) + 1

        pil_img = Image.fromarray(img_o[:, :, ::-1])
        plot_img = draw_objs(pil_img,
                             bboxes,
                             classes,
                             scores,
                             category_index=category_index,
                             box_thresh=0.2,
                             line_thickness=3,
                             font='arial.ttf',
                             font_size=20)
        plt.imshow(plot_img)
        plt.show()
        # 保存预测的图片结果
        plot_img.save("test_result.jpg")


if __name__ == "__main__":
    main()
输入图像如下:
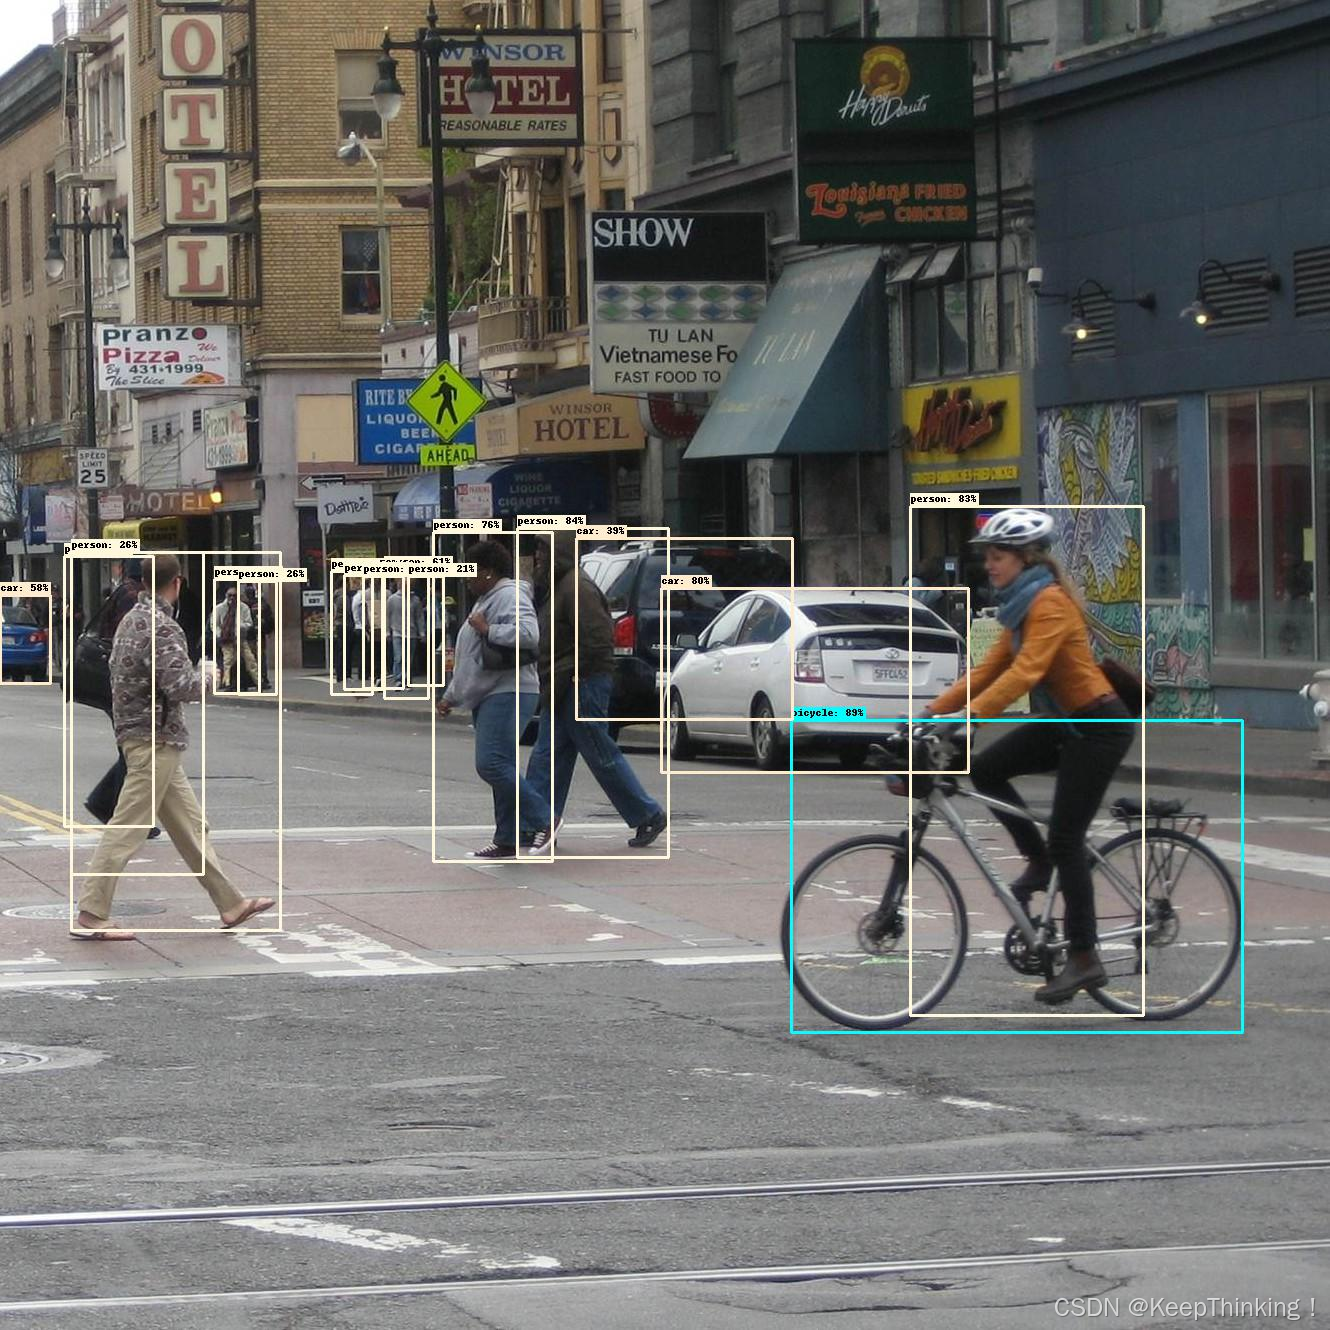
YOLO-v3检测结果如下图所示:
由此可见检测结果还是非常准确的,预测框的召回率也较高。
总结
本周的学习到此结束,下周将会学习CenterNet,以及复习之前学习的内容。
如有错误,请各位大佬指出,谢谢!


 3196
3196

 被折叠的 条评论
为什么被折叠?
被折叠的 条评论
为什么被折叠?
 到【灌水乐园】发言


