


预备工作
创建虚拟环境:
conda create -n myenv#创建
conda activate myenv#激活
安装transformers包
pip install git+https://github.com/huggingface/transformers或者
conda install -c huggingface transformers快速上手pipeline
transformer库中最基本的对象是pipeline(管道),将模型与其他必要预处理和后处理步骤组合起来,使我们可以直接输入任何文本并获得可理解的答案,它支持如下的任务:
- 情感分析(Sentiment analysis):一段文本是正面还是负面的情感倾向
- 文本生成(Text generation):给定一段文本,让模型补充后面的内容
- 命名实体识别(Name entity recognition):识别文字中出现的人名地名的命名实体
- 问答(Question answering):给定一段文本以及针对它的一个问题,从文本中抽取答案
- 填词(Filling masked text):把一段文字的某些部分mask住,然后让模型填空
- 摘要(Summarization):根据一段长文本中生成简短的摘要
- 翻译(Translation):把一种语言的文字翻译成另一种语言
- 特征提取(Feature extraction):把一段文字用一个向量来表示
from transformers import pipeline
classifier = pipeline('sentiment-analysis')
results = classifier(["We are very happy to show you the Transformers library.",
"We hope you don't hate it."])
for result in results:
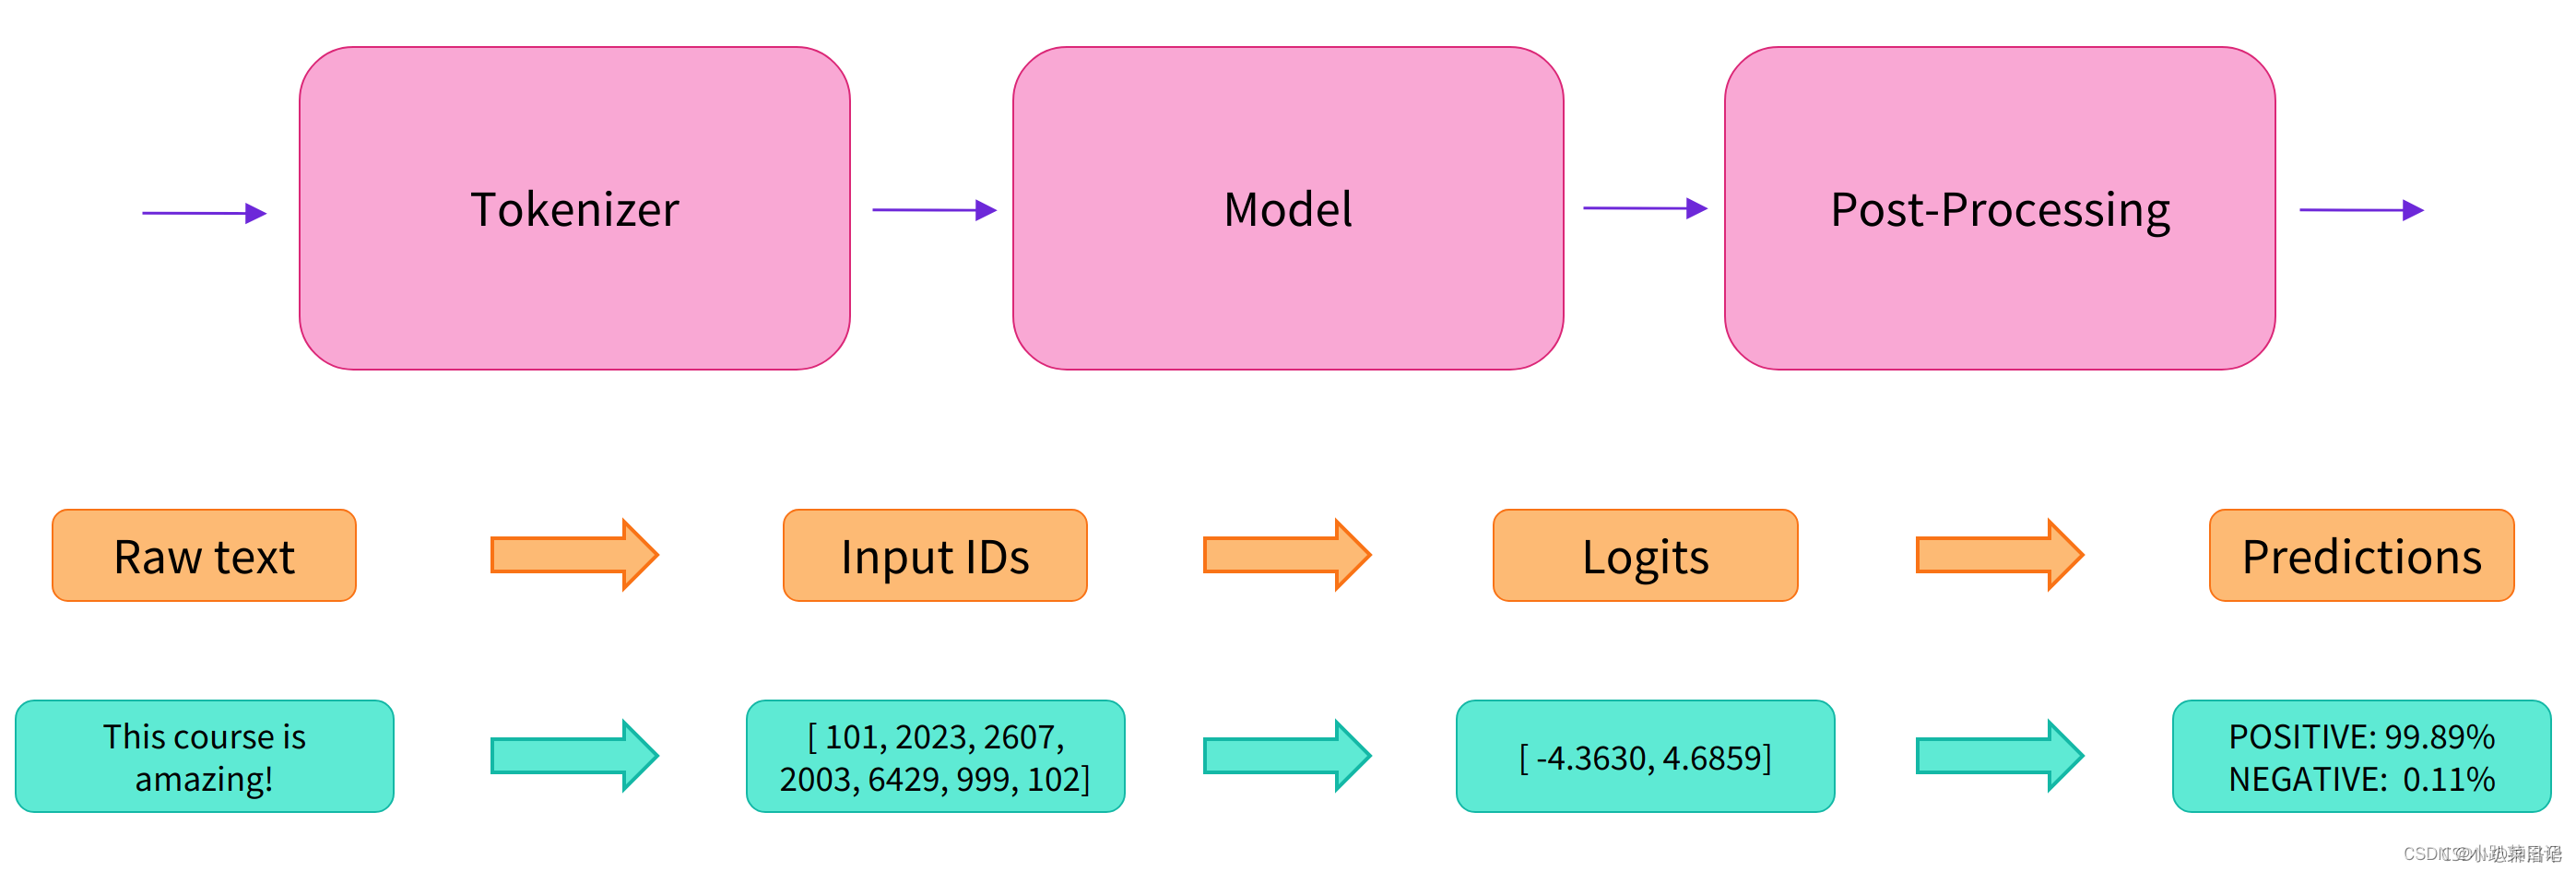
print(f"label: {result['label']}, with score: {round(result['score'], 4)}")当第一次运行的时候,它会下载预训练模型和分词器(tokenizer)并且缓存下来
![]()
pipeline将三个步骤组合在一起:预处理、传递输入到模型和后处理:
transformers包介绍
transformers不是一个基础的神经网络库来一步一步构造Transformer,而是把常见的Transformer模型封装成一个building block,我们可以方便的在PyTorch或者TensorFlow里使用它。
只有configuration,models和tokenizer三个主要类。
Configuration类用于配置模型的各种参数,如模型类型、层数、隐藏单元数等。它允许用户通过创建一个配置对象来自定义模型的架构。例如,BertConfig是 BERT 模型的配置类,用户可以通过设置不同的参数来配置不同的 BERT 模型变体。Models类包含了各种预训练的深度学习模型,如BERT、GPT等。通过从相应的模型类中实例化对象,用户可以加载预训练的权重并进行推理或微调。例如,BertModel是 Hugging Face Transformers 库中用于加载和使用 BERT 模型的类。Tokenizer将输入文本转换为模型可以理解的标记。它也负责将模型的输出标记转换回人类可读的形式。例如,BertTokenizer是用于对文本进行标记化的类,与 BERT 模型一起使用。
练习:在wikitext数据集上pre-train,在MRPC和RTE数据集上fine-tune
数据集
下载数据集or模型
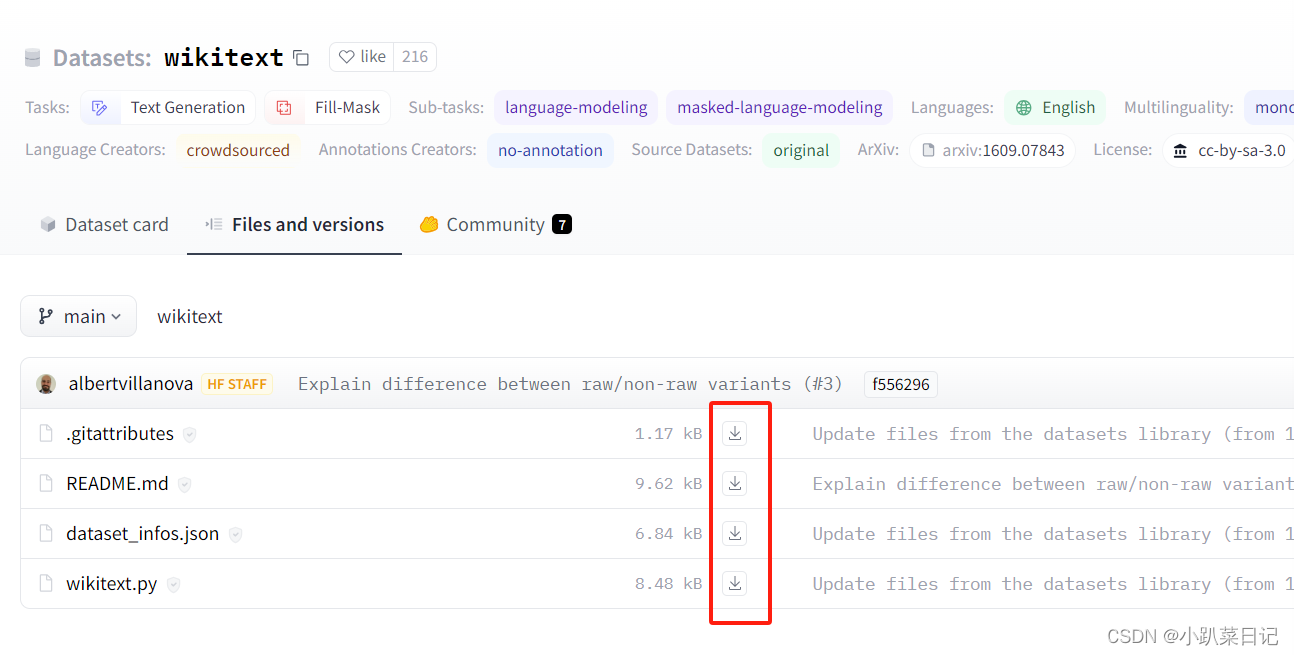
例如wikitext数据集,地址:https://huggingface.co/datasets/wikitext/tree/main
sudo apt-get install git-lfs
git lfs clone https://huggingface.co/datasets/wikitext
- 不能使用git clone https://huggingface.co/t5-base,从huggingface中git clone下来的模型看似下载下来了,但是其实下载下来的并不是实质的模型文件(如果你检查文件的大小,只有几B) ,后续通过from_pretrained()函数来加载模型时会报错:safetensors_rust.SafetensorError: Error while deserializing header: HeaderTooLarge
- 使用git clone 数据集似乎没有问题
如果实验室的服务器不能上外网,下载数据集的时候遇到问题:
Cloning into 'wikitext'...
fatal: unable to access 'https://huggingface.co/datasets/wikitext/': Failed to connect to huggingface.co port 443: Connection timed out
解决办法:手动下载文件到本地,然后上传到服务器上
如果实验室服务器配置了代理,能上外网,那么通过以下命令就能成功下载:
git lfs clone https://huggingface.co/datasets/wikitext加载数据集
从服务器(本地)加载:
import datasets
wikitext_datasets=datasets.load_dataset("/mnt/workspace/wzf/transformer/datasets/wikitext", 'wikitext-103-v1')
print(wikitext_datasets)
mrpc_datasets=datasets.load_dataset("/mnt/workspace/wzf/transformer/datasets/mrpc")
print(mrpc_datasets)
rte_datasets=datasets.load_dataset("/mnt/workspace/wzf/transformer/datasets/rte")
print(rte_datasets)
注:
load_dataset函数会执行wikitext/mrpc/rte文件夹下的.py文件,通过.py代码,加载原始数据,如果报错应该查看.py文件的内容
ps:save_to_disk保存至服务器;load_from_disk读取服务器数据集
数据结构
数据格式
wikitext:
DatasetDict({
    test: Dataset({
        features: ['text'],
        num_rows: 4358
    })
    train: Dataset({
        features: ['text'],
        num_rows: 1801350
    })
    validation: Dataset({
        features: ['text'],
        num_rows: 3760
    })
})
mrpc:
DatasetDict({
    train: Dataset({
        features: ['text1', 'text2', 'label', 'idx', 'label_text'],
        num_rows: 3668
    })
    validation: Dataset({
        features: ['text1', 'text2', 'label', 'idx', 'label_text'],
        num_rows: 408
    })
    test: Dataset({
        features: ['text1', 'text2', 'label', 'idx', 'label_text'],
        num_rows: 1725
    })
})
rte:
DatasetDict({
    train: Dataset({
        features: ['text1', 'text2', 'label', 'idx', 'label_text'],
        num_rows: 2490
    })
    validation: Dataset({
        features: ['text1', 'text2', 'label', 'idx', 'label_text'],
        num_rows: 277
    })
    test: Dataset({
        features: ['text1', 'text2', 'label', 'idx', 'label_text'],
        num_rows: 3000
    })
})
查看几条样本
wikitext:
raw_train_dataset = wikitext_datasets["train"]
print(raw_train_dataset[0])
print(raw_train_dataset[1])
print(raw_train_dataset[2])
print(raw_train_dataset[3])
输出:
{'text': ''}
{'text': ' = Valkyria Chronicles III = \n'}
{'text': ''}
{'text': ' Senjō no Valkyria 3 : <unk> Chronicles ( Japanese : 戦場のヴァルキュリア3 , lit . Valkyria of the Battlefield 3 ) , commonly referred to as Valkyria Chronicles III outside Japan , is a tactical role @-@ playing video game developed by Sega and Media.Vision for the PlayStation Portable . Released in January 2011 in Japan , it is the third game in the Valkyria series . Employing the same fusion of tactical and real @-@ time gameplay as its predecessors , the story runs parallel to the first game and follows the " Nameless " , a penal military unit serving the nation of Gallia during the Second Europan War who perform secret black operations and are pitted against the Imperial unit " <unk> Raven " . \n'}
mrpc:
raw_train_dataset = mrpc_datasets["train"]
print(raw_train_dataset[0])
输出:
{'text1': 'Amrozi accused his brother , whom he called " the witness " , of deliberately distorting his evidence .',
'text2': 'Referring to him as only " the witness " , Amrozi accused his brother of deliberately distorting his evidence .',
'label': 1,
'idx': 0,
'label_text': 'equivalent'}
查看数据类别、特征
mrpc:
raw_train_dataset.features输出:
{'text1': Value(dtype='string', id=None),
 'text2': Value(dtype='string', id=None),
'label': Value(dtype='int64', id=None),
'idx': Value(dtype='int64', id=None),
'label_text': Value(dtype='string', id=None)}
数据预处理——分词器tokenizer
使用AutoTokenizer类来处理数据,通过AutoTokenizer.from_pretrained()函数根据预训练模型,定义分词器tokenizer。transformers会处理下载、缓存和其它所有加载模型相关的细节(下载了模型需要的词表库tokens vocabulary,它会被缓存起来,从而再次使用的时候不会重新下载),而所有这些模型都统一在Hugging Face Models管理。
Tokenizer的主要作用是将文本转换为模型可以处理的输入形式(通常是标记的索引序列)
举例使用bert-base-uncased模型分词单个句子对
from transformers import AutoTokenizer
checkpoint = "/mnt/workspace/wzf/transformer/model/bert-base-uncased"
tokenizer = AutoTokenizer.from_pretrained(checkpoint)#实例化tokenizer
inputs = tokenizer("This is the first sentence.", "This is the second one.")
print(inputs)
输出:
{'input_ids': [101, 2023, 2003, 1996, 2034, 6251, 1012, 102, 2023, 2003, 1996, 2117, 2028, 1012, 102],
'token_type_ids': [0, 0, 0, 0, 0, 0, 0, 0, 1, 1, 1, 1, 1, 1, 1],
'attention_mask': [1, 1, 1, 1, 1, 1, 1, 1, 1, 1, 1, 1, 1, 1, 1]}input_ids一般来说随着预训练模型名字的不同而有所不同。原因是不同的预训练模型在预训练的时候设定了不同的规则。token_type_ids:0就表示的第一句话,1表示第二句话
解码input_ids:
tokenizer.convert_ids_to_tokens(inputs["input_ids"])输出:
['[CLS]', 'this', 'is', 'the', 'first', 'sentence', '.', '[SEP]', 'this', 'is', 'the', 'second', 'one', '.', '[SEP]']
tokenizer()这种处理方法的缺点是处理之后返回的不是dataset格式,而是返回字典(带有我们的键:input_ids、attention_mask 和 token_type_ids,对应键值对的值)。为了使我们的数据保持dataset的格式,我们将使用更灵活的Dataset.map 方法,map 方法是对数据集中的每个元素应用同一个函数,所以让我们定义一个函数来对输入进行tokenize预处理
分词函数tokenize_function和map映射
mrpc:
def mrpc_tokenize_function(example):
        return tokenizer(example["text1"], example["text2"], truncation=True)

mrpc_tokenized_datasets = mrpc_datasets.map(mrpc_tokenize_function, batched=True)
print(mrpc_tokenized_datasets)
map函数参数:num_proc参数用于指定并行处理数据的进程数量,例如num_proc=4;batched=True参数用于map函数一次应用于数据集的整个batch元素,而不是分别应用于每个元素;tokenizer参数:
use_fast=True参数表示选择使用快速分词器;padding=True填充输入序列,使得批次内序列长度一致;truncation=True 截断过长的序列;return_tensors="pt" 返回PyTorch 张量;
输出:
DatasetDict({
    train: Dataset({
        features: ['text1', 'text2', 'label', 'idx', 'label_text', 'input_ids', 'token_type_ids', 'attention_mask'],
        num_rows: 3668
    })
    validation: Dataset({
        features: ['text1', 'text2', 'label', 'idx', 'label_text', 'input_ids', 'token_type_ids', 'attention_mask'],
        num_rows: 408
    })
    test: Dataset({
        features: ['text1', 'text2', 'label', 'idx', 'label_text', 'input_ids', 'token_type_ids', 'attention_mask'],
        num_rows: 1725
    })
})
wikitext:
def wikitext_tokenize_function(example):
        return tokenizer(example["text"], truncation=True, max_length=512)

wikitext_tokenized_datasets = wikitext_datasets.map(wikitext_tokenize_function, batched=True)
print(wikitext_tokenized_datasets)
输出:
DatasetDict({
    test: Dataset({
        features: ['text', 'input_ids', 'token_type_ids', 'attention_mask'],
        num_rows: 4358
    })
    train: Dataset({
        features: ['text', 'input_ids', 'token_type_ids', 'attention_mask'],
        num_rows: 1801350
    })
    validation: Dataset({
        features: ['text', 'input_ids', 'token_type_ids', 'attention_mask'],
        num_rows: 3760
    })
})
映射后多出了tokenizer生成的input_ids、token_type_ids、attention_mask
数据填充——DataCollatorForLanguageModeling类
DataCollatorForLanguageModeling主要用于处理模型的输入数据,包括 tokenization、masking 等。
-
mlm:设置为True,DataCollatorForLanguageModeling将为 MLM 任务准备批次数据。 -
mlm_probability: 用于掩盖标记的概率。
from transformers import DataCollatorForLanguageModeling
data_collator = DataCollatorForLanguageModeling(tokenizer=tokenizer, mlm=True, mlm_probability=0.15)
模型参数——TrainingArguments类
TrainingArguments类定义模型参数。
from transformers import TrainingArguments
training_args = TrainingArguments(output_dir="test-trainer", evaluation_strategy="epoch")
print(training_args)
evaluation_strategy="epoch" 表示每个epoch评估一次,evaluation_strategy="steps"每训练 eval_steps步时进行一次评估
输出:
TrainingArguments(
_n_gpu=1,
adafactor=False,
adam_beta1=0.9,
adam_beta2=0.999,
adam_epsilon=1e-08,
auto_find_batch_size=False,
bf16=False,
bf16_full_eval=False,
data_seed=None,
dataloader_drop_last=False,
dataloader_num_workers=0,
dataloader_persistent_workers=False,
dataloader_pin_memory=True,
ddp_backend=None,
ddp_broadcast_buffers=None,
ddp_bucket_cap_mb=None,
ddp_find_unused_parameters=None,
ddp_timeout=1800,
debug=[],
deepspeed=None,
disable_tqdm=False,
dispatch_batches=None,
do_eval=False,
do_predict=False,
do_train=False,
eval_accumulation_steps=None,
eval_delay=0,
eval_steps=None,
evaluation_strategy=no,
fp16=False,
fp16_backend=auto,
fp16_full_eval=False,
fp16_opt_level=O1,
fsdp=[],
fsdp_config={'min_num_params': 0, 'xla': False, 'xla_fsdp_grad_ckpt': False},
fsdp_min_num_params=0,
fsdp_transformer_layer_cls_to_wrap=None,
full_determinism=False,
gradient_accumulation_steps=1,
gradient_checkpointing=False,
gradient_checkpointing_kwargs=None,
greater_is_better=None,
group_by_length=False,
half_precision_backend=auto,
hub_always_push=False,
hub_model_id=None,
hub_private_repo=False,
hub_strategy=every_save,
hub_token=<HUB_TOKEN>,
ignore_data_skip=False,
include_inputs_for_metrics=False,
include_num_input_tokens_seen=False,
include_tokens_per_second=False,
jit_mode_eval=False,
label_names=None,
label_smoothing_factor=0.0,
learning_rate=5e-05,
length_column_name=length,
load_best_model_at_end=False,
local_rank=0,
log_level=passive,
log_level_replica=warning,
log_on_each_node=True,
logging_dir=test-trainer/runs/Dec14_19-35-03_dsw-30998-59d59d765d-gp7nz,
logging_first_step=False,
logging_nan_inf_filter=True,
logging_steps=500,#训练500次打印一次损失
logging_strategy=steps,
lr_scheduler_kwargs={},
lr_scheduler_type=linear,
max_grad_norm=1.0,
max_steps=-1,
metric_for_best_model=None,
mp_parameters=,
neftune_noise_alpha=None,
no_cuda=False,
num_train_epochs=3.0,
optim=adamw_torch,
optim_args=None,
output_dir=test-trainer,
overwrite_output_dir=False,
past_index=-1,
per_device_eval_batch_size=8,
per_device_train_batch_size=8,
prediction_loss_only=False,
push_to_hub=False,
push_to_hub_model_id=None,
push_to_hub_organization=None,
push_to_hub_token=<PUSH_TO_HUB_TOKEN>,
ray_scope=last,
remove_unused_columns=True,
report_to=['tensorboard'],
resume_from_checkpoint=None,
run_name=test-trainer,
save_on_each_node=False,
save_only_model=False,
save_safetensors=True,
save_steps=500,
save_strategy=steps,
save_total_limit=None,
seed=42,
skip_memory_metrics=True,
split_batches=False,
tf32=None,
torch_compile=False,
torch_compile_backend=None,
torch_compile_mode=None,
torchdynamo=None,
tpu_metrics_debug=False,
tpu_num_cores=None,
use_cpu=False,
use_ipex=False,
use_legacy_prediction_loop=False,
use_mps_device=False,
warmup_ratio=0.0,
warmup_steps=0,
weight_decay=0.0,
)
模型导入——AutoModelForMaskedLM类
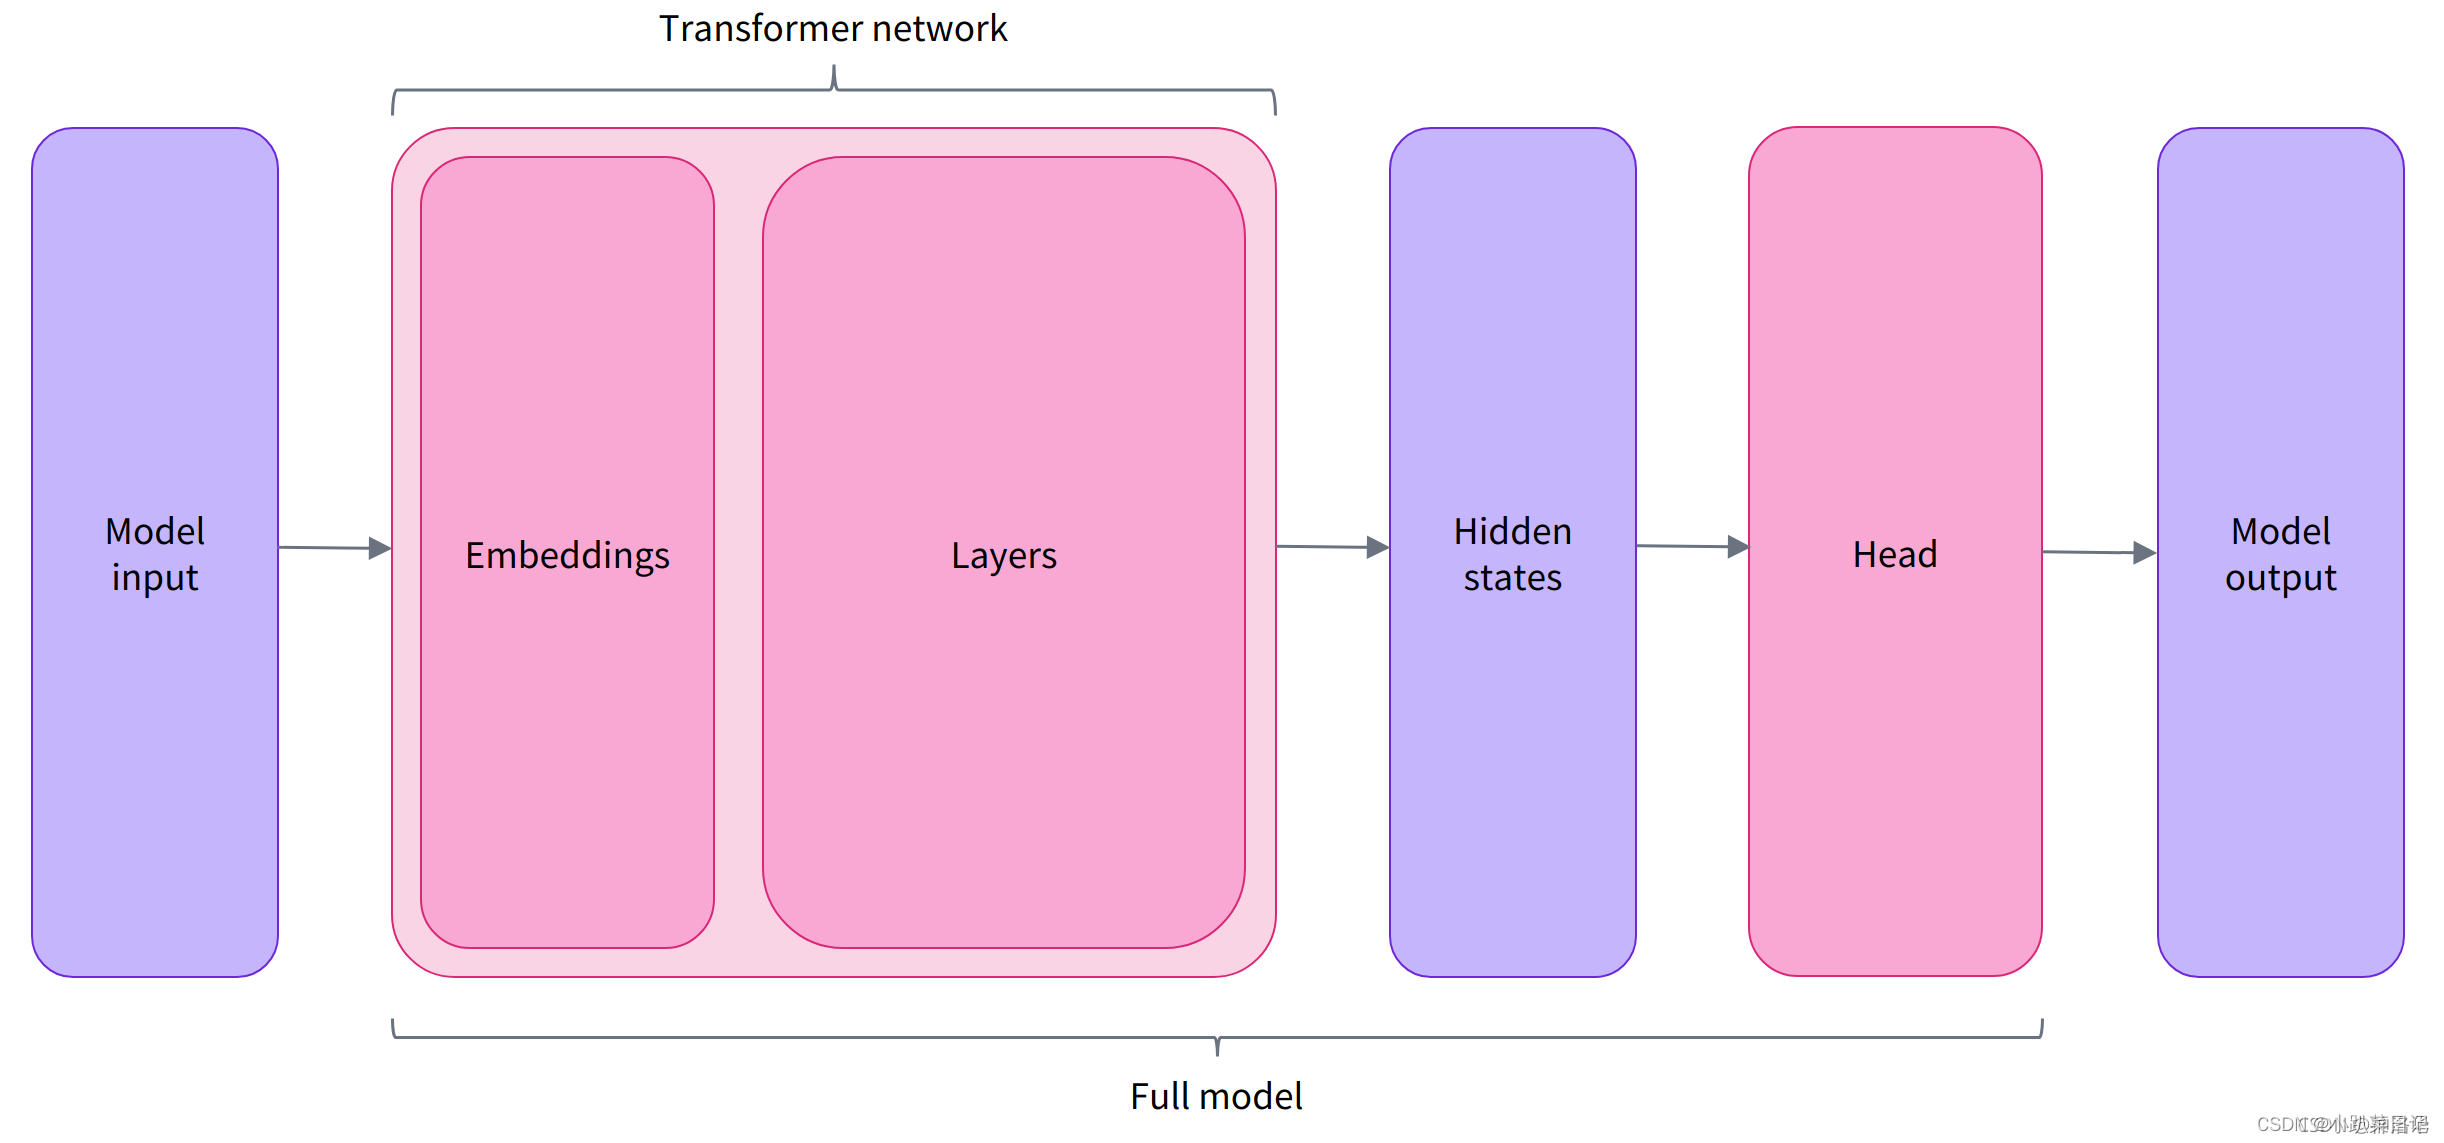
模型有很多的类,其中AutoModel类可以从checkpoint实例化任何模型,这是一种比较好的实例化模型方法。但是AutoModel类只包含基本的Transformer模块,给定一些输入,它会输出隐藏状态hidden states(logits向量),将隐藏状态输入到Model heads(通常由一个或几个线性层组成)中,并将它们投影到不同的维度上,得到model output输出(logits向量),然后可以使用softmax激活函数得到概率
以下为举例,与任务无关:
from transformers import AutoTokenizer

checkpoint = "distilbert-base-uncased-finetuned-sst-2-english"
tokenizer = AutoTokenizer.from_pretrained(checkpoint) # 自动加载该模型训练时所用的分词器
raw_inputs = [
    "I've been waiting for a HuggingFace course my whole life.",
    "I hate this so much!",
]
inputs = tokenizer(raw_inputs, padding=True, truncation=True, return_tensors="pt")
print(inputs)

from transformers import AutoModelForSequenceClassification
checkpoint = "distilbert-base-uncased-finetuned-sst-2-english"
model = AutoModelForSequenceClassification.from_pretrained(checkpoint)
outputs = model(**inputs)
print(outputs.logits.shape)

import torch
predictions = torch.nn.functional.softmax(outputs.logits, dim=-1)
print(predictions)
输出:
{'input_ids': tensor([[  101,  1045,  1005,  2310,  2042,  3403,  2005,  1037, 17662, 12172,
          2607,  2026,  2878,  2166,  1012,   102],
        [  101,  1045,  5223,  2023,  2061,  2172,   999,   102,     0,     0,
             0,     0,     0,     0,     0,     0]]), 'attention_mask': tensor([[1, 1, 1, 1, 1, 1, 1, 1, 1, 1, 1, 1, 1, 1, 1, 1],
        [1, 1, 1, 1, 1, 1, 1, 1, 0, 0, 0, 0, 0, 0, 0, 0]])}
torch.Size([2, 2])
tensor([[4.0195e-02, 9.5980e-01],
        [9.9946e-01, 5.4418e-04]], grad_fn=<SoftmaxBackward0>)
因为我们要使用wikitext数据集pre_tain,所以选择AutoModelForMaskedLM类,因为它包含了我们想要的模型Head。
from transformers import AutoModelForMaskedLM
model = AutoModelForMaskedLM.from_pretrained(checkpoint)
如果是情感分析,使用AutoModelForSequenceClassification类
模型训练or微调——trainer类
使用训练器trainer,主要参数:
- Model:用于训练、评估或用于预测的模型
- args (TrainingArguments):训练调整的参数。如果未提供,将默认为 TrainingArguments 的基本实例
- data_collator(DataCollator,可选)– 用于批处理train_dataset 或 eval_dataset 的的函数
- train_dataset:训练集
- eval_dataset:验证集
- compute_metrics:用于计算评估指标的函数。必须传入EvalPrediction 并将返回一个字典,键值对是metric和其value。
- callbacks (回调函数,可选):用于自定义训练循环的回调列表(List of TrainerCallback)
- optimizers:一个包含优化器和学习率调整器的元组,默认优化器是AdamW,默认的学习率是线性的学习率,从5e-5 到 0
定义训练器trainer(参数compute_metrics后文有介绍)
from transformers import Trainer

pretraining_trainer = Trainer(
        model=model,
        args=training_args,
        train_dataset=wikitext_tokenized_datasets["train"],
        eval_dataset=wikitext_tokenized_datasets["validation"],
        data_collator=data_collator,
        tokenizer=tokenizer,
    )
fine_tuning_trainer = Trainer(
        model=model,
        args=fine_tuning_args,
        train_dataset=mrpc_tokenized_datasets["train"],
        eval_dataset=mrpc_tokenized_datasets["validation"],
        data_collator=DataCollatorForLanguageModeling(tokenizer=tokenizer, mlm=True, mlm_probability=0.15),
        tokenizer=tokenizer,
        compute_metrics=mrpc_compute_metrics,
    )
要在我们的数据集上微调模型,我们只需要调用 Trainer 的 train方法:
pretraining_trainer.train()
fine_tuning_trainer.train()
trainer预测
使用 Trainer.predict 命令获得模型的预测结果:
predictions = trainer.predict(tokenized_datasets["validation"])
print(predictions.predictions.shape, predictions.label_ids.shape)
输出:
(408, 2) (408,)predict 方法输出一个具有三个字段的元组。
- predictions: 预测值,形状为:[batch_size, num_labels],是logits 而不是经过softmax之后的结果
- label_ids:真实的的label id
评估函数
评估指标
import evaluate

metric = evaluate.load("glue", "mrpc")
metric.compute(predictions=preds, references=predictions.label_ids)
正常来说如果直接使用指标名称“accuracy”或者"glue", "mrpc"等,程序将会从 huggingface 上下载相应模块到缓存中使用,实际上我的问题就是无法顺利下载
报错:
FileNotFoundError: Couldn't find a module script at /mnt/workspace/wzf/transformer/datasets/fine_tuningdata/glue/glue.py.
Module 'glue' doesn't exist on the Hugging Face Hub either.
解决方法:
将相关文件下载到本地,然后上传到服务器上(采用 local metric script 方法):打开官方Github,GitHub - huggingface/evaluate: 🤗 Evaluate: A library for easily evaluating machine learning models and datasets.
下载 metrics 文件夹,放在测试脚本的目录下,将'glue' 改为 '/mnt/workspace/wzf/transformer/metrics/glue',再次运行文件即可得到正确结果
评估函数compute_metrics
- 传入EvalPrediction元组(logits,label_ids )
- 返回一个字典 {metric 名字:metric 值}
Trainer的compute_metrics 可以计算训练时具体的评估指标的值(比如acc、F1分数等等)。如果trainer不设置compute_metrics 就只显示training loss,这不是一个直观的数字。
import evaluate
import numpy as np
def compute_metrics(eval_preds):
    metric = evaluate.load("/mnt/workspace/wzf/transformer/metrics/glue", "mrpc")
    logits, labels = eval_preds
    predictions = np.argmax(logits, axis=-1)
    return metric.compute(predictions=predictions, references=labels)
完整代码
import datasets
from transformers import AutoTokenizer, AutoModelForMaskedLM, DataCollatorForLanguageModeling, TrainingArguments, Trainer

# 加载Wikitext数据集
wikitext_datasets = datasets.load_dataset("/mnt/workspace/wzf/transformer/datasets/wikitext", 'wikitext-103-v1')
mrpc_datasets = datasets.load_dataset("/mnt/workspace/wzf/transformer/datasets/mrpc")
rte_datasets = datasets.load_dataset("/mnt/workspace/wzf/transformer/datasets/rte")

import evaluate
import numpy as np
def mrpc_compute_metrics(eval_preds):
    metric = evaluate.load("/mnt/workspace/wzf/transformer/metrics/glue", "mrpc")
    logits, labels = eval_preds
    predictions = np.argmax(logits, axis=-1)
    return metric.compute(predictions=predictions, references=labels)
def rte_compute_metrics(eval_preds):
    metric = evaluate.load("/mnt/workspace/wzf/transformer/metrics/glue", "rte")
    logits, labels = eval_preds
    predictions = np.argmax(logits, axis=-1)
    return metric.compute(predictions=predictions, references=labels)

modelname=["bert-base-cased","bert-base-chinese","bert-base-uncased","gpt2","roberta-base","roberta-large","t5-base","t5-small","vit-gpt2-image-captioning"]
for i in range(len(modelname)):
# 分词器
    checkpoint = "/mnt/workspace/wzf/transformer/model/"+modelname[i]
    tokenizer = AutoTokenizer.from_pretrained(checkpoint)

    # 分词函数和添加标签
    def wikitext_tokenize_function(example):
        return tokenizer(example["text"], truncation=True, max_length=512)
    def mrpc_tokenize_function(example):
        return tokenizer(example["text1"], example["text2"], truncation=True)

    # 分词和添加标签
    wikitext_tokenized_datasets = wikitext_datasets.map(wikitext_tokenize_function, batched=True)
    mrpc_tokenized_datasets = mrpc_datasets.map(mrpc_tokenize_function, batched=True)
    rte_tokenized_datasets = rte_datasets.map(mrpc_tokenize_function, batched=True)

    # 数据填充
    data_collator = DataCollatorForLanguageModeling(tokenizer=tokenizer, mlm=True, mlm_probability=0.15)
    # 加载预训练模型
    model = AutoModelForMaskedLM.from_pretrained(checkpoint)

    # 模型参数
    training_args = TrainingArguments(
        output_dir="./pretraining_result/"+modelname[i],
        overwrite_output_dir=True,
        num_train_epochs=1,
    )
    # 创建预训练 Trainer
    pretraining_trainer = Trainer(
        model=model,
        args=training_args,
        train_dataset=wikitext_tokenized_datasets["train"],
        eval_dataset=wikitext_tokenized_datasets["validation"],
        data_collator=data_collator,
        tokenizer=tokenizer,
    )
    pretraining_trainer.train()


    # 微调参数
    fine_tuning_args = TrainingArguments(
        output_dir="./fine_tuning_result/"+modelname[i],
        overwrite_output_dir=True,
        num_train_epochs=1,
    )
    # 创建微调 Trainer
    fine_tuning_trainer = Trainer(
        model=model,
        args=fine_tuning_args,
        train_dataset=mrpc_tokenized_datasets["train"],
        eval_dataset=mrpc_tokenized_datasets["validation"],
        data_collator=DataCollatorForLanguageModeling(tokenizer=tokenizer, mlm=True, mlm_probability=0.15),
        tokenizer=tokenizer,
        compute_metrics=mrpc_compute_metrics,
    )
    fine_tuning_trainer.train()

    fine_tuning_trainer = Trainer(
        model=model,
        args=fine_tuning_args,
        train_dataset=rte_tokenized_datasets["train"],
        eval_dataset=rte_tokenized_datasets["validation"],
        data_collator=DataCollatorForLanguageModeling(tokenizer=tokenizer, mlm=True, mlm_probability=0.15),
        tokenizer=tokenizer,
        compute_metrics=rte_compute_metrics,
    )
    fine_tuning_trainer.train()
输出:暂时还没跑完
其他
读取外部数据集
# Load the dataset
data_files = {}

data_path = DATA_PATH

train_file = data_path + "train.json"
data_files["train"] = train_file
extension = train_file.split(".")[-1]

valid_file = data_path + "dev.json"
data_files["validation"] = valid_file

test_file = data_path + "test.json"
data_files["test"] = test_file

raw_datasets = load_dataset(extension, data_files=data_files)
model.resize_token_embeddings(len(tokenizer))
GPU使用
import os

os.environ['CUDA_VISIBLE_DEVICES'] = '0'
参考:
HuggingFace Transformers框架使用教程_haggingface transformers怎么搭建-CSDN博客


 1337
1337


 被折叠的 条评论
为什么被折叠?
被折叠的 条评论
为什么被折叠?
 到【灌水乐园】发言


