


- 🍨 本文为🔗365天深度学习训练营 中的学习记录博客
- 🍖 原作者:K同学啊 | 接辅导、项目定制
一、前期工作
1.设置GPU
from tensorflow       import keras
from tensorflow.keras import layers,models
import os, PIL, pathlib
import matplotlib.pyplot as plt
import tensorflow        as tf
import numpy             as np

gpus = tf.config.list_physical_devices("GPU")

if gpus:
    gpu0 = gpus[0]                                        #如果有多个GPU,仅使用第0个GPU
    tf.config.experimental.set_memory_growth(gpu0, True)  #设置GPU显存用量按需使用
    tf.config.set_visible_devices([gpu0],"GPU")

gpus
2.导入数据
data_dir = "./P6/"

data_dir = pathlib.Path(data_dir)
3. 查看数据
image_count = len(list(data_dir.glob('*/*.jpg')))

print("图片总数为:",image_count)
输出
图片总数为: 1800
roses = list(data_dir.glob('Jennifer Lawrence/*.jpg'))
PIL.Image.open(str(roses[3]))
输出

二、数据预处理
1.加载数据
batch_size = 32
img_height = 224
img_width = 224
train_ds = tf.keras.preprocessing.image_dataset_from_directory(
    data_dir,
    validation_split=0.1,
    subset="training",
    label_mode = "categorical",
    seed=123,
    image_size=(img_height, img_width),
    batch_size=batch_size)
输出
Found 1800 files belonging to 17 classes.
Using 1620 files for training.
val_ds = tf.keras.preprocessing.image_dataset_from_directory(
    data_dir,
    validation_split=0.1,
    subset="validation",
    label_mode = "categorical",
    seed=123,
    image_size=(img_height, img_width),
    batch_size=batch_size)
输出
Found 1800 files belonging to 17 classes.
Using 180 files for validation.
class_names = train_ds.class_names
print(class_names)
输出
[‘Angelina Jolie’, ‘Brad Pitt’, ‘Denzel Washington’, ‘Hugh Jackman’, ‘Jennifer Lawrence’, ‘Johnny Depp’, ‘Kate Winslet’, ‘Leonardo DiCaprio’, ‘Megan Fox’, ‘Natalie Portman’, ‘Nicole Kidman’, ‘Robert Downey Jr’, ‘Sandra Bullock’, ‘Scarlett Johansson’, ‘Tom Cruise’, ‘Tom Hanks’, ‘Will Smith’]
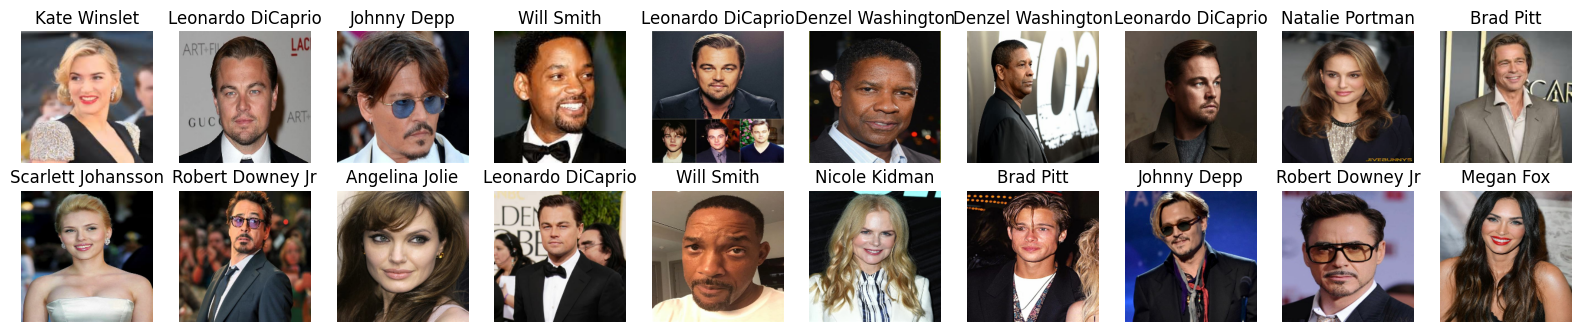
2.可视化数据
plt.figure(figsize=(20, 10))

for images, labels in train_ds.take(1):
    for i in range(20):
        ax = plt.subplot(5, 10, i + 1)

        plt.imshow(images[i].numpy().astype("uint8"))
        plt.title(class_names[np.argmax(labels[i])])

        plt.axis("off")
输出
3.再次检查数据
for image_batch, labels_batch in train_ds:
    print(image_batch.shape)
    print(labels_batch.shape)
    break
输出
(32, 224, 224, 3)
(32, 17)
4.配置数据集
AUTOTUNE = tf.data.AUTOTUNE

train_ds = train_ds.cache().shuffle(1000).prefetch(buffer_size=AUTOTUNE)
val_ds = val_ds.cache().prefetch(buffer_size=AUTOTUNE)
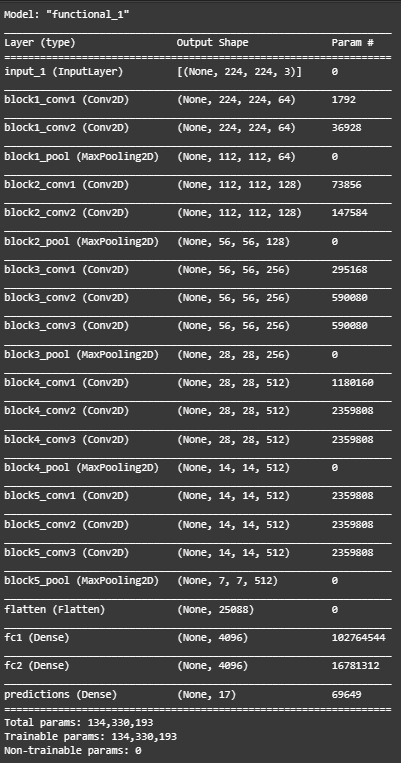
三、构建VGG-16网络
模型前置知识
VGG-16是一种深度卷积神经网络,它在2014年的ImageNet图像分类竞赛中取得了亚军的成绩。VGG-16的网络结构非常简洁明了,整个网络都使用了同样大小的卷积核尺寸(3×3)和最大池化尺寸(2×2)。这种策略验证了通过不断加深网络结构可以提升性能。VGG-16的网络由16层组成(不包括Max
pooling层和softmax层),所有的卷积核都使用33的大小,池化核都使用大小为22。它采用步长stride=1,padding=0的Max
pooling。卷积层深度依次为64 -> 128 -> 256 -> 512 ->512。最后是三个全连接层,用于将特征向量映射到类别上。关于VGG-16的优点,首先,VGG网络的结构非常简洁,整个网络都使用了同样大小的卷积核尺寸(3×3)和最大池化尺寸(2×2);其次,几个小滤波器(3×3)卷积层的组合比一个大滤波器(5×5或7×7)卷积层好;再者,VGG网络的深度可以通过增加卷积层和池化层来提高性能。
然而,VGG-16也存在一些缺点。首先,由于网络的深度较深且使用了大量的参数,因此需要大量的内存和计算资源进行训练。其次,由于其对所有位置的局部信息同等对待,无法很好地处理目标的尺度、姿态、形变等问题。此外,由于其网络较深,可能会导致梯度消失或梯度爆炸的问题。
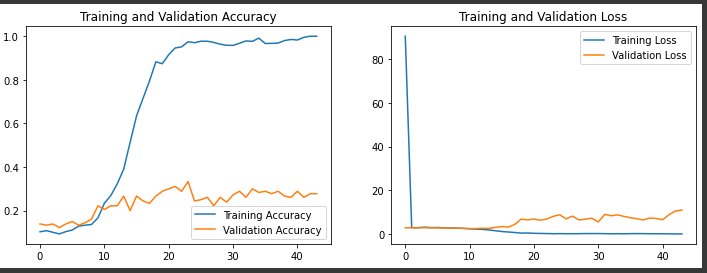
这里必须要好好说一下我的心路历程。这个模型我整整调试了三天。后来果断的放弃了CNN,首先是太慢了,然后总是落到局部最优解,bs,学习率,早停各种参数不断地改就是要出问题。有人指点我说是深度不够,我就把CNN加深了好多层,结果完全没用,还是连续十几个epoch都不行,一直准确率卡在百分之一。加上每一次本地跑都特别特别慢,真的是给我跑绝望了。后来大佬给我分析,人像识别就不该用CNN,加上教案推荐用VGG然后我就用VGG,但是结果组开始依旧不太好。然后我开始停下来,仔细分析。人脸识别的难处在于,鼻子耳朵这些特征与物体识别的不同,然后就是对网络要求要深。本来用YOLO就可以暴力实现,但是教案让试着用VGG,那么就用VGG吧(其实本来VGG也就够用,做风格迁移都没问题)。后来我找到了一个震惊我十年的方法------我一直在调学习率,基本上就是十的负1234这些改。然后大佬跟我说尝试3e-4,我去!一下子跳出来了,甚至到44个epoch的时候,准确率百分百了!果然,还得看经验啊!
from tensorflow.keras import layers, models, Input
from tensorflow.keras.models import Model
from tensorflow.keras.layers import Conv2D, MaxPooling2D, Dense, Flatten, Dropout

def VGG16(nb_classes, input_shape):
    input_tensor = Input(shape=input_shape)
    # 1st block
    x = Conv2D(64, (3,3), activation='relu', padding='same',name='block1_conv1')(input_tensor)
    x = Conv2D(64, (3,3), activation='relu', padding='same',name='block1_conv2')(x)
    x = MaxPooling2D((2,2), strides=(2,2), name = 'block1_pool')(x)
    # 2nd block
    x = Conv2D(128, (3,3), activation='relu', padding='same',name='block2_conv1')(x)
    x = Conv2D(128, (3,3), activation='relu', padding='same',name='block2_conv2')(x)
    x = MaxPooling2D((2,2), strides=(2,2), name = 'block2_pool')(x)
    # 3rd block
    x = Conv2D(256, (3,3), activation='relu', padding='same',name='block3_conv1')(x)
    x = Conv2D(256, (3,3), activation='relu', padding='same',name='block3_conv2')(x)
    x = Conv2D(256, (3,3), activation='relu', padding='same',name='block3_conv3')(x)
    x = MaxPooling2D((2,2), strides=(2,2), name = 'block3_pool')(x)
    # 4th block
    x = Conv2D(512, (3,3), activation='relu', padding='same',name='block4_conv1')(x)
    x = Conv2D(512, (3,3), activation='relu', padding='same',name='block4_conv2')(x)
    x = Conv2D(512, (3,3), activation='relu', padding='same',name='block4_conv3')(x)
    x = MaxPooling2D((2,2), strides=(2,2), name = 'block4_pool')(x)
    # 5th block
    x = Conv2D(512, (3,3), activation='relu', padding='same',name='block5_conv1')(x)
    x = Conv2D(512, (3,3), activation='relu', padding='same',name='block5_conv2')(x)
    x = Conv2D(512, (3,3), activation='relu', padding='same',name='block5_conv3')(x)
    x = MaxPooling2D((2,2), strides=(2,2), name = 'block5_pool')(x)
    # full connection
    x = Flatten()(x)
    x = Dense(4096, activation='relu',  name='fc1')(x)
    x = Dense(4096, activation='relu', name='fc2')(x)
    output_tensor = Dense(nb_classes, activation='softmax', name='predictions')(x)

    model = Model(input_tensor, output_tensor)
    return model

model=VGG16(len(class_names), (img_width, img_height, 3))
model.summary()
输出
四、训练模型
1.设置动态学习率
initial_learning_rate = 3e-4

lr_schedule = tf.keras.optimizers.schedules.ExponentialDecay(
        initial_learning_rate,
        decay_steps=30,
        decay_rate=0.96,
        staircase=True)

optimizer = tf.keras.optimizers.Adam(learning_rate=lr_schedule)

model.compile(optimizer=optimizer,
              loss=tf.keras.losses.CategoricalCrossentropy(from_logits=True),
              metrics=['accuracy'])
model.compile(optimizer="Adam",
              loss=tf.keras.losses.CategoricalCrossentropy(),
              metrics=['accuracy'])
2.早停与保存最佳模型参数
from tensorflow.keras.callbacks import ModelCheckpoint, EarlyStopping

epochs = 80

checkpointer = ModelCheckpoint('best_model.h5',
                                monitor='val_accuracy',
                                verbose=1,
                                save_best_only=True,
                                save_weights_only=True)

earlystopper = EarlyStopping(monitor='val_accuracy',
                             min_delta=0.0001,
                             patience=20,
                             verbose=1)
3.训练模型
history = model.fit(train_ds,
                    validation_data=val_ds,
                    epochs=epochs,
                    callbacks=[checkpointer, earlystopper])
输出


五、模型评估
1.Loss与Acurracy图
acc = history.history['accuracy']
val_acc = history.history['val_accuracy']

loss = history.history['loss']
val_loss = history.history['val_loss']

epochs_range = range(len(loss))

plt.figure(figsize=(12, 4))
plt.subplot(1, 2, 1)
plt.plot(epochs_range, acc, label='Training Accuracy')
plt.plot(epochs_range, val_acc, label='Validation Accuracy')
plt.legend(loc='lower right')
plt.title('Training and Validation Accuracy')

plt.subplot(1, 2, 2)
plt.plot(epochs_range, loss, label='Training Loss')
plt.plot(epochs_range, val_loss, label='Validation Loss')
plt.legend(loc='upper right')
plt.title('Training and Validation Loss')
plt.show()
输出
2.指定图片进行预测
# 加载效果最好的模型权重
model.load_weights('best_model.h5')
from PIL import Image
import numpy as np

img = Image.open("./P6/Jennifer Lawrence/003_963a3627.jpg")  #这里选择你需要预测的图片
image = tf.image.resize(img, [img_height, img_width])

img_array = tf.expand_dims(image, 0)

predictions = model.predict(img_array) # 这里选用你已经训练好的模型
print("预测结果为:",class_names[np.argmax(predictions)])
输出
预测结果为: Jennifer Lawrence


 187
187


 被折叠的 条评论
为什么被折叠?
被折叠的 条评论
为什么被折叠?
 到【灌水乐园】发言


