


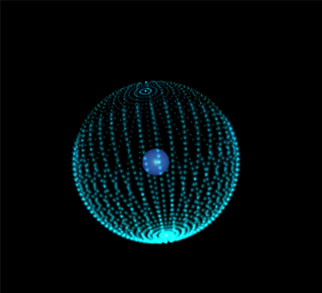
先看效果图:左图为rm的文件,右图为我在Android系统设备上的改进图。
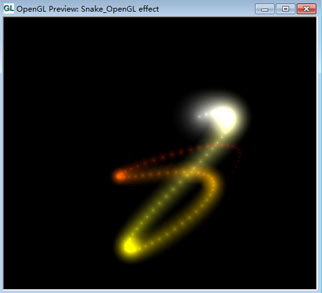
第一步:打开AMD\RenderMonkey 1.82\Examples\GL2\Particle System.rfx,在Snake_OpenGL上面单击右键,set as active effect.出现上面左图效果。查看相关代码。
第二步:在Eclipse里面编写自己的shader:参考rm里面的shader。这是学习rm的核心地方。
1、定点着色器:
uniform mat4 uMVPMatrix;
uniform mat4 uMMatrix;
uniform float uTime;
uniform float uLong;

attribute vec3 aPosition;

varying vec2 vTexCoord;
varying float vColor;

void main(){

    vTexCoord=aPosition.xy;
    vColor   =aPosition.z;

    vec3 position;
    position=15.0*aPosition.z*(aPosition.x*vec3(uMMatrix[0][0],uMMatrix[1][0],uMMatrix[2][0])+
                               aPosition.y*vec3(uMMatrix[0][1],uMMatrix[1][1],uMMatrix[2][1]));
    float t=uTime*1.0+uLong*aPosition.z;
    position.x+=10.0*cos(t);
    position.y+=10.0*sin(t);

    gl_Position=uMVPMatrix*vec4(position,1.0);
}precision mediump float;
uniform float uParticleExp;
uniform sampler2D uPalette;
varying vec2 vTexCoord;
varying float vColor;
void main(){
gl_FragColor=(1.0-pow(dot(vTexCoord,vTexCoord),uParticleExp))*
texture2D(uPalette,vec2(vColor,0.0));
}第三步:画单条线
package com.gzdxid.particles;

import java.nio.FloatBuffer;

import com.gzdxid.utils.MatrixState;
import com.gzdxid.utils.UtilBufferTransfer;

import android.opengl.GLES20;

public class DrawParticleSnake {

	int mProgram;
	int muMVPMatrixHandle;
	int muMMatrixHandle;
	int muTimeHandle;
	int muLongHandle;
	int muParticleExpHandle;

	int maPositionHandle;

	FloatBuffer mVertexBuffer;
	int vCount = 0;

	public DrawParticleSnake(float[] vertices, int mProgram) {
		// TODO Auto-generated constructor stub
		initVertex(vertices);
		initShader(mProgram);
	}

	private void initVertex(float[] vertices) {
		// TODO Auto-generated method stub
		vCount = vertices.length / 3;
		mVertexBuffer = UtilBufferTransfer.getFloatBuffer(vertices);
	}

	private void initShader(int mProgram) {
		// TODO Auto-generated method stub
		this.mProgram = mProgram;
		muMVPMatrixHandle = GLES20.glGetUniformLocation(mProgram, "uMVPMatrix");
		muMMatrixHandle = GLES20.glGetUniformLocation(mProgram, "uMMatrix");
		muTimeHandle = GLES20.glGetUniformLocation(mProgram, "uTime");
		muLongHandle=GLES20.glGetUniformLocation(mProgram, "uLong");
		muParticleExpHandle = GLES20.glGetUniformLocation(mProgram, "uParticleExp");

		maPositionHandle = GLES20.glGetAttribLocation(mProgram, "aPosition");
	}

	public void drawSelf(float time,float length, float exp, int texId) {
		GLES20.glUseProgram(mProgram);
		GLES20.glUniformMatrix4fv(muMVPMatrixHandle, 1, false, MatrixState.getFinalMatrix(), 0);
		GLES20.glUniformMatrix4fv(muMMatrixHandle, 1, false, MatrixState.getMMatrix(), 0);
		GLES20.glUniform1f(muTimeHandle, time);
		GLES20.glUniform1f(muLongHandle, length);
		GLES20.glUniform1f(muParticleExpHandle, exp);
		GLES20.glVertexAttribPointer(maPositionHandle, 3, GLES20.GL_FLOAT, false, 3 * 4, mVertexBuffer);
		GLES20.glEnableVertexAttribArray(maPositionHandle);
		GLES20.glActiveTexture(GLES20.GL_TEXTURE0);
		GLES20.glBindTexture(GLES20.GL_TEXTURE_2D, texId);
		GLES20.glDrawArrays(GLES20.GL_TRIANGLES, 0, vCount);
	}

}
package com.gzdxid.particles;

import com.gzdxid.utils.DrawBallColorLight;
import com.gzdxid.utils.MatrixState;
import com.gzdxid.utils.ShaderManager;
import com.gzdxid.utils.UtilLoad;

import android.content.res.Resources;
import android.opengl.GLES20;

public class DrawParticleBall {

	private DrawParticleSnake snake = null;
	private DrawBallColorLight ball = null;
	private float scale;
//	private int sankeNum = 8;

	public DrawParticleBall(float scale, Resources r) {
		// TODO Auto-generated constructor stub
		this.scale = scale;
		snake = new DrawParticleSnake(UtilLoad.loadVertexOnly("obj_quard_array.obj", r), ShaderManager.getParticleSnakeProgram());
		ball = new DrawBallColorLight(0.5f, ShaderManager.getLightColorShaderProgram());
	}

	public void drawSelf(float time, float length, float exp, int texId, float r, float g, float b, float a) {

		GLES20.glEnable(GLES20.GL_DEPTH_TEST);
		DrawBall(r, g, b, a);
		drawSnake(time, length, exp, texId);
		GLES20.glDisable(GLES20.GL_DEPTH_TEST);
	}

	private void drawSnake(float time, float length, float exp, int texId) {

		sanke_1(time, length, exp, texId);
//		sanke_2(time, length, exp, texId);

	}
/*
	private void sanke_2(float time, float length, float exp, int texId) {
		// TODO Auto-generated method stub
		GLES20.glEnable(GLES20.GL_BLEND);
		GLES20.glBlendFunc(GLES20.GL_ONE, GLES20.GL_ONE);
		GLES20.glDepthMask(false);
		MatrixState.pushMatrix();
		MatrixState.scale(0.06f * scale, 0.06f * scale, 0.06f * scale);

		//-------------start--------------
		MatrixState.pushMatrix();
		for(int i=0;i<6;i++){
			MatrixState.rotate(360/6, 1, 0, 0);

			MatrixState.pushMatrix();
			MatrixState.rotate(0, 0, 0, 1);
			snake.drawSelf(time, length, exp, texId);
			MatrixState.rotate(90, 0, 0, 1);
			snake.drawSelf(time, length, exp, texId);
			MatrixState.rotate(90, 0, 0, 1);
			snake.drawSelf(time, length, exp, texId);
			MatrixState.rotate(90, 0, 0, 1);
			snake.drawSelf(time, length, exp, texId);
			MatrixState.rotate(10, 0, 1, 0);
			MatrixState.popMatrix();
		}
		MatrixState.popMatrix();
		//-----------------end-------------

		MatrixState.popMatrix();
		GLES20.glDisable(GLES20.GL_BLEND);
		GLES20.glDepthMask(true);
	}
*/

	private void sanke_1(float time, float length, float exp, int texId) {
		GLES20.glEnable(GLES20.GL_BLEND);
		GLES20.glBlendFunc(GLES20.GL_ONE, GLES20.GL_ONE);
		GLES20.glDepthMask(false);

		MatrixState.pushMatrix();
		MatrixState.scale(0.03f * scale, 0.03f * scale, 0.03f * scale);
		for(int i=0;i<360;i+=10){
			MatrixState.pushMatrix();
			MatrixState.rotate(i, 1, 0, 0);
			snake.drawSelf(time, length, exp, texId);
			MatrixState.popMatrix();
		}
		MatrixState.popMatrix();

		GLES20.glDisable(GLES20.GL_BLEND);
		GLES20.glDepthMask(true);
	}

	private void DrawBall(float r, float g, float b, float a) {
		// TODO Auto-generated method stub
		GLES20.glEnable(GLES20.GL_BLEND);
		GLES20.glBlendFunc(GLES20.GL_SRC_ALPHA, GLES20.GL_ONE_MINUS_SRC_ALPHA);
		MatrixState.pushMatrix();
		MatrixState.scale(0.1f * scale, 0.1f * scale, 0.1f * scale);
		ball.drawSelf(r, g, b, a);
		MatrixState.popMatrix();
		GLES20.glDisable(GLES20.GL_BLEND);
	}

}
                                MatrixState.pushMatrix();
				particleBall.drawSelf(uTime,7.0f,0.1f, snakeBitmap[0], 0.2f, 0.2f, 0.8f, 0.3f);
MatrixState.popMatrix();1、结合http://blog.csdn.net/sh15285118586/article/details/43671613和另外一篇OpenGL es2.0 配置自己的matrix一起看。
2、里面的三维模型要用3D exploration转换成obj文件。
3、下面参数的对应在上面
private void sanke_1(float time, float length, float exp, int texId)这个函数中。非常重要!

最后补加载obj文件代码:
public static float[] loadVertexOnly(String fname,Resources r){
		float[] result=null;
		try {
			InputStream is=r.getAssets().open(fname);
			InputStreamReader isReader=new InputStreamReader(is);
			BufferedReader br=new BufferedReader(isReader);
			String temps=null;
			while((temps=br.readLine())!=null){
				String []tempsa=temps.split("[ ]+");
				if(tempsa[0].trim().equals("v")){
					alv.add(Float.parseFloat(tempsa[1]));
					alv.add(Float.parseFloat(tempsa[2]));
					alv.add(Float.parseFloat(tempsa[3]));
				}else if (tempsa[0].trim().equals("f")) {
					 for(int i=1;i<4;i++){
						 index=Integer.parseInt(tempsa[i].split("/")[0])-1;
						 x=alv.get(3*index);
						 y=alv.get(3*index+1);
						 z=alv.get(3*index+2);
						 alvResult0.add(x);
						 alvResult0.add(y);
						 alvResult0.add(z);
						 }
				}
			}
			int vsize0 = alvResult0.size();
			result = new float[vsize0];
			for (int i = 0; i < vsize0; i++) {
				result[i] = alvResult0.get(i);
			}

			clearAll();
		} catch (Exception e) {
			// TODO: handle exception
			Log.d("load error","load error");
			e.printStackTrace();
		}
		return result;
	}


 9162
9162

 被折叠的 条评论
为什么被折叠?
被折叠的 条评论
为什么被折叠?
 到【灌水乐园】发言


