经典文字渲染:位图字体
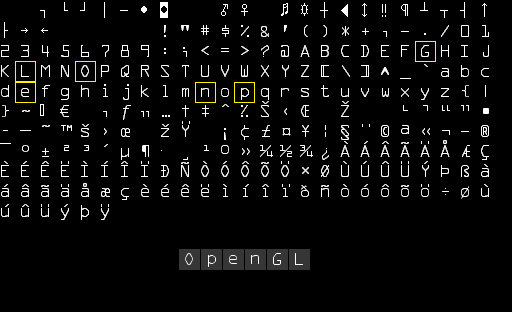
在早期渲染文字时,选择你应用程序的字体(或者创建你自己的字体)来绘制文字是通过将所有用到的文字加载在一张大纹理图中来实现的。这张纹理贴图我们把它叫做位图字体(Bitmap Font),它包含了所有我们想要使用的字符。这些字符被称为字形(Glyph)。每个字形根据他们的编号被放到位图字体中的确切位置,在渲染这些字形的时候根据这些排列规则将他们取出并贴到指定的2D方块中。上图展示了我们如何从一张位图字体的纹理中通过对字形的合理取样(通过小心地选择字形的纹理坐标)来实现绘制文字“OpenGL”到2D方块中的原理。通过对OpenGL启用混合并让位图字体的纹理背景保持透明,这样就能实现使用OpenGL绘制你想要文字到屏幕的功能。上图的这张位图字体是使用Codehead的位图字体生成器生成的。
使用这种途径来绘制文字有许多优势也有很多缺点。首先,它相对来说很容易实现,并且因为位图字体被预渲染好,使得这种方法效率很高。然而,这种途径并不够灵活。当你想要使用不同的字体时,你不得不重新生成位图字体,以及你的程序会被限制在一个固定的分辨率:如果你对这些文字进行放大的话你会看到文字的像素边缘。此外,这种方式仅局限于用来绘制很少的字符,如果你想让它来扩展支持Unicode文字的话就很不现实了。
这种绘制文字的方式曾经得益于它的高速和可移植性而非常流行,然而现在已经存在更加灵活的方式了。其中一个是我们即将展开讨论的使用FreeType库来加载TrueType字体的方式。
现代文字渲染:FreeType
FreeType是一个能够用于加载字体并将他们渲染到位图以及提供多种字体相关的操作的软件开发库。它是一个非常受欢迎的跨平台字体库,被用于 Mac OSX、Java、PlayStation主机、Linux、Android等。FreeType的真正吸引力在于它能够加载TrueType字体。
TrueType字体不采用像素或其他不可缩放的方式来定义,而是一些通过数学公式(曲线的组合)。这些字形,类似于矢量图像,可以根据你需要的字体大小来生成像素图像。通过使用TrueType字体可以轻易呈现不同大小的字符符号并且没有任何质量损失。
由于框架用的就是SDL,所以这里用的是SDL_TTF2.0,实际上SDL_TTF是把FreeType进行了一次封装。
定义一个用来储存这些属性的结构体,并创建一个字符表来存储这些字形属性。
struct Character {
	GLuint		TextureID;
	Vector2		Size;
	Vector2		Bearing;
	GLuint		Advance;    //Offset to advance to next glyph
};
加载的思路就是预先生成表示128个ASCII字符的字符表。并为每一个字符储存纹理和一些度量值。这样,所有需要的字符就被存下来备用了。
//Init character
	TTF_Init();
	font = TTF_OpenFont("../../Assets/consola.ttf", 24);

	SDL_Color color = { 255, 0, 0 };
	SDL_Surface *face = NULL;
	//14 is a magic number...
	for (GLubyte c = 14; c < 128; c++)
	{
		char tmpChar = /*'a' +*/ c;
		string tmp(1,tmpChar);

		face = TTF_RenderText_Blended(font, tmp.c_str(), color);

		int mode;
		if (face->format->BytesPerPixel == 3) { // RGB 24bit
			mode = GL_RGB;
		}
		else if (face->format->BytesPerPixel == 4) { // RGBA 32bit
			mode = GL_RGBA;
		}
		else {
			SDL_FreeSurface(face);
			return false;
		}

		GLuint texture = 0;

		glGenTextures(1, &texture);
		glBindTexture(GL_TEXTURE_2D, texture);

		glTexImage2D(GL_TEXTURE_2D, 0, mode, face->w, face->h, 0, mode, GL_UNSIGNED_BYTE, face->pixels);

		glTexParameteri(GL_TEXTURE_2D, GL_TEXTURE_WRAP_S, GL_CLAMP_TO_EDGE);
		glTexParameteri(GL_TEXTURE_2D, GL_TEXTURE_WRAP_T, GL_CLAMP_TO_EDGE);
		glTexParameteri(GL_TEXTURE_2D, GL_TEXTURE_MIN_FILTER, GL_LINEAR);
		glTexParameteri(GL_TEXTURE_2D, GL_TEXTURE_MAG_FILTER, GL_LINEAR);

		int minx, maxx, miny, maxy, advance;
		if (TTF_GlyphMetrics(font, *(tmp.c_str()), &minx, &maxx, &miny, &maxy, &advance) == -1)
		{
			printf("%s\n", TTF_GetError());
		}

		Character character = {
			texture,
			Vector2(face->w, face->h),
			Vector2(minx, maxy),
			advance
		};
		Characters.insert(std::pair<GLchar, Character>(tmpChar, character));
	}

	characterShader = new ShaderProgram("../../Assets/shader/character.vert", "../../Assets/shader/character.frag");
	Matrix4x4 projection = Transform::OrthoFrustum(0.0f, static_cast<GLfloat>(creationFlags.width), 0.0f, static_cast<GLfloat>(creationFlags.height), -1000, 1000);
	characterShader->Use();
	glUniformMatrix4fv(glGetUniformLocation(characterShader->GetProgramID(), "projection"), 1, GL_FALSE, &projection[0]);

	// Configure VAO/VBO for texture quads
	glGenVertexArrays(1, &characterVAO);
	glGenBuffers(1, &characterVBO);
	glBindVertexArray(characterVAO);
	glBindBuffer(GL_ARRAY_BUFFER, characterVBO);
	glBufferData(GL_ARRAY_BUFFER, sizeof(GLfloat) * 6 * 4, NULL, GL_DYNAMIC_DRAW);
	glEnableVertexAttribArray(0);
	glVertexAttribPointer(0, 4, GL_FLOAT, GL_FALSE, 4 * sizeof(GLfloat), 0);
	glBindBuffer(GL_ARRAY_BUFFER, 0);
	glBindVertexArray(0);
	return true;
注意这里专门开了正交透视矩阵来进行字体渲染
Matrix4x4 projection = Transform::OrthoFrustum(0.0f, static_cast<GLfloat>(creationFlags.width), 0.0f, static_cast<GLfloat>(creationFlags.height), -1000, 1000);
characterShader->Use();
glUniformMatrix4fv(glGetUniformLocation(characterShader->GetProgramID(), "projection"), 1, GL_FALSE, &projection[0]);
关于投影矩阵可以参考这个: 详解MVP矩阵之ProjectionMatrix
关于TTF_GlyphMetrics,可以参考下图
看一下着色器
#version 330 core
layout (location = 0) in vec4 vertex; // <vec2 pos, vec2 tex>
out vec2 TexCoords;

uniform mat4 projection;

void main()
{
    gl_Position = projection * vec4(vertex.xy, 0, 1.0);
    TexCoords = vertex.zw;
}
#version 330 core
in vec2 TexCoords;
out vec4 color;

uniform sampler2D text;
uniform vec3 textColor;

void main()
{
    vec4 sampled = vec4(1.0, 1.0, 1.0, texture(text, TexCoords).a);
    color = vec4(textColor, 1.0) * sampled;
}
渲染文字的接口实现如下
void Renderer::RenderText(std::string text, GLfloat x, GLfloat y, GLfloat scale, Color color)
{
	characterShader->Use();
	glUniform3f(glGetUniformLocation(characterShader->GetProgramID(), "textColor"), color.r, color.g, color.b);
	//glUniform3f(glGetUniformLocation(s.Program, "textColor"), color.r, color.g, color.b);
	glActiveTexture(GL_TEXTURE0);
	glBindVertexArray(characterVAO);

	std::string::const_iterator c;
	for (c = text.begin(); c != text.end(); c++)
	{
		Character ch = Characters[*c];

		GLfloat xpos = x + ch.Bearing.x * scale;
		//GLfloat ypos = y - (ch.Size.y - ch.Bearing.y) * scale;
		GLfloat ypos = y;

		GLfloat w = ch.Size.x * scale;
		GLfloat h = ch.Size.y * scale;
		// VBO
		GLfloat vertices[6][4] = {
			{ xpos,     ypos,   0.0, 1.0 },
			{ xpos,     ypos + h,       0.0, 0.0 },
			{ xpos + w, ypos + h,       1.0, 0.0 },

			{ xpos,     ypos,   0.0, 1.0 },
			{ xpos + w, ypos + h,       1.0, 0.0 },
			{ xpos + w, ypos,   1.0, 1.0 }
		};

		// Render glyph texture over quad
		glBindTexture(GL_TEXTURE_2D, ch.TextureID);
		// Update content of VBO memory
		glBindBuffer(GL_ARRAY_BUFFER, characterVBO);
		glBufferSubData(GL_ARRAY_BUFFER, 0, sizeof(vertices), vertices); // Be sure to use glBufferSubData and not glBufferData

		glBindBuffer(GL_ARRAY_BUFFER, 0);
		// Render quad
		glDrawArrays(GL_TRIANGLES, 0, 6);
		// Now advance cursors for next glyph (note that advance is number of 1/64 pixels)
		x += ch.Advance  * scale;
	}
	glBindVertexArray(0);
	glBindTexture(GL_TEXTURE_2D, 0);
}
现在如果要在屏幕上显示FPS,只需要
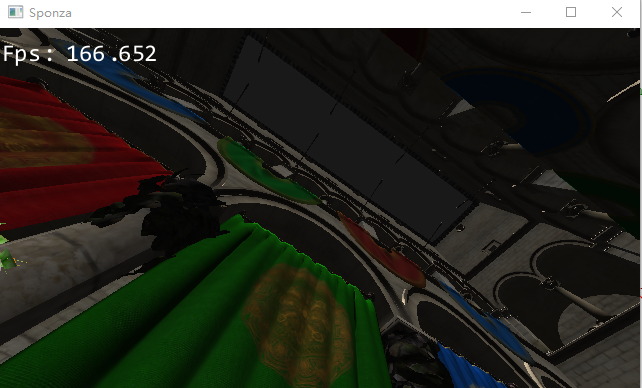
RenderText(fps.str(), - 0.5f * parent->GetWindowWidth(), 0.5f * parent->GetWindowHeight() - 100, 1, Color(1, 1, 1, 1));结果

参考
SDLTutorial Series - Part 6 - Displaying Text with SDL_ttf


 本文介绍两种OpenGL中的文字渲染方法:一种是使用位图字体(Bitmap Font)的传统方式;另一种是使用FreeType库加载TrueType字体的现代方式。文章详细介绍了如何使用FreeType库加载和渲染文字,包括生成字符表、加载纹理、设置顶点数据等步骤。


 188
188

 被折叠的 条评论
为什么被折叠?


