


1. 数据集的加载与处理
在此处下载数据集,是一个面部姿态处理的数据集。由如下几个部分构成:

其中图片为原图,face_landmarks.csv文件中记录了每张图片和其对应的关键点的坐标信息 。
现在先加载一副图片以及其对应的坐标信息看一下人脸关键点显示的效果:
# 加载表格
landmarks_frame = pd.read_csv('data/faces/face_landmarks.csv')

# n是表格中的索引号
n = 0
# 加载一个数据,看一下
img_names = landmarks_frame.iloc[n, 0]
landmarks = landmarks_frame.iloc[n, 1:].as_matrix()
landmarks = landmarks.astype('float').reshape(-1, 2)

print('image name:{}'.format(img_names))
print('landmarks shape: {}'.format(landmarks.shape))

# 显示次长图像与其标注点的样式
def show_landmarks(image, landmarks):
    plt.imshow(image)
    plt.scatter(x=landmarks[:, 0], y=landmarks[:, 1], s = 10, marker='.', c='r')
    plt.pause(0.001)

plt.figure()
show_landmarks(io.imread(os.path.join('data/faces/', img_names)), landmarks)
plt.show()
image name:0805personali01.jpg
landmarks shape: (68, 2)

现在来自定义一个数据集用来更方便的加载这些数据。
torch.utils.data.Dataset 是一个代表数据集的抽象类。你自定的数据集类应该继承自 Dataset 类并重新实现以下方法:
- len 实现 len(dataset) 返还数据集的尺寸。
- getitem 用来获取一些索引数据,例如 dataset[i] 中的 。
class FaceLandmarksDataset(Dataset):
    def __init__(self, csv_file, root_dir, transform = None):
        self.landmarks_frame = pd.read_csv(csv_file)
        self.root_dir = root_dir
        self.transform = transform

    def __len__(self):
        return len(self.landmarks_frame)

    def __getitem__(self, idx):
        img_name = os.path.join(self.root_dir, self.landmarks_frame.iloc[idx, 0])
        image = io.imread(img_name)

        landmarks = self.landmarks_frame.iloc[idx, 1:].as_matrix()
        landmarks = landmarks.astype('float').reshape(-1, 2)

        sample = {'image': image, 'landmarks': landmarks}
        if self.transform:
            self.transform(sample)

        return sample
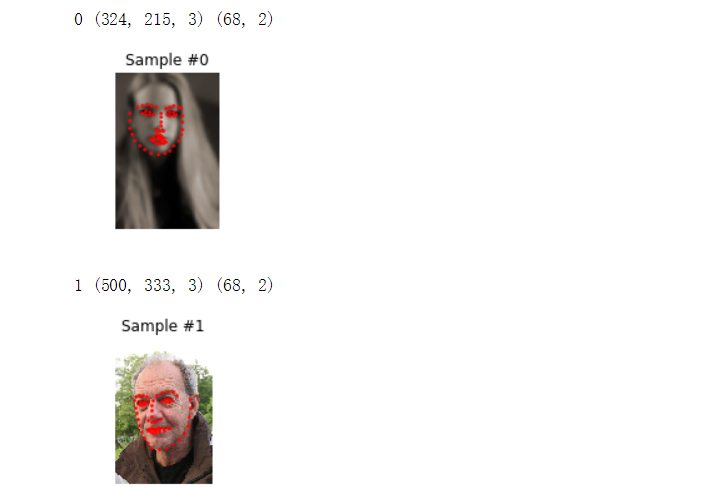
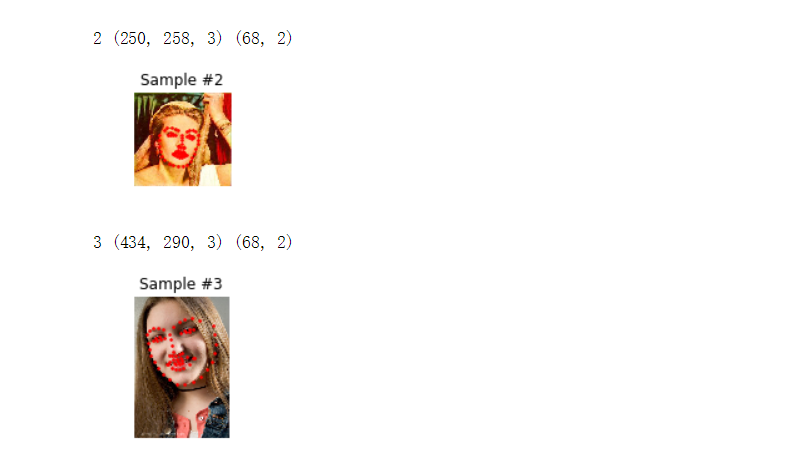
接下来加载几组数据测试一下:
face_dataset = FaceLandmarksDataset(csv_file = 'data/faces/face_landmarks.csv', root_dir = 'data/faces/')

fig = plt.figure()

for i in range(4):
    sample = face_dataset[i]

    print(i, sample['image'].shape, sample['landmarks'].shape)


    ax = plt.subplot(1, 4, i + 1)
    plt.tight_layout()
    ax.set_title('Sample #{}'.format(i))
    ax.axis('off')
#     show_landmarks(**sample)
    show_landmarks(sample['image'], sample['landmarks'])
有时候需要对数据集中的数据进行预处理,比如对图片进行裁剪、缩放或者需要将numpy表示的图片转换为tensor。
将对应的操作写成类,在使用的时候调用就可以了,只要实现类中的__init__方法和__call__方法就可以。
class Rescale(object):
    def __init__(self, output_size):
        assert isinstance(output_size, (int, tuple))
        self.output_size = output_size
    def __call__(self, sample):
        image, landmarks = sample['image'], sample['landmarks']

        h, w = image.shape[:2]
        if isinstance(self.output_size, int):
            if h > w:
                new_h, new_w = self.output_size * h / w, self.output_size
            else:
                new_h, new_w = self.output_size, self.output_size * w / h
        else:
            new_h, new_w = self.output_size

        image = transform.resize(image, (new_h, new_w))
        landmarks = landmarks * [new_w / w, new_h / h]

        return  {'image': image, 'landmarks': landmarks}

class RandomCrop(object):
    def __init__(self, output_size):
        assert isinstance(output_size, (tuple, int))

        if isinstance(output_size, int):
            self.output_size = output_size, output_size
        if isinstance(output_size, tuple):
            assert len(output_size) == 2
            self.output_size = output_size
    def __call__(self, sample):
        image, landmarks = sample['image'], sample['landmarks']

        h, w = image.shape[:2]
        new_h, new_w = self.output_size

        top = np.random.randint(0, h - new_h)
        left = np.random.randint(0, w - new_w)

        image = image[top: top + new_h,
                      left: left + new_w]

        landmarks = landmarks - [left, top]

        return {'image': image, 'landmarks': landmarks}

class ToTensor(object):
    def __init__(self, sample):
        image, landmarks = sample['image'], sample['landmarks']
        # numpy image:HWC
        # torch image:CHW
        image = image.transpose((2, 0, 1))
        return {'image':torch.from_numpy(image), 'landmarks':torch.from_numpy(landmarks)}
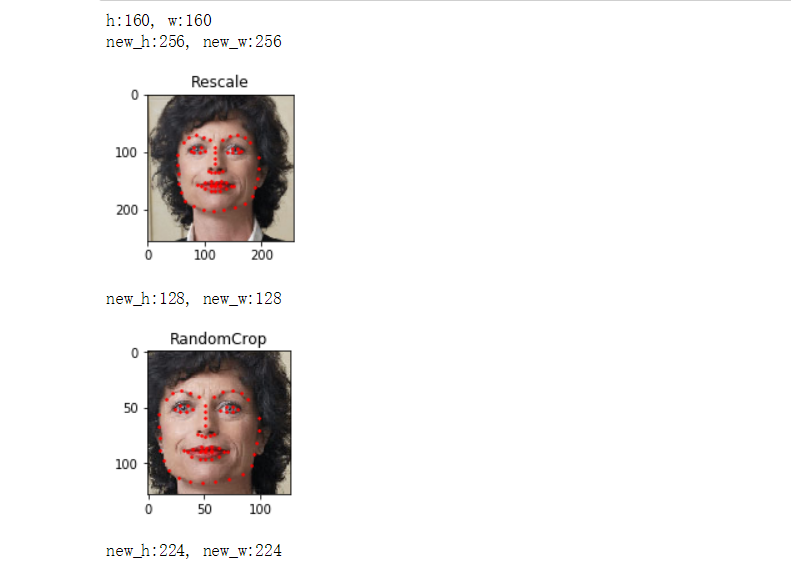
接下来测试一下,做这样一个操作:先将图片缩放成256*256,再将其随机裁剪成224*224的大小
scale = Rescale(256)
crop = RandomCrop(128)
composed = transforms.Compose([Rescale(256),
                               RandomCrop(224)])

fig = plt.figure()
sample = face_dataset[65]
h, w = sample['image'].shape[:2]
print('h:%d, w:%d' % (h, w))
for i, tsfrm in enumerate([scale, crop, composed]):
    transformed_sample = tsfrm(sample)
    new_h, new_w = transformed_sample['image'].shape[:2]
    print('new_h:%d, new_w:%d'%(new_h, new_w))
    ax = plt.subplot(1, 3, i + 1)
    plt.tight_layout()
    ax.set_title(type(tsfrm).__name__)
    show_landmarks(**transformed_sample)

plt.show()

这样我们就可以利用transform进行数据的迭代加载了:
transformed_dataset = FaceLandmarksDataset(csv_file='data/faces/face_landmarks.csv', root_dir='data/faces/',
                                          transform=transforms.Compose([ReScale(256), RandomCrop(224), ToTensor()]))
transformed_dataset = FaceLandmarksDataset(csv_file='data/faces/face_landmarks.csv',
                                           root_dir='data/faces/',
                                           transform=transforms.Compose([
                                               Rescale(256),
                                               RandomCrop(224),
                                               ToTensor()
                                           ]))

for i in range(4):
    sample = transformed_dataset[i]

    print(i, sample['image'].size(), sample['landmarks'].size())
0 torch.Size([3, 224, 224]) torch.Size([68, 2])
1 torch.Size([3, 224, 224]) torch.Size([68, 2])
2 torch.Size([3, 224, 224]) torch.Size([68, 2])
3 torch.Size([3, 224, 224]) torch.Size([68, 2])
现在将加载数据的过程变得更符合需要,加上批处理和shuffle的过程:
dataloader = DataLoader(transformed_dataset, batch_size=4,
                        shuffle=True, num_workers=0)

def show_landmarks_batch(sample_batched):
    """Show image with landmarks for a batch of samples."""
    images_batch, landmarks_batch = \
            sample_batched['image'], sample_batched['landmarks']
    batch_size = len(images_batch)
    im_size = images_batch.size(2)

    grid = utils.make_grid(images_batch)
    plt.imshow(grid.numpy().transpose((1, 2, 0)))

    for i in range(batch_size):
        plt.scatter(landmarks_batch[i, :, 0].numpy() + i * im_size,
                    landmarks_batch[i, :, 1].numpy(),
                    s=10, marker='.', c='r')

        plt.title('Batch from dataloader')

for i_batch, sample_batched in enumerate(dataloader):
    print(i_batch, sample_batched['image'].size(),
          sample_batched['landmarks'].size())

    # observe 4th batch and stop.
    if i_batch == 3:
        plt.figure()
        show_landmarks_batch(sample_batched)
        plt.axis('off')
        plt.ioff()
        plt.show()
        break


 2247
2247


 被折叠的 条评论
为什么被折叠?
被折叠的 条评论
为什么被折叠?
 到【灌水乐园】发言


