


文章目录
Masked and Shuffled Blind Spot Denoising for Real-World Images
Website: https://hamadichihaoui.github.io/mash
单张图像降噪,就是利用训练的方法对单张图像训练的时候进行迭代降噪。
1.噪声的空间相关性
利用公式2定义 噪声的空间相关性
beta = 0 的时候,表示噪声再空间上没有相关性,即使相邻像素,噪声也没有相关性。
beta = 0.5的时候,有中等相关度
beta = 1的时候,空间噪声有比较高的相关度,某个像素的噪声是 5,则相邻像素的噪声和 5比较接近,就是相关。

示例,对图像添加不同空间相关度的噪声效果:

对应的添加空间相关噪声的code:
import numpy as np
import matplotlib.pyplot as plt
from PIL import Image


def generate_noise_image0():
    # 读取灰度图片并归一化
    img = Image.open('your_image.png').convert('L')
    img = np.array(img, dtype=np.float32)
    H, W = img.shape
    N = H * W
    sigma = 25
    k = 3
    betas = [0, 0.5, 1]

    # 构造像素坐标
    coords = np.array([(i // W, i % W) for i in range(N)])

    # 计算距离矩阵
    D = np.linalg.norm(coords[:, None, :] - coords[None, :, :], axis=-1)

    # 生成相关噪声并显示
    fig, axs = plt.subplots(1, 4, figsize=(16, 5))
    axs[0].imshow(img.astype(np.uint8), cmap='gray')
    axs[0].set_title('Original')
    axs[0].axis('off')

    for idx, beta in enumerate(betas):
        # 构造协方差矩阵
        Sigma = np.zeros((N, N), dtype=np.float32)
        Sigma[D == 0] = sigma ** 2
        mask = (D > 0) & (D <= k)
        Sigma[mask] = (beta ** (k - D[mask] / k)) * (sigma ** 2)
        # 采样噪声
        noise = np.random.multivariate_normal(np.zeros(N), Sigma).reshape(H, W)
        noisy_img = np.clip(img + noise, 0, 255)
        axs[idx + 1].imshow(noisy_img.astype(np.uint8), cmap='gray')
        axs[idx + 1].set_title(f'beta={beta}')
        axs[idx + 1].axis('off')
    plt.tight_layout()
    plt.show()

from numpy.lib.stride_tricks import sliding_window_view
import math
def generate_noise_image(img, sigma=25, k=3, betas=[0, 0.5, 1]):
    #img = Image.open(image_path).convert('L')
    img = np.array(img, dtype=np.float32)
    H, W = img.shape
    pad = k
    img_pad = np.pad(img, pad, mode='reflect')
    window_shape = (2*k+1, 2*k+1)
    patches = sliding_window_view(img_pad, window_shape)
    patches = patches.reshape(-1, (2*k+1)*(2*k+1))
    center_idx = (2*k+1)*(2*k+1)//2

    fig, axs = plt.subplots(1, len(betas)+1, figsize=(16, 5))
    axs[0].imshow(img.astype(np.uint8), cmap='gray')
    axs[0].set_title('Original')
    axs[0].axis('off')

    for idx, beta in enumerate(betas):
        # 构造小协方差矩阵
        # 街区距离:每个像素与中心像素的街区距离
        dists = np.array([max(np.abs(i//(2*k+1)-k), np.abs(i%(2*k+1)-k)) for i in range((2*k+1)*(2*k+1))])
        Sigma = (beta ** (k - dists / k)) * (sigma ** 2)
        Sigma[dists==0] = sigma ** 2
        # 构造协方差矩阵
        cov = np.zeros([(2*k+1)*(2*k+1), (2*k+1)*(2*k+1)])
        print(cov.shape)
        cov[:,center_idx] = Sigma
        # 批量采样
        noises = np.random.multivariate_normal(np.zeros((2*k+1)*(2*k+1)), cov, size=patches.shape[0])
        noise_img = noises[:, center_idx].reshape(H, W)
        noisy_img = np.clip(img + noise_img, 0, 255).astype(np.uint8)
        axs[idx+1].imshow(noisy_img, cmap='gray')
        axs[idx+1].set_title(f'beta={beta}')
        axs[idx+1].axis('off')
    plt.tight_layout()
    #plt.show()
    return noisy_img
def generate_noise_image_color(image_path, sigma=25, k=3, betas=[0, 0.5, 1]):
    img = Image.open(image_path)
    img = np.array(img, dtype=np.float32)
    if img.ndim == 2:
        img = img[..., None]
    H, W, C = img.shape
    pad = k
    img_pad = np.pad(img, ((pad, pad), (pad, pad), (0, 0)), mode='reflect')
    window_shape = (2*k+1, 2*k+1)
    fig, axs = plt.subplots(1, len(betas)+1, figsize=(16, 5))
    axs[0].imshow(np.clip(img, 0, 255).astype(np.uint8))
    axs[0].set_title('Original')
    axs[0].axis('off')
    for idx, beta in enumerate(betas):
        noisy_img = np.zeros_like(img)
        for c in range(C):
            patches = sliding_window_view(img_pad[..., c], window_shape)
            patches = patches.reshape(-1, (2*k+1)*(2*k+1))
            center_idx = (2*k+1)*(2*k+1)//2
            dists = np.array([max(abs(i//(2*k+1)-k), abs(i%(2*k+1)-k)) for i in range((2*k+1)*(2*k+1))])
            Sigma = (beta ** (k - dists / k)) * (sigma ** 2)
            Sigma[dists==0] = sigma ** 2
            cov = np.zeros([(2*k+1)*(2*k+1), (2*k+1)*(2*k+1)])
            cov[:,center_idx] = Sigma
            noises = np.random.multivariate_normal(np.zeros((2*k+1)*(2*k+1)), cov, size=patches.shape[0])
            noise_img = noises[:, center_idx].reshape(H, W)
            noisy_img[..., c] = np.clip(img[..., c] + noise_img, 0, 255)
        axs[idx+1].imshow(noisy_img.astype(np.uint8))
        axs[idx+1].set_title(f'beta={beta}')
        axs[idx+1].axis('off')
    plt.tight_layout()
    plt.show()
"""
这是空间位置相关的示例代码。
还有另一种可能性是,值相关。
"""
if __name__ == "__main__":
    file = r'E:\share\data\benchmark\B100\HR\12084.png'
    generate_noise_image_color(file)
2.mask
自监督图像降噪一般利用blind spot net,盲点网络。
本文定义mask , =0表示被mask, =1表示为原图
每个像素被mask的概率,其实也是整张图像被mask的比例, 概率 tao

3.loss

f函数内部表示的是被mask后的图像: 原图与mask相乘。通过f网络 预测整张图像的值,与原图建立损失。
最后 1-m 表示只有被mask后的像素 对损失起作用。
总的含义就是 通过未被mask的像素 预测 被mask的像素。
4.masking ratio 与 spatial correlation的关系
这是本文的核心:
如下图所示
1)对于噪声空间相关度小的图像, mask ratio越小越好
2)对于噪声空间相关度大的图像, mask ratio越大越好,这个也好理解,mask ratio越大,网络学习更多内容相关的推理能力
3)但是总的效果是,噪声空间相关度越小,越容易降噪,降噪效果最好,细碎的噪声更容易去除,这个很有道理,也符合常识,空间相关度大的噪声比较难以区分是纹理还是噪声。

5.空间噪声去相关
上面说到 噪声空间相关度越小,降噪总体效果越好。
因此作者想要利用一些方法,使噪声空间相关度变小,进而提升降噪性能。
理论上, gt图像也就是clean图像中颜色值相同的pixels 对应的noisy pixel 打乱顺序,但是我们不知道 clean gt图像
作者的具体方法是,局部 shuffle,且只对平坦区域的pixel shuffle
1)首先确定平坦区域:
对于 模型输出的降噪后的图
4x4 local patch的标准差,小于阈值 lamda 判定未平坦区域:
2)交换顺序:
对于平坦区域的像素,4x4 patch的邻域内像素 shuffle
3)结果:只看图感觉像是增加了相关性

4)公式:
Γ(y) define the local random permutation of pixels within s × s (e.g., s = 4) tiles of y

5)loss:
也由公式4变为公式6:

6)试验结果:

6.Automated selection of the BSD masking ratio
看懂这个图就行了,
tao 是mask的概率,每个图都有tao=0.2和0.8两条曲线, 表示该图像被mask的概率。
然后计算对应的噪声水平:
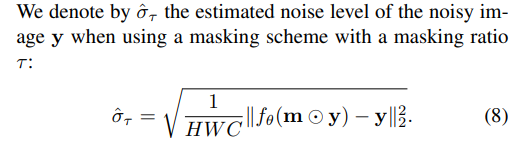
可以发现,beta 越大, 公式9越大,有正相关性质。因此利用公式9作为beta估计的近似。
具体来说就是 分别mask taolow, taohigh, 然后运行模型计算公式8得到噪声估计,进而计算两者的差异
然后就可以根据公式9估计的beta值进一步确定 mask ratio应该设置为多少。

7.小结
以上整体算法已经很清晰了,具体细节可以查看原文。
本文主要提出了, pixel shuffle 去空间相关 和 自适应选取mask ratio 两种改进策略
需要注意的是本文只针对单张图像像素降噪,zero-shot方法。


 被折叠的 条评论
为什么被折叠?
被折叠的 条评论
为什么被折叠?
 到【灌水乐园】发言


