


Unity StanderShaderFowardBase源码解析
文章目录
顶点处理
首先是顶点函数用到的数据结构,以及关键函数。
输入结构-VertexInput
struct VertexInput{
float4 vertex   : POSITION;
half3 normal    : NORMAL;
float2 uv0      : TEXCOORD0;
float2 uv1      : TEXCOORD1;
#if defined(DYNAMICLIGHTMAP_ON) || defined(UNITY_PASS_META)
float2 uv2      : TEXCOORD2;
#endif
#ifdef _TANGENT_TO_WORLD
half4 tangent   : TANGENT;
#endif
UNITY_VERTEX_INPUT_INSTANCE_ID
};
输出结构-VertexOutputForwardBase
struct VertexOutputForwardBase
{
UNITY_POSITION(pos);//float4 pos : SV_POSITION   SV_POSITION和VPOS语义,均为片元使用坐标,GPU使用SV_POSITION中的值
                                      //来从剪辑空间位置计算屏幕像素位置。如果使用POSITION语义,我们还要手动处理透视触发,去除w分量。
float4 tex                            : TEXCOORD0;
float4 eyeVec                         : TEXCOORD1;    // eyeVec.xyz | fogCoord
float4 tangentToWorldAndPackedData[3] : TEXCOORD2;    // [3x3:tangentToWorld | 1x3:viewDirForParallax or worldPos]
half4 ambientOrLightmapUV             : TEXCOORD5;    // SH or Lightmap UV
UNITY_LIGHTING_COORDS(6,7)
// next ones would not fit into SM2.0 limits, but they are always for SM3.0+
#if UNITY_REQUIRE_FRAG_WORLDPOS && !UNITY_PACK_WORLDPOS_WITH_TANGENT
float3 posWorld                     : TEXCOORD8;
#endif
UNITY_VERTEX_INPUT_INSTANCE_ID
UNITY_VERTEX_OUTPUT_STEREO
};
顶点函数-vertForwardBase
VertexOutputForwardBase vertForwardBase (VertexInput v)   {
//设置InstanceID
UNITY_SETUP_INSTANCE_ID(v);
VertexOutputForwardBase o;
//初始化数据
UNITY_INITIALIZE_OUTPUT(VertexOutputForwardBase, o);
//获取到o数据的instanceID
UNITY_TRANSFER_INSTANCE_ID(v, o);
//双眼效应,游戏基本可以忽略,vr使用
UNITY_INITIALIZE_VERTEX_OUTPUT_STEREO(o);
float4 posWorld = mul(unity_ObjectToWorld, v.vertex);
//世界位置坐标是否压缩在切线空间中
#if UNITY_REQUIRE_FRAG_WORLDPOS
    #if UNITY_PACK_WORLDPOS_WITH_TANGENT
        o.tangentToWorldAndPackedData[0].w = posWorld.x;
        o.tangentToWorldAndPackedData[1].w = posWorld.y;
        o.tangentToWorldAndPackedData[2].w = posWorld.z;
    #else
        o.posWorld = posWorld.xyz;
    #endif
#endif
o.pos = UnityObjectToClipPos(v.vertex);
//初始化UV信息,根据输入确定xy为第一套uv信息,zw是保存第一套uv信息还是第二套uv信息--UnityStandardInput.cginc
o.tex = TexCoords(v);
//--在本cgnic中,如果在2.0中会进行normalize,如果在3.0的时候不进行处理,在片元中进行处理
o.eyeVec.xyz = NormalizePerVertexNormal(posWorld.xyz - _WorldSpaceCameraPos);
float3 normalWorld = UnityObjectToWorldNormal(v.normal);
//_TANGENT_TO_WORLD是否需要切空间的转换,在UnityStandardInput.cginc中定义,如果有法线贴图,directional的lightmap,或者视差图,需要此转换
 #ifdef _TANGENT_TO_WORLD
    float4 tangentWorld = float4(UnityObjectToWorldDir(v.tangent.xyz), v.tangent.w);
    //在UnityStandardUtils.cginc中,获取切空间到世界空间的矩阵
    float3x3 tangentToWorld = CreateTangentToWorldPerVertex(normalWorld, tangentWorld.xyz, tangentWorld.w);
    o.tangentToWorldAndPackedData[0].xyz = tangentToWorld[0];
    o.tangentToWorldAndPackedData[1].xyz = tangentToWorld[1];
    o.tangentToWorldAndPackedData[2].xyz = tangentToWorld[2];
#else
    //如果没有定义_TANGENT_TO_WORLD则将normalWorld保存。
    o.tangentToWorldAndPackedData[0].xyz = 0;
    o.tangentToWorldAndPackedData[1].xyz = 0;
    o.tangentToWorldAndPackedData[2].xyz = normalWorld;
#endif
//We need this for shadow receving-设置影子接受
UNITY_TRANSFER_LIGHTING(o, v.uv1);
//--在本cgnic中,获取环境光。如果没有开启静态光图和动态光图则使用球谐计算,返回的是颜色,反之返回uv,xy-->静态光图uv,zw-->动态光图uv
o.ambientOrLightmapUV = VertexGIForward(v, posWorld, normalWorld);

#ifdef _PARALLAXMAP
    //定义了rotation为模型到切线空间的转换,定义在UnityCG.cginc中
    TANGENT_SPACE_ROTATION;
    //将viewdir坐标转换到切线空间中,并进行存储
    half3 viewDirForParallax = mul (rotation, ObjSpaceViewDir(v.vertex));
    o.tangentToWorldAndPackedData[0].w = viewDirForParallax.x;
    o.tangentToWorldAndPackedData[1].w = viewDirForParallax.y;
    o.tangentToWorldAndPackedData[2].w = viewDirForParallax.z;
#endif
//雾效处理
UNITY_TRANSFER_FOG_COMBINED_WITH_EYE_VEC(o,o.pos);
return o;   }
有注释的或者一些直白的就略过了
-
o.tex = TexCoords(v);
float4 TexCoords(VertexInput v)
{  float4 texcoord;
texcoord.xy = TRANSFORM_TEX(v.uv0, _MainTex); // Always source from uv0
texcoord.zw = TRANSFORM_TEX(((_UVSec == 0) ? v.uv0 : v.uv1), _DetailAlbedoMap);
return texcoord;  }
初始化UV信息,_UVSec定义在UnityStandardInput.cginc中,赋值是在材质面板中赋值。
VertexGIForward
-
o.ambientOrLightmapUV = VertexGIForward(v, posWorld, normalWorld);
inline half4 VertexGIForward(VertexInput v, float3 posWorld, half3 normalWorld){
half4 ambientOrLightmapUV = 0;
// Static lightmaps
 //LIGHTMAP_ON==》使用静态光照贴图
 #ifdef LIGHTMAP_ON
    ambientOrLightmapUV.xy = v.uv1.xy * unity_LightmapST.xy + unity_LightmapST.zw;
    ambientOrLightmapUV.zw = 0;
 //  UNITY_SHOULD_SAMPLE_SH 当前渲染的动态模型,使用SH得到间接的漫反射信息,
 //其中UNITY_SHOULD_SAMPLE_SH如下定义。#define UNITY_SHOULD_SAMPLE_SH
// ( defined (LIGHTMAP_OFF) && defined(DYNAMICLIGHTMAP_OFF) ) 以看出当没有光照贴图和动态光图时我们获取到
// 的漫反射信息
 #elif UNITY_SHOULD_SAMPLE_SH
//如果VERTEXLIGHT_ON开启,获取非重要点光源的光照信息。(顶点光照,在光源设置,import且为pixelLigth为像素光  照)
#ifdef VERTEXLIGHT_ON
 ambientOrLightmapUV.rgb = Shade4PointLights (
      unity_4LightPosX0, unity_4LightPosY0, unity_4LightPosZ0,
      unity_LightColor[0].rgb, unity_LightColor[1].rgb, unity_LightColor[2].rgb, unity_LightColor[3].rgb,
      unity_4LightAtten0, posWorld, normalWorld);
#endif
  //计算球谐数值---UnityStanderUtils.cginc
ambientOrLightmapUV.rgb = ShadeSHPerVertex (normalWorld, ambientOrLightmapUV.rgb);
#endif

#ifdef DYNAMICLIGHTMAP_ON
   ambientOrLightmapUV.zw = v.uv2.xy * unity_DynamicLightmapST.xy + unity_DynamicLightmapST.zw;
#endif
return ambientOrLightmapUV;}

顶点球谐函数
half3 ShadeSHPerVertex (half3 normal, half3 ambient)
{
#if UNITY_SAMPLE_FULL_SH_PER_PIXEL
// Completely per-pixel
// nothing to do here
#elif (SHADER_TARGET < 30) || UNITY_STANDARD_SIMPLE
// Completely per-vertex
//--对于2.0的手机,直接使用
ambient += max(half3(0,0,0), ShadeSH9 (half4(normal, 1.0)));
#else
// L2 per-vertex, L0..L1 & gamma-correction per-pixel
// NOTE: SH data is always in Linear AND calculation is split between vertex & pixel
// Convert ambient to Linear and do final gamma-correction at the end (per-pixel)
 #ifdef UNITY_COLORSPACE_GAMMA
    ambient = GammaToLinearSpace (ambient);
 #endif
ambient += SHEvalLinearL2 (half4(normal, 1.0));     // no max since this is only L2 contribution
#endif
return ambient; }
首先我们需要知道unity内部的灯光的分类,像素光,定点光,球谐光是如何划分的,百度下就可了。其实通过上面的对UNITY_SHOULD_SAMPLE_SH的定义可以看出,上面的逻辑写的是有点小问题的。静态光照贴图和动态光照贴图都不开启的时候才会进行球谐计算,如果任意一个开启则不会进行球谐计算。换句话说,如果开启球谐计算ambientOrLightmapUV中的rgb存储的为颜色数据,反之在xy存储静态光照贴图的uv信息(使用顶点输入的uv1),zw存储动态光照贴图的uv信息(使用uv2)。
那么球谐函数算的是什么,是用来做动态全局光照的,什么几儿玩意。有兴趣的可以看看他的赋值过程,虽然我也没看过,但是球谐基包含的信息有光照探针,和球谐光照的信息,我理解的只是信息(后面你会发现在片元着色器里还会使用一次球谐函数,为什么?跟ShaderTarget有关,2.0在顶点做计算,3.0在片元计算,3.0真的是土豪)
tangentToWorldAndPackedData
-
tangentToWorldAndPackedData这个数据是一个3*4的矩阵,前3行3列表示切空间到世界空间的变换矩阵,当 定义了UNITY_REQUIRE_FRAG_WORLDPOS和UNITY_PACK_WORLDPOS_WITH_TANGENT则将世界坐标保存在每行的第四列中,否则直接保存在posWorld中。当使用了_PARALLAXMAP高度图则也是保存在 每行的第四列中,那问题是,如果都定义了呢?那不就有数据丢失了么?怎么可能~两者肯定是不能同时存在的,不信你看,注意下面标注手机平台是不会将woldPos压缩到这个结构中的,手机平台采用的是mediump的精度,猜测是保存在posWorld中然后可以在片元中使用时使用中等精度,如果是保存在矩阵中没办法做精度转换,mark下,带确定。。。
#if UNITY_STANDARD_SIMPLE #define UNITY_REQUIRE_FRAG_WORLDPOS 0 #else #define UNITY_REQUIRE_FRAG_WORLDPOS 1 #endif // Should we pack worldPos along tangent (saving an interpolator) // We want to skip this on mobile platforms, because worldpos gets packed into mediump #if UNITY_REQUIRE_FRAG_WORLDPOS && !defined(_PARALLAXMAP) && !defined(SHADER_API_MOBILE) #define UNITY_PACK_WORLDPOS_WITH_TANGENT 1 #else #define UNITY_PACK_WORLDPOS_WITH_TANGENT 0 #endif -
什么顶点就这么完了,干了点啥?我上我也行啊,总结下:顶点做了数据准备工作:位置,uv,切空间转换,开启静动太光照贴图的时候设置二者的uv,没开启的是时候计算环境的颜色(2.0在顶点用球谐计算,3.0用球谐在片元计算)。其实到了我们就发现默认材质的变体何其庞大了,对于手游来讲大部分都不会用到,所以很有必要跟他一毛一样的苗条型的standershader。
片元处理
先来看看数据结构,输入就是顶点着色器的输出VertexOutputForwardBase,但是我们再此之前需要引入一些其他的数据结构:
中间数据-FragmentCommonData
struct FragmentCommonData
{
half3 diffColor, specColor;
// Note: smoothness & oneMinusReflectivity for optimization purposes, mostly for DX9 SM2.0 level.
// Most of the math is being done on these (1-x) values, and that saves a few precious ALU slots.
half oneMinusReflectivity, smoothness;
float3 normalWorld;
float3 eyeVec;
half alpha;
float3 posWorld;
#if UNITY_STANDARD_SIMPLE
half3 reflUVW;//起的啥破名,就是反射向量
#endif
#if UNITY_STANDARD_SIMPLE
half3 tangentSpaceNormal;
#endif
};
//----UNITY_STANDARD_SIMPLE的定义是根据UNITY_NO_FULL_STANDARD_SHADER来定义的,这个可以根据需要自定义在shader中,
我们这里暂且不讨论simple的情况,啊?为什么?因为简单。。啊???简单怎么开启后数据结构怎么还多了俩?。。。啊!我看看,还真是,
这个。。。慌什么~~我们是不是看到在VertexOutputForwardBase这个结构中有个UNITY_REQUIRE_FRAG_WORLDPOS,这个就是定义如下:
#if UNITY_STANDARD_SIMPLE
#define UNITY_REQUIRE_FRAG_WORLDPOS 0
#else
#define UNITY_REQUIRE_FRAG_WORLDPOS 1
#endif
原来不开启的需要世界坐标,那么久很明显了,simple时为了效率计算会在顶点和某些计算上做近似算法,所以我们先忽略掉,毕竟我们是有追求
的。但是我们需要知道这些变量的替代位置,接下来遇到的时候会指出来的。接下来请GI家族闪亮登场,什么玩意,一头雾水
………………………………………………………………………………………………………………………………………………………………………
GI数据结构–UnityGI UnityIndirect UnityLight UnityGIInput
struct UnityGI
{
UnityLight light;
UnityIndirect indirect;
};
struct UnityIndirect
{
half3 diffuse;
half3 specular;
};
struct UnityLight
{
half3 color;
half3 dir;
half  ndotl; // 为了兼容,其实没有用
};
我们可以看到UnityGI就是存储了一个灯光的颜色和方向,还有(间接光照)漫反射和高光的颜色。也不过如此嘛~~~
………………………………………………………………………………………………………………………………………………………………………………

struct UnityGIInput
{
UnityLight light; //逐像素灯光,有引擎设置,如果还不知道是啥,看看上面引擎如何划分像素,顶点,球谐光照的。

float3 worldPos;
half3 worldViewDir;
half atten;
half3 ambient;
float4 lightmapUV; // .xy = static lightmap UV, .zw = dynamic lightmap UV
//UNITY_SPECCUBE_BLENDING 光照探针融合,主要是当收到多个光照探针影响的时候,开启后会有过渡,而不是直接突变(
 //MeshRender-Lighting-ReflectionProbes设置)。
//UNITY_SPECCUBE_BOX_PROJECTION Box计算,开启后会增加方位计算,反射采样有视角,法线,以及位置决定,所以会随着移动,反射有变化。(ReflectionProbe-Runtimesettings-BoxProjection)
//UNITY_ENABLE_REFLECTION_BUFFERS--字面意思是否开启反射缓冲,延迟渲染涉及到的,没用过,我也不知道。。。
#if defined(UNITY_SPECCUBE_BLENDING) || defined(UNITY_SPECCUBE_BOX_PROJECTION) || defined(UNITY_ENABLE_REFLECTION_BUFFERS)
float4 boxMin[2];
#endif
//反射开启boxprojection,还需要获取到box的大小和位置
#ifdef UNITY_SPECCUBE_BOX_PROJECTION
float4 boxMax[2];
float4 probePosition[2];
#endif
// HDR cubemap properties, use to decompress HDR texture
float4 probeHDR[2];
};
什么?难道这就是计算出刚才看到那个UnityGI的输入数据??不错,好眼力。
到了这里呢~我们的片元的数据结构就已经完成了,由于本次是源码解析,就不叨叨原理的,之后有空讲解下stander的理解以及pbr的原理。好了,直接来代码了
片元函数-fragForwardBaseInternal
half4 fragForwardBaseInternal (VertexOutputForwardBase i)
{
//进行LOD相关计算。--在UnityCG.cginc中定义
//UNITY_APPLY_DITHER_CROSSFADE这个宏定义是在场景对象添加LOD Group,并且Fade Mode为Cross Fade的情况下才会生效,
//代码的核心逻辑就是先计算对象在屏幕空间下的坐标,然后去采样_DitherMaskLOD2D贴图,根据Alpha值进行alpha test裁剪,最终的效果就
//是离摄像机越远的物体,会逐渐消失
UNITY_APPLY_DITHER_CROSSFADE(i.pos.xy);
//初始化内部变量相关工作,主要是对FragmentCommonData进行初始化和赋值--在UnityCG.cginc中定义
FRAGMENT_SETUP(s)
//GPU Instance的计算
UNITY_SETUP_INSTANCE_ID(i);
//视域的计算--与上面的分别定义在UnityInstancing.cginc中
UNITY_SETUP_STEREO_EYE_INDEX_POST_VERTEX(i);
//主光--获取灯光的位置和颜色,unity中保存在_LightColor0和_WorldSpaceLightPos0中
UnityLight mainLight = MainLight ();
//计算光照衰减--用于阴影的计算,在AutoLight.cginc中
UNITY_LIGHT_ATTENUATION(atten, i, s.posWorld);
//--获取遮罩
half occlusion = Occlusion(i.tex.xy);
//--获取GI,还记得上面那个ambientOrLightmapUV的计算么?球谐函数算的GI
UnityGI gi = FragmentGI (s, occlusion, i.ambientOrLightmapUV, atten, mainLight);
 half4 c = UNITY_BRDF_PBS (s.diffColor, s.specColor, s.oneMinusReflectivity, s.smoothness, s.normalWorld, -s.eyeVec, gi.light, gi.indirect);
c.rgb += Emission(i.tex.xy);
UNITY_EXTRACT_FOG_FROM_EYE_VEC(i);
UNITY_APPLY_FOG(_unity_fogCoord, c.rgb);
return OutputForward (c, s.alpha);
}
LODGoup计算- UNITY_APPLY_DITHER_CROSSFADE
#ifdef LOD_FADE_CROSSFADE
#define UNITY_APPLY_DITHER_CROSSFADE(vpos)  UnityApplyDitherCrossFade(vpos)
sampler2D _DitherMaskLOD2D;
void UnityApplyDitherCrossFade(float2 vpos)
{
    vpos /= 4; // the dither mask texture is 4x4
    vpos.y = frac(vpos.y) * 0.0625 /* 1/16 */ + unity_LODFade.y; // quantized lod fade by 16 levels
    clip(tex2D(_DitherMaskLOD2D, vpos).a - 0.5);
}
#else
#define UNITY_APPLY_DITHER_CROSSFADE(vpos)
#endif
如果开启动态混合(设定位置LOD GOUP–FadeMode–CrossFade),定义UNITY_APPLY_DITHER_CROSSFADE函数,参数为vpos,注意这个vpos为屏幕空间的位置(注意语义SV_POSITION和POSITION的区别),通过采样_DitherMaskLOD2D来实现LOD的动态替换。通过这个函数我们可以将进行LOD 动态消隐时不需要的片元剔除掉。
初始化片元数据FRAGMENT_SETUP
#define FRAGMENT_SETUP(x) FragmentCommonData x = \
FragmentSetup(i.tex, i.eyeVec.xyz, IN_VIEWDIR4PARALLAX(i), i.tangentToWorldAndPackedData, IN_WORLDPOS(i));
//分析:参数i为VertexOutputForwardBase的数据。
//IN_VIEWDIR4PARALLAX这个是干啥的?还记得在顶点函数中,我们世界坐标和viewDir的保存位置么?没错,就是获取。
//#define IN_VIEWDIR4PARALLAX(i) NormalizePerPixelNormal(half3(i.tangentToWorldAndPackedData[0].w,i.tangentToWorldAndPackedData[1].w,i.tangentToWorldAndPackedData[2].w))
//细节实现
inline FragmentCommonData FragmentSetup (inout float4 i_tex, float3 i_eyeVec, half3 i_viewDirForParallax, float4 tangentToWorld[3], float3         i_posWorld)
{
//---在UnityStandardInput.cginc中--计算视察贴图的,重置uv
i_tex = Parallax(i_tex, i_viewDirForParallax);
//---在UnityStandardInput.cginc 获取alpha值
half alpha = Alpha(i_tex.xy);
#if defined(_ALPHATEST_ON)
    clip (alpha - _Cutoff);
#endif
//初始化FragmentCommonData数值--就在本cginc中
FragmentCommonData o = UNITY_SETUP_BRDF_INPUT (i_tex);
//世界空间的法线
o.normalWorld = PerPixelWorldNormal(i_tex, tangentToWorld);
//viewdir---target3.0在这里归一化,2.0是在顶点就做了归一化。归一化是为了防止数据溢出
o.eyeVec = NormalizePerPixelNormal(i_eyeVec);
o.posWorld = i_posWorld;

// NOTE: shader relies on pre-multiply alpha-blend (_SrcBlend = One, _DstBlend = OneMinusSrcAlpha)
//在unitystanderuitils.cginc中,计算alpha对漫反射颜色造成的影响,
o.diffColor = PreMultiplyAlpha (o.diffColor, alpha, o.oneMinusReflectivity, /*out*/ o.alpha);
return o;
}
没错,这不操作就是为了得到我们刚才说的那个数据结构FragmentCommonData,接下来我们逐一分析,因为之后的每一步都是精彩的部分。
-
首先我们高度图。高度图在stander面板中显示为Height Map(代码中为_ParallaxMap),指定该图后出现一个可控的滚动条(代码中为_Parallax)。这个图是为了突出层次感,怎么突出层次感?其实就是通过对贴图采样的uv进行指定的偏移,从而模拟层次效果。
//定义在UnityStandardInput.cginc中,注意这个viewDir为切空间的viewDir float4 Parallax (float4 texcoords, half3 viewDir) { //当不存在高度图和target小于3.0时,不进行计算 #if !defined(_PARALLAXMAP) || (SHADER_TARGET < 30) // Disable parallax on pre-SM3.0 shader target models return texcoords; #else //先对高度图进行采样,只是用了g通道,所以如果有项目需要使用高度图可以在这里做点文章 half h = tex2D (_ParallaxMap, texcoords.xy).g; float2 offset = ParallaxOffset1Step (h, _Parallax, viewDir); //就是对原来的uv进行一次偏移 return float4(texcoords.xy + offset, texcoords.zw + offset); #endif } //ParallaxOffset1Step,注意,这是切空间的viewDir,切线空间组成[tangent.xyz, binormal, normal] //height范围为0-0.08, vec2 ParallaxOffset( float h, float height, vec3 viewDir ) { //变换一下h=(h-0.5)*height,高度图以0.5为分割 h = h * height - height/2.0; vec3 v = normalize(viewDir); //切空间的的z值累加,几何意义就是是viewdir逼近normal,换种说法就是,viewdir和normal的夹角越小, //(v.xy / v.z)的值就逼近于0,下面的0.42只不过是一个调节系数。 v.z += 0.42; //h是由高度图控制,由美术定义,(v.xy / v.z)是视角与法线的夹角。两者相乘决定了uv的偏移量。 return h * (v.xy / v.z); } -
Alpha获取
//_Color就是stander面板上的颜色, half Alpha(float2 uv) { //_SMOOTHNESS_TEXTURE_ALBEDO_CHANNEL_A 通过面板Source控制,==AlbedoAlpha时开启,MetallicAlpha时关闭 #if defined(_SMOOTHNESS_TEXTURE_ALBEDO_CHANNEL_A) return _Color.a; #else return tex2D(_MainTex, uv).a * _Color.a; #endif } -
UNITY_SETUP_BRDF_INPUT
这句话就是进行了BRDF的数据创建,并且完成了我们上面提到的FragmentCommonData 的创建了,他的定义默认使用SpecularSetup,但是我们的standershader使用的MetallicSetup,另外还有RoughnessSetup,三种对应了pbr的三种制作方式,分别是高光流,金属流,粗糙度流。我们就先讲解MetallicSetup,这里金属度作用用来描述这个物体当一束强光(1,1,1,1)照射上去是,他的高光颜色和漫反射颜色是什么样的,这个跟金属度和固有色有关://输入即uv inline FragmentCommonData MetallicSetup (float4 i_tex) { //获取x金属度和y光滑度,定义在UnityStandardInput.cginc中 half2 metallicGloss = MetallicGloss(i_tex.xy); half metallic = metallicGloss.x; half smoothness = metallicGloss.y; // this is 1 minus the square root of real roughness m. half oneMinusReflectivity; half3 specColor; //通过金属度计算漫反射颜色,高光颜色,还有漫反射系数。 输入:贴图颜色,金属度,高光色,1-反射 half3 diffColor = DiffuseAndSpecularFromMetallic (Albedo(i_tex), metallic, /*out*/ specColor, /*out*/ oneMinusReflectivity); FragmentCommonData o = (FragmentCommonData)0; o.diffColor = diffColor; o.specColor = specColor; o.oneMinusReflectivity = oneMinusReflectivity; o.smoothness = smoothness; return o; } //计算金属度和光滑度。我们这里好像看到了老朋友,在计算计算alpha的时候见到过 //_SMOOTHNESS_TEXTURE_ALBEDO_CHANNEL_A,由此可以看出,透明度会影响光滑度。然后还有这个_Glossiness //和_GlossMapScale的使用,可以看到两者是不会共存的,当alpha通道的获取是从贴图中获取时,使用_GlossMapScale来 //做系数,所以此时光滑度和透明度有关。如果alpha是从金属图获取且金属图不存在时,使用_Glossiness来表示光滑度。 half2 MetallicGloss(float2 uv) { half2 mg; #ifdef _METALLICGLOSSMAP #ifdef _SMOOTHNESS_TEXTURE_ALBEDO_CHANNEL_A mg.r = tex2D(_MetallicGlossMap, uv).r; mg.g = tex2D(_MainTex, uv).a; #else mg = tex2D(_MetallicGlossMap, uv).ra; #endif mg.g *= _GlossMapScale; #else mg.r = _Metallic; #ifdef _SMOOTHNESS_TEXTURE_ALBEDO_CHANNEL_A mg.g = tex2D(_MainTex, uv).a * _GlossMapScale; #else mg.g = _Glossiness; #endif #endif return mg; } inline half3 DiffuseAndSpecularFromMetallic (half3 albedo, half metallic, out half3 specColor, out half oneMinusReflectivity) { //unity_ColorSpaceDielectricSpec定义在UnityCG.cginc中,它的rgb存了介于金属与非金属之间的F0的颜色,这个颜 //色与金属贴图上的颜色通过金属度进行插值,并承以自定义的颜色,来决定最终传入F项公式的F0的颜色。 specColor = lerp (unity_ColorSpaceDielectricSpec.rgb, albedo, metallic); //用来计算漫反射, oneMinusReflectivity = OneMinusReflectivityFromMetallic(metallic); return albedo * oneMinusReflectivity; } inline half OneMinusReflectivityFromMetallic(half metallic) { // 由于能量守恒漫反射比例=1-反射比例. 反射比例=lerp(dielectricSpec, 1, metallic),所以 // 1-reflectivity = 1-lerp(dielectricSpec, 1, metallic) = lerp(1-dielectricSpec, 0, metallic) // 将(1-dielectricSpec) 存储在 unity_ColorSpaceDielectricSpec.a中(简写alpha),然后带入就有 // 1-reflectivity = lerp(alpha, 0, metallic) = alpha + metallic*(0 - alpha) = // = alpha - metallic * alpha half oneMinusDielectricSpec = unity_ColorSpaceDielectricSpec.a; return oneMinusDielectricSpec - metallic * oneMinusDielectricSpec; } -
PerPixelWorldNormal
计算世界空间的法线float3 PerPixelWorldNormal(float4 i_tex, float4 tangentToWorld[3]) { //是否使用了法线贴图,如果使用了需要采样法线贴图(如果有detailmap细节问题也在这里采样) #ifdef _NORMALMAP half3 tangent = tangentToWorld[0].xyz; half3 binormal = tangentToWorld[1].xyz; half3 normal = tangentToWorld[2].xyz; #if UNITY_TANGENT_ORTHONORMALIZE //这个宏的定义是XNormal的计算方式,一般不会使用 normal = NormalizePerPixelNormal(normal); // ortho-normalize Tangent tangent = normalize (tangent - normal * dot(tangent, normal)); // recalculate Binormal half3 newB = cross(normal, tangent); binormal = newB * sign (dot (newB, binormal)); #endif half3 normalTangent = NormalInTangentSpace(i_tex); float3 normalWorld = NormalizePerPixelNormal(tangent * normalTangent.x + binormal * normalTangent.y + normal * normalTangent.z); // @TODO: see if we can squeeze this normalize on SM2.0 as well #else float3 normalWorld = normalize(tangentToWorld[2].xyz); #endif return normalWorld; } /****NormalInTangentSpace的函数,其实就是对法线贴图就行采样,如果有细节图则和细节贴图做融合 half3 NormalInTangentSpace(float4 texcoords) { half3 normalTangent = UnpackScaleNormal(tex2D (_BumpMap, texcoords.xy), _BumpScale); //---UNITY_ENABLE_DETAIL_NORMALMAP开启在ProjectSettings--Graphics--TierSettings--DetailNormalMap #if _DETAIL && defined(UNITY_ENABLE_DETAIL_NORMALMAP) //--采样遮罩图,只是用了A通道,然后用这个数值做差值系数来差值法线和detailmap的数据 half mask = DetailMask(texcoords.xy); half3 detailNormalTangent = UnpackScaleNormal(tex2D (_DetailNormalMap, texcoords.zw), _DetailNormalMapScale); #if _DETAIL_LERP normalTangent = lerp( normalTangent, detailNormalTangent, mask); #else normalTangent = lerp( normalTangent, BlendNormals(normalTangent, detailNormalTangent), mask); #endif #endif return normalTangent; } -
PreMultiplyAlpha 计算透明度对颜色的影响
 inline half3 PreMultiplyAlpha (half3 diffColor, half alpha, half oneMinusReflectivity, out half outModifiedAlpha)
 {
     //_ALPHAPREMULTIPLY_ON --通过设置shader面板的rendermodel开启,不懂的可以查查rendermode的代码开启
     #if defined(_ALPHAPREMULTIPLY_ON)
         // NOTE: shader relies on pre-multiply alpha-blend (_SrcBlend = One, _DstBlend = OneMinusSrcAlpha)
          //这里透明度影响了漫反射的颜色,由于颜色混合的时候采用了one,OneMinusSrcAlpha的方式,所以这里直接乘
          //alpha,这里我们看到透明度只是影响了漫反射的颜色,然而并没有对高光颜色做处理。
         diffColor *= alpha;
         #if (SHADER_TARGET < 30)
                     // SM2.0: instruction count limitation
             // Instead will sacrifice part of physically based transparency where amount Reflectivity is affecting Transparency
             // SM2.0: uses unmodified alpha
             //target2.0 忽略了反射对透明度的影响
             outModifiedAlpha = alpha;
         #else
             // Reflectivity 'removes' from the rest of components, including Transparency
             //反射对透明度的影响,现实中,反射越强透明度则会越弱,表现为高光则会越明显。Mark一下,这个公式的表示
             //当混合des颜色的时候1-outAlpha=(1-alpha)*(1-reflectivity) 就是目标的混和系数,这就明显了,原来这个公式的
             //意义就是混合目标颜色受透明度和反射比例影响,在这里我们做一些更特殊的表现,只要更改公式即可
             // outAlpha = 1-(1-alpha)*(1-reflectivity) = 1-(oneMinusReflectivity - alpha*oneMinusReflectivity) =
             //          = 1-oneMinusReflectivity + alpha*oneMinusReflectivity
             outModifiedAlpha = 1-oneMinusReflectivity + alpha*oneMinusReflectivity;
         #endif
     #else
         outModifiedAlpha = alpha;
     #endif
     return diffColor;
 }
UNITY_LIGHT_ATTENUATION阴影衰减
这个计算这里简单说一下,之后打算专门来个深入研究,尤其是卡通的阴影处理,还是很有意思的。
这里在VertexOutputForwardBase结构中设置UNITY_LIGHTING_COORDS(6,7),然后在顶点函数中调用 UNITY_TRANSFER_LIGHTING(o, v.uv1)。最后再片元函数中使用UNITY_LIGHT_ATTENUATION(atten, i, i.worldPos)就可以得到综合了衰减和阴影的一个系数,这个系数可以和最终的光照颜色相乘就可以实现阴影的效果了。
Occlusion遮罩获取
定义在UnityStandardInput.cginc中
half Occlusion(float2 uv)
{
#if (SHADER_TARGET < 30)
    //获取遮罩图的,并获取g通道
    return tex2D(_OcclusionMap, uv).g;
#else
    half occ = tex2D(_OcclusionMap, uv).g;
    //其实我也不明,unity要这么写一下子,直接写成lerp(1,occ,_OcclusionStrength),是不想欠cg的情么。。
    return LerpOneTo (occ, _OcclusionStrength);
#endif
}

half LerpOneTo(half b, half t)
{
    half oneMinusT = 1 - t;
    return oneMinusT + b * t;
}
FragmentGI
GI是啥?不知道,IG倒是听过。。
全局光照,简称GI,等于没说。。。。
全局光照=直接光+间接光+自发光;直接光就是我们平时用的主光源,在这里因为是ForwardBase就是一盏光。间接光就是非直接光之外的都是间接光。。。Unity间接光=反射探针+光照探针+环境光
/***片元着色的调用 s:FragmentCommonData
UnityGI gi = FragmentGI (s, occlusion, i.ambientOrLightmapUV, atten, mainLight);
***/
inline UnityGI FragmentGI (FragmentCommonData s, half occlusion, half4 i_ambientOrLightmapUV, half atten, UnityLight light, bool reflections)
	{
	    UnityGIInput d;
	    d.light = light;
	    d.worldPos = s.posWorld;
	    d.worldViewDir = -s.eyeVec;
	    d.atten = atten;
	    //是否读取光照图,还是使用球谐函数计算好的颜色值
	    #if defined(LIGHTMAP_ON) || defined(DYNAMICLIGHTMAP_ON)
	        d.ambient = 0;
	        d.lightmapUV = i_ambientOrLightmapUV;
	    #else
	        d.ambient = i_ambientOrLightmapUV.rgb;
	        d.lightmapUV = 0;
	    #endif
	    //反射探头
	    d.probeHDR[0] = unity_SpecCube0_HDR;
	    d.probeHDR[1] = unity_SpecCube1_HDR;
	    #if defined(UNITY_SPECCUBE_BLENDING) || defined(UNITY_SPECCUBE_BOX_PROJECTION)
	      d.boxMin[0] = unity_SpecCube0_BoxMin; // .w holds lerp value for blending
	    #endif
	    #ifdef UNITY_SPECCUBE_BOX_PROJECTION
        d.boxMax[0] = unity_SpecCube0_BoxMax;
        d.probePosition[0] = unity_SpecCube0_ProbePosition;
        d.boxMax[1] = unity_SpecCube1_BoxMax;
        d.boxMin[1] = unity_SpecCube1_BoxMin;
        d.probePosition[1] = unity_SpecCube1_ProbePosition;
        #endif

	    if(reflections)
	    {
	        //如果应用了反射,这里获取环境的处理信息--定义在UnityImageBasedLighting.cginc中--就是干了获取roughness和reflUVW的数值
	        Unity_GlossyEnvironmentData g = UnityGlossyEnvironmentSetup(s.smoothness, -s.eyeVec, s.normalWorld, s.specColor);
	        // Replace the reflUVW if it has been compute in Vertex shader. Note: the compiler will optimize the calcul in UnityGlossyEnvironmentSetup itself
	        #if UNITY_STANDARD_SIMPLE
	            g.reflUVW = s.reflUVW;
	        #endif
	                return UnityGlobalIllumination (d, occlusion, s.normalWorld, g);
	    }
	    else
	    {
	        //间接光的镜面反射部分--UnityGlobalIllumination.cginc中,这个跟上面的区别就是既不计算间接光的反射部分。
	        return UnityGlobalIllumination (d, occlusion, s.normalWorld);
	    }
}
UnityGlossyEnvironmentSetup
Unity_GlossyEnvironmentData UnityGlossyEnvironmentSetup(half Smoothness, half3 worldViewDir, half3 Normal, half3 fresnel0)
{
    Unity_GlossyEnvironmentData g;

    g.roughness /* perceptualRoughness */   = SmoothnessToPerceptualRoughness(Smoothness);//(1 - smoothness)
    g.reflUVW   = reflect(-worldViewDir, Normal);

    return g;
}
UnityGlobalIllumination
	inline UnityGI UnityGlobalIllumination (UnityGIInput data, half occlusion, half3 normalWorld,
	Unity_GlossyEnvironmentData glossIn)
	{
	    UnityGI o_gi = UnityGI_Base(data, occlusion, normalWorld);//这里计算了GI的漫反射颜色,以及灯光信息。
	    o_gi.indirect.specular = UnityGI_IndirectSpecular(data, occlusion, glossIn);
	    return o_gi;
	}
UnityGI_Base
计算GI的灯光数据,以及漫反射颜色。注意这个漫反射颜色和FragmentCommonData的漫反射颜色的区别。FragmentCommonData说的物体的本质,由金属度决定,这个是间接光的漫反射颜色。
inline UnityGI UnityGI_Base(UnityGIInput data, half occlusion, half3 normalWorld)
{
    //初始化GI数据结构
    UnityGI o_gi;
    ResetUnityGI(o_gi);
     //考虑性能原因,可以在GI处理阴影和混合
     //***开启屏幕阴影(也就是必须要有shadowmap的绘制),以及开启光照贴图,会在打开再GI的时候处理阴影
		#if defined( SHADOWS_SCREEN ) && defined( LIGHTMAP_ON )
		    #define HANDLE_SHADOWS_BLENDING_IN_GI 1
		#endif
     **//
    #if defined(HANDLE_SHADOWS_BLENDING_IN_GI)
        //采样获取阴影的数值---影子详解之后我有文章分析
        half bakedAtten = UnitySampleBakedOcclusion(data.lightmapUV.xy, data.worldPos);
        //获取在视空间下两者的距离值
        float zDist = dot(_WorldSpaceCameraPos - data.worldPos, UNITY_MATRIX_V[2].xyz);
        //根据距离计算衰减系数
        float fadeDist = UnityComputeShadowFadeDistance(data.worldPos, zDist);
        //混合实时阴影和bake的阴影
        data.atten = UnityMixRealtimeAndBakedShadows(data.atten, bakedAtten, UnityComputeShadowFade(fadeDist));
    #endif

    o_gi.light = data.light;
    o_gi.light.color *= data.atten;
    //是否启动球谐光照,只有当没有静态和动态光照没有开启的时候才会开启球谐采样,所以下面
    //UNITY_SHOULD_SAMPLE_SH和LIGHTMAP_ON,DYNAMICLIGHTMAP_ON是冲突的
    #if UNITY_SHOULD_SAMPLE_SH
        o_gi.indirect.diffuse = ShadeSHPerPixel(normalWorld, data.ambient, data.worldPos);
    #endif

    #if defined(LIGHTMAP_ON)
        // Baked lightmaps--解析光照贴图的烘焙的颜色
        half4 bakedColorTex = UNITY_SAMPLE_TEX2D(unity_Lightmap, data.lightmapUV.xy);
        half3 bakedColor = DecodeLightmap(bakedColorTex);

        #ifdef DIRLIGHTMAP_COMBINED
            fixed4 bakedDirTex = UNITY_SAMPLE_TEX2D_SAMPLER (unity_LightmapInd, unity_Lightmap, data.lightmapUV.xy);
            o_gi.indirect.diffuse += DecodeDirectionalLightmap (bakedColor, bakedDirTex, normalWorld);

            #if defined(LIGHTMAP_SHADOW_MIXING) && !defined(SHADOWS_SHADOWMASK) && defined(SHADOWS_SCREEN)
                ResetUnityLight(o_gi.light);
                //删除lightmap中由主光源产生的衰减
                o_gi.indirect.diffuse = SubtractMainLightWithRealtimeAttenuationFromLightmap (o_gi.indirect.diffuse, data.atten, bakedColorTex, normalWorld);
            #endif
        #else // not directional lightmap
            o_gi.indirect.diffuse += bakedColor;

            #if defined(LIGHTMAP_SHADOW_MIXING) && !defined(SHADOWS_SHADOWMASK) && defined(SHADOWS_SCREEN)
                ResetUnityLight(o_gi.light);
                o_gi.indirect.diffuse = SubtractMainLightWithRealtimeAttenuationFromLightmap(o_gi.indirect.diffuse, data.atten, bakedColorTex, normalWorld);
            #endif

        #endif
    #endif
    #ifdef DYNAMICLIGHTMAP_ON
        // Dynamic lightmaps
        fixed4 realtimeColorTex = UNITY_SAMPLE_TEX2D(unity_DynamicLightmap, data.lightmapUV.zw);
        half3 realtimeColor = DecodeRealtimeLightmap (realtimeColorTex);

        #ifdef DIRLIGHTMAP_COMBINED
            half4 realtimeDirTex = UNITY_SAMPLE_TEX2D_SAMPLER(unity_DynamicDirectionality, unity_DynamicLightmap, data.lightmapUV.zw);
            o_gi.indirect.diffuse += DecodeDirectionalLightmap (realtimeColor, realtimeDirTex, normalWorld);
        #else
            o_gi.indirect.diffuse += realtimeColor;
        #endif
    #endif

    o_gi.indirect.diffuse *= occlusion;
    return o_gi;
}
UnityGI_IndirectSpecular
//间接光照高光,有反射探针使用反射探针的,没有就使用默认的unity_IndirectSpecColor,这个颜色每帧刷新
inline half3 UnityGI_IndirectSpecular(UnityGIInput data, half occlusion, Unity_GlossyEnvironmentData glossIn)
{
    half3 specular;

    #ifdef UNITY_SPECCUBE_BOX_PROJECTION
        // we will tweak reflUVW in glossIn directly (as we pass it to Unity_GlossyEnvironment twice for probe0 and
        //probe1), so keep original to pass into BoxProjectedCubemapDirection
        half3 originalReflUVW = glossIn.reflUVW;
        glossIn.reflUVW = BoxProjectedCubemapDirection (originalReflUVW, data.worldPos, data.probePosition[0], data.boxMin[0], data.boxMax[0]);
    #endif
    //不使用反射探头,如果使用了反射探针,则采样反射探针中的颜色,否则就使用unity_IndirectSpecColor默认的颜色
    #ifdef _GLOSSYREFLECTIONS_OFF
        specular = unity_IndirectSpecColor.rgb;
    #else
        half3 env0 = Unity_GlossyEnvironment (UNITY_PASS_TEXCUBE(unity_SpecCube0), data.probeHDR[0], glossIn);
        #ifdef UNITY_SPECCUBE_BLENDING
            const float kBlendFactor = 0.99999;
            float blendLerp = data.boxMin[0].w;
            UNITY_BRANCH
            if (blendLerp < kBlendFactor)
            {
                #ifdef UNITY_SPECCUBE_BOX_PROJECTION
                    glossIn.reflUVW = BoxProjectedCubemapDirection (originalReflUVW, data.worldPos, data.probePosition[1], data.boxMin[1], data.boxMax[1]);
                #endif

                half3 env1 = Unity_GlossyEnvironment (UNITY_PASS_TEXCUBE_SAMPLER(unity_SpecCube1,unity_SpecCube0), data.probeHDR[1], glossIn);
                specular = lerp(env1, env0, blendLerp);
            }
            else
            {
                specular = env0;
            }
        #else
            specular = env0;
        #endif
    #endif

    return specular * occlusion;
}
UNITY_BRDF_PBS
终于等到你,写这个好累,断断续续写了好久,已经两万五千字了,但是这里材质高潮啊~~~但是我已经累了。。。
首先我第一眼就看到常威在打来福。。,哦?其实就是根据平台选择不同的算法,他又在说瞎话,这肯定是根据设置来的,在Graphics-TierSettings-StandardShaderQuality中设定,那就挨个分析下吧,看看有啥区别。
#if !defined (UNITY_BRDF_PBS) // allow to explicitly override BRDF in custom shader
    // still add safe net for low shader models, otherwise we might end up with shaders failing to compile
    #if SHADER_TARGET < 30 || defined(SHADER_TARGET_SURFACE_ANALYSIS)
        #define UNITY_BRDF_PBS BRDF3_Unity_PBS
    #elif defined(UNITY_PBS_USE_BRDF3)
        #define UNITY_BRDF_PBS BRDF3_Unity_PBS
    #elif defined(UNITY_PBS_USE_BRDF2)
        #define UNITY_BRDF_PBS BRDF2_Unity_PBS
    #elif defined(UNITY_PBS_USE_BRDF1)
        #define UNITY_BRDF_PBS BRDF1_Unity_PBS
    #else
        #error something broke in auto-choosing BRDF
    #endif
#endif
BRDF3_Unity_PBS
这个看上去应该是最垃圾的那个,居然是target2.0用的,上去就是一顿暴揍。这个是操作是真的666,表示不知道为啥这就行?就这?就这?言归正传,三挡是做了一系列优化,利用Blinn-Phong去简化了BRDF的高光计算( ( n . h ) k (n.h)^k (n.h)k,替换为了 ( r . l ) k (r.l)^k (r.l)k),然后利用LUT技术做出模拟高光分布的曲线。BRDF3直接光的漫反射并没有做菲涅尔处理,而是直接相加。直接光的高光是通过通过Blinn-Phong做了法线分布,然后采用LUT做了高光系数,乘以高光颜色。这样就完成了直接光的计算,间接光的计算,使用全局光中的漫反射乘以物体本身的漫反射,间接光高光,则是使用差值做的计算,具体为啥是那俩货我也没弄明白怎么推导出来的。。
half4 BRDF3_Unity_PBS (half3 diffColor, half3 specColor, half oneMinusReflectivity, half smoothness,
    float3 normal, float3 viewDir,
    UnityLight light, UnityIndirect gi)
{

    float3 reflDir = reflect (viewDir, normal);
    half nl = saturate(dot(normal, light.dir));
    half nv = saturate(dot(normal, viewDir));

    //这里我有点不太明白,说是Blinn-Phong的光照 模型,但是没有半角,我觉得更像是Phong模型。。等等,
    //不要怀疑官方,好吧,我错了。首先我们看,通过下面计算,用rlPow4AndFresnelTerm.x来模拟了法线分布,
    //rlPow4AndFresnelTerm.y来模拟了菲涅尔。
    // use R.L instead of N.H to save couple of instructions
    half2 rlPow4AndFresnelTerm = Pow4 (float2(dot(reflDir, light.dir), 1-nv));
    // power exponent must match kHorizontalWarpExp in NHxRoughness() function in GeneratedTextures.cpp
    half rlPow4 = rlPow4AndFresnelTerm.x;
    half fresnelTerm = rlPow4AndFresnelTerm.y;

    half grazingTerm = saturate(smoothness + (1-oneMinusReflectivity));

    half3 color = BRDF3_Direct(diffColor, specColor, rlPow4, smoothness);
    color *= light.color * nl;
    color += BRDF3_Indirect(diffColor, specColor, gi, grazingTerm, fresnelTerm);

    return half4(color, 1);
}
//猴赛雷,这是什么?原来是unity内置的LUT图.偷偷的,也不告诉大家一声。
sampler2D_float unity_NHxRoughness;
half3 BRDF3_Direct(half3 diffColor, half3 specColor, half rlPow4, half smoothness)
{
    half LUT_RANGE = 16.0; // must match range in NHxRoughness() function in GeneratedTextures.cpp
    // Lookup texture to save instructions
    half specular = tex2D(unity_NHxRoughness, half2(rlPow4, SmoothnessToPerceptualRoughness(smoothness))).r * LUT_RANGE;
#if defined(_SPECULARHIGHLIGHTS_OFF)
    specular = 0.0;
#endif

    return diffColor + specular * specColor;
}

half3 BRDF3_Indirect(half3 diffColor, half3 specColor, UnityIndirect indirect, half grazingTerm, half fresnelTerm)
{
    half3 c = indirect.diffuse * diffColor;
    c += indirect.specular * lerp (specColor, grazingTerm, fresnelTerm);
    return c;
}
BRDF2_Unity_PBS
中等级别的PBS,手机端默认的使用效果,我觉得现在的手机还是很厉害的,直接走最高的就行。。这个法线分布函数参看CookTorrance BRDF。舌头疼,其实这里的东西你要说为什么这么算,啊?他这里为什么要乘个4,为什么还要和0.32比较,我也一脸蒙蔽。。我只能借川普的一句话,或许,这就是人生吧~~
half4 BRDF2_Unity_PBS (half3 diffColor, half3 specColor, half oneMinusReflectivity, half smoothness,
    float3 normal, float3 viewDir,
    UnityLight light, UnityIndirect gi)
{
    float3 halfDir = Unity_SafeNormalize (float3(light.dir) + viewDir);

    half nl = saturate(dot(normal, light.dir));
    float nh = saturate(dot(normal, halfDir));
    half nv = saturate(dot(normal, viewDir));
    float lh = saturate(dot(light.dir, halfDir));

    // Specular term
    //获取理想粗糙度= (1 - smoothness),为啥说是理想的粗糙度呢?因为要计算真是的粗糙度=他的平方
    half perceptualRoughness = SmoothnessToPerceptualRoughness (smoothness);
    //计算粗糙度=perceptualRoughness*perceptualRoughness,可能是这样更接近真是效果
    half roughness = PerceptualRoughnessToRoughness(perceptualRoughness);

#if UNITY_BRDF_GGX

    // GGX Distribution multiplied by combined approximation of Visibility and Fresnel
    // See "Optimizing PBR for Mobile" from Siggraph 2015 moving mobile graphics course
    // https://community.arm.com/events/1155
    half a = roughness;
    float a2 = a*a;
    //这个就是GGX的d的算法,没看出来怎么线性表达的。。。
	float d = nh * nh * (a2 - 1.f) + 1.00001f;
#ifdef UNITY_COLORSPACE_GAMMA
    // Tighter approximation for Gamma only rendering mode!
    // DVF = sqrt(DVF);
    // DVF = (a * sqrt(.25)) / (max(sqrt(0.1), lh)*sqrt(roughness + .5) * d);
    //上面的DVF就是本次计算的高光公式了,但是在线性空间下需要对其进行平方计算,我们假定GAMMA空间下
    //specularTerm为GA,Linear的specularTerm为LA
    //怎么看上去GA都不等于DVF,但是LA=DVF*DVF,然后在看LA和GA的转换,差在sqrt(4*(roughness + 0.5f))= (1.5f + roughness)
    //上。至于为什么会造成这个差异,可能是人生吧。。。
    float specularTerm = a / (max(0.32f, lh) * (1.5f + roughness) * d);
#else
    float specularTerm = a2 / (max(0.1f, lh*lh) * (roughness + 0.5f) * (d * d) * 4);
#endif

    // on mobiles (where half actually means something) denominator have risk of overflow
    // clamp below was added specifically to "fix" that, but dx compiler (we convert bytecode to metal/gles)
    // sees that specularTerm have only non-negative terms, so it skips max(0,..) in clamp (leaving only min(100,...))
#if defined (SHADER_API_MOBILE)
    specularTerm = specularTerm - 1e-4f;
#endif

#else
// Legacy---这是老的版本,可以忽略了,为了兼容才留下的
		    half specularPower = PerceptualRoughnessToSpecPower(perceptualRoughness);
		    // Modified with approximate Visibility function that takes roughness into account
		    // Original ((n+1)*N.H^n) / (8*Pi * L.H^3) didn't take into account roughness
		    // and produced extremely bright specular at grazing angles

		    half invV = lh * lh * smoothness + perceptualRoughness * perceptualRoughness;
		    // approx ModifiedKelemenVisibilityTerm(lh, perceptualRoughness);
		    half invF = lh;

		    half specularTerm = ((specularPower + 1) * pow (nh, specularPower)) / (8 * invV * invF + 1e-4h);

			#ifdef UNITY_COLORSPACE_GAMMA
			    specularTerm = sqrt(max(1e-4f, specularTerm));
			#endif

#endif

#if defined (SHADER_API_MOBILE)
    specularTerm = clamp(specularTerm, 0.0, 100.0); // Prevent FP16 overflow on mobiles
#endif
//如果关闭高光,这里设置为0,在Stander的面板中可以设定
#if defined(_SPECULARHIGHLIGHTS_OFF)
    specularTerm = 0.0;
#endif
// surfaceReduction = Int D(NdotH) * NdotH * Id(NdotL>0) dH = 1/(realRoughness^2+1)
// 1-0.28*x^3 as approximation for (1/(x^4+1))^(1/2.2) on the domain [0;1]
// 1-x^3*(0.6-0.08*x)   approximation for 1/(x^4+1)
#ifdef UNITY_COLORSPACE_GAMMA
    half surfaceReduction = 0.28;
#else
    half surfaceReduction = (0.6-0.08*perceptualRoughness);
#endif

    surfaceReduction = 1.0 - roughness*perceptualRoughness*surfaceReduction;
    //计算掠角--相同的掠射角方向看过去,粗糙表面的菲涅尔效应,要比光滑表面的菲涅尔效应弱一些
    half grazingTerm = saturate(smoothness + (1-oneMinusReflectivity));
    //最终颜色=(物体漫反射颜色+高光数据*高光颜色)*灯光颜色*NL+环境光漫反射颜色*物体漫反射颜色
    //+衰减系数*环境光高光颜色*菲涅尔系数           由此可见,物体漫反射和环境光漫反射并没有菲涅尔效果
    half3 color =   (diffColor + specularTerm * specColor) * light.color * nl
                    + gi.diffuse * diffColor
                    + surfaceReduction * gi.specular * FresnelLerpFast (specColor, grazingTerm, nv);

    return half4(color, 1);
}
BRDF1_Unity_PBS
马上就要到了这个代码的尾声了,传说的中BRDF,也是比较正统的计算,大部分关于pbr的介绍其实都是按照这个做的,按照公式一步一步走吧。主要是对比前两个的区别,了解下为什么前两个消耗低。。盗用一张图

// Main Physically Based BRDF
// Derived from Disney work and based on Torrance-Sparrow micro-facet model
//
// BRDF = kD / pi + kS * (D * V * F) / 4
// I = BRDF * NdotL
//上面是列除了我们看到的公式,实际上我们再运算是在等式两边乘以了PI即:PI* BRDF = kD + kS * (D * V * F)* PI/ 4
//至于为什么,乘了个PI,可能是为了兼容的问题吧。也可能这就是人生吧~~
//
// * NDF (depending on UNITY_BRDF_GGX):
// a) Normalized BlinnPhong
// b) GGX
//
// * Smith for Visiblity term
//
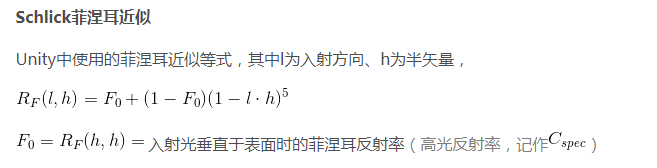
// * Schlick approximation for Fresnel
//
half4 BRDF1_Unity_PBS (half3 diffColor, half3 specColor, half oneMinusReflectivity, half smoothness,
float3 normal, float3 viewDir,
UnityLight light, UnityIndirect gi)
{
//获取理想粗糙度= (1 - smoothness),为啥说是理想的粗糙度呢?因为要计算真是的粗糙度=他的平方
float perceptualRoughness = SmoothnessToPerceptualRoughness (smoothness);
//半角
float3 halfDir = Unity_SafeNormalize (float3(light.dir) + viewDir);
// NdotV should not be negative for visible pixels, but it can happen due to perspective projection and normal mapping
// In this case normal should be modified to become valid (i.e facing camera) and not cause weird artifacts.
// but this operation adds few ALU and users may not want it. Alternative is to simply take the abs of NdotV (less correct but works too).
// Following define allow to control this. Set it to 0 if ALU is critical on your platform.
// This correction is interesting for GGX with SmithJoint visibility function because artifacts are more visible in this case due to highlight edge of rough surface
// Edit: Disable this code by default for now as it is not compatible with two sided lighting used in SpeedTree.
//上面这一大丢翻译的其实就是透视相机会使可见的像素的,N*V为负值,这是不应该的,为什么会为负,因为他是计算
//机啊,所以需要确保为正,然后列出了两个方案,一个是修正法线的,然后这个没有使用,还有一个是abs的。
#define UNITY_HANDLE_CORRECTLY_NEGATIVE_NDOTV 0
#if UNITY_HANDLE_CORRECTLY_NEGATIVE_NDOTV --这段是关闭的,看上面
// The amount we shift the normal toward the view vector is defined by the dot product.
half shiftAmount = dot(normal, viewDir);
normal = shiftAmount < 0.0f ? normal + viewDir * (-shiftAmount + 1e-5f) : normal;
// A re-normalization should be applied here but as the shift is small we don't do it to save ALU.
//normal = normalize(normal);
half nv = saturate(dot(normal, viewDir)); // TODO: this saturate should no be necessary here
#else
half nv = abs(dot(normal, viewDir)); // This abs allow to limit artifact
#endif
half nl = saturate(dot(normal, light.dir));
float nh = saturate(dot(normal, halfDir));
half lv = saturate(dot(light.dir, viewDir));
half lh = saturate(dot(light.dir, halfDir));
// Diffuse term--迪士尼的漫反射模型,看看高级的就是不一样啊,BRDF2的直接光的漫反射根本不考虑菲涅尔。
//这个漫反射直接入射,法线,视角,粗糙度各种相关
half diffuseTerm = DisneyDiffuse(nv, nl, lh, perceptualRoughness) * nl;
// Specular term
// HACK: theoretically we should divide diffuseTerm by Pi and not multiply specularTerm!
//其实应该是在漫反射项除以pi的,而不是像我们现在这样早高光像乘以了pi。这是因为以下两点
// BUT 1) that will make shader look significantly darker than Legacy ones
// BUT 1)这将比原来的材质看起来更暗
// and 2) on engine side "Non-important" lights have to be divided by Pi too in cases when they are injected into ambient SH
//and 2)引擎把“不重要”的灯除以Pi,然后注入球谐环境参数中
//其实呢就是,第一为了保证兼用,第二因为在不重要的灯光处理的时候,已经对灯光除了pi。
//计算粗糙度=perceptualRoughness*perceptualRoughness,可能是这样更接近真是效果
float roughness = PerceptualRoughnessToRoughness(perceptualRoughness);
#if UNITY_BRDF_GGX
// GGX with roughtness to 0 would mean no specular at all, using max(roughness, 0.002) here to match HDrenderloop roughtness remapping.
//GGX粗糙度为0意味着没有高光,限定最小0.002来匹配HDrenderloop粗糙度重塑。
roughness = max(roughness, 0.002);
//可见函数
half V = SmithJointGGXVisibilityTerm (nl, nv, roughness);
//法线分布项
float D = GGXTerm (nh, roughness);
#else
// Legacy---旧版本,默认不使用
half V = SmithBeckmannVisibilityTerm (nl, nv, roughness);
half D = NDFBlinnPhongNormalizedTerm (nh, PerceptualRoughnessToSpecPower(perceptualRoughness));
#endif
//计算高光系数,
half specularTerm = V*D * UNITY_PI; // Torrance-Sparrow model, Fresnel is applied later
# ifdef UNITY_COLORSPACE_GAMMA
specularTerm = sqrt(max(1e-4h, specularTerm));
# endif
// specularTerm * nl can be NaN on Metal in some cases, use max() to make sure it's a sane value
//避免负数
specularTerm = max(0, specularTerm * nl);
//是否打开反射,在shader面板开启或者关闭
#if defined(_SPECULARHIGHLIGHTS_OFF)
specularTerm = 0.0;
#endif
// surfaceReduction = Int D(NdotH) * NdotH * Id(NdotL>0) dH = 1/(roughness^2+1)
half surfaceReduction;
//计算衰减,用于间接光的衰减计算模拟
# ifdef UNITY_COLORSPACE_GAMMA
surfaceReduction = 1.0-0.28*roughness*perceptualRoughness; // 1-0.28*x^3 as approximation for (1/(x^4+1))^(1/2.2) on the domain [0;1]
# else
surfaceReduction = 1.0 / (roughness*roughness + 1.0); // fade \in [0.5;1]
# endif
// To provide true Lambert lighting, we need to be able to kill specular completely.
specularTerm *= any(specColor) ? 1.0 : 0.0;
//计算掠角
half grazingTerm = saturate(smoothness + (1-oneMinusReflectivity));
//拆开了看就是,间接光漫反射*物体本身漫反射颜色+物体本身漫反射颜色*灯光颜色*漫反射比例+高光比例*灯光
//颜色*菲涅尔效应颜色+衰减系数*间接光高光*间接光菲涅尔颜色
half3 color = diffColor * (gi.diffuse + light.color * diffuseTerm)
+ specularTerm * light.color * FresnelTerm (specColor, lh)
+ surfaceReduction * gi.specular * FresnelLerp (specColor, grazingTerm, nv);
return half4(color, 1);
}
inline float3 Unity_SafeNormalize(float3 inVec)
{
float dp3 = max(0.001f, dot(inVec, inVec));
return inVec * rsqrt(dp3);//rsqrt(x)=1 / sqrt(x),平方根的倒数,排除0向量?
}
SmithJointGGXVisibilityTerm
//
inline half SmithJointGGXVisibilityTerm (half NdotL, half NdotV, half roughness)
{

    half a = roughness;
    half lambdaV = NdotL * (NdotV * (1 - a) + a);
    half lambdaL = NdotV * (NdotL * (1 - a) + a);
    return 0.5f / (lambdaV + lambdaL + 1e-5f);
   }
引用公式:
遮挡关系计算,我们看下这个函数图,当:1.a为0.5,NdotL为0.5,2.a为0.1,NdotL为0.5 3.a为0.1,NdotL为0.01
由此可见遮挡关系相对于视角的数值分布。
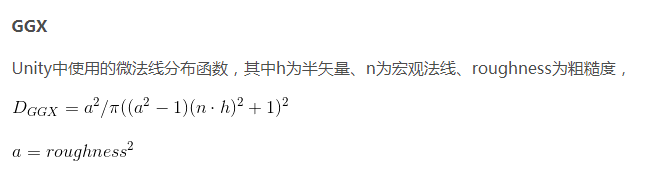
GGX
//GGX公式计算--
inline float GGXTerm (float NdotH, float roughness)
{
    float a2 = roughness * roughness;

    float d = (NdotH * a2 - NdotH) * NdotH + 1.0f;
    return UNITY_INV_PI * a2 / (d * d + 1e-7f); // This function is not intended to be running on Mobile,
}
公式: 
粗糙度为0,GGX为0,粗糙度为1,GGX为PI。啊?不应该是反着么?越粗糙高光越高?
真是吃了数学不好的亏,我们看下当d分别为0.01,0.5,0.8的时候,函数的分布图是怎么样的?(为了和
标准GGX公式做匹配,我是出了PI的,其实不会影响曲线轨迹)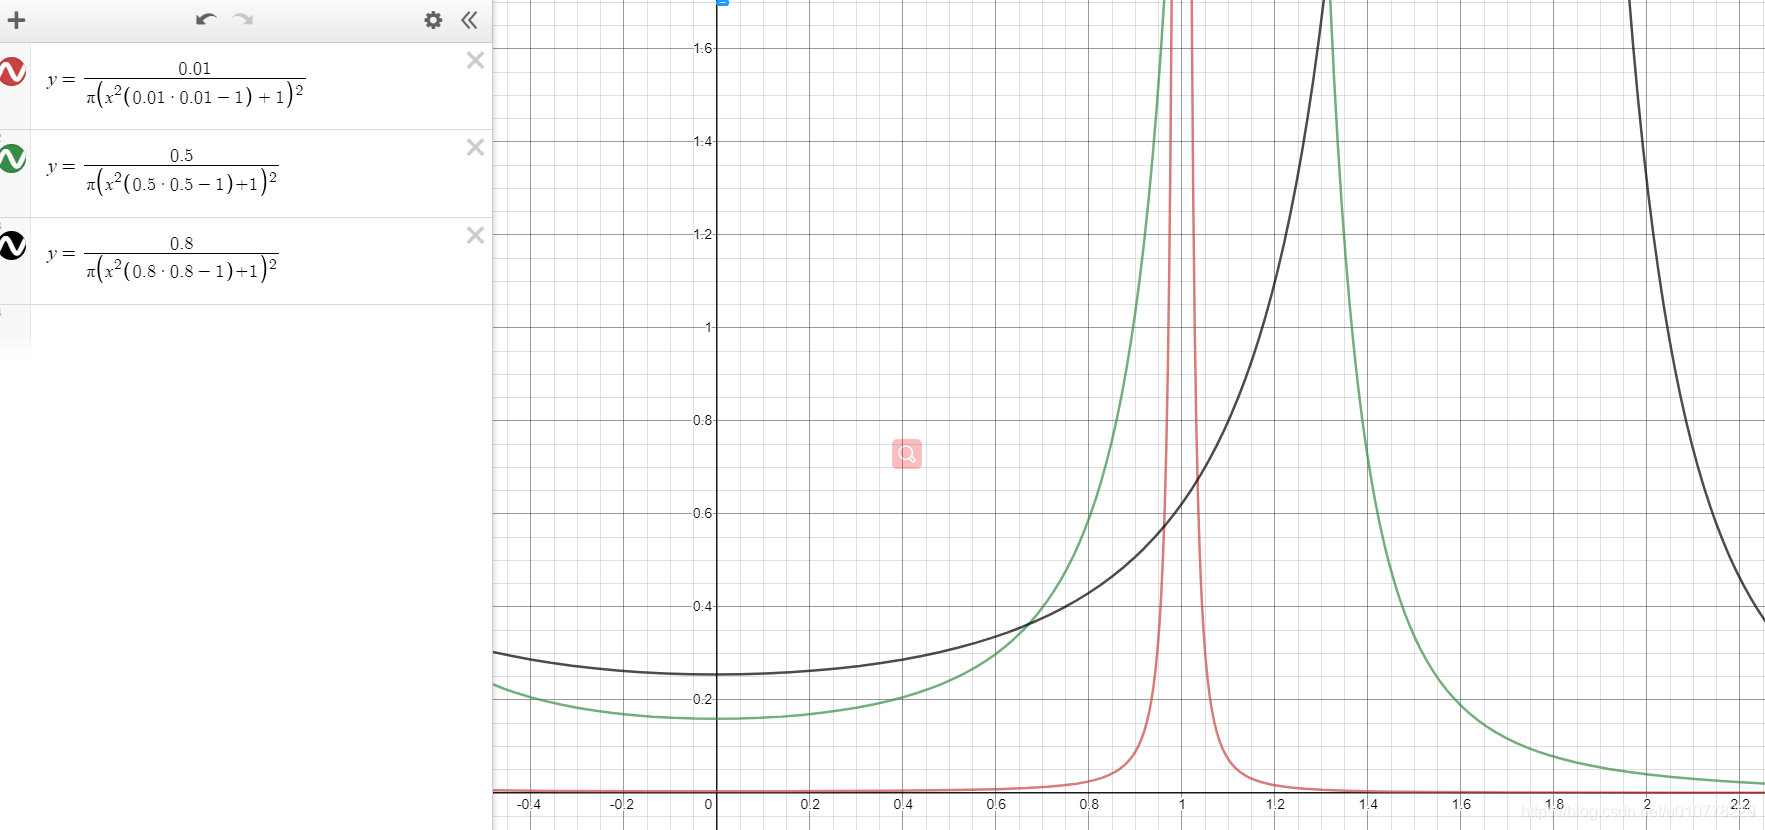
由此我们可以看出,粗糙度越高就越平滑,当粗糙度越低的时候,在接近0的时候会有较高的突变,这也是为什么粗糙度接近0时,高光的光斑会越来越小了。但是如果粗糙度为0会发生什么?纳尼,GGX为0了,不,这不可能个人认为粗糙度为0,使用GGX不符合能量守恒,只能无限接近,但不能为0,。所以上面有个粗糙度最小值为0.02,我也不知道这么理解对不对
总结
终于结束了,除了有点浪费时间,对自己还是有很大帮助的,自己回头看看这近4万的篇幅还是真的挺恶心人的,不过看一遍源码还是很舒服的。毕竟,做了这么久unity,还是主要以记笔记的方式做记录吧~~~这个系列打算继续做后续,一个是阴影,一个是制作自定义pbr,至于PBR原理部分暂时没有打算去做,比较普遍了。OK~走起。


 1718
1718


 被折叠的 条评论
为什么被折叠?
被折叠的 条评论
为什么被折叠?
 到【灌水乐园】发言


