


 本文详细解析了GFPGAN的工作原理,包括其结构、loss函数和代码实现,同时比较了GFPGAN与CodeFormer在人脸图像恢复方面的优劣。介绍了如何在SDWebui中集成GFPGAN,并讨论了两者在不同场景下的适用性。
目录
1. 效果展示
2. GFPGAN原理浅析和代码实现分析
3. SDWebui中使用
4. GFPGAN和CodeFormer对比
5. 参考资料
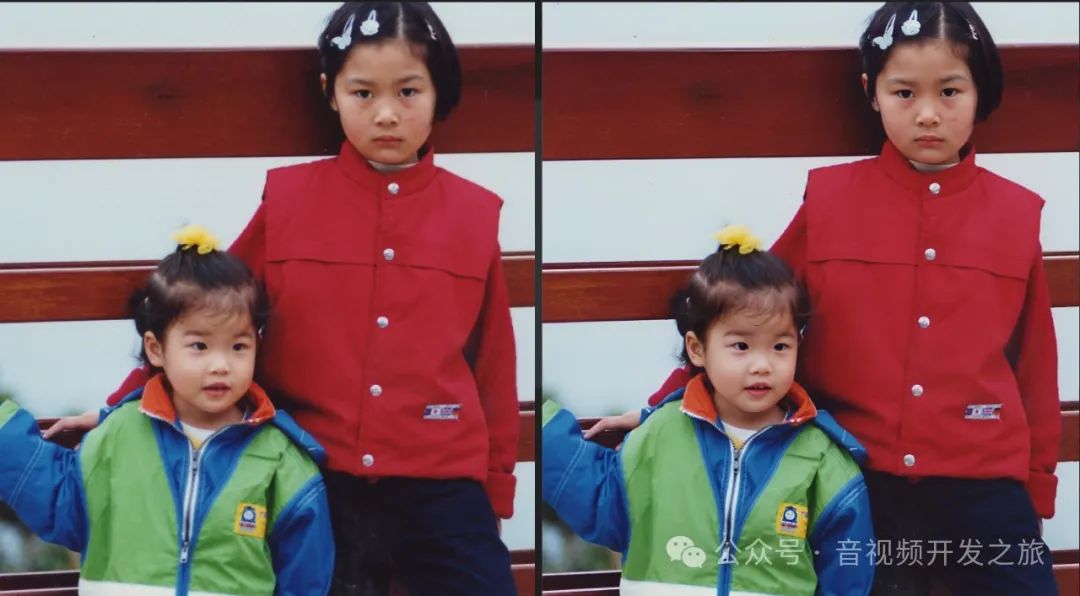
一、效果展示

二、GFPGAN原理浅析和代码实现分析
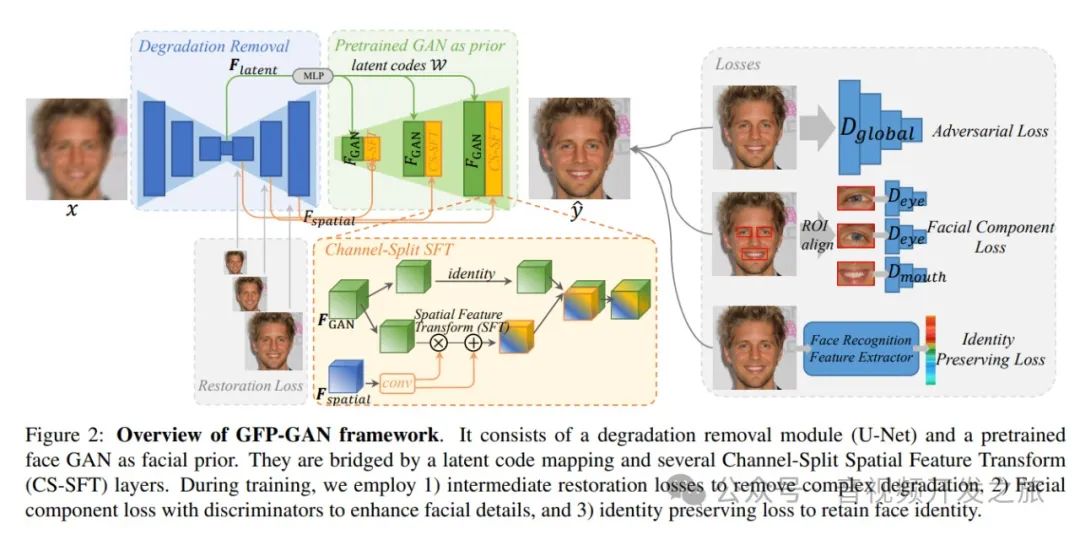
图片来源:https://arxiv.org/pdf/2101.04061.pdf
2.1 GFP-GAN框架概述
它由一个U-Net模块和一个预训练的人脸GAN模型组成。
GFP-GAN中为了保证人脸变清晰同时保持真实性,有四个loss
1. “Reconstruction Loss” 使用预训练的 VGG-19 网络来完成分辨率的增强
2. “Adversarial Loss” 使用 StyleGAN2 中类似的方法来生成逼真的纹理;
3. “Facial Component Loss” 为了让面部细节真实,使用辨别器单独生成和应用面部区块的补丁,特别处理了眼睛、嘴巴等局部细节;
4. “Identity Preserving Loss” 使用预训练的 ArcFace 模型,来帮助将原始图片中的身份特征恢复到 GFPGAN 生成的新图片中。
2.2 代码实现分析
2.2.1 模型加载
模型加载方面和CodeFormer基本一致:人脸检测模型retinaface_resnet50、背景超分模型realesrgan;以及人脸修复的GFPGAN模型
inference_gfpgan.py### 设置背景超分RealEsrGAN模型if args.bg_upsampler == 'realesrgan':from basicsr.archs.rrdbnet_arch import RRDBNetfrom realesrgan import RealESRGANermodel = RRDBNet(num_in_ch=3, num_out_ch=3, num_feat=64, num_block=23, num_grow_ch=32, scale=2)bg_upsampler = RealESRGANer(scale=2,model_path='https://github.com/xinntao/Real-ESRGAN/releases/download/v0.2.1/RealESRGAN_x2plus.pth',model=model,tile=args.bg_tile,tile_pad=10,pre_pad=0,half=True) # need to set False in CPU mode#### 设置GFPGAN模型arch = 'clean'channel_multiplier = 2model_name = 'GFPGANv1.4'url = 'https://github.com/TencentARC/GFPGAN/releases/download/v1.3.0/GFPGANv1.4.pth'model_path = os.path.join('experiments/pretrained_models', model_name + '.pth')restorer = GFPGANer(model_path=model_path,upscale=args.upscale,arch=arch,channel_multiplier=channel_multiplier,bg_upsampler=bg_upsampler)#gfpgan/utils.py 初始化人脸修复helper类(使用retinaface_resnet50模型) 提供人脸关键点检测、人脸裁剪对齐以及贴合原图等功能封装self.face_helper = FaceRestoreHelper(upscale,face_size=512,crop_ratio=(1, 1),det_model='retinaface_resnet50',save_ext='png',use_parse=True,device=self.device,model_rootpath='gfpgan/weights')
2.2.2 人脸修复
可以看到处理流程和CodeFormer完全一致:获取人脸5个关键点、对人脸进行摆正裁剪、进行人脸修复 最后把修复后的人脸贴回原图
input_img = cv2.imread(img_path, cv2.IMREAD_COLOR)#返回人脸裁剪后图片cropped_faces;人脸修复后图片restored_faces以及人脸修复后贴回原图的图片restored_imgcropped_faces, restored_faces, restored_img = restorer.enhance(input_img,has_aligned=args.aligned,only_center_face=args.only_center_face,paste_back=True,weight=args.weight)
restorer.enhance的实现在gfpgan/utils.py
self.face_helper.read_image(img)# 获取每个人脸的5个关键点self.face_helper.get_face_landmarks_5(only_center_face=only_center_face, eye_dist_threshold=5)#对人人脸进行摆正和裁剪处理self.face_helper.align_warp_face()#对人脸进行修复for cropped_face in self.face_helper.cropped_faces:# prepare datacropped_face_t = img2tensor(cropped_face / 255., bgr2rgb=True, float32=True)normalize(cropped_face_t, (0.5, 0.5, 0.5), (0.5, 0.5, 0.5), inplace=True)cropped_face_t = cropped_face_t.unsqueeze(0).to(self.device)try:output = self.gfpgan(cropped_face_t, return_rgb=False, weight=weight)[0]# convert to imagerestored_face = tensor2img(output.squeeze(0), rgb2bgr=True, min_max=(-1, 1))except RuntimeError as error:print(f'\tFailed inference for GFPGAN: {error}.')restored_face = cropped_facerestored_face = restored_face.astype('uint8')self.face_helper.add_restored_face(restored_face)#把修复后的人脸贴回原图if not has_aligned and paste_back:# upsample the backgroundif self.bg_upsampler is not None:# Now only support RealESRGAN for upsampling backgroundbg_img = self.bg_upsampler.enhance(img, outscale=self.upscale)[0]else:bg_img = Noneself.face_helper.get_inverse_affine(None)# paste each restored face to the input imagerestored_img = self.face_helper.paste_faces_to_input_image(upsample_img=bg_img)return self.face_helper.cropped_faces, self.face_helper.restored_faces, restored_img
三、SDWebui中使用
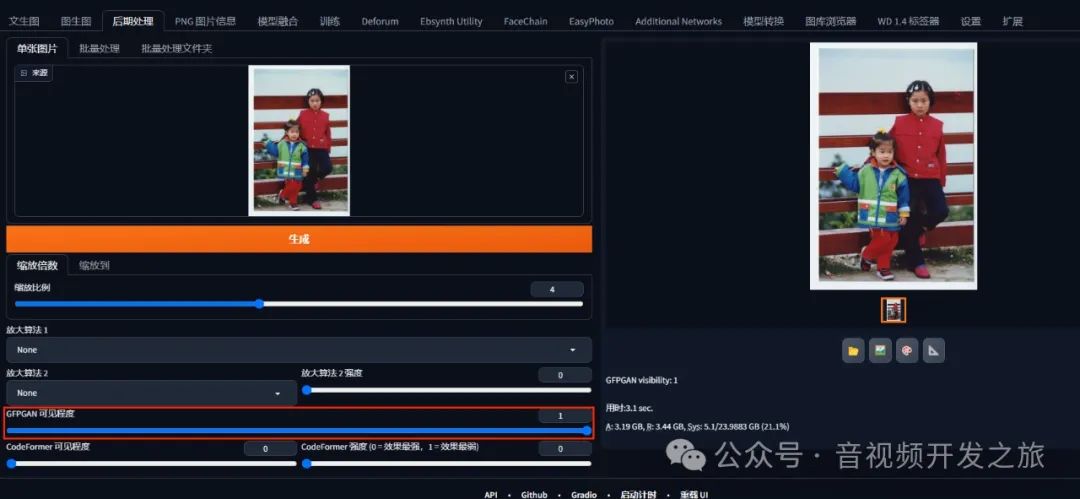
代码实现在 modules/gfpgan_model.py
#加载模型model_url = "https://github.com/TencentARC/GFPGAN/releases/download/v1.3.0/GFPGANv1.4.pth"models = modelloader.load_models(model_path, model_url, user_path, ext_filter="GFPGAN")#人脸修复cropped_faces, restored_faces, gfpgan_output_bgr = model.enhance(np_image_bgr, has_aligned=False, onl
四、GFPGAN和CodeFormer对比
GFP-GAN在处理严重退化和保持面部身份方面表现出色,适合于高质量人脸图像恢复。CodeFormer通过利用Transformer技术提供更自然的面部细节恢复,适合于要求高自然度和面部表情复原的应用
选择什么模型,结合自己的实际情况,如果需求对人脸还原保真度要求比较高,gfpgan效果稍微好点;如果追求更锐化的效果 可以使用CodeFormer。
当然每个算法模型都不是完美的,都会有badcase存在,比如下图中的舌头部分。
算法不能完全完美自动化时,人工审核还是有必要的

五、参考资料
1. GFPGAN论文 https://arxiv.org/abs/2101.04061
2.GFPGAN(论文简述)https://www.bilibili.com/video/BV1Hr4y1C7vK/?spm_id_from=333.337.search-card.all.click&vd_source=03a763fa6cf49b01f658f32592f5a6f3
3. Stable Diffusion 硬核生存指南:WebUI 中的 GFPGAN https://soulteary.com/2023/08/04/stable-diffusion-hardcore-survival-guide-gfpgan-in-webui.html
感谢你的阅读
接下来我们继续学习输出AIGC相关内容,欢迎关注公众号“音视频开发之旅”,一起学习成长。
欢迎交流


 460
460

 被折叠的 条评论
为什么被折叠?
被折叠的 条评论
为什么被折叠?
 到【灌水乐园】发言


