


框架介绍.
entitas是一个超快、超轻量的c# Entity-Component-System (ECS)框架,专门为Unity引擎设计。提供内部缓存和高速的组件访问,经过精心设计,可以在垃圾收集环境中最优地工作。
框架解析
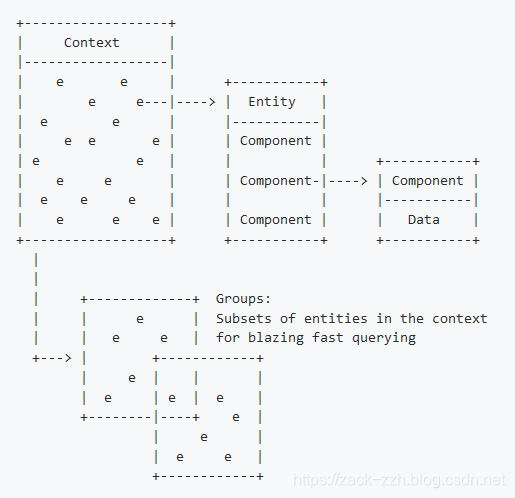
要理解框架,就需要知道这四种概念,分别是:Entiy实体、Context环境、Group组、Collector收集器。如图,在一个Context中,会有很多Entity,每个Entity都拥有若干Component,Component中只有数据,而Group是拥有相同Component的Entity集合,用于快速查找拥有特定属性的Entity。
Entity
Entity实体是保存数据的容器,用于表示应用程序中的某些对象。可以以IComponent的形式从实体中添加、替换或删除数据。实体有相应的事件来让你知道组件是否被添加、替换或删除。
Context
Context环境是用来创建和销毁entity的工厂,用它来过滤感兴趣的entity。
Group
Group支持对Context中的实体进行超级快速过滤。当实体发生变化时,它们会不断更新,并且可以立即返回实体组。假设有数千个实体,而你只想要那些具有PositionComponent的实体——只需为这个Group询问Context,就可以很方便的获得结果。
Collector
Collector 收集器提供了一种随时间变化对组中的更改作出反应的简单方法。它能很方便的汇总处理特定的Entity。
基本使用
Group
Group总是最新的,并且包含与指定匹配程序匹配的所有实体。每个环境都有一个特定的匹配器类型——如果在你的游戏环境中寻找实体(比如游戏实体),你需要使用GameMatcher
var context = contexts.game;

var movables = context.GetGroup(GameMatcher.Movable);
var count = movables.count; // count is 0, the group is empty

var entity1 = context.CreateEntity();
entity1.isMovable = true;
var entity2 = context.CreateEntity();
entity2.IsMovable = true;

count = movables.count; // count is 2, the group contains the entity1 and entity2

// GetEntities() always provides an up to date list
var movableEntities = movables.GetEntities();
foreach (var e in movableEntities) {
    // Do sth
}

entity1.Destroy();
entity2.Destroy();

count = movables.count; // count is 0, the group is empty
首先我们有一个Context(可以理解为一个存放当前Entity的池),然后每一个Entity都携带了很多个Component。Component里存放了所需要的Data。再往下可以看到一个Groups的概念,可以理解为根据不同的筛选需求将entity归属在不同的groups里,主要是方便查找。
但是Group毕竟是一个被动分组的过程,那么在运行时还需要有动态收集的需求,这个时候要用到两个东西一个叫Matcher(匹配器),一个叫Collector(收集器)。下面可以看一下用法:
Group:
Collector:
看起来这两个东西好似分不清楚用法,但可以这么理解:
Group收集的是当前带有特定组件(Position)的 Entity。而 Collector收集的是发生了变化的Entity。比如一个Entity失去了Position组件,或者一个Entity增加了Position。举个例子,比如我的MoveSystem所关心的是所有MoveComponent的Entity,那么我只要用Group收集就好了。如果一个单位因为中了陷阱或者被束缚、击晕等行为导致被移除了MoveComponent,那么我们就可以使用Collector去收集,然后根据原因作出表现。
Matcher
Matcher匹配器由代码生成器生成,可以组合。匹配器通常用于从感兴趣的上下文中获取实体组。需要在匹配器前加上你感兴趣的上下文名称(例如GameMatcher, InputMatcher等)。
var matcher = GameMatcher.Movable;

GameMatcher.AllOf(GameMatcher.Movable, GameMatcher.Position);

GameMatcher.AnyOf(GameMatcher.Move, GameMatcher.Position);

GameMatcher
    .AllOf(GameMatcher.Position)
    .AnyOf(GameMatcher.Health, GameMatcher.Interactive)
    .NoneOf(GameMatcher.Animating);
Systems
entitas中有四种Systems:
- IInitializeSystem: 只执行一次 (system.Initialize())
- IExecuteSystem: 每帧执行 (system.Execute())
- ICleanupSystem: 在其他系统完成后每一帧执行(system.Cleanup())
- ReactiveSystem: 当观察的group改变时执行(system.Execute(Entity[]))
public class MoveSystem : IExecuteSystem {
    public void Execute() {
        // Do sth
    }
}

public class CreateLevelSystem : IInitializeSystem {
    public void Initialize() {
        // Do sth
    }
}

public class RenderPositionSystem: ReactiveSystem<GameEntity> {

    public RenderPositionSystem(Contexts contexts) : base(contexts.Game) {

    }

    protected override Collector<GameEntity> GetTrigger(IContext<GameEntity> context) {
        return context.CreateCollector(GameMatcher.Position);
    }

    protected override bool Filter(GameEntity entity) {
        // check for required components (here it is position and view)
        return entity.hasPosition && entity.hasView;
    }

    protected override void Execute(List<GameEntity> entities) {
        foreach (var e in entities) {
            // do stuff to the matched entities
            e.view.gameObject.transform.position = e.position.position;
        }
    }
}
最后需要注意的是,需要创建一个管理System的System,因为一个游戏开发过程中,不可能只有一个System的,为了方便管理,便有了【Feature】System的概念。这个类要继承Feature,在构造器里Add所有System进去。Feature就像一个管理System的SystemManager。
var systems = new Systems(contexts)
    .Add(new CreateLevelSystem(contexts))
    .Add(new UpdateBoardSystem(contexts))
    .Add(new MoveSystem(contexts))
    .Add(new RenderPositionSystem(contexts));

// Call once on start
systems.Initialize();

// Call every frame
systems.Execute();
System详解
总共有上述四种Systems,在实际开发中,需要为应用程序中的每个任务或行为创建systems,并按照定义的顺序执行它们。
InitializeSystem
InitializeSystem在程序开始时运行一次。它实现接口IInitializeSystem,后者定义了Initialize()方法。这是您设置初始游戏状态的地方,类似于Unity的Start()方法。
using Entitas;

public class MyInitSystem : IInitializeSystem {

    public void Initialize() {
        // Initialization code here
    }

}
ExecuteSystem
ExecuteSystem每帧执行一次。它实现接口IExecuteSystem,接口定义了Execute()方法。这是放置需要每帧执行的代码的地方,类似于Unity的Update()方法。
using Entitas;

public class MyExecSystem : IExecuteSystem {

    public void Execute() {
        // per-frame code goes here
    }

}
CleanupSystem
在所有其他systems完成它们的工作之后,CleanupSystem在每个帧的末尾运行。它实现了接口ICleanupSystem,接口定义了方法Cleanup()。如果想要创建只存在于一帧的实体,那么这个工具非常有用。
public class MyCleanupSystem : ICleanupSystem {

    public void Cleanup() {
        // cleanup code here
        // runs after every execute and reactive system has completed
    }

}
ReactiveSystem
ReactiveSystem在底层是使用了group观察者。通过它,你可以轻而易举的拥有发生改变的你感兴趣的实体。假设你在战场上有100个战斗单位,但是只有10个单位改变了他们的位置。不使用普通的IExecuteSystem,根据位置更新所有100个视图,您可以使用IReactiveSystem,它只更新10个更改单元的视图。所以效率很高。与其他system不同,ReactiveSystem继承自基类ReactiveSystem,而不是实现接口。entitas为游戏中的每个context生成一个实体类型。如果您的context是Game, GameState and Input,那么将生成三种类型:GameEntity、GameStateEntity和InputEntity。
ReactiveSystem要求提供它们响应的特定context和关联实体类型。基类定义了一些必须实现的抽象方法。首先,须创建一个构造函数,该构造函数调用基构造函数并为其提供适当的context。必须重写3个方法
GetTrigger()返回一个Collector收集器,它告诉system要响应什么事件。
Filter()对collector收集器返回的实体执行最后检查,确保它们在对每个实体调用Execute()之前都附加了所需的组件。
Execute()是游戏逻辑的主要位置。需要注意的是:不应该尝试将ReactiveSystem和ExecuteSystem相结合,只需将ReactiveSystem看作是ExecuteSystem的一种特殊情况。所有其他接口都可以混合使用。
using System.Collections.Generic;
using Entitas;

public class MyReactiveSystem : ReactiveSystem<MyContextEntity> {

    public MyReactiveSystem (Contexts contexts) : base(contexts.MyContext) {
        // pass the context of interest to the base constructor
    }

    protected override ICollector<MyContextEntity> GetTrigger(IContext<MyContextEntity> context) {
        // specify which component you are reacting to
        // return context.CreateCollector(MyContextMatcher.MyComponent);

        // you can also specify which type of event you need to react to
        // return context.CreateCollector(MyContextMatcher.MyComponent.Added()); // the default
        // return context.CreateCollector(MyContextMatcher.MyComponent.Removed());
        // return context.CreateCollector(MyContextMatcher.MyComponent.AddedOrRemoved());

        // combine matchers with AnyOf and AllOf
        // return context.CreateCollector(LevelMatcher.AnyOf(MyContextMatcher.Component1, MyContextMatcher.Component2));

        // use multiple matchers
        // return context.CreateCollector(LevelMatcher.MyContextMatcher, MyContextMatcher.Component2.Removed());

        // or any combination of all the above
        // return context.CreateCollector(LevelMatcher.AnyOf(MyContextMatcher.Component1, MyContextMatcher.Component2),
        //                                LevelMatcher.Component3.Removed(),
        //                                LevelMatcher.AllOf(MyContextMatcher.C4, MyContextMatcher.C5).Added());
    }

    protected override bool Filter(MyContextEntity entity) {
        // check for required components
    }

    protected override void Execute(List<MyContextEntity> entities) {
        foreach (var e in entities) {
            // do stuff to the matched entities
        }
    }
}
要响应来自多个context的实体的更改,需要使用multi-reactive system(多响应系统)。首先,需要声明一个接口,该接口将组合来自具有相同组件的多个context的实体,并且需要通过部分类为实体类实现该接口。然后创建从MultiReactiveSystem继承的系统,并传递新接口。
public interface PositionViewEntity : IEntity, IPosition, IView {}

public partial class EnemyEntity : PositionViewEntity {}
public partial class ProjectileEntity : PositionViewEntity {}


public class ViewSystem : MultiReactiveSystem<PositionViewEntity, Contexts> {

    public ViewSystem(Contexts contexts) : base(contexts) {}

    protected override ICollector[] GetTrigger(Contexts contexts) {
        return new ICollector[] {
            contexts.Enemy.CreateCollector(EnemyMatcher.Position),
            contexts.Projectile.CreateCollector(ProjectileMatcher.Position)
        };
    }

    protected override bool Filter(PositionViewEntityentity) {
        return entity.hasView && entity.hasPosition;
    }

    protected override void Execute(List<PositionViewEntity> entities) {
        foreach(var e in entities) {
            e.View.transform.position = e.Position.value;
        }
    }
}
Features
entitas为提供了Features来组织你的system。使用Features将相关system组合在一起。这有一个额外的好处,就是可以在Unity层次结构中为你的system分离可视化调试对象。现在可以在逻辑组中检查它们,而不是一次检查所有。
Feature还可以帮助你在项目中执行更广泛的范例规则。功能的执行顺序由添加它们的顺序决定,把你的系统分成InputSystems: Feature, GameLogicSystems: Feature和RenderingSystems: Feature,然后按照这个顺序初始化它们,确保游戏逻辑不会被干扰。
Feature要求实现构造函数。使用Add()方法向Feature添加system。这里添加它们的顺序定义了它们在运行时的执行顺序。可以在GameController中使用Feature将systems组实例化。
using Entitas;

public class InputSystems : Feature
{
    public InputSystems(Contexts contexts) : base("Input Systems")
    {
        // order is respected
        Add(new EmitInputSystem(contexts));
        Add(new ProcessInputSystem(contexts));
    }
}
在你的GameController中:
Systems createSystems(Contexts contexts) {

     // order is respected
     return new Feature("Systems")

         // Input executes first
         .Add(new InputSystems(contexts))
         // Update
         .Add(new GameBoardSystems(contexts))
         .Add(new GameStateSystems(contexts))
         // Render executes after game logic
         .Add(new ViewSystems(contexts))
         // Destroy executes last
         .Add(new DestroySystem(contexts));
}
entitas中的Attributes
Code Generator(代码生成器)目前支持与类、接口和结构一起使用的以下特性:
- [Context]: 可以使用此特性使组件仅在指定的context中可用;例如 [MyContextName], [Enemies], [UI]....提高内存占用。它还可以创建组件。
- [Unique]: 代码生成器将提供额外的方法,以确保最多存在一个具有该组件的实体。
- [FlagPrefix]:仅可用于支持标记组件的自定义前缀。
- [PrimaryEntityIndex]: 可用于将实体限制为唯一的组件值。
- [EntityIndex]: 可用于搜索具有组件值的实体。
- [CustomComponentName]: 为一个类或接口生成具有不同名称的多个组件。
- [DontGenerate]: 代码生成器不会使用此属性处理组件。
- [Cleanup]: 代码生成器将生成删除组件或销毁实体的系统。
这些特性的具体使用可以参考https://github.com/sschmid/Entitas-CSharp/wiki/Attributes
Code Generator代码生成
code generator是entitas框架的一大特色,可以让我们在开发时少写一些代码,在unity编辑器project面板中,Generated目录下都是自动生成的文件,不要去修改它们。
官方文档中介绍说可以自定义以及扩展code generator,让codegenerator更好的为我们服务,这一点我暂时没有去尝试。
个人看法
以下是个人愚见,如有错误欢迎指正。
优点:
- 遵循这个框架的规则去写代码,代码结构清晰。
- ECS这种模式,耦合度就很低,所有的游戏物体都是组件的组合而已,可扩展性强,通过合理组合component就能配置出一个新的游戏物体。
- 很方便的管理所有实体状态,entitas提供了类似状态机的功能,当感兴趣的某个属性发生变化时,能在System中很方便的做出响应,不管什么状态,都能很方便的做出对应处理。
- unity本身的开发模式就类似ECS,unity2018更是推出了最新的ECS框架,entitas很符合这种开发模式
- entitas自开源以来,一直在更新维护,并受到了unity官方的认可,在unite大会上都有提到。所以,这个框架还是很靠谱的。
缺点:
- 国内资料少,上手难度高。国内用这个框架开发的特别少,遇到问题需要自己爬坑。
- 不适合小项目。小项目用entitas反而麻烦
- entitas更新太快,官方wiki文档更新没有跟上,比如,我在看官方Demo-MatchOne的时候,有个Event的Attribute, wiki上暂时还没有这个的
- 代码热更方面是个问题, entitas基本对unity开发定了一套完整的规则,特别是有Code Generate,如果项目发布后想要更新加入新的代码会很麻烦,官方对此也没有说明,目前好像也没有人分享在entitas中加入lua热更的功能


 1625
1625


 被折叠的 条评论
为什么被折叠?
被折叠的 条评论
为什么被折叠?
 到【灌水乐园】发言


