


一、安装torch
$ curl -s https://raw.githubusercontent.com/torch/ezinstall/master/install-deps | bash
$ git clone https://github.com/torch/distro.git ~/torch --recursive
$ cd ~/torch
$ ./install.sh # and enter "yes" at the end to modify your bashrc
$ source ~/.bashrc
如果上述方式不行,可以试如下方法:
sudo apt-get install curl
# 2.Install the basic package dependencies that LuaJIT and Torch require.
这个没什么说的,搞定以后,你会在你的额bashrc文件下看到类似这样的一行:
卸载torch. /home/work-station/torch/install/bin/torch-activate
rm -rf ~/torch
$ luarocks install nn
$ luarocks install nngraph
$ luarocks install image
三、安装cjson
******************************************************************************************************
CUDA6.5安装
******************************************************************************************************
$ sudo chmod +x ./ cuda_6.5.14_linux_64.run
将CUDA6.5解压成三个文件($sudo sh cuda*.run --noexec --target .)(.前面有空格)
分别为:
CUDA安装包: cuda-linux64-rel-6.5.14-18749181.run
NVIDIA驱动: NVIDIA-Linux-x86_64-340.29.run
SAMPLE包: cuda-samples-linux-6.5.14-18745345.run
(这里就不安装NVIDIA驱动)
开始安装CUDA,
$ sudo ./cuda-linux64-rel-6.5.14-18749181.run
安装完成后需要在/etc/profile中
①添加环境变量,
PATH=/usr/local/cuda-6.5/bin:$PATH$ export PATH
LD_LIBRARY_PATH=/usr/local/cuda-6.5/lib64:$LD_LIBRARY_PATH$ export LD_LIBRARY_PATH
保存后, 执行下列命令, 使环境变量立即生效
$source /etc/profile
②添加lib路径,
在/etc/ld.so.conf.d/新建文件cuda.conf,并编辑
cd /etc/ld.so.conf.d
$ sudo touch cuda.conf
$ sudo gedit cuda.conf
/usr/local/cuda-6.5/lib64
执行下列命令使之立刻生效
$ sudo ldconfig
继续,安装CUDA SAMPLE,安装下列依赖包
$sudo apt-get install freeglut3-dev build-essential libx11-dev libxmu-dev libxi-dev libgl1-mesa-glx libglu1-mesa libglu1-mesa-dev
然后用下述命令安装sample文件
$sudo ./cuda-samples-linux-6.5.14-18745345.run
完成后编译Sample文件,更若干分钟后
$ cd /usr/local/cuda-6.5/samples
$ sudo make
编译完成后, 进入 samples/bin/x86_64/linux/release
$ sudo ./deviceQuery
如果出现下列显卡信息,则驱动及cuda安装成功:./deviceQuery Starting...
CUDA Device Query (Runtime API) version (CUDART static linking)
Detected 1 CUDA Capable device(s)
Device 0: "GeForce GTX 750 Ti"
CUDA Driver Version / Runtime Version 6.5 / 6.5
CUDA Capability Major/Minor version number: 5.0
Total amount of global memory: 2048 MBytes (2147155968 bytes)
( 5) Multiprocessors, (128) CUDA Cores/MP: 640 CUDA Cores
GPU Clock rate: 1084 MHz (1.08 GHz)
Memory Clock rate: 2700 Mhz
Memory Bus Width: 128-bit
L2 Cache Size: 2097152 bytes
Maximum Texture Dimension Size (x,y,z) 1D=(65536), 2D=(65536, 65536), 3D=(4096, 4096, 4096)
Maximum Layered 1D Texture Size, (num) layers 1D=(16384), 2048 layers
Maximum Layered 2D Texture Size, (num) layers 2D=(16384, 16384), 2048 layers
Total amount of constant memory: 65536 bytes
Total amount of shared memory per block: 49152 bytes
Total number of registers available per block: 65536
Warp size: 32
Maximum number of threads per multiprocessor: 2048
Maximum number of threads per block: 1024
Max dimension size of a thread block (x,y,z): (1024, 1024, 64)
Max dimension size of a grid size (x,y,z): (2147483647, 65535, 65535)
Maximum memory pitch: 2147483647 bytes
Texture alignment: 512 bytes
Concurrent copy and kernel execution: Yes with 1 copy engine(s)
Run time limit on kernels: Yes
Integrated GPU sharing Host Memory: No
Support host page-locked memory mapping: Yes
Alignment requirement for Surfaces: Yes
Device has ECC support: Disabled
Device supports Unified Addressing (UVA): Yes
Device PCI Bus ID / PCI location ID: 1 / 0
Compute Mode:
< Default (multiple host threads can use ::cudaSetDevice() with device simultaneously) >
deviceQuery, CUDA Driver = CUDART, CUDA Driver Version = 6.5, CUDA Runtime Version = 6.5, NumDevs = 1, Device0 = GeForceGTX 750 Ti
Result = PASS
五、安装cuda相关的包
Then get the cutorch and cunnpackages:
$ luarocks install cutorch
$ luarocks install cunn
tar -xzvf cudnn-6.5-linux-R1.tgz
cd cudnn-6.5-linux-R1
sudo cp lib* /usr/local/cuda/lib64/
sudo cp cudnn.h /usr/local/cuda/include/
执行后发现还是找不到库, 报错
error while loading shared libraries: libcudnn.so.6.5: cannot open shared objectfile: No such file or directory
而lib文件夹是在系统路径里的,用ls -al发现是文件权限的问题,因此用下述命令先删除软连接
cd /usr/local/cuda/lib64/
sudo rm -rf libcudnn.so libcudnn.so.6.5
然后修改文件权限,并创建新的软连接
sudo chmod u=rwx,g=rx,o=rx libcudnn.so.6.5.18
sudo ln -sf libcudnn.so.6.5.18 libcudnn.so.6.5
sudo ln -sf libcudnn.so.6.5 libcudnn.so
以下是装过caffe后出现的问题:
我当时就是在这个位置出问题的,我的机子之前安装caffe的时候安装过cuda和cudnn,我把所有的都安装完,开始跑示例的时候,这个时候出错了:
These bindings are for version 4005 or above, while the loaded CuDNN is version: 4004
Are you using an older version of CuDNN?
意思很明显,就是cudnn版本低了
好吧,开始版本升级中,中间参照了这个帖子,但是依然没解决我的问题,最后终于让我搞定了,特此记录
这是cudnn与torch相关的内容(具体是什么我也不清楚)Step 1:删除/usr/local/lib/下的所有以libcudnn开头的so文件和链接文件,比如libcudnn.so.7.0.58
Step 2:下载最新版本的cudnn,下载地址最后给出,首先要注册,过几天Nvidia才会给你下载权限
Step 3:假设你已经下载了最新版本的cudnn,假设是* cudnn-7.0-linux-x64-v4.0-prod.tgz*,不说了解压,进入cuda目录,执行:$ sudo cp include/* /usr/local/cuda/include/
$sudo cp lib64/* /usr/local/cuda/lib64/
搞定
sudo apt-get install libhdf5-serial-dev hdf5-tools
git clone git@github.com:deepmind/torch-hdf5.git
#如果上面这句代码下载有问题,可以换成这句代码git clone https://github.com/deepmind/torch-hdf5
cd torch-hdf5
luarocks make hdf5-0-0.rockspec LIBHDF5_LIBDIR="/usr/lib/x86_64-linux-gnu/"安装h5py已经pip的情况下:$ sudo pip install h5py
(可跳过)未能安装pip的情况下:
$ sudo apt-get install python-pip python-dev build-essential
$ sudo pip install --upgrade pip
$ sudo pip install --upgrade virtualenv
$ sudo pip install h5py
(可跳过)如果pip安装不成功可以试试下面安装pip的方法:
wget https://bootstrap.pypa.io/get-pip.py --no-check-certificate
sudo python get-pip.py八、下载已有模型,对数据进行预测模型下载地址(具体下载地址:http://cs.stanford.edu/people/karpathy/neuraltalk2/checkpoint_v1.zip),下载解压就可以
准备好你的图片,之后执行:
th eval.lua -model /path/to/model -image_folder /path/to/image/directory -num_images 10
有可能出现如下问题:
user@user-XPS-8500:~/neural-style$ th neural_style.lua -gpu 0 -backend cudnn
nil
/home/user/torch/install/bin/luajit: /home/user/torch/install/share/lua/5.1/trepl/init.lua:384: /home/ben/torch/install/share/lua/5.1/trepl/init.lua:384: /home/user/torch/install/share/lua/5.1/cudnn/ffi.lua:1279: 'libcudnn (R4) not found in library path.
Please install CuDNN from https://developer.nvidia.com/cuDNN
Then make sure files named as libcudnn.so.4 or libcudnn.4.dylib are placed in your library load path (for example /usr/local/lib , or manually add a path to LD_LIBRARY_PATH)
stack traceback:
[C]: in function 'error'
/home/user/torch/install/share/lua/5.1/trepl/init.lua:384: in function 'require'
neural_style.lua:64: in function 'main'
neural_style.lua:500: in main chunk
[C]: in function 'dofile'
.../user/torch/install/lib/luarocks/rocks/trepl/scm-1/bin/th:145: in main chunk
[C]: at 0x00406670
user@user-XPS-8500:~/neural-style$
我的解决方案是,执行如下代码:luarocks install cudnn
写上你的model文件的路径和图片文件夹的路径,如果你想预测所有的图片将:
-num_images 10 改为-num_images -1
启动httpServer
预测之后会在你的vis文件夹下生成vis.json文件在imgs中会有你预测的图片:
![]()
启动server:
$ cd vis
$ python -m SimpleHTTPServer
浏览器访问:
localhost:8000,就可以看见了
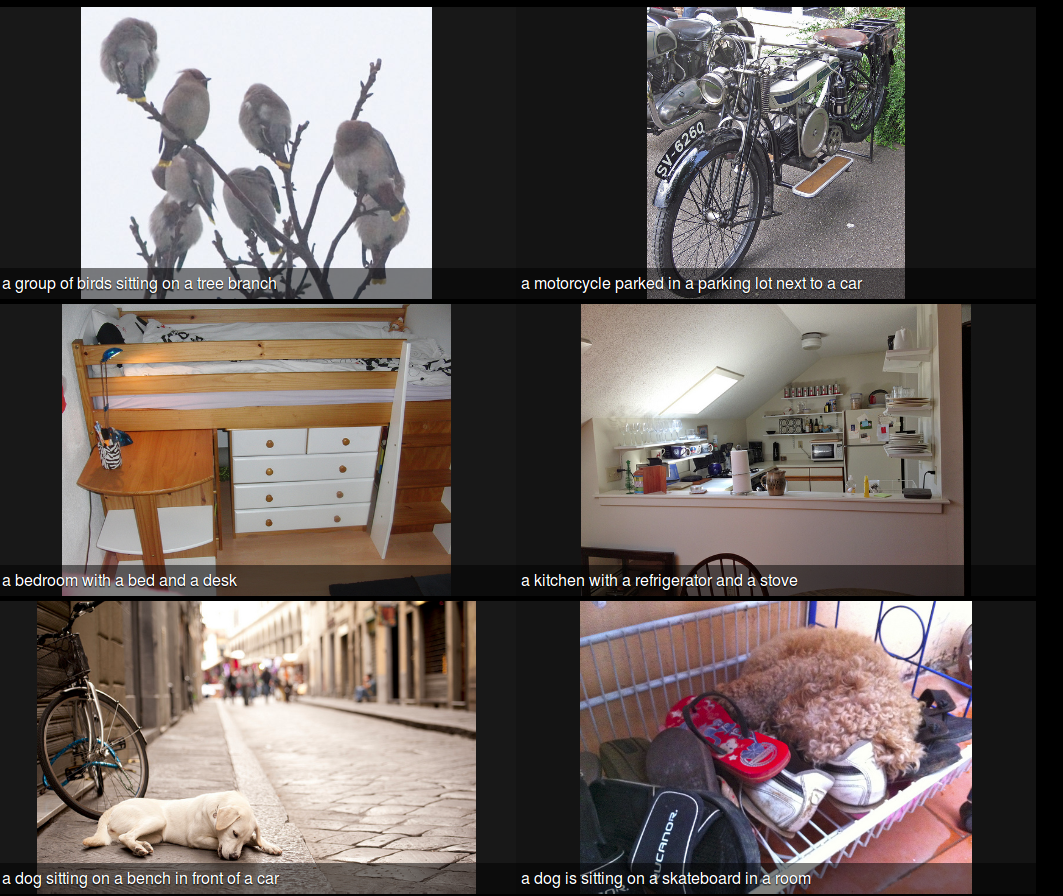
我的结果
我随机从百度上下了6个图片,预测结果是这样的:


 1万+
1万+

 被折叠的 条评论
为什么被折叠?
被折叠的 条评论
为什么被折叠?
 到【灌水乐园】发言


