


a color buffer for writing color values,
a depth buffer to write and test depth information
a stencil buffer that allows us to discard certain fragments based on some condition.
这些缓冲区的组合,存储在 GPU 内存中的某处,称为Framebuffer帧缓冲区
之前所做的渲染操作都是在附加到默认Framebuffer上的renderbuffer之上完成的
基础知识:
1.FrameBuffer的完整性
- We have to attach at least one buffer (color, depth or stencil buffer).(至少关联一个buffer)
- There should be at least one color attachment.(至少关联一个color buffer)
- All attachments should be complete as well (reserved memory).(所有关联对象都需要运转完好)
- Each buffer should have the same number of samples.(所有buffer需要有同样数量的采样)
2.off-screen rendering(离屏渲染)
当前的帧缓冲区不是默认的帧缓冲区,因此渲染命令不会影响窗口的视觉输出
3.Texture attachments (纹理附着)
将一个特定的纹理附加到帧缓冲区时,所有渲染命令都将东西写入这个特殊的纹理,就像它是普通颜色/深度或模板缓冲区一样。 使用纹理的优点是渲染输出会存储在纹理图像中,然后我们可以轻松地在着色器中使用它。
The glFrameBufferTexture2D function has the following parameters:
target: the framebuffer type we're targeting (draw, read or both).attachment: the type of attachment we're going to attach. Right now we're attaching a color attachment. Note that the0at the end suggests we can attach more than 1 color attachment. We'll get to that in a later chapter.textarget: the type of the texture you want to attach.texture: the actual texture to attach.level: the mipmap level. We keep this at0.
在颜色附着旁边,我们还可以将深度和模板纹理附加到帧缓冲区对象。 要附加深度附件,我们将附件类型指定为 GL_DEPTH_ATTACHMENT。 请注意,纹理的格式和内部格式类型应变为 GL_DEPTH_COMPONENT 以反映深度缓冲区的存储格式。 要附加模板缓冲区,您使用 GL_STENCIL_ATTACHMENT 作为第二个参数并将纹理的格式指定为 GL_STENCIL_INDEX。
4.Renderbuffer object attachments(渲染缓冲区)
渲染缓冲区对象是一个实际的缓冲区,例如 字节、整数、像素或其他任何内容的数组。 但是,无法直接读取渲染缓冲区对象。 这赋予了它额外的优势,即 OpenGL 可以进行一些内存优化,从而使其在屏幕外渲染到帧缓冲区的纹理方面具有性能优势。(可能是压缩了,所以不能直接读取)
Renderbuffer 对象将所有渲染数据直接存储到它们的缓冲区中,而无需任何转换为特定于纹理的格式,从而使它们作为可写存储介质更快。 您无法直接读取它们,但可以通过慢速 glReadPixels 读取它们。 这从当前绑定的帧缓冲区返回指定的像素区域,但不直接从附件本身返回。
因为它们的数据是原始格式,所以在写入数据或将数据复制到其他缓冲区时速度非常快。 因此,在使用渲染缓冲区对象时,诸如切换缓冲区之类的操作非常快。 我们在每一帧结束时使用的 glfwSwapBuffers 函数也可以用渲染缓冲区对象实现:我们只需写入渲染缓冲区图像,然后在最后交换到另一个图像。 Renderbuffer 对象非常适合此类操作。
由于渲染缓冲区对象是只写的,因此它们通常用作深度和模板附着,因为大多数时候我们并不真正需要从它们读取值,但我们确实关心深度和模板测试。 我们需要深度和模板值进行测试,但不需要对这些值进行采样,因此渲染缓冲区对象非常适合这一点。 当我们不从这些缓冲区中采样时,通常首选渲染缓冲区对象。
如果您需要从特定缓冲区(如颜色或深度值)中采样数据,则应改用Texture Attachmentts纹理附件。
5.Rendering to a texture(渲染一个贴图纹理)
    // framebuffer configuration
    // 初始化配置
    // -------------------------
    unsigned int framebuffer;
    glGenFramebuffers(1, &framebuffer);
    glBindFramebuffer(GL_FRAMEBUFFER, framebuffer);
    // create a color attachment texture
    // 创建一个颜色贴图附着
    unsigned int textureColorbuffer;
    glGenTextures(1, &textureColorbuffer);
    glBindTexture(GL_TEXTURE_2D, textureColorbuffer);
    glTexImage2D(GL_TEXTURE_2D, 0, GL_RGB, SCR_WIDTH, SCR_HEIGHT, 0, GL_RGB, GL_UNSIGNED_BYTE, NULL);
    glTexParameteri(GL_TEXTURE_2D, GL_TEXTURE_MIN_FILTER, GL_LINEAR);
    glTexParameteri(GL_TEXTURE_2D, GL_TEXTURE_MAG_FILTER, GL_LINEAR);
    glFramebufferTexture2D(GL_FRAMEBUFFER, GL_COLOR_ATTACHMENT0, GL_TEXTURE_2D, textureColorbuffer, 0);
Post-processing (后期处理)
1.Inversion(反向)
void main()
{
    FragColor = vec4(vec3(1.0 - texture(screenTexture, TexCoords)), 1.0);
}
2.Grayscale(灰度)
所有rgb都变成一样的,实际显示出来就是灰色的了
void main()
{
    FragColor = texture(screenTexture, TexCoords);
    float average = (FragColor.r + FragColor.g + FragColor.b) / 3.0;
    FragColor = vec4(average, average, average, 1.0);
}
适配眼睛之后
void main()
{
FragColor = texture(screenTexture, TexCoords);
float average = 0.2126 * FragColor.r + 0.7152 * FragColor.g + 0.0722 * FragColor.b;
FragColor = vec4(average, average, average, 1.0);
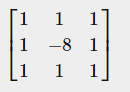
} 3.Kernel effects(内核效果,锐化)
//一个片元代表的偏移值
const float offset = 1.0 / 300.0;

void main()
{
    //定义当前片元,上下左右相邻片元位置
    vec2 offsets[9] = vec2[](
        vec2(-offset,  offset), // top-left
        vec2( 0.0f,    offset), // top-center
        vec2( offset,  offset), // top-right
        vec2(-offset,  0.0f),   // center-left
        vec2( 0.0f,    0.0f),   // center-center
        vec2( offset,  0.0f),   // center-right
        vec2(-offset, -offset), // bottom-left
        vec2( 0.0f,   -offset), // bottom-center
        vec2( offset, -offset)  // bottom-right
    );

    //上下左右片元的加权
    float kernel[9] = float[](
        -1, -1, -1,
        -1,  9, -1,
        -1, -1, -1
    );
    //把上下左右片元的颜色,叠加到当前片元中来
    vec3 sampleTex[9];
    for(int i = 0; i < 9; i++)
    {
        sampleTex[i] = vec3(texture(screenTexture, TexCoords.st + offsets[i]));
    }
    vec3 col = vec3(0.0);
    for(int i = 0; i < 9; i++)
        col += sampleTex[i] * kernel[i];

    FragColor = vec4(col, 1.0);
} 
4.Blur (模糊)
对周围的片元,进行如下公式的平均化处理,比如上方片元权重为2,左边片元权重为2
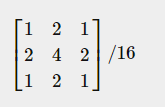
float kernel[9] = float[](
    1.0 / 16, 2.0 / 16, 1.0 / 16,
    2.0 / 16, 4.0 / 16, 2.0 / 16,
    1.0 / 16, 2.0 / 16, 1.0 / 16
);
5.Edge detection (边缘检测)
代码分析
1.实现一个平面显示所有场景
    // create a renderbuffer object for depth and stencil attachment (we won't be sampling these)
    //创建一个renderbuffer 对象,用于depth和stencil
    unsigned int rbo;
    glGenRenderbuffers(1, &rbo);
    glBindRenderbuffer(GL_RENDERBUFFER, rbo);
    glRenderbufferStorage(GL_RENDERBUFFER, GL_DEPTH24_STENCIL8, SCR_WIDTH, SCR_HEIGHT); // use a single renderbuffer object for both a depth AND stencil buffer.
    glFramebufferRenderbuffer(GL_FRAMEBUFFER, GL_DEPTH_STENCIL_ATTACHMENT, GL_RENDERBUFFER, rbo); // now actually attach it
    // now that we actually created the framebuffer and added all attachments we want to check if it is actually complete now
    if (glCheckFramebufferStatus(GL_FRAMEBUFFER) != GL_FRAMEBUFFER_COMPLETE)
        cout << "ERROR::FRAMEBUFFER:: Framebuffer is not complete!" << endl;

    //创建了rander buffer 把它设定为主framebuffer
glBindFramebuffer(GL_FRAMEBUFFER, 0);左侧是开启颜色,右侧是关闭颜色,由于使用render buffer渲染到一个平面上,故能看到的矩形就只有一个了

2.后视镜效果
创建texture的render buffer,并把frame buffer的id设定为0
    // create a color attachment texture
    unsigned int textureColorbuffer;
    glGenTextures(1, &textureColorbuffer);
    glBindTexture(GL_TEXTURE_2D, textureColorbuffer);
    glTexImage2D(GL_TEXTURE_2D, 0, GL_RGB, SCR_WIDTH, SCR_HEIGHT, 0, GL_RGB, GL_UNSIGNED_BYTE, NULL);
    glTexParameteri(GL_TEXTURE_2D, GL_TEXTURE_MIN_FILTER, GL_LINEAR);
    glTexParameteri(GL_TEXTURE_2D, GL_TEXTURE_MAG_FILTER, GL_LINEAR);
    glFramebufferTexture2D(GL_FRAMEBUFFER, GL_COLOR_ATTACHMENT0, GL_TEXTURE_2D, textureColorbuffer, 0);
while中:
//渲染之前,先开启framebuffer
glBindFramebuffer(GL_FRAMEBUFFER, framebuffer);先渲染身后的图形,并把其中的颜色存储在texture buffer中。再渲染前方,并顺便把texture buffer中存储的图像,赋予给镜子的矩形:
        screenShader.use();
        glBindVertexArray(quadVAO);
        glBindTexture(GL_TEXTURE_2D, textureColorbuffer);	// use the color attachment texture as the texture of the quad plane
        glDrawArrays(GL_TRIANGLES, 0, 6);


 972
972


 被折叠的 条评论
为什么被折叠?
被折叠的 条评论
为什么被折叠?
 到【灌水乐园】发言


