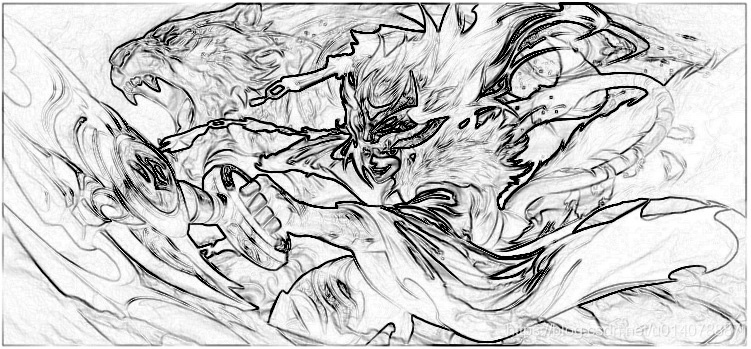
效果图


原理
- 检测一个像素是不是边缘点,我们可以通过检测他周围的颜色值,如果颜色值过度较大,则是一个边缘点,如果颜色值过渡较小,则就不是一个边缘点。
- 我们可以通过检测每个像素周围八个像素的颜色值进行判断
- 通过算子,算子记录的变化的梯度值,目前比较流行的就是sobel算子
- 算子的原理我们会另外一篇博文去讲解,这里我们只需要知道,分别算出像素x、y与算子矩阵的结果,就可以知道这个点是不是边缘点
Sobel算子
Gx={
	-1,0,1,
	-2,0,2,
	-1,0,1
}
Gy={
	-1,-2,-1,
	0,0,0,
	1,2,1
}
- 用每个像素的颜色值,分别乘以Gx和Gy中对应的算子,最后的结果相加,得到edge。
定义采样灰度计算
fixed luminance(fixed4 color) {
	return  0.2125 * color.r + 0.7154 * color.g + 0.0721 * color.b;
}
- 我们通过这个公式,将彩色像素进行一定的灰度处理
- 这一步只能说让结果更好,但是事实上需不需要这一步,还是得看我们最终所需要的效果而定
定义edge边缘颜色
fixed4 _EdgeColor;
fixed4 withEdgeColor = lerp(tex2D(_MainTex, i.uv[4]), _EdgeColor, edge);
- edge较大时,得到的颜色是几乎就是_EdgeColor,即边缘颜色
- edge较小时,_EdgeColor几乎不影响图片本身的采样结果
定义非边缘区域的颜色
fixed4 _BackGroudColor;
fixed4 onlyEdgeColor = lerp(_BackGroudColor , _EdgeColor, edge);
- edge较大时,几乎使用_EdgeColor
- edge较小时,几乎使用_BackGroudColor
再插值一次,将背景色融入到整体的采样中
float _EdgeOnly;
return lerp(withEdgeColor, onlyEdgeColor, _EdgeOnly);
- 因为edge比较大的地方withEdgeColor与onlyEdgeColor几乎相等,插值结果不明显,
- edge小的地方,withEdgeColor取到的是图片的采样颜色,onlyEdgeColor取到的则是背景的补偿色
- _EdgeOnly小,则纯取withEdgeColor,
- _EdgeOnly大,onlyEdgeColor则会在最终的颜色上增加贡献度
完整shader代码
Shader "ZW/EdgeDetection" {
Properties {
_MainTex ("Base (RGB)", 2D) = "white" {}
_EdgeOnly ("Edge Only", Float) = 1.0
_EdgeColor ("Edge Color", Color) = (0, 0, 0, 1)
_BackgroundColor ("Background Color", Color) = (1, 1, 1, 1)
}
SubShader {
Pass {
ZTest Always Cull Off ZWrite Off
CGPROGRAM
#include "UnityCG.cginc"
#pragma vertex vert
#pragma fragment fragSobel
sampler2D _MainTex;
uniform half4 _MainTex_TexelSize;
fixed _EdgeOnly;
fixed4 _EdgeColor;
fixed4 _BackgroundColor;
struct v2f {
float4 pos : SV_POSITION;
half2 uv[9] : TEXCOORD0;
};
v2f vert(appdata_img v) {
v2f o;
o.pos = UnityObjectToClipPos(v.vertex);
half2 uv = v.texcoord;
o.uv[0] = uv + _MainTex_TexelSize.xy * half2(-1, -1);
o.uv[1] = uv + _MainTex_TexelSize.xy * half2(0, -1);
o.uv[2] = uv + _MainTex_TexelSize.xy * half2(1, -1);
o.uv[3] = uv + _MainTex_TexelSize.xy * half2(-1, 0);
o.uv[4] = uv + _MainTex_TexelSize.xy * half2(0, 0);
o.uv[5] = uv + _MainTex_TexelSize.xy * half2(1, 0);
o.uv[6] = uv + _MainTex_TexelSize.xy * half2(-1, 1);
o.uv[7] = uv + _MainTex_TexelSize.xy * half2(0, 1);
o.uv[8] = uv + _MainTex_TexelSize.xy * half2(1, 1);
return o;
}
fixed luminance(fixed4 color) {
return 0.2125 * color.r + 0.7154 * color.g + 0.0721 * color.b;
}
half Sobel(v2f i) {
const half Gx[9] = {-1, 0, 1,
-2, 0, 2,
-1, 0, 1};
const half Gy[9] = {-1, -2, -1,
0, 0, 0,
1, 2, 1};
half texColor;
half edgeX = 0;
half edgeY = 0;
for (int it = 0; it < 9; it++) {
texColor = luminance(tex2D(_MainTex, i.uv[it]));
edgeX += texColor * Gx[it];
edgeY += texColor * Gy[it];
}
half edge = 1 - abs(edgeX) - abs(edgeY);
return abs(edgeX) + abs(edgeY);
}
fixed4 fragSobel(v2f i) : SV_Target {
half edge = Sobel(i);
fixed4 withEdgeColor = lerp(tex2D(_MainTex, i.uv[4]), _EdgeColor, edge);
fixed4 onlyEdgeColor = lerp(_BackgroundColor,_EdgeColor , edge);
return lerp(withEdgeColor, onlyEdgeColor, _EdgeOnly);
}
ENDCG
}
}
FallBack Off
}
使用
- 这个我们最终做成一个屏幕特效指给相机,也可以做成材质球指给模型或者其他2D图像,具体看自己的需求吧,有什么问题可以留言告诉博主。
- 还有就是这个代码中的函数及for循环最好还是去掉,这里博主图省事就这样了。shader对循环及其他分支结构的处理性能并不高,能不用就不用


 204
204

 被折叠的 条评论
为什么被折叠?


