


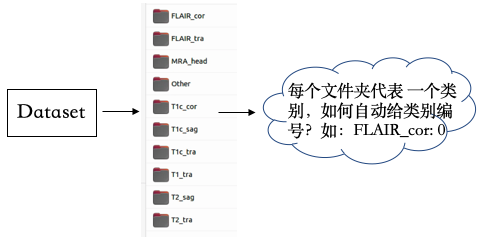
如图所示,做多类别分类,每个文件夹代表一个类别,所有图像均为NIFTI格式,如何加载进 MONAI 进行训练?
在这之前,我们来看看 MONAI dataset 加载方法:
MONAI dataset 的数据(image, label)输入有两种形式,一种是 array(数组), 一种是dict(字典)。
简单区分一下
以 array 形式加载数据
images = [
        "IXI314-IOP-0889-T1.nii.gz",
        "IXI249-Guys-1072-T1.nii.gz",
        "IXI609-HH-2600-T1.nii.gz",
        "IXI173-HH-1590-T1.nii.gz",
        "IXI020-Guys-0700-T1.nii.gz",
    ]

labels = np.array([0, 0, 0, 1, 0, 0, 0, 1, 1, 0, 0, 0, 1, 0, 1, 0, 1, 0, 1, 0], dtype=np.int64)

train_ds = ImageDataset(image_files=images, labels=labels, transform=train_transforms)
train_loader = DataLoader(train_ds, batch_size=2, shuffle=True, num_workers=2, pin_memory=torch.cuda.is_available())
从代码里很容易看到,images 和 labels 都是 array, 直接作为 ImageDataset 的参数就行。
以 dict 形式加载数据
images = [
        "IXI314-IOP-0889-T1.nii.gz",
        "IXI249-Guys-1072-T1.nii.gz",
        "IXI609-HH-2600-T1.nii.gz",
        "IXI173-HH-1590-T1.nii.gz",
        "IXI020-Guys-0700-T1.nii.gz",
    ]

labels = np.array([0, 0, 0, 1, 0, 0, 0, 1, 1, 0, 0, 0, 1, 0, 1, 0, 1, 0, 1, 0], dtype=np.int64)

train_files = [{"img": img, "label": label} for img, label in zip(images, labels)]
train_ds = monai.data.Dataset(data=train_files, transform=train_transforms)
train_loader = DataLoader(train_ds, batch_size=2, shuffle=True, num_workers=4, pin_memory=torch.cuda.is_available())
这里 images 和 labels 都是 array, 只不过最后会把他们打包成一个字典,使得每个样本的 image和label相对应起来。然后传给 Dataset。
所以,回到最初的问题,不管用array形式还是dict形式,我们都需要构建一个 images/labels, 其中images里面是每个image的地址,如果是分类问题,labels是每个图像的类别, 如果是分割问题,则是ground truth的地址。
进一步的问题是:如何给文件夹的每个图像定义label?

当然,这在torchvision中,有一个函数(ImageFolder)可以轻松搞定!
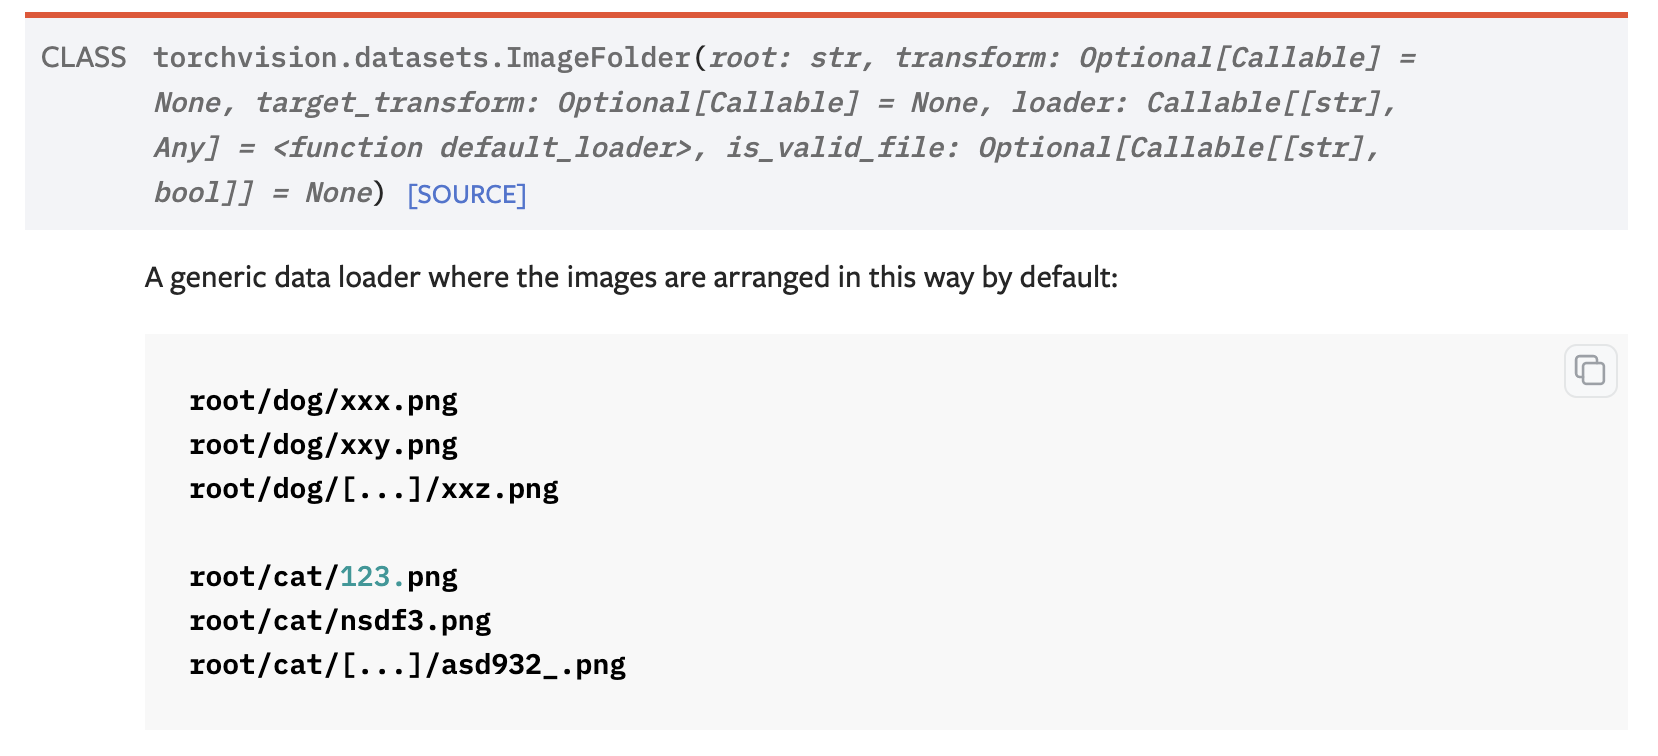
但是!他的缺点是不可以加载后缀为gz的文件,但是医学图像大部分都是三维图像,后缀为nii.gz,怎么办???
我们可以借鉴他的思路,自己写一个支持 .gz文件的不就好了。
说干就干
第一种:直接修改源代码
查看源码,它不支持 gz的主要原因是它指定了后缀为下面这些👇
IMG_EXTENSIONS = (‘.jpg’, ‘.jpeg’, ‘.png’, ‘.ppm’, ‘.bmp’, ‘.pgm’, ‘.tif’, ‘.tiff’, ‘.webp’)
因为不包含gz,所以不支持。
源码在torchvision/datasets/folder.py
那一种简单粗暴地方法就是直接修改 IMG_EXTENSIONS,在后面加一个 ‘.gz’,就可以使用了。
使用案例:
from torchvision.datasets import ImageFolder
data_root = '/dataset'
dataset = ImageFolder(root=data_root)
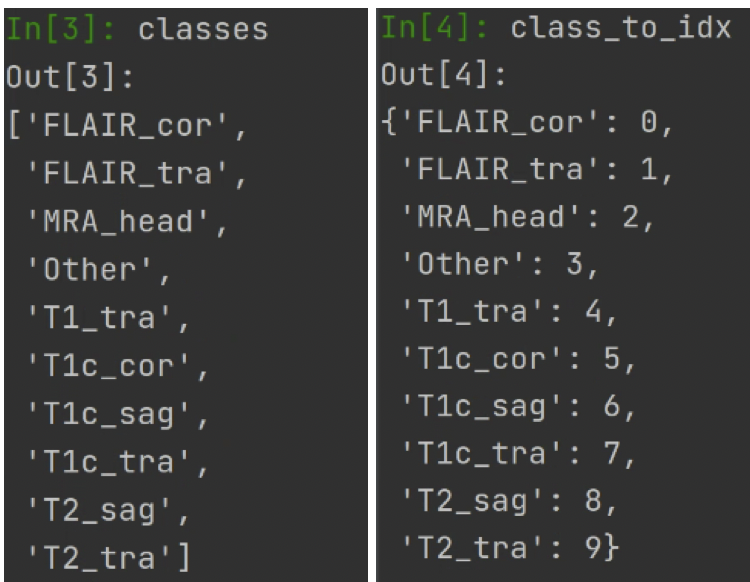
classes = dataset.classes # 获得类别名称(文件夹的名字)
class_to_idx = dataset.class_to_idx # 获得类别对应的索引或标签
images_labels = dataset.imgs
images = [tup[0] for tup in images_labels] # array
labels = [tup[1] for tup in images_labels] # array
# for dict
train_files = [{'image': tup[0], 'label': tup[1]} for tup in images_labels] # dict
然后就可以传到上述两种dataset了,完美解决👍👍
但是这种方法对源代码造成了破坏,不易移植,虽然简单粗暴,但是不推荐!!
我们可以根据他的思路自己写一个
第二种:构建自己的ImageFolder
构建思路:
- step 1 获取文件夹名称作为classes,并给它标签。
def find_classes(directory: str):
    """Finds the class folders in a dataset.
    """
    classes = sorted(entry.name for entry in os.scandir(directory) if entry.is_dir())
    if not classes:
        raise FileNotFoundError(f"Couldn't find any class folder in {directory}.")

    class_to_idx = {cls_name: i for i, cls_name in enumerate(classes)}
    return classes, class_to_idx
- step 2 遍历文件夹,赋予每个图像标签
在这一步中,我们会检查每个图像的后缀。
img_label_dict = []
imgs = []
labels = []
for target_class in sorted(class_to_idx.keys()):
  class_index = class_to_idx[target_class]
  target_dir = os.path.join(directory, target_class)
  if not os.path.isdir(target_dir):
    continue
  for root, _, fnames in sorted(os.walk(target_dir, followlinks=True)):
      for fname in sorted(fnames):
        if is_valid_file(fname): # 判断后缀是否有效
            path = os.path.join(root, fname)
            item = {'img': path, 'label': class_index}
            img_label_dict.append(item)
            imgs.append(path)
            labels.append(class_index)
这是关键代码,不全。
最后贴上完整代码
import os
from typing import Any, Callable, cast, Dict, List, Optional, Tuple


# 从 data 根目录自动获取不同的类别文件夹,并自动给文件夹标签
def find_classes(directory: str):
    """Finds the class folders in a dataset.
    """
    classes = sorted(entry.name for entry in os.scandir(directory) if entry.is_dir())
    if not classes:
        raise FileNotFoundError(f"Couldn't find any class folder in {directory}.")

    class_to_idx = {cls_name: i for i, cls_name in enumerate(classes)}
    return classes, class_to_idx


# 检查 file 的后缀是不是在允许的扩展中
def has_file_allowed_extension(filename: str, extensions: Tuple[str, ...]) -> bool:
    """Checks if a file is an allowed extension.

    Args:
        filename (string): path to a file
        extensions (tuple of strings): extensions to consider (lowercase)

    Returns:
        bool: True if the filename ends with one of given extensions
    """
    return filename.lower().endswith(extensions)


# 从根目录中获取 图像的类别,以及自动为类别设置类标签,返回【图像-标签对, 类别名, 类别对应的索引等】
def make_dataset(
    directory: str,
    class_to_idx: Optional[Dict[str, int]] = None,
    extensions: Optional[Tuple[str, ...]] = None,
    is_valid_file: Optional[Callable[[str], bool]] = None,
) -> List[Tuple[str, int]]:
    """Generates a list of samples of a form (path_to_sample, class).
    """
    directory = os.path.expanduser(directory)

    if class_to_idx is None:
        classes, class_to_idx = find_classes(directory)
    elif not class_to_idx:
        raise ValueError("'class_to_index' must have at least one entry to collect any samples.")

    both_none = extensions is None and is_valid_file is None
    both_something = extensions is not None and is_valid_file is not None
    if both_none or both_something:
        raise ValueError("Both extensions and is_valid_file cannot be None or not None at the same time")

    if extensions is not None:

        def is_valid_file(x: str) -> bool:
            return has_file_allowed_extension(x, cast(Tuple[str, ...], extensions))

    is_valid_file = cast(Callable[[str], bool], is_valid_file)

    img_label_dict = []
    imgs = []
    labels = []
    available_classes = set()
    for target_class in sorted(class_to_idx.keys()):
        class_index = class_to_idx[target_class]
        target_dir = os.path.join(directory, target_class)
        if not os.path.isdir(target_dir):
            continue
        for root, _, fnames in sorted(os.walk(target_dir, followlinks=True)):
            for fname in sorted(fnames):
                if is_valid_file(fname):
                    path = os.path.join(root, fname)
                    item = {'img': path, 'label': class_index}
                    img_label_dict.append(item)
                    imgs.append(path)
                    labels.append(class_index)

                    if target_class not in available_classes:
                        available_classes.add(target_class)

    empty_classes = set(class_to_idx.keys()) - available_classes
    if empty_classes:
        msg = f"Found no valid file for the classes {', '.join(sorted(empty_classes))}. "
        if extensions is not None:
            msg += f"Supported extensions are: {', '.join(extensions)}"
        raise FileNotFoundError(msg)

    return img_label_dict, imgs, labels, classes, class_to_idx


if __name__ == '__main__':
    data_root = 'dataset'
    # classes, class_to_idx = find_classes(data_root)
    # 允许的扩展名
    extensions = ('.jpg', '.jpeg', '.png', '.ppm', '.bmp', '.pgm', '.tif', '.tiff', '.webp', '.gz')
    img_label_dict, imgs, labels, classes, class_to_idx= make_dataset(data_root, extensions=extensions)
完结~
文章持续更新,可以关注微信公众号【医学图像人工智能实战营】获取最新动态,一个关注于医学图像处理领域前沿科技的公众号。坚持已实践为主,手把手带你做项目,打比赛,写论文。凡原创文章皆提供理论讲解,实验代码,实验数据。只有实践才能成长的更快,关注我们,一起学习进步~
我是Tina, 我们下篇博客见~
白天工作晚上写文,呕心沥血
觉得写的不错的话最后,求点赞,评论,收藏。或者一键三连


 562
562


 被折叠的 条评论
为什么被折叠?
被折叠的 条评论
为什么被折叠?
 到【灌水乐园】发言


