


方法封装:

/**
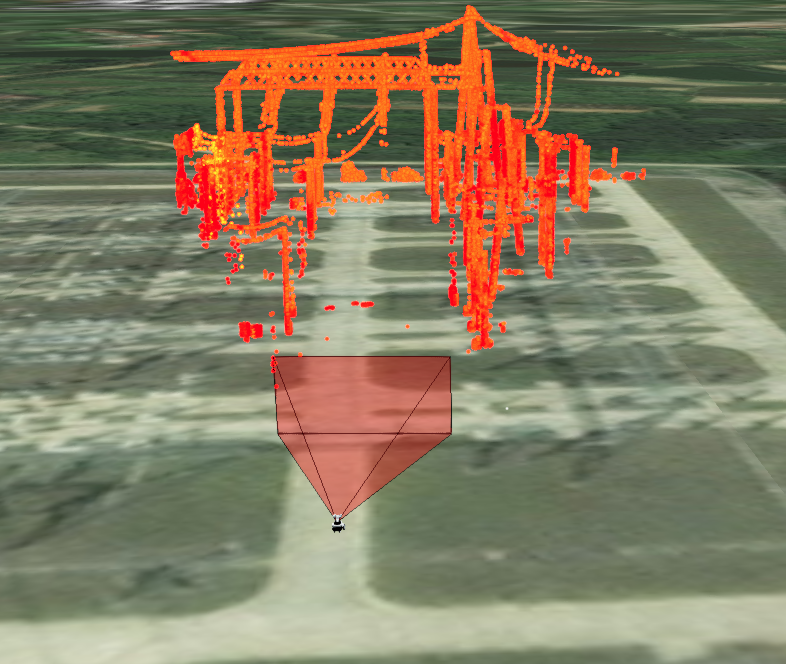
* 绘制视锥
* 苹果园dog
*/
export default class {
constructor(viewer, options) {
this.viewer = viewer;
this._position = options.position;
this._orientation = options.orientation;
this._fov = options.fov || 35.0;
this._near = options.near||0.1;
this._far = options.far||20;
this._fill = options.fill || false;
this._closed = options.closed || false;
this._color = options.color || new Cesium.Color(1.0, 0.0, 0.0, 0.2);
this._outlineColor=options.outlineColor||new Cesium.Color(0.0, 0.0, 0.0, 0.5);
this._flat = options.flat || true;
this.update(this._position,this._orientation);
}
update(position, orientation) {
this._position = position;
this._orientation = orientation;
this._add();
}
_add() {
this._clear();
this._addFrustum();
this._addOutline();
}
_clear() {
this._clearFrustum();
this._clearOutline();
}
_addFrustum() {
if (!Cesium.defined(this._position)) {
return;
}
if (!Cesium.defined(this.viewer)) {
return;
}
var scene = this.viewer.scene;
var frustum = new Cesium.PerspectiveFrustum({
fov: Cesium.Math.toRadians(this._fov),
aspectRatio: scene.canvas.clientWidth / scene.canvas.clientHeight,
near: this._near,
far: this._far,
});
this._frustum=frustum;
var frustumGeometry = new Cesium.FrustumGeometry({
frustum: frustum,
origin: this._position,
orientation: this._orientation,
vertexFormat: Cesium.VertexFormat.POSITION_ONLY,
});
var frustumGeometryInstance = new Cesium.GeometryInstance({
geometry: frustumGeometry,
attributes: {
color: Cesium.ColorGeometryInstanceAttribute.fromColor(
this._color
),
},
id: "frustum",
});
this._frustumPrimitive = scene.primitives.add(
new Cesium.Primitive({
geometryInstances: frustumGeometryInstance,
appearance: new Cesium.PerInstanceColorAppearance({
closed: this._closed,
flat: this._flat,
}),
asynchronous:false
})
);
}
调用:(代码有的在其他js模块,比如matrixUtil.js,就不贴了)
      //视锥绘制开始
      var mCameraHeightThanBottom = modelm.boundingSphere.radius / 1.7;
      let mCameraLoc = matrixUtil.localToWorldCartesian3(
        worldCoorOrigin,
        x - localconfig.x,
        y - localconfig.y,
        z + mCameraHeightThanBottom - localconfig.z
      );
      let m2 = Cesium.Transforms.eastNorthUpToFixedFrame(mLoc);
      var rotation222 = Cesium.Matrix4.getMatrix3(m2, new Cesium.Matrix3());
      Cesium.Matrix3.multiply(
        rotation222,
        Cesium.Matrix3.fromRotationZ(Cesium.Math.toRadians(angle + 90)),
        rotation222
      );
      Cesium.Matrix3.multiply(
        rotation222,
        Cesium.Matrix3.fromRotationX(Cesium.Math.PI_OVER_TWO * 0.91),
        rotation222
      );
      var orientation222 = Cesium.Quaternion.fromRotationMatrix(rotation222);
      this.drawViewFrustum(mCameraLoc, orientation222);//画
      //视锥绘制结束
      this.angleHistory = angle; //保存当前角度
      modelm.modelMatrix = m;//新模型矩阵,更新模型位置和角度


 1125
1125


 被折叠的 条评论
为什么被折叠?
被折叠的 条评论
为什么被折叠?
 到【灌水乐园】发言


